论文:Segment Anything
代码:https://github.com/facebookresearch/segment-anything
系列篇:
(1)【技术追踪】SAM(Segment Anything Model)代码解析与结构绘制之Image Encoder
(2)【技术追踪】SAM(Segment Anything Model)代码解析与结构绘制之Prompt Encoder
本篇示例依然采用系列篇中的狗狗图像运行代码,预测部分代码如下:
input_point = np.array([[1300, 800]])   # 输入point的坐标
input_label = np.array([1])   # label=1表示前景, label=0表示背景
# 输入box的坐标,(700,400)为左上角坐标, (1900,1100)为右下角坐标
input_box = np.array([[700, 400, 1900, 1100]])
# 调用预测函数
masks, scores, logits = predictor.predict(point_coords=input_point,point_labels=input_label,box=input_box,multimask_output=True,
)
1. Mask Decoder代码解析
(1)输入参数
在【segment_anything/predictor.py --> SamPredictor类 -->predict_torch函数】中调用了mask_decoder实现mask预测,如下所示:
low_res_masks, iou_predictions = self.model.mask_decoder(image_embeddings=self.features,image_pe=self.model.prompt_encoder.get_dense_pe(),sparse_prompt_embeddings=sparse_embeddings,dense_prompt_embeddings=dense_embeddings,multimask_output=multimask_output,)
①参数self.features为input_image经过image_encoder嵌入后的向量,本例中大小为 [ 1 , 256 , 64 , 64 ] {[1, 256, 64, 64]} [1,256,64,64] ;
②参数sparse_embeddings为prompt point和prompt box经过prompt_encoder得到的嵌入向量,本例中其大小为 [ 1 , 3 , 256 ] {[1, 3, 256]} [1,3,256] ;
③参数dense_embeddings在本例中为无prompt mask输入时采用 nn.Embedding 的预定义嵌入向量, 其大小为 [ 1 , 256 , 64 , 64 ] {[1, 256, 64, 64]} [1,256,64,64] ;
④参数multimask_output是bool型参数,默认为True,支持多mask输出;
⑤参数self.model.prompt_encoder.get_dense_pe()调用PositionEmbeddingRandom实现位置编码,其大小为 [ 1 , 256 , 64 , 64 ] {[1, 256, 64, 64]} [1,256,64,64] ;
def get_dense_pe(self) -> torch.Tensor:return self.pe_layer(self.image_embedding_size).unsqueeze(0)
(2)MaskDecoder类
位置:【segment_anything/modeling/mask_decoder.py -->MaskDecoder类】
作用: 初始化网络结构,并调用predict_masks函数实现mask和iou预测
先看MaskDecoder的 _ _ i n i t _ _ {\_\_init\_\_} __init__ 初始化函数和 f o r w a r d {forward} forward 函数:
class MaskDecoder(nn.Module):def __init__(self,*,transformer_dim: int,transformer: nn.Module,num_multimask_outputs: int = 3,activation: Type[nn.Module] = nn.GELU,iou_head_depth: int = 3,iou_head_hidden_dim: int = 256,) -> None:super().__init__()self.transformer_dim = transformer_dim # transformer的通道维度 = 256self.transformer = transformer # 用于mask预测的transformer = TwoWayTransformerself.num_multimask_outputs = num_multimask_outputs # 消除歧义时需要的mask数量 = 3self.iou_token = nn.Embedding(1, transformer_dim) # (1, 256)self.num_mask_tokens = num_multimask_outputs + 1 # mask数目加1 = 4self.mask_tokens = nn.Embedding(self.num_mask_tokens, transformer_dim) # (4, 256)# 以反卷积实现4倍上采样self.output_upscaling = nn.Sequential(nn.ConvTranspose2d(transformer_dim, transformer_dim // 4, kernel_size=2, stride=2),LayerNorm2d(transformer_dim // 4),activation(),nn.ConvTranspose2d(transformer_dim // 4, transformer_dim // 8, kernel_size=2, stride=2),activation(),)# 4个mask对应的mlpself.output_hypernetworks_mlps = nn.ModuleList([MLP(transformer_dim, transformer_dim, transformer_dim // 8, 3)for i in range(self.num_mask_tokens)])# iou预测对应的mlpself.iou_prediction_head = MLP(transformer_dim, iou_head_hidden_dim, self.num_mask_tokens, iou_head_depth)def forward(self,image_embeddings: torch.Tensor,image_pe: torch.Tensor,sparse_prompt_embeddings: torch.Tensor,dense_prompt_embeddings: torch.Tensor,multimask_output: bool,) -> Tuple[torch.Tensor, torch.Tensor]:masks, iou_pred = self.predict_masks(image_embeddings=image_embeddings, # image encoder嵌入 [1, 256, 64, 64]image_pe=image_pe, # 图像嵌入大小对应的位置编码 [1, 256, 64, 64]sparse_prompt_embeddings=sparse_prompt_embeddings, # prompt point和box嵌入 [1, 3, 256]dense_prompt_embeddings=dense_prompt_embeddings, # prompt mask嵌入[1, 256, 64, 64]) # 输出mask.size()=[1,4,256,256], iou_pred.size()=[1,4]# Select the correct mask or masks for outputif multimask_output:mask_slice = slice(1, None) # 从索引1开始取后面全部else:mask_slice = slice(0, 1) # 从索引0开始取到1结束masks = masks[:, mask_slice, :, :] # [1, 3, 256, 256]iou_pred = iou_pred[:, mask_slice] # [1, 3]return masks, iou_pred
传送门:【python函数】内置函数slice()用法解析
f o r w a r d {forward} forward 的过程中主要完成了 predict_masks 函数调用;而在 _ _ i n i t _ _ {\_\_init\_\_} __init__函数中定义了 t r a n s f o r m e r {transformer} transformer , o u t p u t _ u p s c a l i n g {output\_upscaling} output_upscaling , o u t p u t _ h y p e r n e t w o r k s _ m l p s {output\_hypernetworks\_mlps} output_hypernetworks_mlps 和 i o u _ p r e d i c t i o n _ h e a d {iou\_prediction\_head} iou_prediction_head 这四个玩意儿,接下来咱来瞅瞅他们是啥样的。
① transformer: 在【segment_anything/build_sam.py】中可以看到为transformer定义为TwoWayTransformer,prompt_embed_dim参数为256。
mask_decoder=MaskDecoder(num_multimask_outputs=3,transformer=TwoWayTransformer(depth=2,embedding_dim=prompt_embed_dim, # 256mlp_dim=2048,num_heads=8,),transformer_dim=prompt_embed_dim,iou_head_depth=3,iou_head_hidden_dim=256,),
TwoWayTransformer 结构如下:
class TwoWayTransformer(nn.Module):def __init__(self,depth: int,embedding_dim: int,num_heads: int,mlp_dim: int,activation: Type[nn.Module] = nn.ReLU,attention_downsample_rate: int = 2,) -> None:super().__init__()self.depth = depth # =2self.embedding_dim = embedding_dim # =256self.num_heads = num_heads # =8self.mlp_dim = mlp_dim # =2048self.layers = nn.ModuleList()# 2个TwoWayAttentionBlock模块for i in range(depth):self.layers.append(TwoWayAttentionBlock(embedding_dim=embedding_dim, # 256num_heads=num_heads, # 8mlp_dim=mlp_dim, # 2048activation=activation, # nn.ReLUattention_downsample_rate=attention_downsample_rate, # 降采样率=2skip_first_layer_pe=(i == 0), # 第1个TwoWayAttentionBlock为True, 第2个TwoWayAttentionBlock为False))# 1个Attention模块self.final_attn_token_to_image = Attention(embedding_dim, num_heads, downsample_rate=attention_downsample_rate)self.norm_final_attn = nn.LayerNorm(embedding_dim)def forward(self,image_embedding: Tensor, # 图像编码:[1,256,64,64]image_pe: Tensor, # 图像位置编码:[1,256,64,64]point_embedding: Tensor, # iou_token,mask_tokens和sparse_prompt_embeddings的拼接向量:[1,8,256]) -> Tuple[Tensor, Tensor]:# BxCxHxW -> BxHWxC == B x N_image_tokens x Cbs, c, h, w = image_embedding.shape # [1, 256, 64, 64]image_embedding = image_embedding.flatten(2).permute(0, 2, 1) # [1,4096,256]image_pe = image_pe.flatten(2).permute(0, 2, 1) # [1,4096,256]# Prepare queriesqueries = point_embedding # 查询Q:[1,8,256]keys = image_embedding # 键值K:[1,4096,256]# Apply transformer blocks and final layernormfor layer in self.layers:queries, keys = layer(queries=queries,keys=keys,query_pe=point_embedding,key_pe=image_pe,) # 经过两个TwoWayAttentionBlock后, queries:[1,8,256], keys:[1,4096,256]# Apply the final attention layer from the points to the imageq = queries + point_embedding # [1,8,256]k = keys + image_pe # [1,4096,256]attn_out = self.final_attn_token_to_image(q=q, k=k, v=keys) # [1,8,256]queries = queries + attn_out # [1,8,256]queries = self.norm_final_attn(queries) # [1,8,256]return queries, keys
Attention 结构如下:
以TwoWayAttentionBlock的第一个Attention模块为例,即:
# embedding_dim = 256, num_heads=8
self.self_attn = Attention(embedding_dim, num_heads)
Attention模块主要实现了Transformer中基本的attention机制,若参数downsample_rate不为1,则会先对维度进行下采样映射:
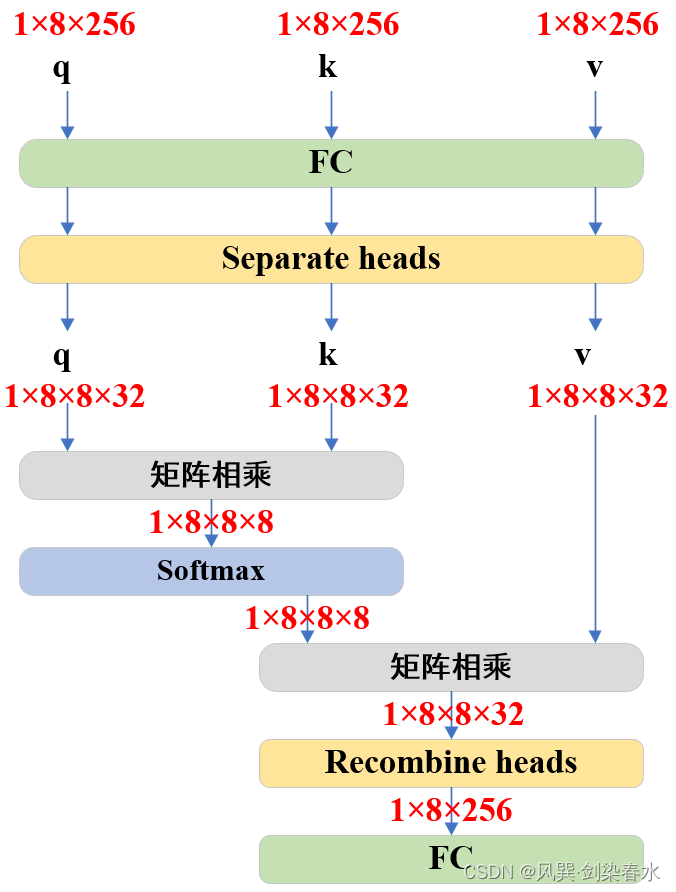
class Attention(nn.Module):def __init__(self,embedding_dim: int, # 256num_heads: int, # 8downsample_rate: int = 1, # 1) -> None:super().__init__()self.embedding_dim = embedding_dim # 256self.internal_dim = embedding_dim // downsample_rate # 256self.num_heads = num_heads # 8assert self.internal_dim % num_heads == 0, "num_heads must divide embedding_dim."self.q_proj = nn.Linear(embedding_dim, self.internal_dim) # (256,256)self.k_proj = nn.Linear(embedding_dim, self.internal_dim) # (256,256)self.v_proj = nn.Linear(embedding_dim, self.internal_dim) # (256,256)self.out_proj = nn.Linear(self.internal_dim, embedding_dim) # (256,256)def _separate_heads(self, x: Tensor, num_heads: int) -> Tensor:b, n, c = x.shapex = x.reshape(b, n, num_heads, c // num_heads)return x.transpose(1, 2) # B x N_heads x N_tokens x C_per_headdef _recombine_heads(self, x: Tensor) -> Tensor:b, n_heads, n_tokens, c_per_head = x.shapex = x.transpose(1, 2)return x.reshape(b, n_tokens, n_heads * c_per_head) # B x N_tokens x Cdef forward(self, q: Tensor, k: Tensor, v: Tensor) -> Tensor:# Input projections# 输入q:[1,8,256];k:[1,8,256];v:[1,8,256]q = self.q_proj(q) # [1,8,256]k = self.k_proj(k) # [1,8,256]v = self.v_proj(v) # [1,8,256]# Separate into headsq = self._separate_heads(q, self.num_heads) # [1,8,8,32]k = self._separate_heads(k, self.num_heads) # [1,8,8,32]v = self._separate_heads(v, self.num_heads) # [1,8,8,32]_, _, _, c_per_head = q.shape # 每个head的维度c_per_head=32# attention机制-----------------------------------------------------------------------# 每个head实现q乘k的转置: [1,8,8,32]@[1,8,32,8]->[1,8,8,8]attn = q @ k.permute(0, 1, 3, 2) # B x N_heads x N_tokens x N_tokensattn = attn / math.sqrt(c_per_head) # q @ k(^T) / 根号dattn = torch.softmax(attn, dim=-1) # [1,8,8,8]# -----------------------------------------------------------------------------------# Get outputout = attn @ v # softmax( q @ k(^T) / 根号d ) @ v ---> [1,8,8,32]out = self._recombine_heads(out) # [1,8,256]out = self.out_proj(out) # [1,8,256]return out
为避免代码看的太晕,把Attention可视化一下,没错,就是最基本的Multi-head Attention啦~
TwoWayAttentionBlock 结构如下:
以TwoWayTransformer的第一个TwoWayAttentionBlock模块为例,即:
TwoWayAttentionBlock(embedding_dim=embedding_dim, # 256num_heads=num_heads, # 8mlp_dim=mlp_dim, # 2048activation=activation, # nn.ReLUattention_downsample_rate=attention_downsample_rate, # 降采样率=2skip_first_layer_pe=(i == 0), # 第1个TwoWayAttentionBlock为True)
TwoWayAttentionBlock模块:
class TwoWayAttentionBlock(nn.Module):def __init__(self,embedding_dim: int,num_heads: int,mlp_dim: int = 2048,activation: Type[nn.Module] = nn.ReLU,attention_downsample_rate: int = 2,skip_first_layer_pe: bool = False,) -> None:super().__init__()self.self_attn = Attention(embedding_dim, num_heads) # embedding_dim=256, num_heads=8self.norm1 = nn.LayerNorm(embedding_dim) # 256self.cross_attn_token_to_image = Attention(embedding_dim, num_heads, downsample_rate=attention_downsample_rate) # embedding_dim=256, num_heads=8, attention_downsample_rate=2self.norm2 = nn.LayerNorm(embedding_dim) # 256# embedding_dim=256, mlp_dim=2048, activation=nn.ReLUself.mlp = MLPBlock(embedding_dim, mlp_dim, activation)self.norm3 = nn.LayerNorm(embedding_dim) # 256self.norm4 = nn.LayerNorm(embedding_dim) # 256self.cross_attn_image_to_token = Attention(embedding_dim, num_heads, downsample_rate=attention_downsample_rate) # embedding_dim=256, num_heads=8, attention_downsample_rate=2self.skip_first_layer_pe = skip_first_layer_pe # Truedef forward(self, queries: Tensor, keys: Tensor, query_pe: Tensor, key_pe: Tensor) -> Tuple[Tensor, Tensor]:# 输入queries:[1,8,256], keys:[1,4096,256], query_pe:[1,8,256], key_pe:[1,4096,256]# Self attention blockif self.skip_first_layer_pe:queries = self.self_attn(q=queries, k=queries, v=queries) # [1,8,256]else:q = queries + query_peattn_out = self.self_attn(q=q, k=q, v=queries)queries = queries + attn_outqueries = self.norm1(queries) # [1,8,256]# Cross attention block, tokens attending to image embeddingq = queries + query_pe # [1,8,256]k = keys + key_pe # [1,4096,256]attn_out = self.cross_attn_token_to_image(q=q, k=k, v=keys) # [1,8,256]queries = queries + attn_out # [1,8,256]queries = self.norm2(queries) # [1,8,256]# MLP blockmlp_out = self.mlp(queries) # [1,8,256]queries = queries + mlp_out # [1,8,256]queries = self.norm3(queries) # [1,8,256]# Cross attention block, image embedding attending to tokensq = queries + query_pe # [1,8,256]k = keys + key_pe # [1,4096,256]attn_out = self.cross_attn_image_to_token(q=k, k=q, v=queries) # [1,4096,256]keys = keys + attn_out # [1,4096,256]keys = self.norm4(keys) # [1,4096,256]return queries, keys
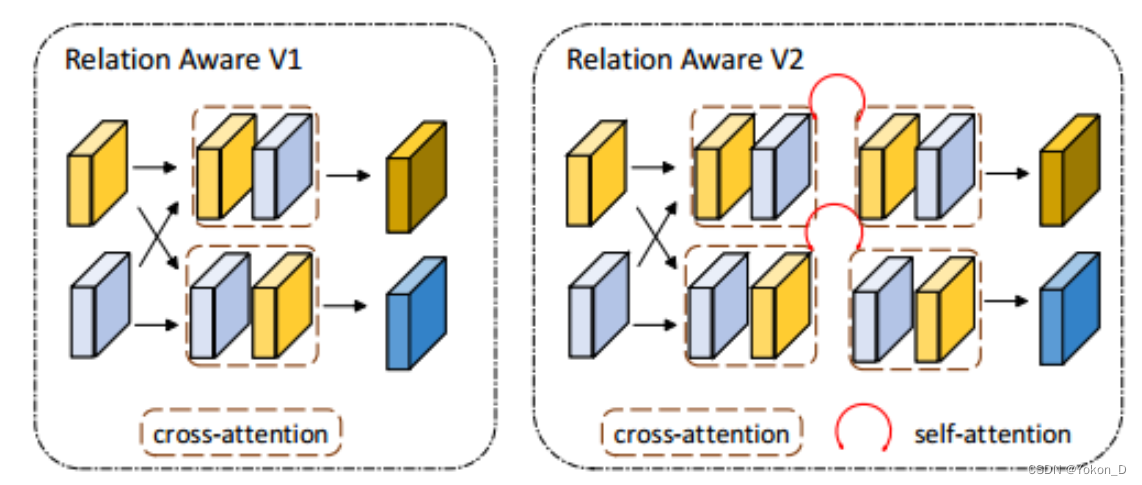
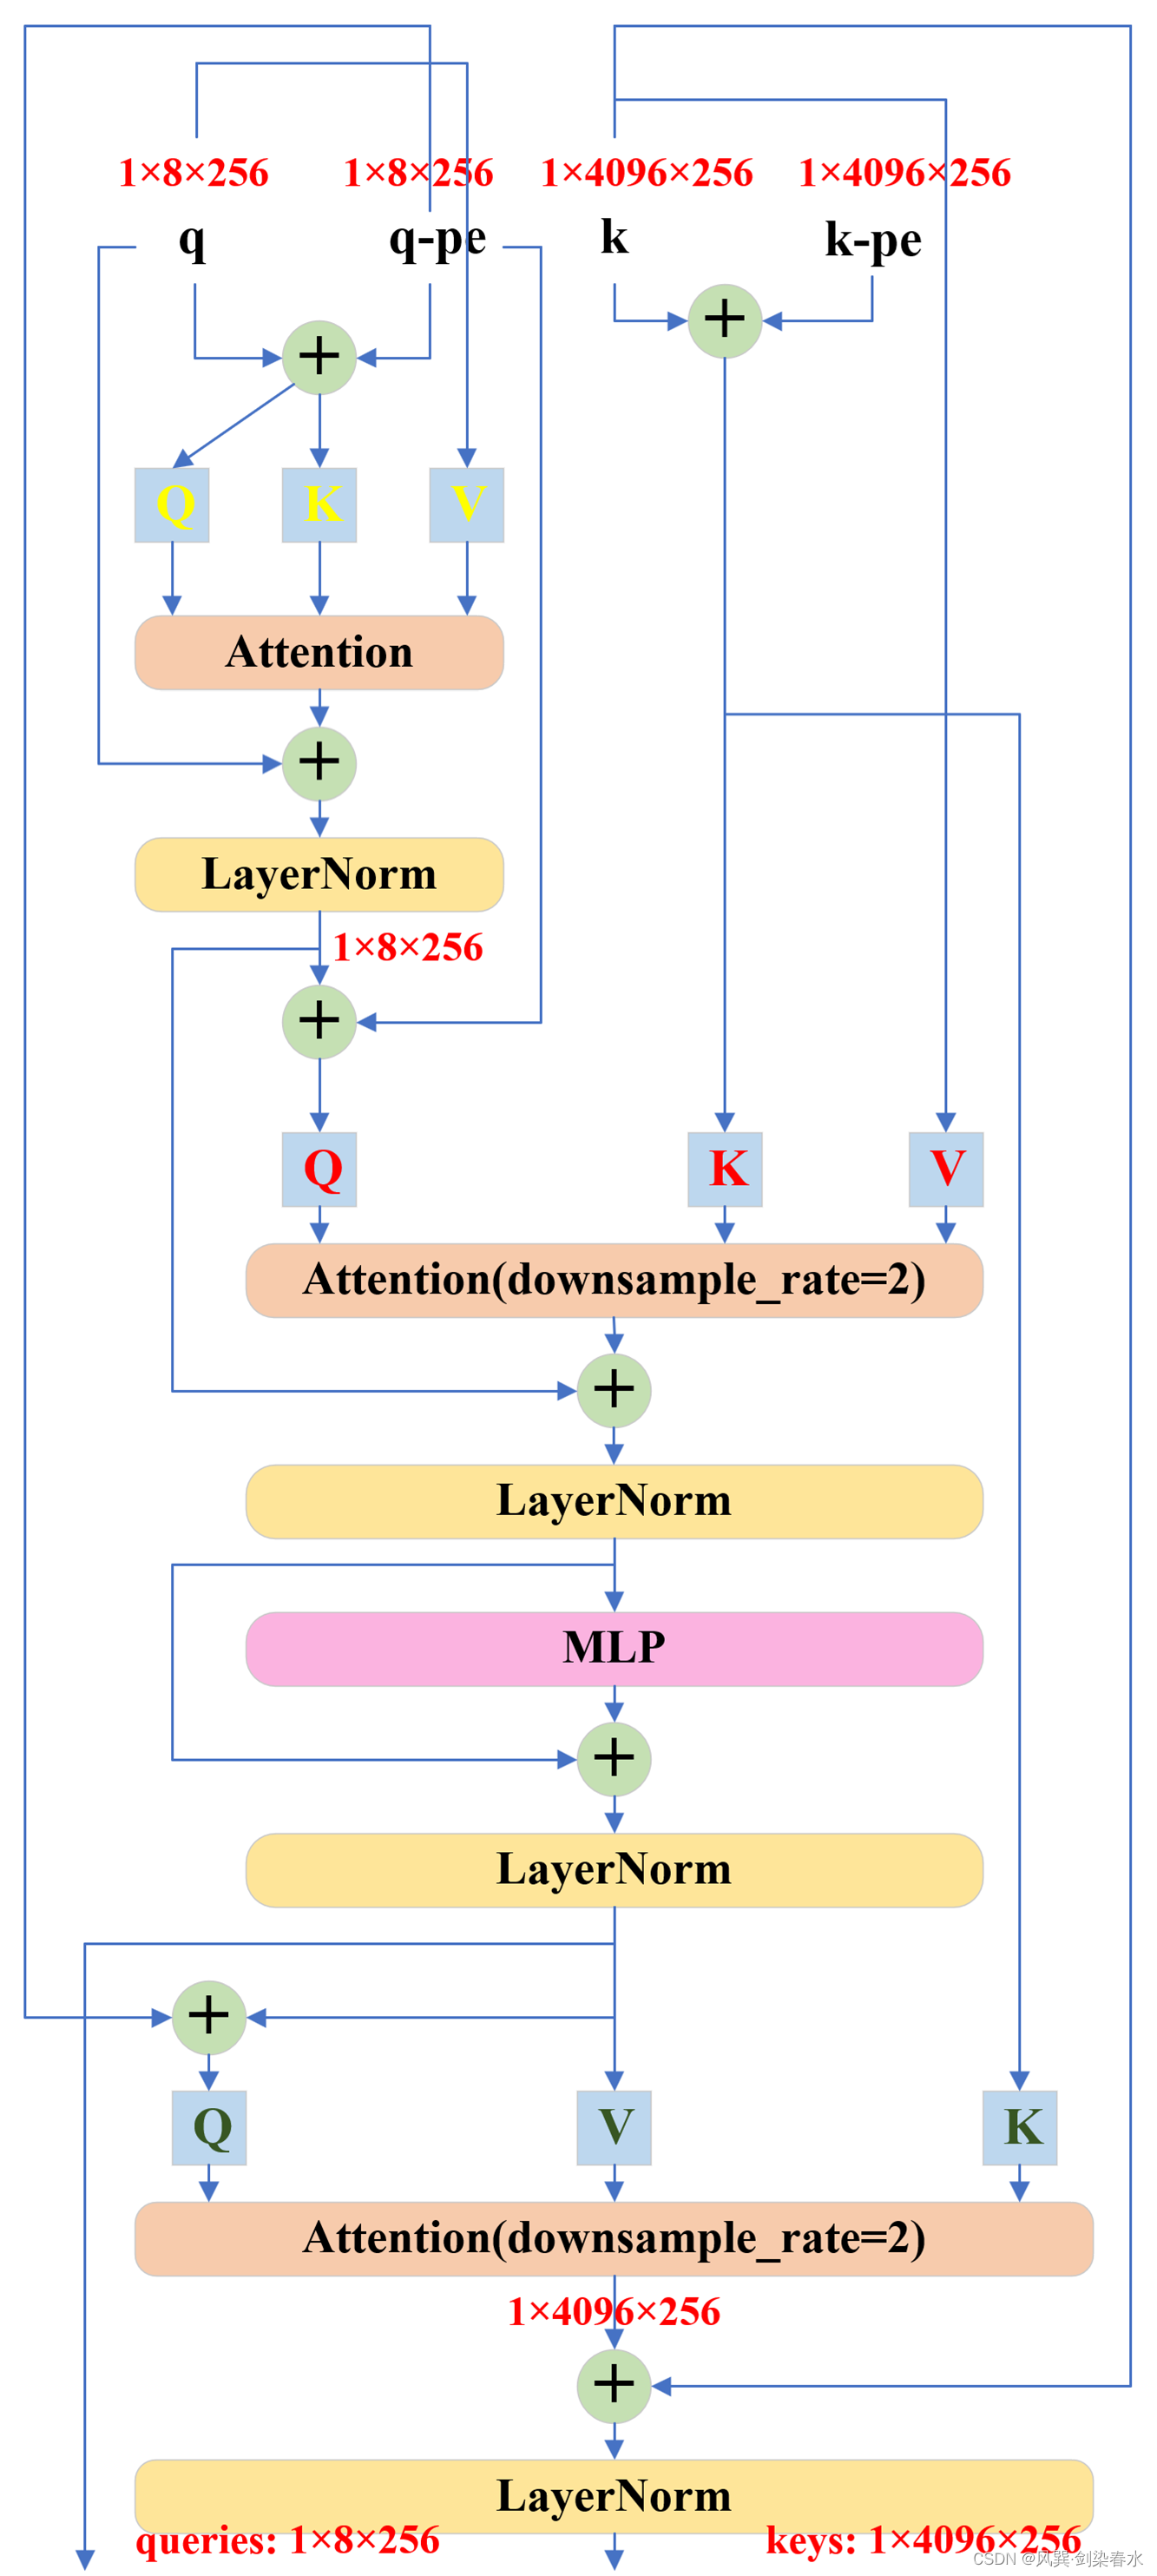
可以看到TwoWayTransformer的结构以及token维度变化并不复杂,但其交错的 Q {Q} Q, K {K} K, V {V} V 确实令人眼花缭乱:
TwoWayTransformer中的MLP:
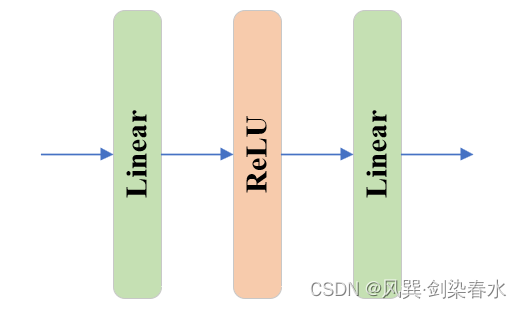
class MLPBlock(nn.Module):def __init__(self,embedding_dim: int,mlp_dim: int,act: Type[nn.Module] = nn.GELU,) -> None:super().__init__()# embedding_dim=256, mlp_dim=2048self.lin1 = nn.Linear(embedding_dim, mlp_dim) self.lin2 = nn.Linear(mlp_dim, embedding_dim)self.act = act()def forward(self, x: torch.Tensor) -> torch.Tensor:return self.lin2(self.act(self.lin1(x)))
MLP为简单的线性、激活、线性结构:
② output_upscaling:
Sequential((0): ConvTranspose2d(256, 64, kernel_size=(2, 2), stride=(2, 2))(1): LayerNorm2d()(2): GELU(approximate='none')(3): ConvTranspose2d(64, 32, kernel_size=(2, 2), stride=(2, 2))(4): GELU(approximate='none')
)
output_upscaling模块由两个反卷积、两个GELU激活和一个LayerNorm组成,实现了特征图的四倍上采样,在 predict_masks函数 中将 [ 1 , 256 , 64 , 64 ] {[1,256,64,64]} [1,256,64,64] 上采样至 [ 1 , 32 , 256 , 256 ] {[1,32,256,256]} [1,32,256,256] 。
src = src.transpose(1, 2).view(b, c, h, w)   # reshape: [1,4096,256]-> [1,256,64,64]
upscaled_embedding = self.output_upscaling(src) # [1,32,256,256]
③ output_hypernetworks_mlps:
ModuleList((0-3): 4 x MLP((layers): ModuleList((0-1): 2 x Linear(in_features=256, out_features=256, bias=True)(2): Linear(in_features=256, out_features=32, bias=True)))
)
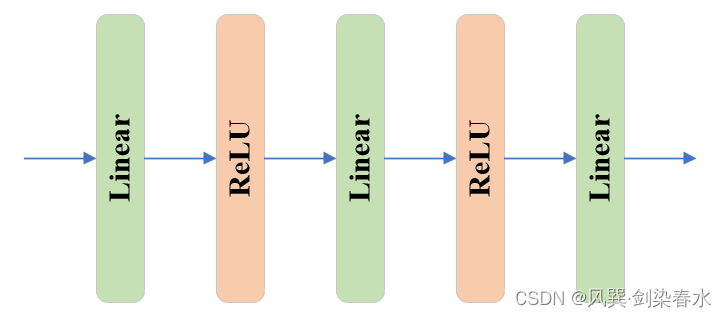
output_hypernetworks_mlps由4个MLP组成,在 predict_masks函数 中将 [ 1 , 256 ] {[1,256]} [1,256] 下采样至 [ 1 , 32 ] {[1,32]} [1,32] 。与TwoWayAttentionBlock中的MLP不同,其结构稍稍多一丢丢:
class MLP(nn.Module):def __init__(self,input_dim: int, # 256hidden_dim: int, # 256output_dim: int, # 32num_layers: int, # 3sigmoid_output: bool = False, # False) -> None:super().__init__()self.num_layers = num_layers # 3h = [hidden_dim] * (num_layers - 1) # [256,256]self.layers = nn.ModuleList(# [input_dim] + h: [256,256,256], h + [output_dim]:[256,256,32]nn.Linear(n, k) for n, k in zip([input_dim] + h, h + [output_dim]))self.sigmoid_output = sigmoid_outputdef forward(self, x):for i, layer in enumerate(self.layers):# i<2经线性层后relu激活x = F.relu(layer(x)) if i < self.num_layers - 1 else layer(x) if self.sigmoid_output:x = F.sigmoid(x)return x
④ iou_prediction_head:
MLP((layers): ModuleList((0-1): 2 x Linear(in_features=256, out_features=256, bias=True)(2): Linear(in_features=256, out_features=4, bias=True))
)
iou_prediction_head用以实现iou预测,由1个MLP完成,其结构与output_hypernetworks_mlps中的MLP一样,只是最终将 [ 1 , 256 ] {[1,256]} [1,256] 映射至 [ 1 , 4 ] {[1,4]} [1,4] ,分别代表非multimask预测时的1个mask和multimask预测时的3个mask的iou。
(3)predict_masks函数
位置:【segment_anything/modeling/mask_decoder.py --> MaskDecoder类 --> predict_masks函数】
作用: 利用上述 t r a n s f o r m e r {transformer} transformer , o u t p u t _ u p s c a l i n g {output\_upscaling} output_upscaling , o u t p u t _ h y p e r n e t w o r k s _ m l p s {output\_hypernetworks\_mlps} output_hypernetworks_mlps 和 i o u _ p r e d i c t i o n _ h e a d {iou\_prediction\_head} iou_prediction_head 四个模块,实现mask和iou预测
此时此刻,首先来重温一下,传入predict_masks函数的参数分别是什么:
① image_embeddings:image encoder嵌入,大小为 [ 1 , 256 , 64 , 64 ] {[1, 256, 64, 64]} [1,256,64,64] ;
② image_pe:图像嵌入大小对应的位置编码,大小同为 [ 1 , 256 , 64 , 64 ] {[1, 256, 64, 64]} [1,256,64,64] ;
③ sparse_prompt_embeddings:prompt point和box嵌入,大小为 [ 1 , 3 , 256 ] {[1, 3, 256]} [1,3,256] ;
④ dense_prompt_embeddings:prompt mask嵌入,大小为 [ 1 , 256 , 64 , 64 ] {[1, 256, 64, 64]} [1,256,64,64] ;
def predict_masks(self,image_embeddings: torch.Tensor, # [1, 256, 64, 64]image_pe: torch.Tensor, # [1, 256, 64, 64]sparse_prompt_embeddings: torch.Tensor, # [1, 3, 256]dense_prompt_embeddings: torch.Tensor, # [1, 256, 64, 64]
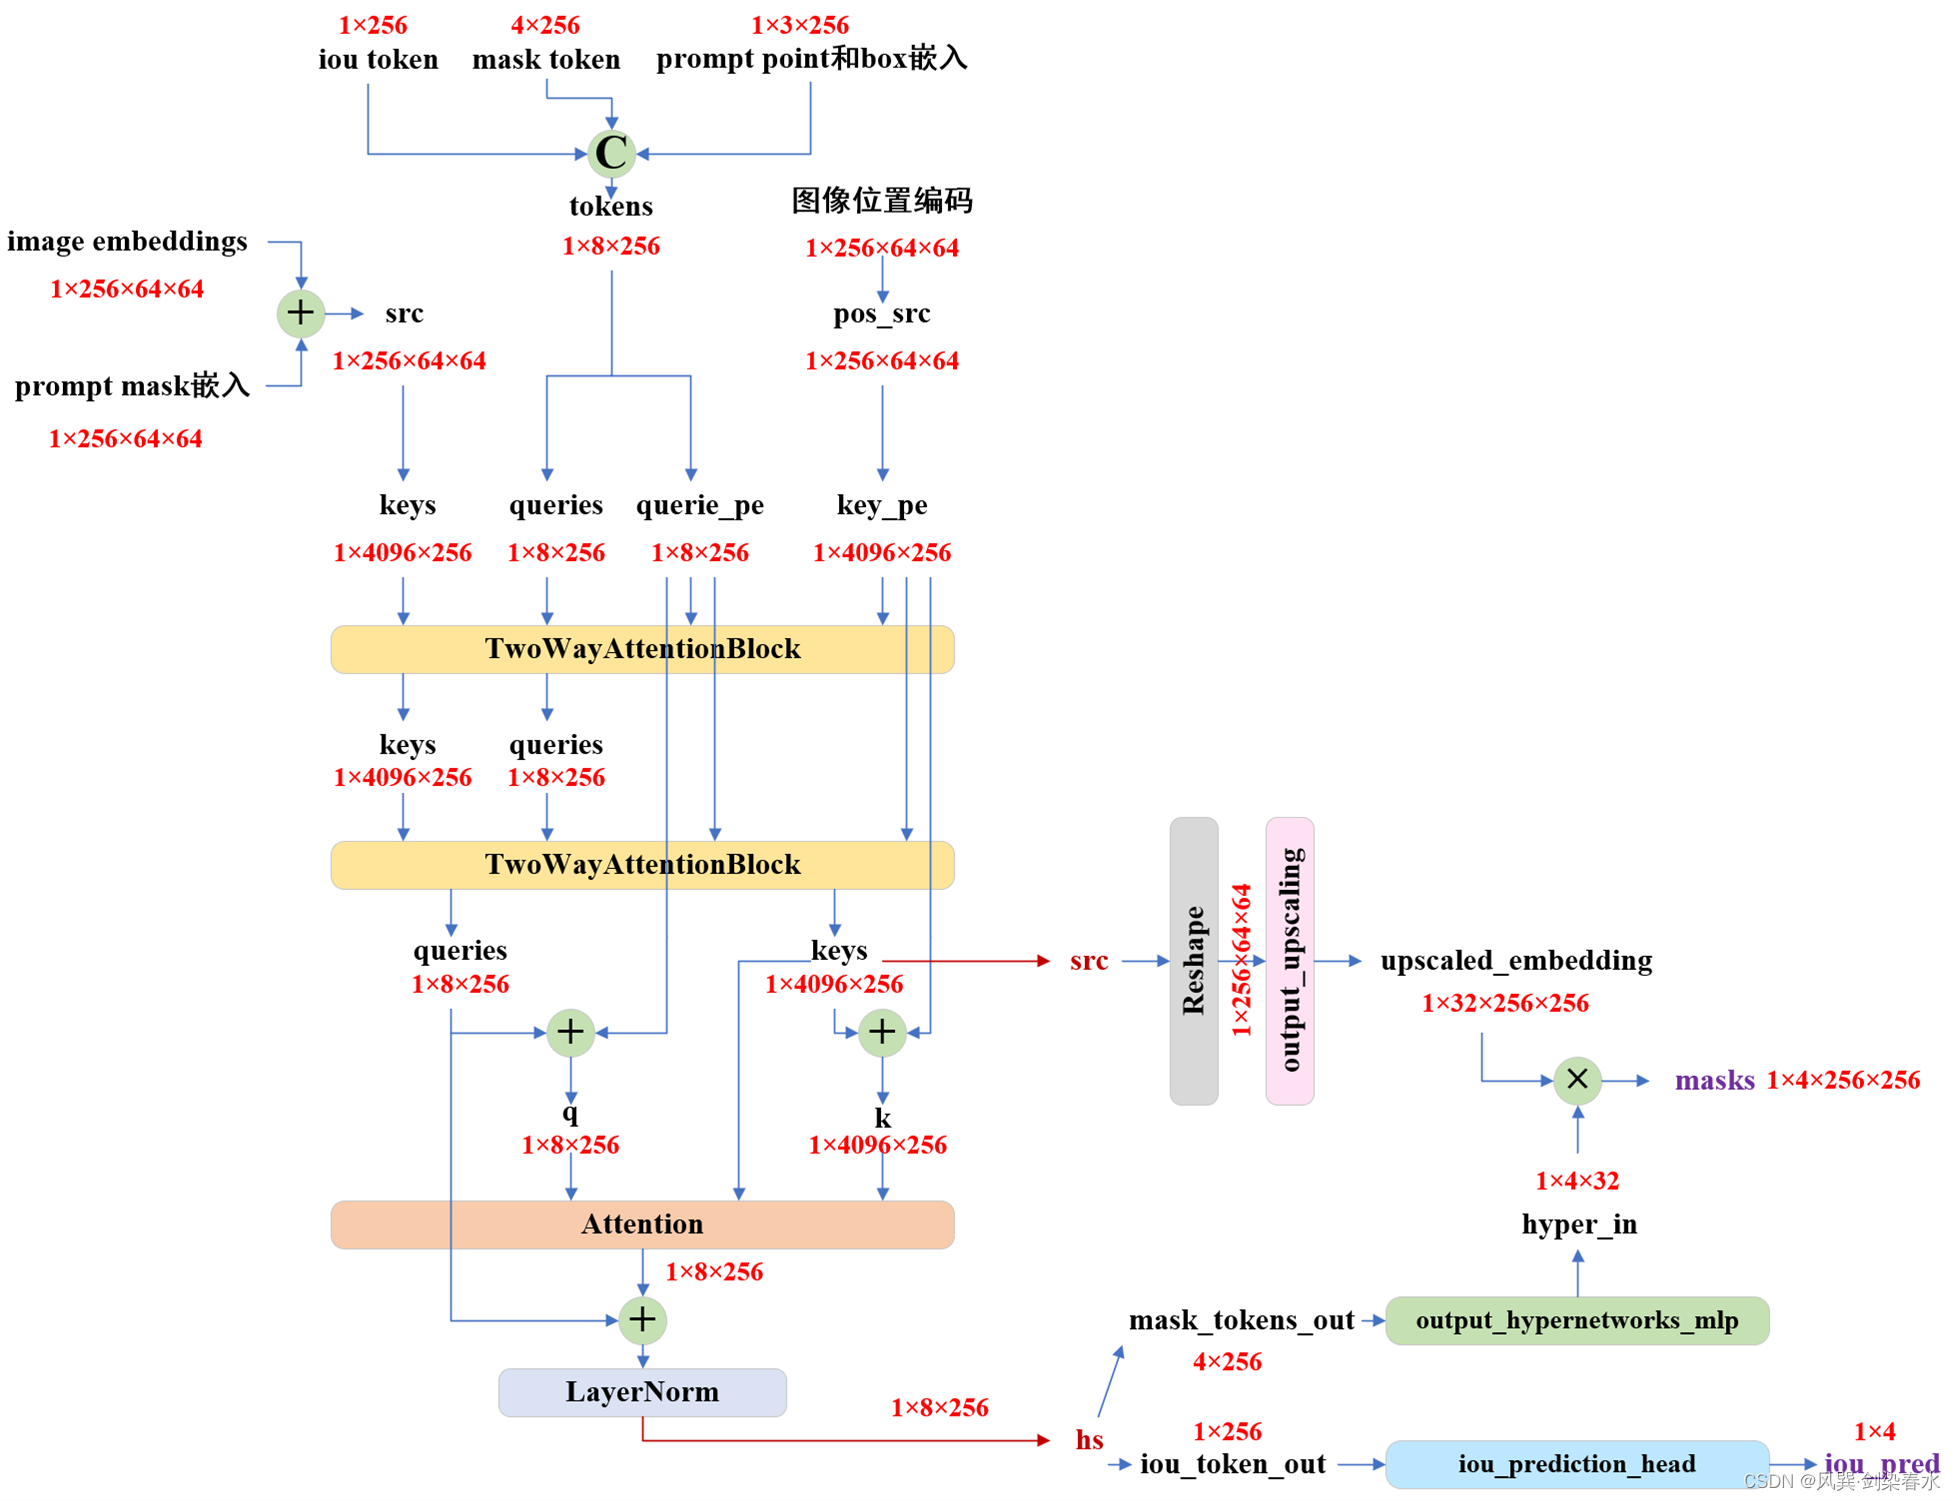
) -> Tuple[torch.Tensor, torch.Tensor]:"""Predicts masks. See 'forward' for more details."""# Concatenate output tokens# 拼接iou的token和mask的token: [1,256]+[4,256]->[5,256]output_tokens = torch.cat([self.iou_token.weight, self.mask_tokens.weight], dim=0)output_tokens = output_tokens.unsqueeze(0).expand(sparse_prompt_embeddings.size(0), -1, -1) # [1,5,256]# iou的token和mask的token + prompt point和box嵌入tokens = torch.cat((output_tokens, sparse_prompt_embeddings), dim=1) # [1,8,256]# Expand per-image data in batch direction to be per-masksrc = torch.repeat_interleave(image_embeddings, tokens.shape[0], dim=0) # 按batch重复: [1,256,64,64]src = src + dense_prompt_embeddings # [1,256,64,64]pos_src = torch.repeat_interleave(image_pe, tokens.shape[0], dim=0) # 按batch重复: [1,256,64,64]b, c, h, w = src.shape # 1,256,64,64# Run the transformer# src是image encoder嵌入和prompt mask嵌入# pos_src是图像嵌入大小对应的位置编码# tokens是iou的token和mask的token + prompt point和box嵌入hs, src = self.transformer(src, pos_src, tokens) # hs:[1,8,256], src:[1,4096,256]iou_token_out = hs[:, 0, :] # 第1个为iou的token输出[1,256]mask_tokens_out = hs[:, 1: (1 + self.num_mask_tokens), :] # 随后4个为mask的token输出[4,256]# Upscale mask embeddings and predict masks using the mask tokenssrc = src.transpose(1, 2).view(b, c, h, w) # reshape: [1,4096,256]-> [1,256,64,64]upscaled_embedding = self.output_upscaling(src) # [1,32,256,256]hyper_in_list: List[torch.Tensor] = []for i in range(self.num_mask_tokens):hyper_in_list.append(self.output_hypernetworks_mlps[i](mask_tokens_out[:, i, :]))hyper_in = torch.stack(hyper_in_list, dim=1) # [1,4,32]b, c, h, w = upscaled_embedding.shape # 1,32,256,256masks = (hyper_in @ upscaled_embedding.view(b, c, h * w)).view(b, -1, h, w) # [1,4,256,256]# Generate mask quality predictionsiou_pred = self.iou_prediction_head(iou_token_out) # [1,4]return masks, iou_pred
由此可见,经TwoWayTransformer获得了iou_token_out和mask_tokens_out,iou_token_out由iou_prediction_head(1个MLP)实现iou预测,4个mask_tokens_out分别经过1个MLP所获得的映射拼接后,与经过output_upscaling上采样后的图像嵌入(包含image encoder嵌入和prompt mask嵌入)进行矩阵相乘,得到mask预测。
2. Mask Decoder结构绘制
(1)结构打印
MaskDecoder((transformer): TwoWayTransformer((layers): ModuleList((0-1): 2 x TwoWayAttentionBlock((self_attn): Attention((q_proj): Linear(in_features=256, out_features=256, bias=True)(k_proj): Linear(in_features=256, out_features=256, bias=True)(v_proj): Linear(in_features=256, out_features=256, bias=True)(out_proj): Linear(in_features=256, out_features=256, bias=True))(norm1): LayerNorm((256,), eps=1e-05, elementwise_affine=True)(cross_attn_token_to_image): Attention((q_proj): Linear(in_features=256, out_features=128, bias=True)(k_proj): Linear(in_features=256, out_features=128, bias=True)(v_proj): Linear(in_features=256, out_features=128, bias=True)(out_proj): Linear(in_features=128, out_features=256, bias=True))(norm2): LayerNorm((256,), eps=1e-05, elementwise_affine=True)(mlp): MLPBlock((lin1): Linear(in_features=256, out_features=2048, bias=True)(lin2): Linear(in_features=2048, out_features=256, bias=True)(act): ReLU())(norm3): LayerNorm((256,), eps=1e-05, elementwise_affine=True)(norm4): LayerNorm((256,), eps=1e-05, elementwise_affine=True)(cross_attn_image_to_token): Attention((q_proj): Linear(in_features=256, out_features=128, bias=True)(k_proj): Linear(in_features=256, out_features=128, bias=True)(v_proj): Linear(in_features=256, out_features=128, bias=True)(out_proj): Linear(in_features=128, out_features=256, bias=True))))(final_attn_token_to_image): Attention((q_proj): Linear(in_features=256, out_features=128, bias=True)(k_proj): Linear(in_features=256, out_features=128, bias=True)(v_proj): Linear(in_features=256, out_features=128, bias=True)(out_proj): Linear(in_features=128, out_features=256, bias=True))(norm_final_attn): LayerNorm((256,), eps=1e-05, elementwise_affine=True))(iou_token): Embedding(1, 256)(mask_tokens): Embedding(4, 256)(output_upscaling): Sequential((0): ConvTranspose2d(256, 64, kernel_size=(2, 2), stride=(2, 2))(1): LayerNorm2d()(2): GELU(approximate='none')(3): ConvTranspose2d(64, 32, kernel_size=(2, 2), stride=(2, 2))(4): GELU(approximate='none'))(output_hypernetworks_mlps): ModuleList((0-3): 4 x MLP((layers): ModuleList((0-1): 2 x Linear(in_features=256, out_features=256, bias=True)(2): Linear(in_features=256, out_features=32, bias=True))))(iou_prediction_head): MLP((layers): ModuleList((0-1): 2 x Linear(in_features=256, out_features=256, bias=True)(2): Linear(in_features=256, out_features=4, bias=True)))
)
(2)结构绘制
整体结构就是这样的啦,完结,撒花~