Spring对事务的支持
- 事务概述
- 事务的四个处理过程
- 事务的四个特性
- 引入事务场景
- Spring实现事务的两种方式
- 声明式事务之注解实现方式
事务概述
- 在一个业务流程当中,通常需要多条DML(insert delete update)语句共同联合才能完成,这多条DML语句必须同时成功,或者同时失败,这样才能保证数据的安全。
- 多条DML要么同时成功,要么同时失败,这叫做事务。
事务的四个处理过程
第一步:开启事务 (start transaction)
第二步:执行核心业务代码
第三步:提交事务(如果核心业务处理过程中没有出现异常)
第四步:回滚事务(如果核心业务处理过程中出现异常)
事务的四个特性
原子性:事务是最小的工作单元,不可再分。
一致性:事务要求要么同时成功,要么同时失败。事务前和事务后的总量不变。
隔离性:事务和事务之间因为有隔离性,才可以保证互不干扰。
持久性:持久性是事务结束的标志。
引入事务场景
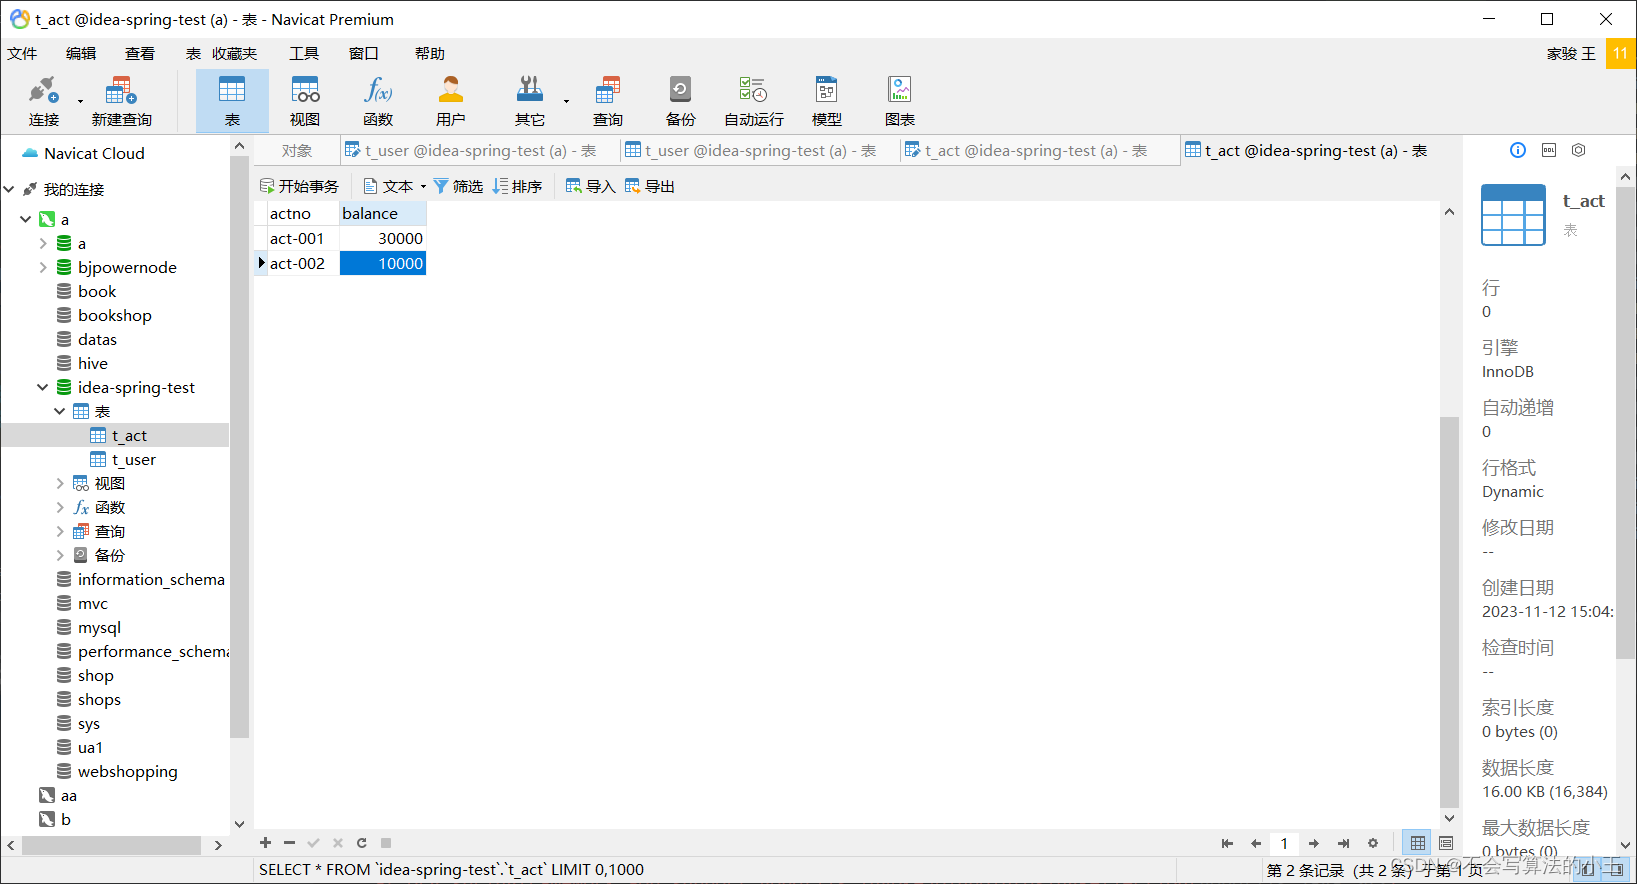
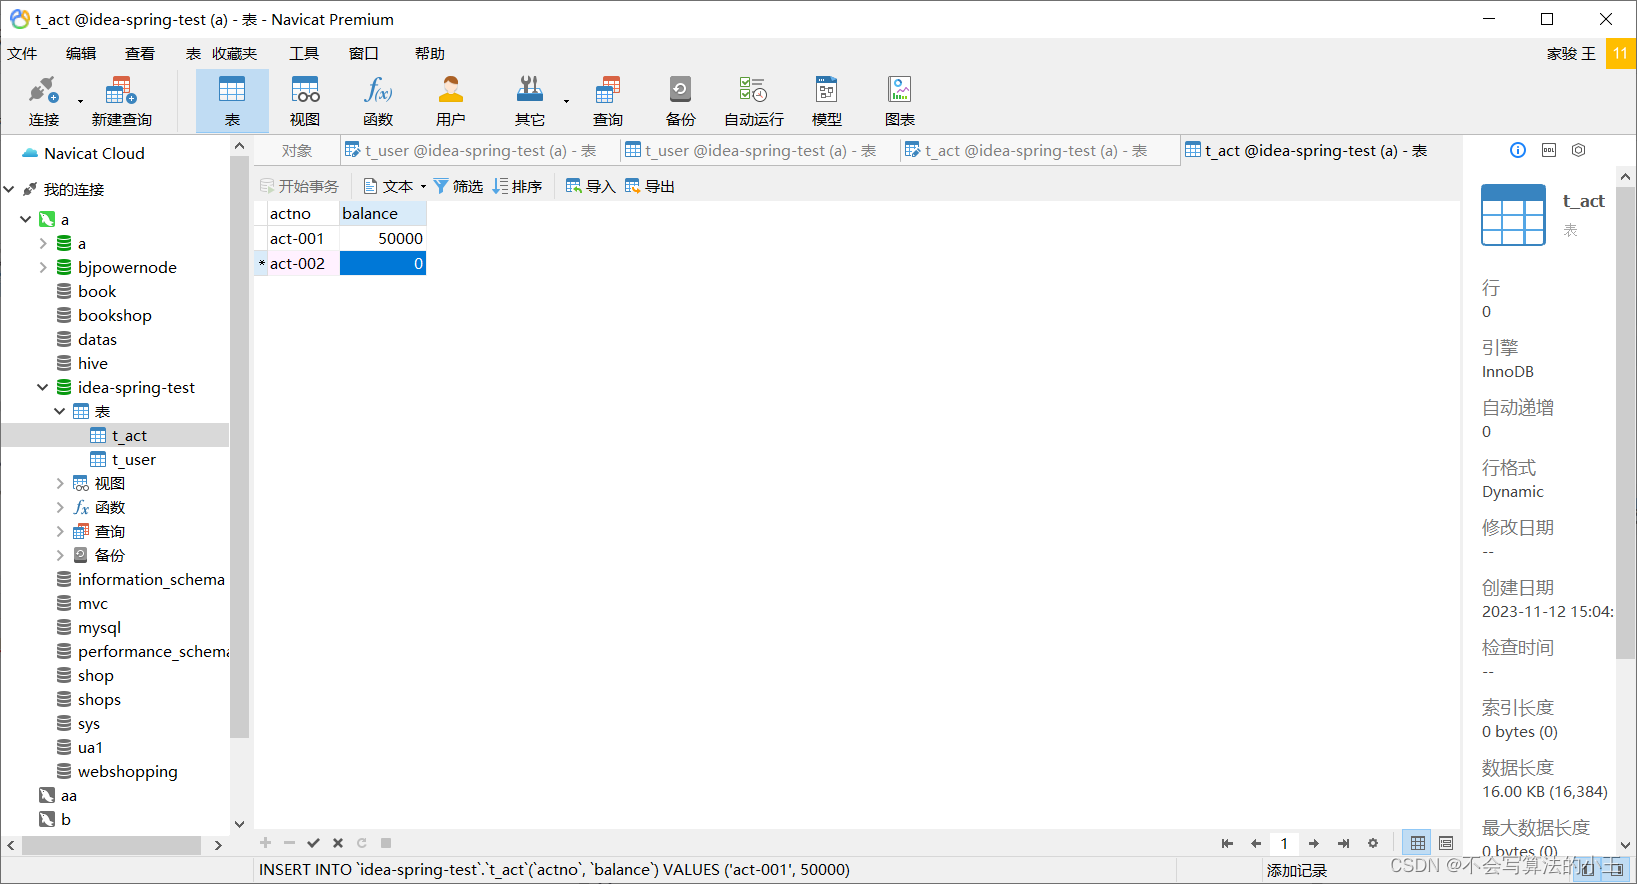
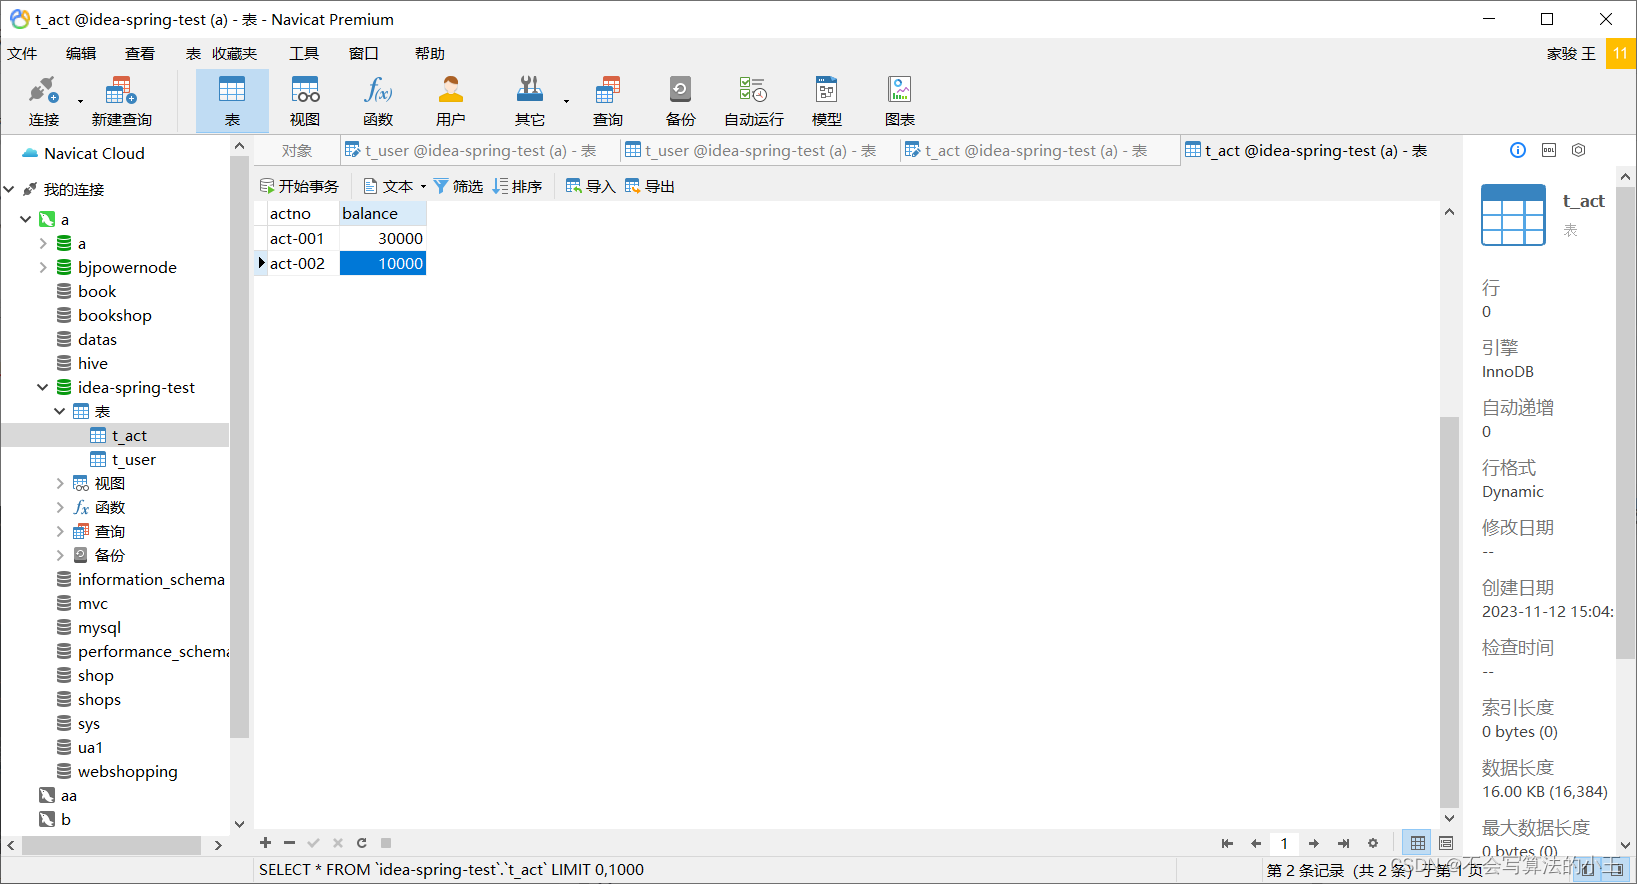
例:两个账户act-001和act-002。act-001账户向act-002账户转账10000,必须同时成功,或者同时失败。
新建模块:spring6-jdbc
连接数据库的技术采用Spring框架的JdbcTemplate
pom.xml
<?xml version="1.0" encoding="UTF-8"?>
<project xmlns="http://maven.apache.org/POM/4.0.0"xmlns:xsi="http://www.w3.org/2001/XMLSchema-instance"xsi:schemaLocation="http://maven.apache.org/POM/4.0.0 http://maven.apache.org/xsd/maven-4.0.0.xsd"><modelVersion>4.0.0</modelVersion><groupId>com.w</groupId><artifactId>spring6-jdbc</artifactId><version>1.0-SNAPSHOT</version><repositories><repository><id>repository.spring.milestone</id><name>Spring Milestone Repository</name><url>https://repo.spring.io/milestone</url></repository></repositories><dependencies><dependency><groupId>org.springframework</groupId><artifactId>spring-context</artifactId><version>6.0.0-M2</version></dependency><dependency><groupId>junit</groupId><artifactId>junit</artifactId><version>4.13.2</version><scope>test</scope></dependency><!--新增的依赖:mysql驱动--><dependency><groupId>mysql</groupId><artifactId>mysql-connector-java</artifactId><version>8.0.30</version></dependency><!--新增的依赖:spring jdbc,这个依赖中有JdbcTemplate--><dependency><groupId>org.springframework</groupId><artifactId>spring-jdbc</artifactId><version>6.0.0-M2</version></dependency><!--@Resource注解--><dependency><groupId>jakarta.annotation</groupId><artifactId>jakarta.annotation-api</artifactId><version>2.1.1</version></dependency><dependency><groupId>org.junit.jupiter</groupId><artifactId>junit-jupiter</artifactId><version>RELEASE</version><scope>test</scope></dependency><dependency><groupId>com.alibaba</groupId><artifactId>druid</artifactId><version>1.1.8</version></dependency></dependencies><properties><maven.compiler.source>17</maven.compiler.source><maven.compiler.target>17</maven.compiler.target></properties></project>
第一步:准备数据库表
t_act
表结构
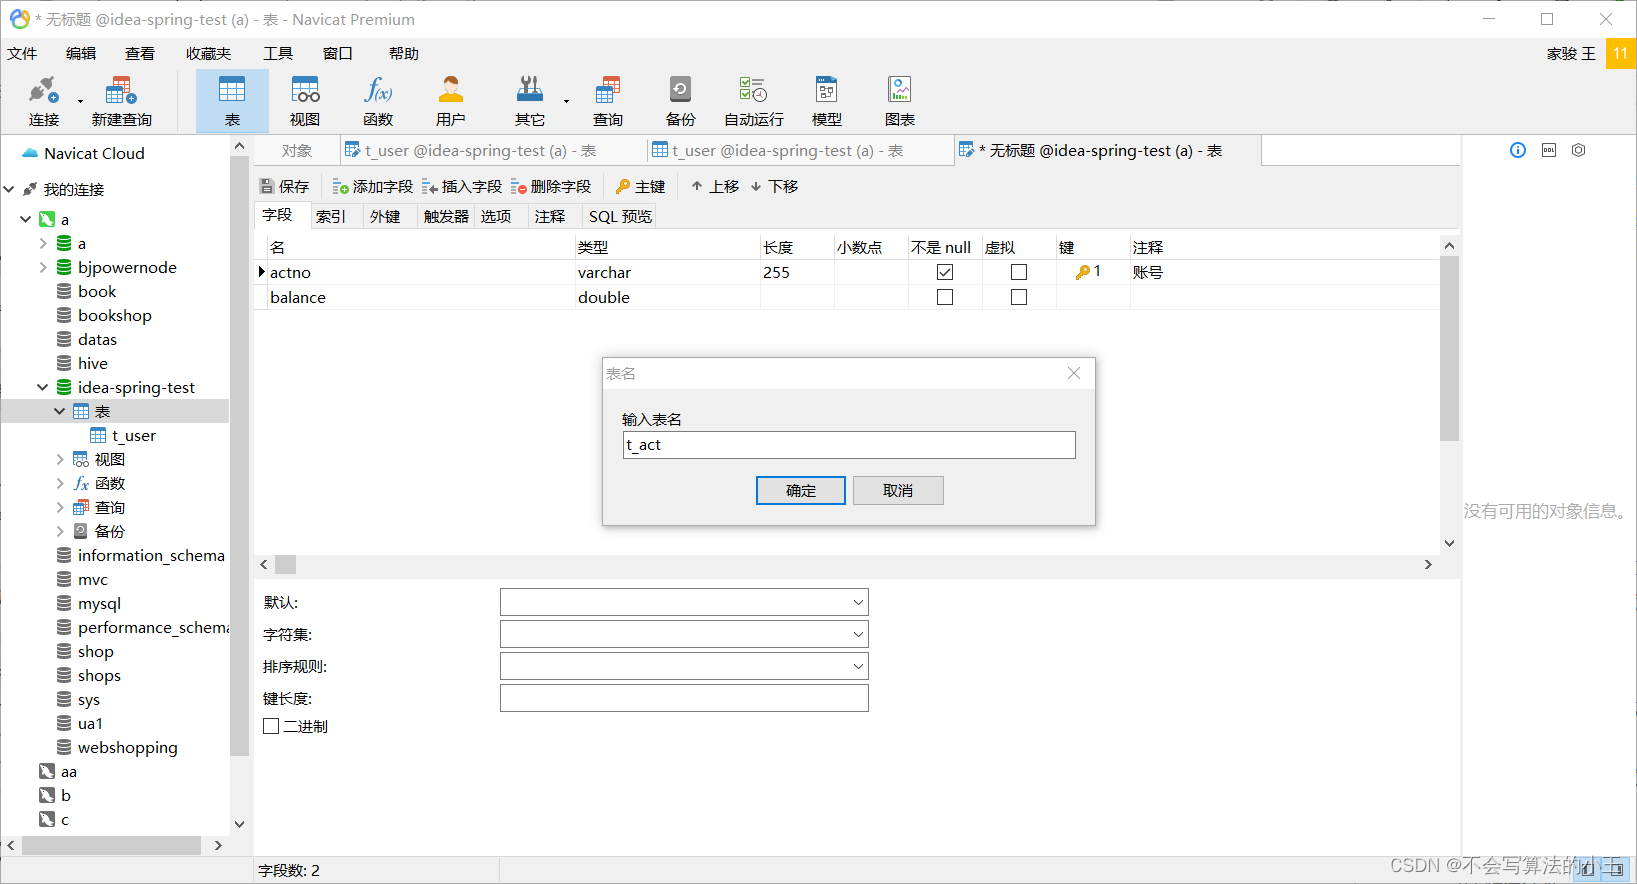
表数据
第二步:创建包结构
com.w.spring6.bank.pojo
com.w.spring6.bank.service
com.w.spring6.bank.service.impl
com.w.spring6.bank.dao
com.w.spring6.bank.dao.impl
第三步:准备POJO类
Account.java
package com.w.spring6.bank.pojo;public class Account {private String actno;private Double balance;@Overridepublic String toString() {return "Account{" +"actno='" + actno + '\'' +", balance=" + balance +'}';}public Account() {}public Account(String actno, Double balance) {this.actno = actno;this.balance = balance;}public String getActno() {return actno;}public void setActno(String actno) {this.actno = actno;}public Double getBalance() {return balance;}public void setBalance(Double balance) {this.balance = balance;}
}
第四步:编写持久层
AccountDao接口
package com.w.spring6.bank.dao;import com.w.spring6.bank.pojo.Account;public interface AccountDao {/*** 根据账号查询余额* @param actno* @return*/Account selectByActno(String actno);/*** 更新账户* @param act* @return*/int update(Account act);}AccountDaoImpl.java
package com.w.spring6.bank.dao.impl;import com.w.spring6.bank.dao.AccountDao;
import com.w.spring6.bank.pojo.Account;import jakarta.annotation.Resource;
import org.springframework.jdbc.core.BeanPropertyRowMapper;
import org.springframework.jdbc.core.JdbcTemplate;
import org.springframework.stereotype.Repository;@Repository("accountDao")
public class AccountDaoImpl implements AccountDao {@Resource(name = "jdbcTemplate")private JdbcTemplate jdbcTemplate;@Overridepublic Account selectByActno(String actno) {String sql = "select actno, balance from t_act where actno = ?";Account account = jdbcTemplate.queryForObject(sql, new BeanPropertyRowMapper<>(Account.class), actno);return account;}@Overridepublic int update(Account act) {String sql = "update t_act set balance = ? where actno = ?";int count = jdbcTemplate.update(sql, act.getBalance(), act.getActno());return count;}
}
第五步:编写业务层
AccountService接口
package com.w.spring6.bank.service;public interface AccountService {/*** 转账* @param fromActno* @param toActno* @param money*/void transfer(String fromActno, String toActno, double money);
}
AccountServiceImpl.java
package com.w.spring6.bank.service.impl;import com.w.spring6.bank.dao.AccountDao;
import com.w.spring6.bank.pojo.Account;
import com.w.spring6.bank.service.AccountService;
import jakarta.annotation.Resource;
import org.springframework.stereotype.Service;@Service("accountService")
public class AccountServiceImpl implements AccountService {@Resource(name = "accountDao")private AccountDao accountDao;@Overridepublic void transfer(String fromActno, String toActno, double money) {// 查询账户余额是否充足Account fromAct = accountDao.selectByActno(fromActno);if (fromAct.getBalance() < money) {throw new RuntimeException("账户余额不足");}// 余额充足,开始转账Account toAct = accountDao.selectByActno(toActno);fromAct.setBalance(fromAct.getBalance() - money);toAct.setBalance(toAct.getBalance() + money);int count = accountDao.update(fromAct);count += accountDao.update(toAct);if (count != 2) {throw new RuntimeException("转账失败,请联系银行");}}
}
第六步:编写Spring配置文件
Spring-bank.xml
<?xml version="1.0" encoding="UTF-8"?>
<beans xmlns="http://www.springframework.org/schema/beans"xmlns:xsi="http://www.w3.org/2001/XMLSchema-instance"xmlns:context="http://www.springframework.org/schema/context"xsi:schemaLocation="http://www.springframework.org/schema/beans http://www.springframework.org/schema/beans/spring-beans.xsd http://www.springframework.org/schema/context https://www.springframework.org/schema/context/spring-context.xsd"><context:component-scan base-package="com.w.spring6.bank"/><bean id="dataSource" class="com.alibaba.druid.pool.DruidDataSource"><property name="driverClassName" value="com.mysql.cj.jdbc.Driver"/><property name="url" value="jdbc:mysql://localhost:3307/idea-spring-test"/><property name="username" value="root"/><property name="password" value="123456"/></bean><bean id="jdbcTemplate" class="org.springframework.jdbc.core.JdbcTemplate"><property name="dataSource" ref="dataSource"/></bean>
</beans>
第七步:编写表示层(测试程序)
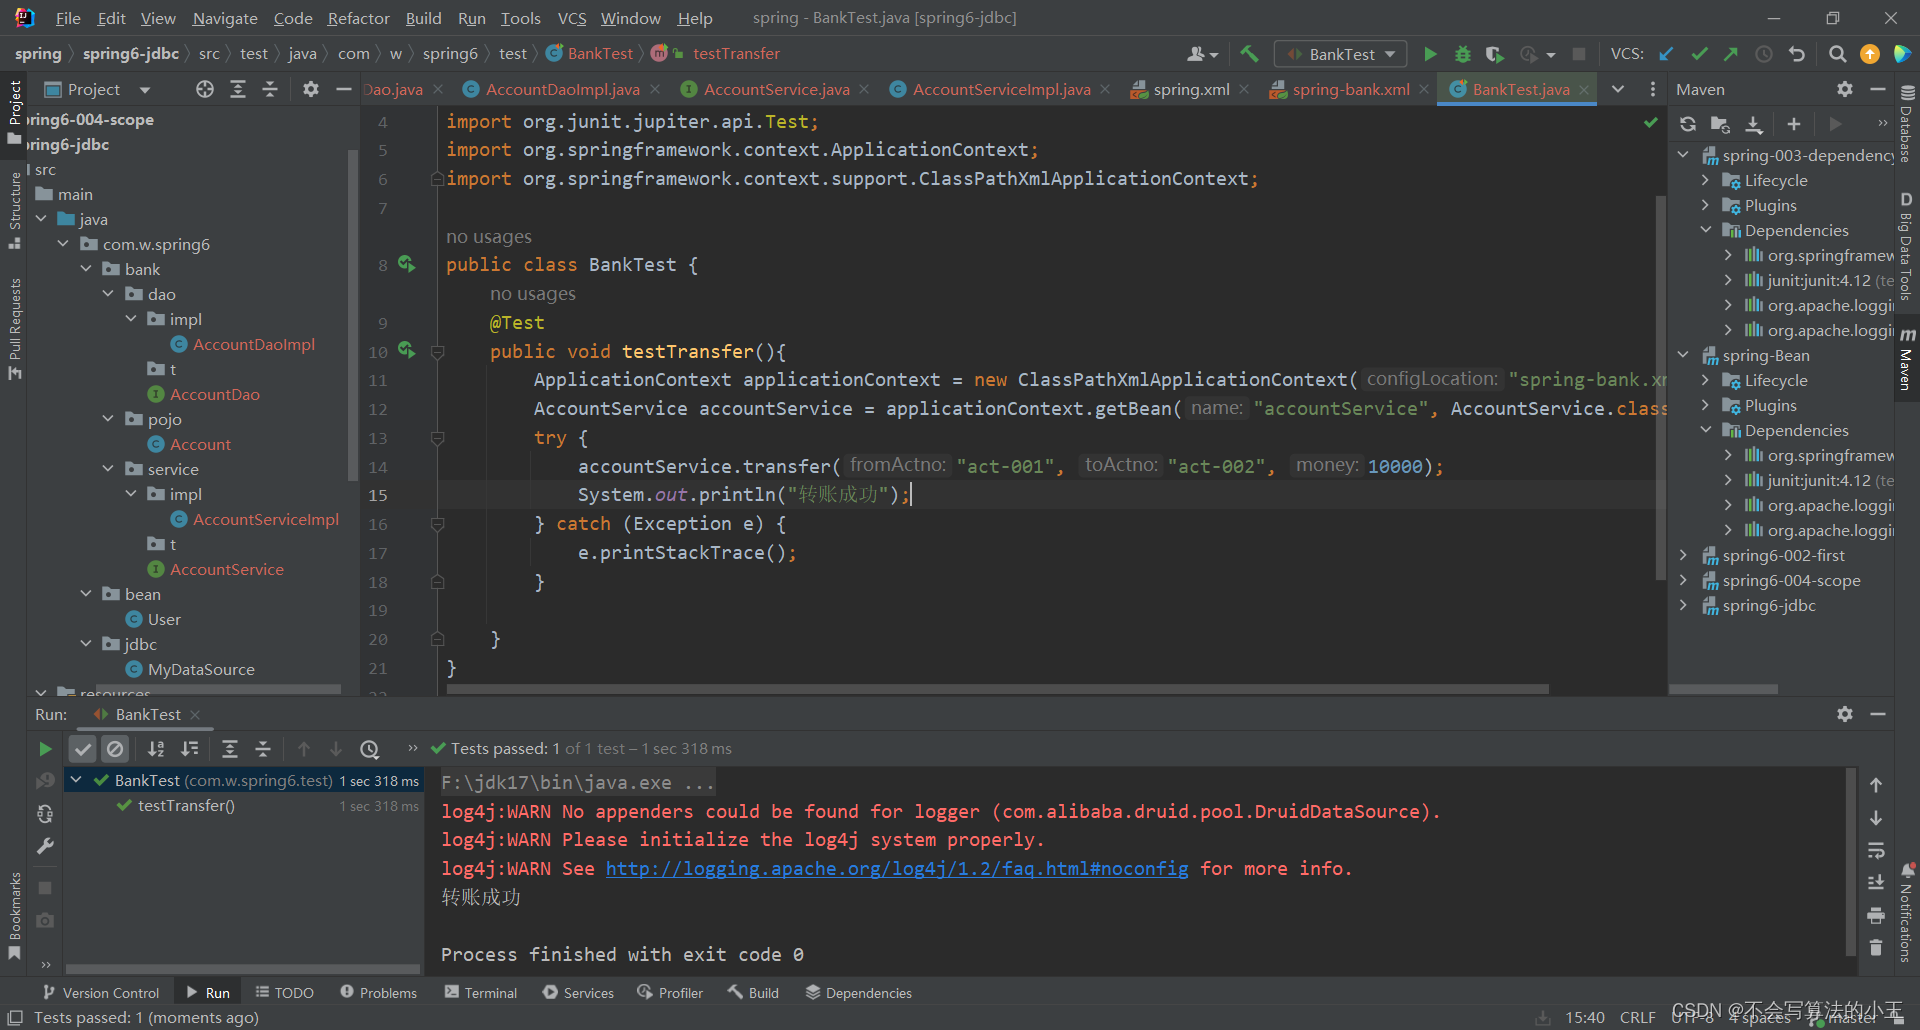
BankTest.java
package com.w.spring6.test;import com.w.spring6.bank.service.AccountService;
import org.junit.jupiter.api.Test;
import org.springframework.context.ApplicationContext;
import org.springframework.context.support.ClassPathXmlApplicationContext;public class BankTest {@Testpublic void testTransfer(){ApplicationContext applicationContext = new ClassPathXmlApplicationContext("spring.xml");AccountService accountService = applicationContext.getBean("accountService", AccountService.class);try {accountService.transfer("act-001", "act-002", 10000);System.out.println("转账成功");} catch (Exception e) {e.printStackTrace();}}
}
运行结果:

模拟异常:
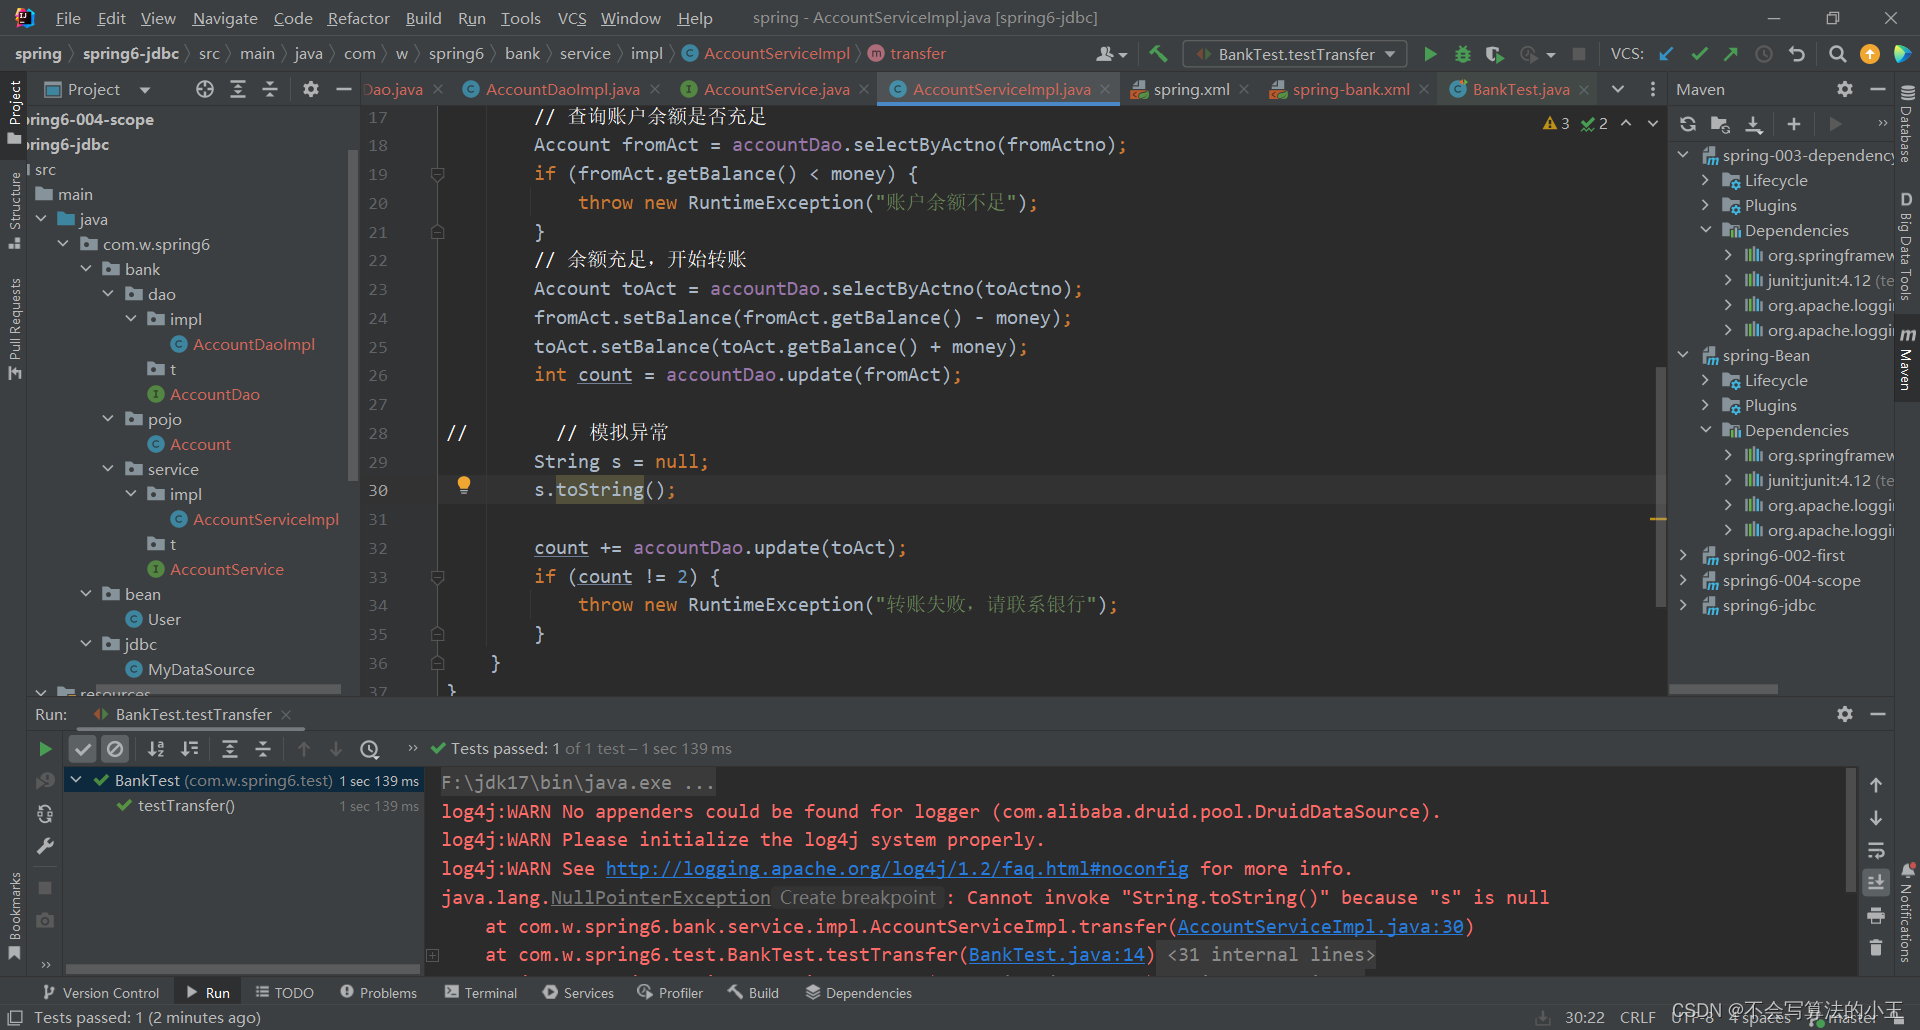
卧槽,少了10000
Spring实现事务的两种方式
- 编程式事务:通过编写代码的方式来实现事务的管理。
- 声明式事务:基于注解方式,基于XML配置方式
声明式事务之注解实现方式
第一步:在spring配置文件中配置事务管理器。
spring-bank.xml
<bean id="transactionManager" class="org.springframework.jdbc.datasource.DataSourceTransactionManager"><property name="dataSource" ref="dataSource"/>
</bean>
第二步:在spring配置文件中引入tx命名空间,在spring配置文件中配置“事务注解驱动器”,开始注解的方式控制事务。
<tx:annotation-driven transaction-manager=“transactionManager”/>
第三步:在service类上或方法上添加@Transactional注解
@Transactional
public class AccountServiceImpl implements AccountService {
}
接着继续运行测试
发现没有丢钱啦!