提示:文章写完后,目录可以自动生成,如何生成可参考右边的帮助文档
目录
前言
一、概述
二、安装
三、 目录结构
四、启停
五、配置文件
1. server.xml
(1) Server
(2) Listener
(3) GlobalNamingResources
(4) Service
01.Connector
(1) port
(2) protocol
(3)connectionTimeout
(4)redirectPor
02.Engine
(1)name
(2)defaultHost
(3) Host
(5) Context
1.docBase
2. path
2. tomcat-users.xml
3. web.xml
六、多tomcat服务部署
1. 部署
2. 命令优化
3. 端口号修改
4.修改访问页面
七、虚拟主机
总结
前言
今天学习的是Tomcat 以下就是今天的全部内容,有点多,希望可以对我们的学习有所帮助。
提示:以下是本篇文章正文内容,下面案例可供参考
一、概述
1. Tomcat 服务器是一个免费的开放源代码的Web 应用服务器,属于轻量级应用服务器,在中小型系统和并发访问用户不是很多的场合下被普遍使用,是开发和调试JSP 程序的首选。
2. Tomcat虚拟主机是通过linux或windows操作系统下进行独立运行的一个网站发布容器,他是一种在单一主机或主机群上,实现多网域服务的方法,可以运行多个网站或服务的技术。
3.默认监听端口
8080/tcp
二、安装
1. 基础配置
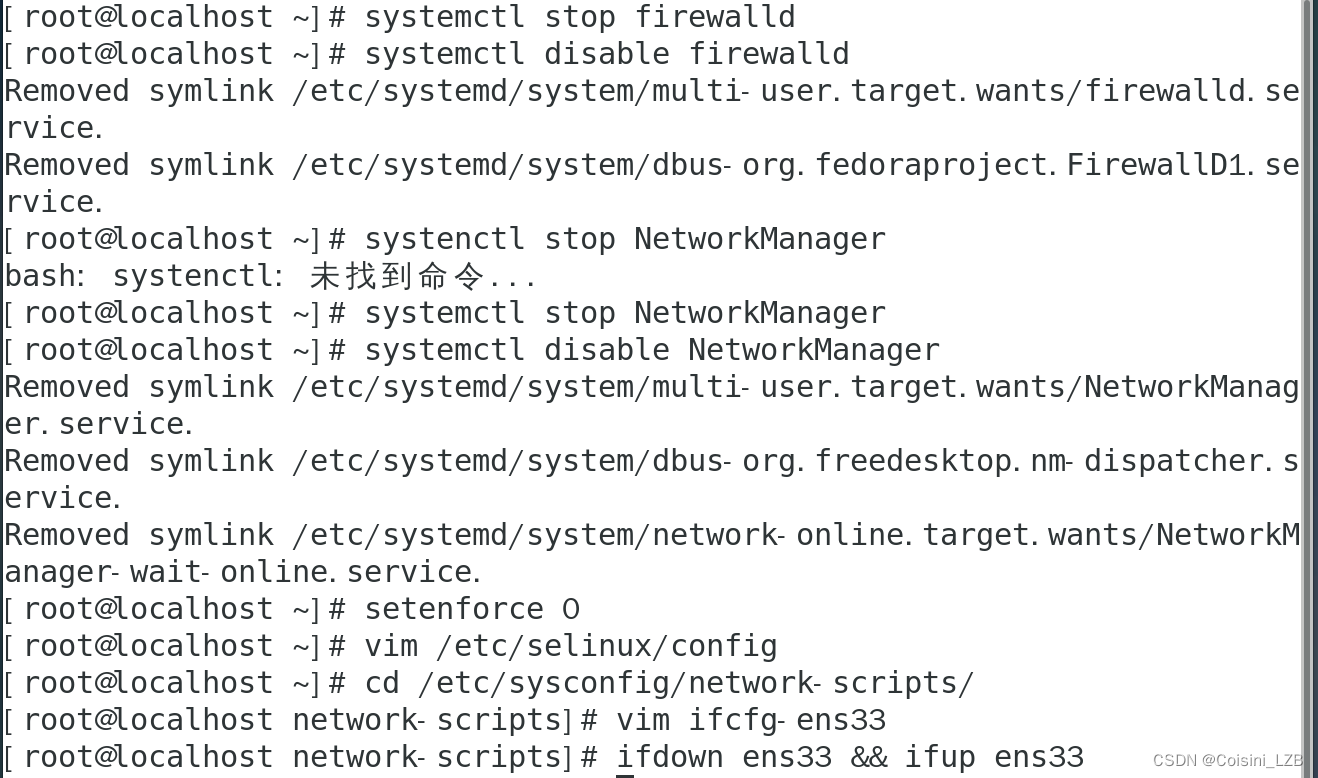
[root@localhost ~]# systemctl stop NetworkManager
[root@localhost ~]# systemctl stop firewalld
[root@localhost ~]# setenforce 0
sed -i "/s/ONBOOT=no/ONBOOT=yes/" /etc/sysconfig/network-scripts/ifcfg-ens33
systemctl restart network
2. java环境
java -version
没有环境
yum groupinstall "开发工具"
下载JDK软件包
tar xf apache-tomcat-8.5.16.tar.gz
mv apache-tomcat-8.5.16 /usr/local/tomcat 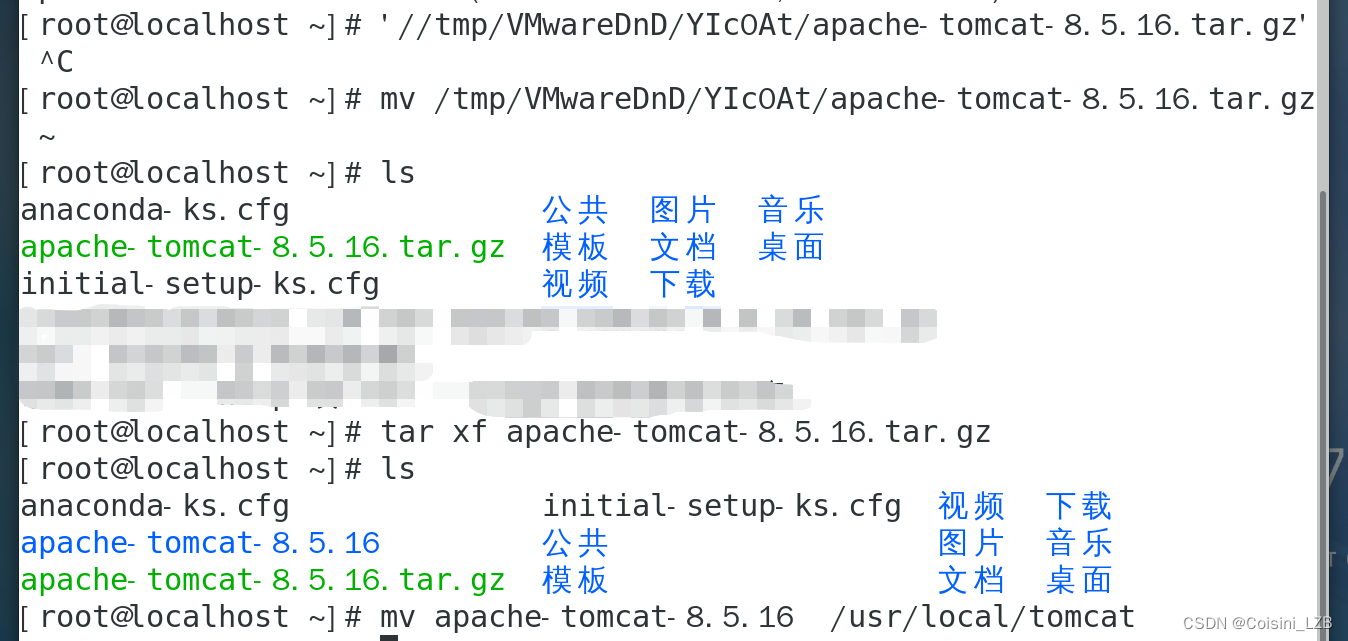
三、 目录结构
bin 命令

logs 日志

conf 配置文件

webapps 应用程序目录
ROOT 访问首页
host-manager 主机管理后台页面
manager 管理后台页面 

四、启停
命令优化
ln -s /usr/local/tomcat/bin/startup.sh /usr/local/bin/btomcat
ln -s /usr/local/tomcat/bin/shutdown.sh /usr/local/bin/stomcat
启动tomcat
tmstart
停止tomcat
stomcat
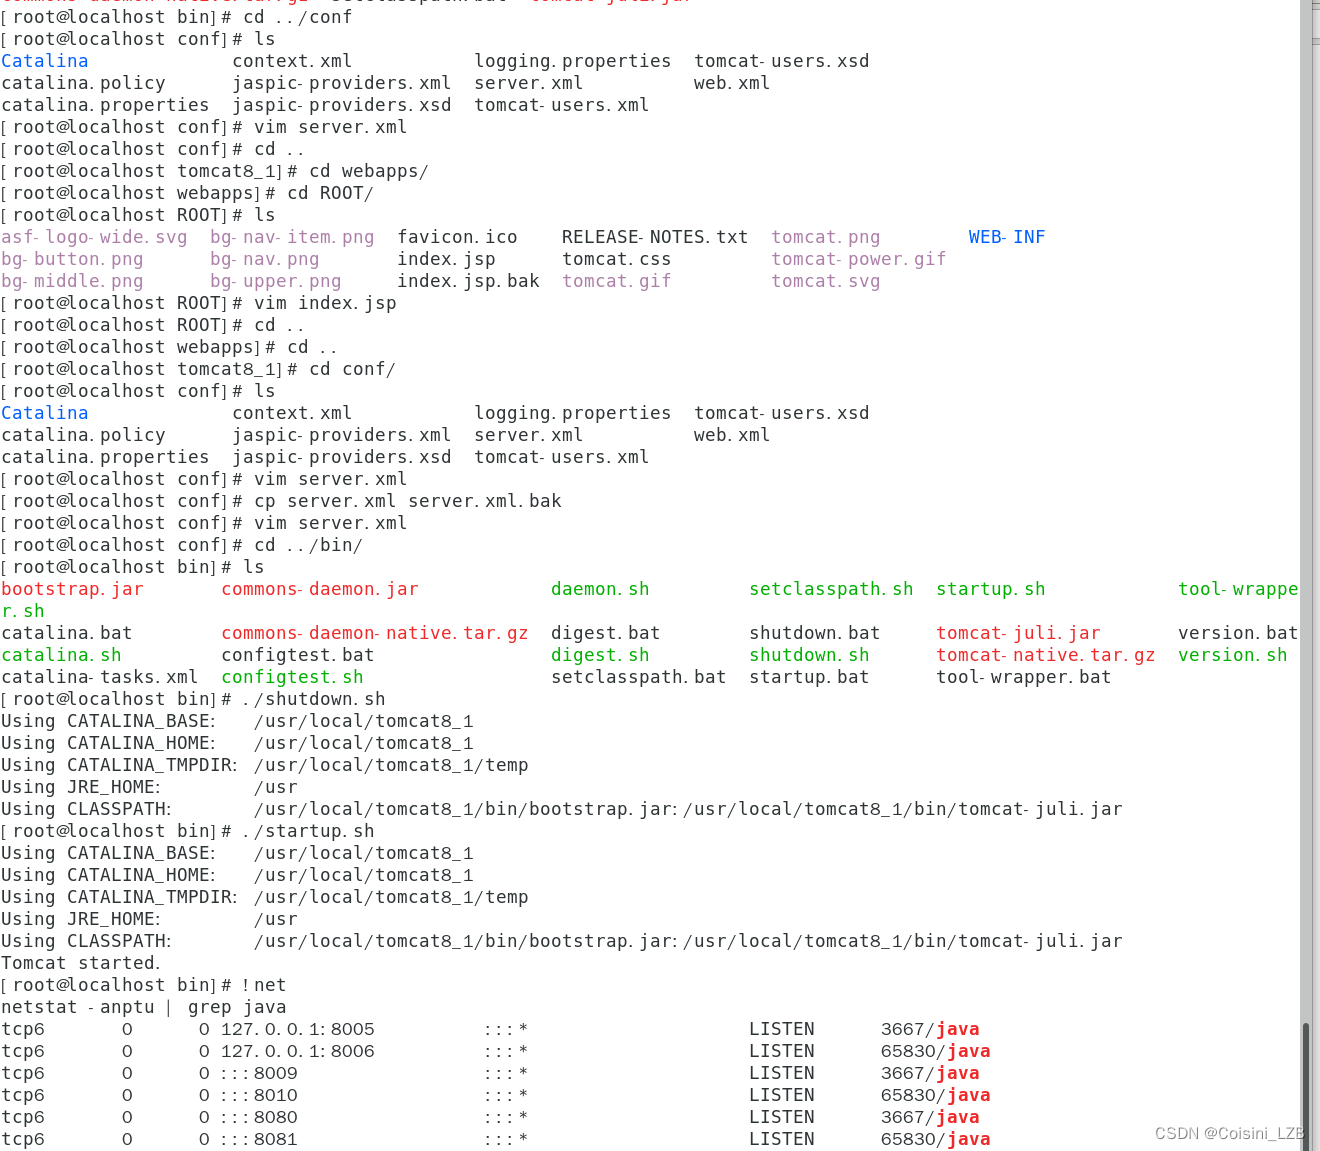
netstat -anptu | grep java
查看运行状态

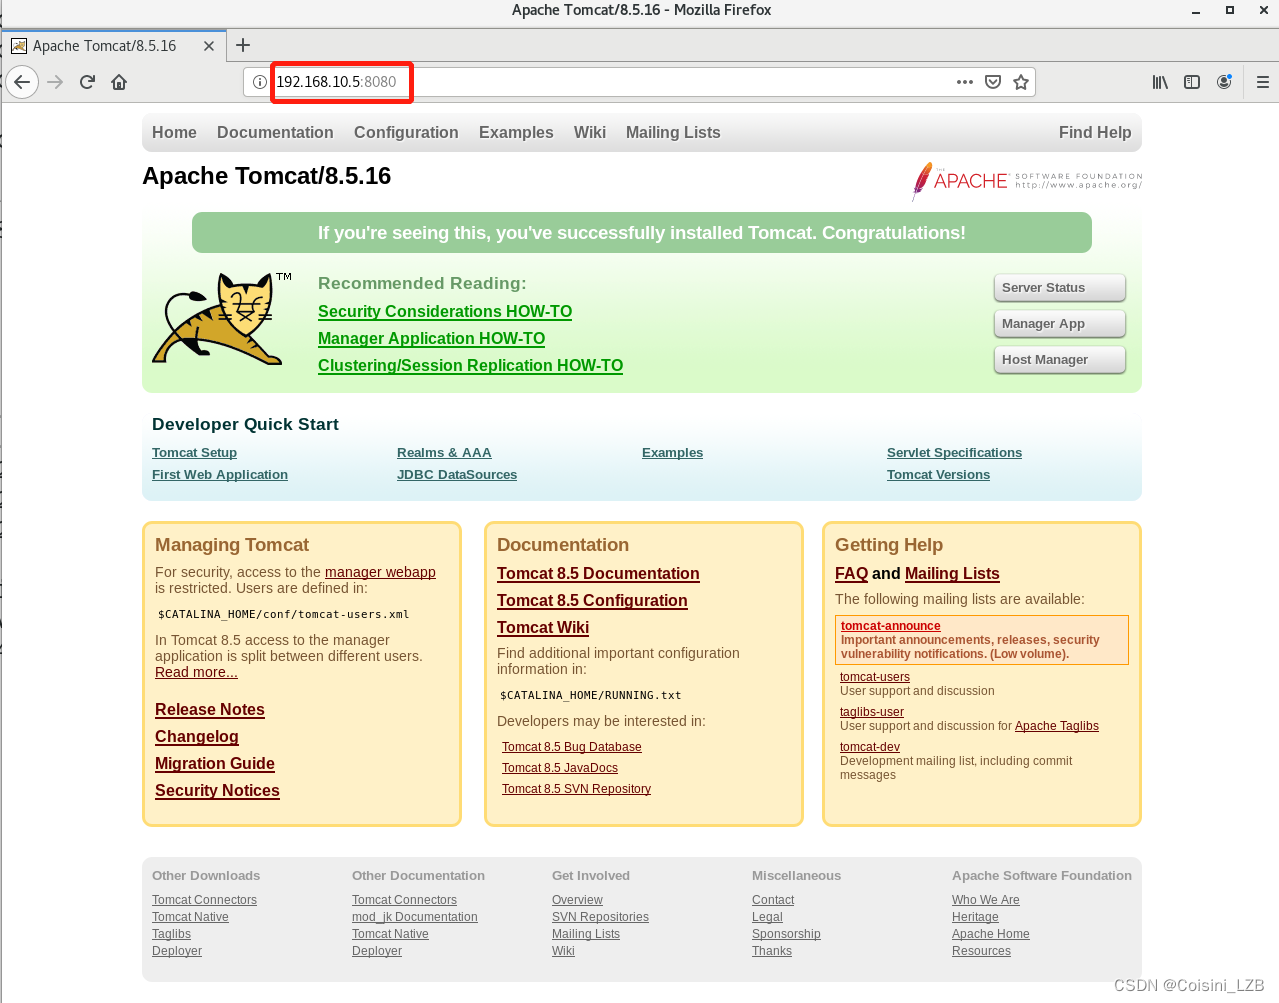
测试:
五、配置文件
1. server.xml
<?xml version="1.0" encoding="UTF-8"?>
<!--Licensed to the Apache Software Foundation (ASF) under one or morecontributor license agreements. See the NOTICE file distributed withthis work for additional information regarding copyright ownership.The ASF licenses this file to You under the Apache License, Version 2.0(the "License"); you may not use this file except in compliance withthe License. You may obtain a copy of the License athttp://www.apache.org/licenses/LICENSE-2.0Unless required by applicable law or agreed to in writing, softwaredistributed under the License is distributed on an "AS IS" BASIS,WITHOUT WARRANTIES OR CONDITIONS OF ANY KIND, either express or implied.See the License for the specific language governing permissions andlimitations under the License.
-->
<!-- Note: A "Server" is not itself a "Container", so you may notdefine subcomponents such as "Valves" at this level.Documentation at /docs/config/server.html-->
<Server port="8005" shutdown="SHUTDOWN"><Listener className="org.apache.catalina.startup.VersionLoggerListener" /><!-- Security listener. Documentation at /docs/config/listeners.html<Listener className="org.apache.catalina.security.SecurityListener" />--><!--APR library loader. Documentation at /docs/apr.html --><Listener className="org.apache.catalina.core.AprLifecycleListener" SSLEngine="on" /><!-- Prevent memory leaks due to use of particular java/javax APIs--><Listener className="org.apache.catalina.core.JreMemoryLeakPreventionListener" /><Listener className="org.apache.catalina.mbeans.GlobalResourcesLifecycleListener" /><Listener className="org.apache.catalina.core.ThreadLocalLeakPreventionListener" /><!-- Global JNDI resourcesDocumentation at /docs/jndi-resources-howto.html--><GlobalNamingResources><!-- Editable user database that can also be used byUserDatabaseRealm to authenticate users--><Resource name="UserDatabase" auth="Container"type="org.apache.catalina.UserDatabase"description="User database that can be updated and saved"factory="org.apache.catalina.users.MemoryUserDatabaseFactory"pathname="conf/tomcat-users.xml" /></GlobalNamingResources><!-- A "Service" is a collection of one or more "Connectors" that sharea single "Container" Note: A "Service" is not itself a "Container",so you may not define subcomponents such as "Valves" at this level.Documentation at /docs/config/service.html--><Service name="Catalina"><!--The connectors can use a shared executor, you can define one or more named thread pools--><!--<Executor name="tomcatThreadPool" namePrefix="catalina-exec-"maxThreads="150" minSpareThreads="4"/>--><!-- A "Connector" represents an endpoint by which requests are receivedand responses are returned. Documentation at :Java HTTP Connector: /docs/config/http.htmlJava AJP Connector: /docs/config/ajp.htmlAPR (HTTP/AJP) Connector: /docs/apr.htmlDefine a non-SSL/TLS HTTP/1.1 Connector on port 8080--><Connector port="8080" protocol="HTTP/1.1"connectionTimeout="20000"redirectPort="8443" /><!-- A "Connector" using the shared thread pool--><!--<Connector executor="tomcatThreadPool"port="8080" protocol="HTTP/1.1"connectionTimeout="20000"redirectPort="8443" />--><!-- Define a SSL/TLS HTTP/1.1 Connector on port 8443This connector uses the NIO implementation. The defaultSSLImplementation will depend on the presence of the APR/nativelibrary and the useOpenSSL attribute of theAprLifecycleListener.Either JSSE or OpenSSL style configuration may be used regardless ofthe SSLImplementation selected. JSSE style configuration is used below.--><!--<Connector port="8443" protocol="org.apache.coyote.http11.Http11NioProtocol"maxThreads="150" SSLEnabled="true"><SSLHostConfig><Certificate certificateKeystoreFile="conf/localhost-rsa.jks"type="RSA" /></SSLHostConfig></Connector>--><!-- Define a SSL/TLS HTTP/1.1 Connector on port 8443 with HTTP/2This connector uses the APR/native implementation which always usesOpenSSL for TLS.Either JSSE or OpenSSL style configuration may be used. OpenSSL styleconfiguration is used below.--><!--<Connector port="8443" protocol="org.apache.coyote.http11.Http11AprProtocol"maxThreads="150" SSLEnabled="true" ><UpgradeProtocol className="org.apache.coyote.http2.Http2Protocol" /><SSLHostConfig><Certificate certificateKeyFile="conf/localhost-rsa-key.pem"certificateFile="conf/localhost-rsa-cert.pem"certificateChainFile="conf/localhost-rsa-chain.pem"type="RSA" /></SSLHostConfig></Connector>--><!-- Define an AJP 1.3 Connector on port 8009 --><Connector port="8009" protocol="AJP/1.3" redirectPort="8443" /><!-- An Engine represents the entry point (within Catalina) that processesevery request. The Engine implementation for Tomcat stand aloneanalyzes the HTTP headers included with the request, and passes themon to the appropriate Host (virtual host).Documentation at /docs/config/engine.html --><!-- You should set jvmRoute to support load-balancing via AJP ie :<Engine name="Catalina" defaultHost="localhost" jvmRoute="jvm1">--><Engine name="Catalina" defaultHost="localhost"><!--For clustering, please take a look at documentation at:/docs/cluster-howto.html (simple how to)/docs/config/cluster.html (reference documentation) --><!--<Cluster className="org.apache.catalina.ha.tcp.SimpleTcpCluster"/>--><!-- Use the LockOutRealm to prevent attempts to guess user passwordsvia a brute-force attack --><Realm className="org.apache.catalina.realm.LockOutRealm"><!-- This Realm uses the UserDatabase configured in the global JNDIresources under the key "UserDatabase". Any editsthat are performed against this UserDatabase are immediatelyavailable for use by the Realm. --><Realm className="org.apache.catalina.realm.UserDatabaseRealm"resourceName="UserDatabase"/></Realm><Host name="www.jx1.com" appBase="webapps/jx1"unpackWARs="true" autoDeploy="true"><!-- SingleSignOn valve, share authentication between web applicationsDocumentation at: /docs/config/valve.html --><!--<Valve className="org.apache.catalina.authenticator.SingleSignOn" />--><!-- Access log processes all example.Documentation at: /docs/config/valve.htmlNote: The pattern used is equivalent to using pattern="common" --><Valve className="org.apache.catalina.valves.AccessLogValve" directory="logs"prefix="jx1_access_log" suffix=".txt"pattern="%h %l %u %t "%r" %s %b" /></Host><Host name="www.jx2.com" appBase="webapps/jx2"unpackWARs="true" autoDeploy="true"><!-- SingleSignOn valve, share authentication between web applicationsDocumentation at: /docs/config/valve.html --><!--<Valve className="org.apache.catalina.authenticator.SingleSignOn" />--><!-- Access log processes all example.Documentation at: /docs/config/valve.htmlNote: The pattern used is equivalent to using pattern="common" --><Valve className="org.apache.catalina.valves.AccessLogValve" directory="logs"prefix="jx2_access_log" suffix=".txt"pattern="%h %l %u %t "%r" %s %b" /></Host></Engine></Service><Service name="Catalina1"><!--The connectors can use a shared executor, you can define one or more named thread pools--><!--<Executor name="tomcatThreadPool" namePrefix="catalina-exec-"maxThreads="150" minSpareThreads="4"/>--><!-- A "Connector" represents an endpoint by which requests are receivedand responses are returned. Documentation at :Java HTTP Connector: /docs/config/http.htmlJava AJP Connector: /docs/config/ajp.htmlAPR (HTTP/AJP) Connector: /docs/apr.htmlDefine a non-SSL/TLS HTTP/1.1 Connector on port 8080--><Connector port="8081" protocol="HTTP/1.1"connectionTimeout="20000"redirectPort="8444" /><!-- A "Connector" using the shared thread pool--><!--<Connector executor="tomcatThreadPool"port="8080" protocol="HTTP/1.1"connectionTimeout="20000"redirectPort="8443" />--><!-- Define a SSL/TLS HTTP/1.1 Connector on port 8443This connector uses the NIO implementation. The defaultSSLImplementation will depend on the presence of the APR/nativelibrary and the useOpenSSL attribute of theAprLifecycleListener.Either JSSE or OpenSSL style configuration may be used regardless ofthe SSLImplementation selected. JSSE style configuration is used below.--><!--<Connector port="8443" protocol="org.apache.coyote.http11.Http11NioProtocol"maxThreads="150" SSLEnabled="true"><SSLHostConfig><Certificate certificateKeystoreFile="conf/localhost-rsa.jks"type="RSA" /></SSLHostConfig></Connector>--><!-- Define a SSL/TLS HTTP/1.1 Connector on port 8443 with HTTP/2This connector uses the APR/native implementation which always usesOpenSSL for TLS.Either JSSE or OpenSSL style configuration may be used. OpenSSL styleconfiguration is used below.--><!--<Connector port="8443" protocol="org.apache.coyote.http11.Http11AprProtocol"maxThreads="150" SSLEnabled="true" ><UpgradeProtocol className="org.apache.coyote.http2.Http2Protocol" /><SSLHostConfig><Certificate certificateKeyFile="conf/localhost-rsa-key.pem"certificateFile="conf/localhost-rsa-cert.pem"certificateChainFile="conf/localhost-rsa-chain.pem"type="RSA" /></SSLHostConfig></Connector>--><!-- Define an AJP 1.3 Connector on port 8009 --><Connector port="8010" protocol="AJP/1.3" redirectPort="8443" /><!-- An Engine represents the entry point (within Catalina) that processesevery request. The Engine implementation for Tomcat stand aloneanalyzes the HTTP headers included with the request, and passes themon to the appropriate Host (virtual host).Documentation at /docs/config/engine.html --><!-- You should set jvmRoute to support load-balancing via AJP ie :<Engine name="Catalina" defaultHost="localhost" jvmRoute="jvm1">--><Engine name="Catalina1" defaultHost="localhost"><!--For clustering, please take a look at documentation at:/docs/cluster-howto.html (simple how to)/docs/config/cluster.html (reference documentation) --><!--<Cluster className="org.apache.catalina.ha.tcp.SimpleTcpCluster"/>--><!-- Use the LockOutRealm to prevent attempts to guess user passwordsvia a brute-force attack --><Realm className="org.apache.catalina.realm.LockOutRealm"><!-- This Realm uses the UserDatabase configured in the global JNDIresources under the key "UserDatabase". Any editsthat are performed against this UserDatabase are immediatelyavailable for use by the Realm. --><Realm className="org.apache.catalina.realm.UserDatabaseRealm"resourceName="UserDatabase"/></Realm><Host name="www.jx3.com" appBase="webapps/jx3"unpackWARs="true" autoDeploy="true"><!-- SingleSignOn valve, share authentication between web applicationsDocumentation at: /docs/config/valve.html --><!--<Valve className="org.apache.catalina.authenticator.SingleSignOn" />--><!-- Access log processes all example.Documentation at: /docs/config/valve.htmlNote: The pattern used is equivalent to using pattern="common" --><Valve className="org.apache.catalina.valves.AccessLogValve" directory="logs"prefix="jx3_access_log" suffix=".txt"pattern="%h %l %u %t "%r" %s %b" /></Host><Host name="www.jx4.com" appBase="webapps/jx4"unpackWARs="true" autoDeploy="true"><!-- SingleSignOn valve, share authentication between web applicationsDocumentation at: /docs/config/valve.html --><!--<Valve className="org.apache.catalina.authenticator.SingleSignOn" />--><!-- Access log processes all example.Documentation at: /docs/config/valve.htmlNote: The pattern used is equivalent to using pattern="common" --><Valve className="org.apache.catalina.valves.AccessLogValve" directory="logs"prefix="jx4_access_log" suffix=".txt"pattern="%h %l %u %t "%r" %s %b" /></Host></Engine></Service>
</Server>(1) Server
erver是server.xml的根元素,用于创建一个Server实例,默认使用的实现类是 org.apache.catalina.core.StandardServer。
内嵌的子元素为 Listener、GlobalNamingResources、Service。
port
tomcat 监听的关闭服务器的端口。
shutdown 关闭服务器的指令字符串
(2) Listener
<!‐‐ 用于以日志形式输出服务器 、操作系统、JVM的版本信息 ‐‐>
<Listener className="org.apache.catalina.startup.VersionLoggerListener" />
<!‐‐ 用于加载(服务器启动) 和 销毁 (服务器停止) APR。 如果找不到APR库, 则会输出日志, 并不影响Tomcat启动 ‐‐>
<Listener className="org.apache.catalina.core.AprLifecycleListener" SSLEngine="on" />
<!‐‐ 用于避免JRE内存泄漏问题 ‐‐>
<Listener className="org.apache.catalina.core.JreMemoryLeakPreventionListener" />
<!‐‐ 用户加载(服务器启动) 和 销毁(服务器停止) 全局命名服务 ‐‐>
<Listener className="org.apache.catalina.mbeans.GlobalResourcesLifecycleListener" />
<!‐‐ 用于在Context停止时重建Executor 池中的线程, 以避免ThreadLocal 相关的内存泄漏 ‐‐>
<Listener className="org.apache.catalina.core.ThreadLocalLeakPreventionListener" />
(3) GlobalNamingResources
<GlobalNamingResources>
<!‐‐ 可编辑的用户数据库,UserDatabaseRealm也可以使用该数据库对用户进行身份验证 ‐‐>
<Resource name="UserDatabase"
auth="Container"
type="org.apache.catalina.UserDatabase"
description="User database that can be updated and saved"
factory="org.apache.catalina.users.MemoryUserDatabaseFactory"
pathname="conf/tomcat‐users.xml" />
</GlobalNamingResources>
(4) Service
该元素用于创建 Service 实例,默认使用 org.apache.catalina.core.StandardService。默认情况下,Tomcat 仅指定了Service 的名称, 值为 “Catalina”。Service 可以内嵌的元素为 : Listener、Executor、Connector、Engine,其中 : Listener 用于为Service添加生命周期监听器, Executor 用于配置Service 共享线程池,Connector 用于配置Service 包含的链接器, Engine 用于配置Service中链接器对应的Servlet 容器引擎。一个Server服务器,可以包含多个Service服务。
01.Connector
executor:指定共享线程池的名称, 也可以通过maxThreads、minSpareThreads 等属性配置内部线程池。
URIEncoding:用于指定编码URI的字符编码, Tomcat8.x版本默认的编码为UTF-8 , Tomcat7.x版本默认为ISO-8859-1。
maxThreads:池中最大线程数。
minSpareThreads:活跃线程数,也就是核心池线程数,这些线程不会被销毁,会一直存在。
acceptCount:接收的连接数。
maxConnections:接收的最大连接数。
compression:是否压缩。
compressionMinSize:压缩的大小。
disableUploadTimeout:禁用上传超时。
(1) port
端口号,Connector 用于创建服务端Socket 并进行监听, 以等待客户端请求链接。如果该属性设置为0,Tomcat将会随机选择一个可用的端口号给当前Connector使用。
(2) protocol
当前Connector 支持的访问协议。 默认为 HTTP/1.1,并采用自动切换机制选择一个基于 JAVA NIO 的链接器或者基于本地APR的链接器(根据本地是否含有Tomcat的本地库判定)
(3)connectionTimeout
Connector接收连接后的等待超时时间, 单位为毫秒。 -1 表示不超时。
(4)redirectPort
当前Connector 不支持SSL请求, 接收到了一个请求, 并且也符合 security-constraint 约束, 需要SSL传输,Catalina自动将请求重定向到指定的端口。
02.Engine
(1)name
用于指定Engine的名称, 默认为Catalina 。该名称会影响一部分Tomcat的存储路径(如临时文件)。
(2)defaultHost
默认使用的虚拟主机名称, 当客户端请求指向的主机无效时, 将交由默认的虚拟主机处理, 默认为localhost。
(3) Host
Host 元素用于配置一个虚拟主机, 它支持以下嵌入元素:Alias、Cluster、Listener、Valve、Realm、Context。
<Host name="www.web1.com" appBase="webapps" unpackWARs="true" autoDeploy="true">
<Alias>www.web2.com</Alias>
</Host>
01. name
Host 元素用于配置一个虚拟主机, 它支持以下嵌入元素:Alias、Cluster、Listener、Valve、Realm、Context。
<Host name="www.web1.com" appBase="webapps" unpackWARs="true" autoDeploy="true">
<Alias>www.web2.com</Alias>
</Host>
02. appBase
当前Host的应用基础目录,当前Host上部署的Web应用均在该目录下(可以是绝对目录,相对路径),默认为webapps
03.unpackWARs
设置为true,Host在启动时会将appBase目录下war包解压为目录。设置为false, Host将直接从war文件启动。
04.autoDeploy
控制tomcat是否在运行时定期检测并自动部署新增或变更的web应用。
(5) Context
1.docBase
Web应用目录或者War包的部署路径。可以是绝对路径,也可以是相对于Host appBase的相对路径。
2. path
Web应用的Context 路径。如果我们Host名为localhost, 则该web应用访问的根路径为: http://localhost:8080/myApp。
2. tomcat-users.xml
主要配置的是Tomcat的用户,角色等信息,用来控制Tomcat中 host-manager、manager的访问权限。
3. web.xml
web.xml 是web应用的描述文件, 它支持的元素及属性来自于Servlet 规范定义 。 在Tomcat 中, Web 应用的描述信息包括 tomcat/conf/web.xml 中默认配置以及 Web应用 WEB-INF/web.xml 下的定制配置。
六、多tomcat服务部署
1. 部署
tar xf apache-tomcat-8.5.16.tar.gz
mv apache-tomcat-8.5.16 /usr/local/tomcat1

2. 命令优化
ln -s /usr/local/tomcat1/bin/startup.sh /usr/local/bin/tmstart
ln -s /usr/local/tomcat1/bin/shutdown.sh /usr/local/bin/tmstop
3. 端口号修改
server
port
connector
port
redirectport


4.修改访问页面
vim /usr/local/tomcat/webapps/ROOT/index.jsp
<%
out.println("tomcat");
%>


测试

七、虚拟主机
1. 基于不同的域名
复制Host字段
<Host></Host>
修改不同Host的name属性,改为不同的域名
修改webapps指定为不同的访问路径
修改日志名称
创建访问目录及首页
mkdir /usr/local/tomcat1/jx1/ROOT -p
vim index.jsp
<Host name="www.jx1.com" appBase="jx1"unpackWARs="true" autoDeploy="true"><Valve className="org.apache.catalina.valves.AccessLogValve" directory="logs"prefix="jx1_access_log" suffix=".txt"pattern="%h %l %u %t "%r" %s %b" />
</Host><Host name="www.jx2.com" appBase="jx2"unpackWARs="true" autoDeploy="true"><Valve className="org.apache.catalina.valves.AccessLogValve" directory="logs"prefix="jx2_access_log" suffix=".txt"pattern="%h %l %u %t "%r" %s %b" />
</Host>


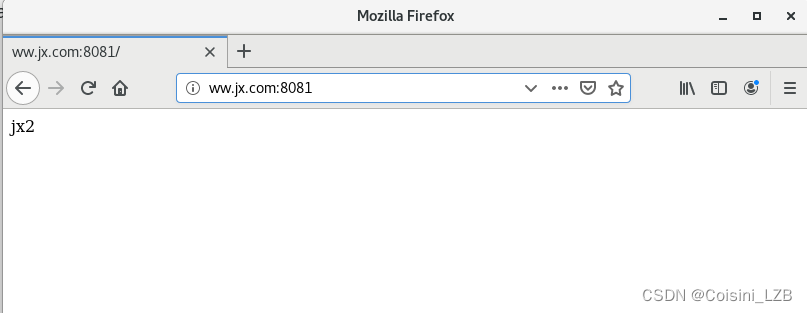
测试

2. 基于不同的端口
<Service name="Catalina1"><Connector port="8082" protocol="HTTP/1.1"connectionTimeout="20000"redirectPort="8445" /><Connector port="8011" protocol="AJP/1.3" redirectPort="8445" /><Engine name="Catalina1" defaultHost="localhost1"><Realm className="org.apache.catalina.realm.LockOutRealm"><Realm className="org.apache.catalina.realm.UserDatabaseRealm"resourceName="UserDatabase"/></Realm><Host name="localhost1" appBase="webapps1"unpackWARs="true" autoDeploy="true"><Valve className="org.apache.catalina.valves.AccessLogValve" directory="logs"prefix="localhost1_access_log" suffix=".txt"pattern="%h %l %u %t "%r" %s %b" /></Host></Engine></Service>
复制Service字段
<Service></Service>
修改Service的name属性
修改Engine的name属性
修改Host的name及appbase属性
修改日志名称
端口号修改
service
port
connector
port
redirectport
在webapps1中创建ROOT目录并写入首页
mkdir /usr/local/tomcat/webapps1/ROOT
vim index.jsp
总结
以上就是今天要讲的内容,有点的,而且全部是动手操作的东西,所以,一起动手操作起来。


