简述:
Master-Master Replication Manager for MySQL(MMRM)是一种用于MySQL数据库的主-主复制管理工具。它允许在多个MySQL主机之间建立双向的主-主复制关系,实现数据的同步和高可用性。
工作原理是通过在每个MySQL主机上配置双向复制,使得每个主机都可以同时作为主服务器和从服务器。当一个主机上的数据发生变化时,它会将这些变化同步到其他主机上,从而实现数据的同步。
MMRM提供了一套简单而强大的命令行工具和API,用于管理和监控复制关系。它可以自动检测和修复复制中的错误,并提供了故障转移和自动切换的功能,以确保系统的高可用性。 对于MMRM的部署,通常需要至少两台主机来实现主-主复制。每台主机都需要安装MySQL数据库,并配置为主服务器和从服务器。可以根据实际需求,增加更多的主机来实现更高的可用性和负载均衡。
总之,MMRM是一个可靠的工具,可以帮助管理和维护MySQL数据库的主-主复制关系,提供数据同步和高可用性的解决方案。
环境五台主机
关闭防火墙和规则
[root@ddd1 ~]# systemctl stop firewalld
[root@ddd1 ~]# setenforce 0
[root@ddd1 ~]# iptables -F
最后一台先忽略
前四台操作
1 2 3 4安装数据库 yum -y install mariadb mariadb-server
修改数据库配置文件
ddd1和ddd2 前两台为主 只需要更改1 2 1是主 2是备主
[root@ddd1 ~]# vim /etc/my.cnf[mysqld]log-bin=mysql-bin
log-slave-updates=true
server-id=1     #另一台master设置为2
relay-log=relay-log-bin
relay-log-index=relay-log-bin.index
ddd3和ddd4 后两台为从 只需要更改3 4
[root@ddd3 ~]# vim /etc/my.cnf[mysqld]server-id=3     #另一台slave设置为4
relay-log=relay-log-bin
relay-log-index=relay-log-bin.index
选择ddd1和ddd2做互为主从
查看日志 show master status
互相授权用户 ddd1授权ddd2 grant replication slave on *.* to 'replication'@'192.168.1.117' identified by '123456';
ddd2授权ddd1 grant replication slave on *.* to 'replication'@'192.168.1.117' identified by '123456';
共同关闭从 stop slave;
指定主服务信息
ddd1 操作 CHANGE MASTER TO MASTER_HOST='192.168.1.117', MASTER_USER='replication', MASTER_PASSWORD='123456', MASTER_LOG_FILE='mysql-bin.000003', MASTER_LOG_POS=245;
ddd2操作 CHANGE MASTER TO MASTER_HOST='192.168.1.129', MASTER_USER='replication', MASTER_PASSWORD='123456', MASTER_LOG_FILE='mysql-bin.000003', MASTER_LOG_POS=245;
共同开启从 start slave;
共同查看状态 show slave status\G
看到两个yes就是成功
[root@ddd2 ~]# systemctl stop firewalld
[root@ddd2 ~]#  setenforce 0
[root@ddd2 ~]# iptables -F
[root@ddd2 ~]# vim /etc/my.cnf
[root@ddd2 ~]# systemctl restart mariadb
[root@ddd2 ~]# mysql
Welcome to the MariaDB monitor.  Commands end with ; or \g.
Your MariaDB connection id is 2
Server version: 5.5.68-MariaDB MariaDB ServerCopyright (c) 2000, 2018, Oracle, MariaDB Corporation Ab and others.Type 'help;' or '\h' for help. Type '\c' to clear the current input statement.MariaDB [(none)]>  show master status;
+------------------+----------+--------------+------------------+
| File             | Position | Binlog_Do_DB | Binlog_Ignore_DB |
+------------------+----------+--------------+------------------+
| mysql-bin.000003 |      245 |              |                  |
+------------------+----------+--------------+------------------+
1 row in set (0.00 sec)MariaDB [(none)]>  grant replication slave on *.* to 'replication'@'192.168.1.129' identified by '123456';
Query OK, 0 rows affected (0.00 sec)MariaDB [(none)]> stop slave;
Query OK, 0 rows affected, 1 warning (0.00 sec)MariaDB [(none)]> CHANGE MASTER TO  MASTER_HOST='192.168.1.129', MASTER_USER='replication',  MASTER_PASSWORD='123456', MASTER_LOG_FILE='mysql-bin.000003',  MASTER_LOG_POS=245;
Query OK, 0 rows affected (0.01 sec)MariaDB [(none)]>  START SLAVE;
Query OK, 0 rows affected (0.01 sec)MariaDB [(none)]> show slave status\G
*************************** 1. row ***************************Slave_IO_State: Waiting for master to send eventMaster_Host: 192.168.1.129Master_User: replicationMaster_Port: 3306Connect_Retry: 60Master_Log_File: mysql-bin.000003Read_Master_Log_Pos: 567Relay_Log_File: relay-log-bin.000002Relay_Log_Pos: 690Relay_Master_Log_File: mysql-bin.000003Slave_IO_Running: YesSlave_SQL_Running: YesReplicate_Do_DB:
把其他两个从ddd3和4设置为主ddd1的从
主操作 给它们两个权限就行了
MariaDB [(none)]> grant replication slave on *.* to 'replication'@'192.168.1.15' identified by '123456';
Query OK, 0 rows affected (0.00 sec)MariaDB [(none)]> grant replication slave on *.* to 'replication'@'192.168.1.126' identified by '123456';
Query OK, 0 rows affected (0.00 sec)
两个从操作 添加主库信息 开启从服务 查看两个yes
MariaDB [(none)]> CHANGE MASTER TO  MASTER_HOST='192.168.1.129', MASTER_USER='replication',  MASTER_PASSWORD='123456', MASTER_LOG_FILE='mysql-bin.000003',  MASTER_LOG_POS=245;
添加主信息
Query OK, 0 rows affected (0.00 sec)MariaDB [(none)]> START SLAVE;       开启从
Query OK, 0 rows affected (0.01 sec)MariaDB [(none)]> show slave status\G       查看
*************************** 1. row ***************************Slave_IO_State: Waiting for master to send eventMaster_Host: 192.168.1.129Master_User: replicationMaster_Port: 3306Connect_Retry: 60Master_Log_File: mysql-bin.000003Read_Master_Log_Pos: 727Relay_Log_File: relay-log-bin.000002Relay_Log_Pos: 1011Relay_Master_Log_File: mysql-bin.000003Slave_IO_Running: YesSlave_SQL_Running: Yes
1到4主机安装 yum -y install mysql-mmm*
安装MySQL Multi-Master Replication Manager (MMM)软件包。MMM是一个用于管理MySQL数据库的高可用性和复制的工具。
所有主机修改配置文件 示例 一个搞定直接可以scp到其他机上
[root@ddd1 ~]#  vim /etc/mysql-mmm/mmm_common.confactive_master_role      writer<host default>cluster_interface       ens33     网卡pid_path                /run/mysql-mmm-agent.pidbin_path                /usr/libexec/mysql-mmm/replication_user        replication     复制用户replication_password    123456          复制用户密码agent_user              mmm_agent       管理用户agent_password          123456          管理用户密码
</host><host db1>  主ip      192.168.1.129    IPmode    master           角色peer    db2              监控谁  db2
</host><host db2>  主ip      192.168.1.117    IPmode    master           角色peer    db1              监控谁  db1
</host><host db3>  从ip      192.168.1.15     IPmode    slave
</host><host db4>  从ip      192.168.1.126    IPmode    slave
</host><role writer> 写入的hosts   db1, db2ips     192.168.1.148    VIP  可以在指主时使用mode    exclusive        独断IP
</role><role reader>hosts   db3, db4ips     192.168.1.128, 192.168.1.122  可以时rip也可以时vip   vip的话用在amoeba,更加安全,在次实验中无作用mode    balanced         方式
</role>
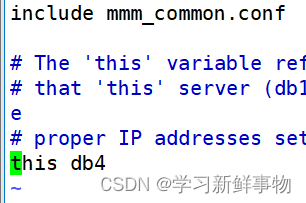
所有服务器修改角色 和配置文件里对应上 vim /etc/mysql-mmm/mmm_agent.conf
上面什么端口对db几 比如192.168.1.126对应this db4
配置监控机
到了第五台机发挥的时候了安装 yum -y install mysql-mmm*
打开
修改监控主机配置文件
vim /etc/mysql-mmm/mmm_mon.conf
ping_ips后面跟上所有服务器的真实ip
<host default>
monitor_user mmm_agent 授权账户和密码 管理用户
monitor_password 123456 密码
</host>
[root@localhost ~]# vim /etc/mysql-mmm/mmm_mon.conf include mmm_common.conf<monitor>ip                  127.0.0.1pid_path            /run/mysql-mmm-monitor.pidbin_path            /usr/libexec/mysql-mmmstatus_path         /var/lib/mysql-mmm/mmm_mond.statusping_ips            192.168.1.129,192.168.1.117,192.168.1.15,192.168.1.126auto_set_online     60# The kill_host_bin does not exist by default, though the monitor will# throw a warning about it missing.  See the section 5.10 "Kill Host# Functionality" in the PDF documentation.## kill_host_bin     /usr/libexec/mysql-mmm/monitor/kill_host#
</monitor><host default>monitor_user        mmm_agent   monitor_password    123456
</host>debug 0
所有数据库启动mysql agent代理服务 systemctl start mysql-mmm-agent
第五台机 启动监控
[root@localhost ~]#  systemctl start mysql-mmm-agent
[root@localhost ~]# systemctl start mysql-mmm-monitor
查看状态 需要等一会 反应慢
[root@localhost ~]# mmm_control showdb1(192.168.1.129) master/ONLINE. Roles: writer(192.168.1.148)db2(192.168.1.117) master/ONLINE. Roles: db3(192.168.1.15) slave/ONLINE. Roles: reader(192.168.1.128)db4(192.168.1.126) slave/ONLINE. Roles: reader(192.168.1.122)
查看监控状态 mmm_control checks all
[root@localhost ~]# mmm_control checks all
db4  ping         [last change: 2023/06/30 20:39:41]  OK
db4  mysql        [last change: 2023/06/30 20:39:41]  OK
db4  rep_threads  [last change: 2023/06/30 20:39:41]  OK
db4  rep_backlog  [last change: 2023/06/30 20:39:41]  OK: Backlog is null
db2  ping         [last change: 2023/06/30 20:39:41]  OK
db2  mysql        [last change: 2023/06/30 20:39:41]  OK
db2  rep_threads  [last change: 2023/06/30 20:39:41]  OK
db2  rep_backlog  [last change: 2023/06/30 20:39:41]  OK: Backlog is null
db3  ping         [last change: 2023/06/30 20:39:41]  OK
db3  mysql        [last change: 2023/06/30 20:39:41]  OK
db3  rep_threads  [last change: 2023/06/30 20:39:41]  OK
db3  rep_backlog  [last change: 2023/06/30 20:39:41]  OK: Backlog is null
db1  ping         [last change: 2023/06/30 20:39:41]  OK
db1  mysql        [last change: 2023/06/30 20:39:41]  OK
db1  rep_threads  [last change: 2023/06/30 20:39:41]  OK
db1  rep_backlog  [last change: 2023/06/30 20:39:41]  OK: Backlog is null
实验停止第一个主服务器
[root@ddd1~]# systemctl stop mariadb
查看监控状态 也就是第五台查看 自动转换到备主了
[root@localhost ~]# mmm_control showdb1(192.168.1.129) master/HARD_OFFLINE. Roles: db2(192.168.1.117) master/ONLINE. Roles: writer(192.168.1.148)db3(192.168.1.15) slave/ONLINE. Roles: reader(192.168.1.128)db4(192.168.1.126) slave/ONLINE. Roles: reader(192.168.1.122)
备主创建数据
MariaDB [(none)]> create database dfssd;
Query OK, 1 row affected (0.01 sec)MariaDB [(none)]> show databases;
+--------------------+
| Database           |
+--------------------+
| information_schema |
| dfssd              |
| mysql              |
| performance_schema |
| test               |
+--------------------+
从查看 不会同步的
MariaDB [(none)]> show databases;
+--------------------+
| Database           |
+--------------------+
| information_schema |
| mysql              |
| performance_schema |
| test               |
+--------------------+
4 rows in set (0.00 sec)
开启原来主库
[root@ddd1 ~]# systemctl restart mariadb
查看 直接同步过来了
[root@ddd1 ~]# mysql
Welcome to the MariaDB monitor. Commands end with ; or \g.
Your MariaDB connection id is 7
Server version: 5.5.68-MariaDB MariaDB ServerCopyright (c) 2000, 2018, Oracle, MariaDB Corporation Ab and others.
Type 'help;' or '\h' for help. Type '\c' to clear the current input statement.
MariaDB [(none)]> show databases;
+--------------------+
| Database |
+--------------------+
| information_schema |
| dfssd |
| mysql |
| performance_schema |
| test |
+--------------------+
但是现在主不会切换 只有现在备主 宕机才会切换回去
[root@ddd2~]# systemctl stop mysql
查看
[root@localhost ~]# mmm_control show
db1(192.168.1.129) master/ONLINE. Roles: writer(192.168.1.199)
db2(192.168.1.139) master/ONLINE. Roles:
db3(192.168.1.126) slave/ONLINE. Roles: reader(192.168.1.25)
db4(192.168.1.117) slave/ONLINE. Roles: reader(192.168.1.232)
再见朋友