02、Tensorflow实现手写数字识别(数字0-9)
开始学习机器学习啦,已经把吴恩达的课全部刷完了,现在开始熟悉一下复现代码。对这个手写数字实部比较感兴趣,作为入门的素材非常合适。
基于Tensorflow 2.10.0与pycharm
1、识别目标
识别手写仅仅是为了区分手写的0到9,所以实际上是一个多分类问题。
STEP1:导入相关包
import numpy as np
import tensorflow as tf
from keras.models import Sequential
from keras.layers import Dense
from sklearn.model_selection import train_test_split
from sklearn.metrics import  classification_report
import matplotlib.pyplot as plt
import logging
import warnings
import numpy as np:这是引入numpy库,并为其设置一个缩写np。Numpy是Python中用于大规模数值计算的库,它提供了多维数组对象及一系列操作这些数组的函数。
import tensorflow as tf:这是引入tensorflow库,并为其设置一个缩写tf。TensorFlow是一个开源的深度学习框架,它被广泛用于各种深度学习应用。
from keras.models import Sequential:这是从Keras库中引入Sequential模型。Keras是一个高级神经网络API,它可以运行在TensorFlow之上。Sequential模型是Keras中的线性堆栈模型,允许你简单地堆叠多个网络层。
from keras.layers import Dense:这是从Keras库中引入Dense层。Dense层是神经网络中的全连接层,每个输入节点与输出节点都是连接的。
from sklearn.model_selection import train_test_split:这是从scikit-learn库中引入train_test_split函数。这个函数用于将数据分割为训练集和测试集。
from sklearn.metrics import classification_report 这行代码的主要作用是导入classification_report 函数,以便在后续的代码中使用它来评估分类模型的性能。
import matplotlib.pyplot as plt:这是引入matplotlib的pyplot模块,并为其设置一个缩写plt。Matplotlib是Python中的绘图库,而pyplot是其中的一个模块,用于绘制各种图形和图像。
import warnings:这是引入Python的标准警告库,它可以用来发出警告,或者过滤掉不需要的警告。
import logging:这是引入Python的标准日志库,用于记录日志信息,方便追踪和调试代码。
STEP2:屏蔽无用警告并允许中文
# 使用warnings模块来忽略特定类型的警告
warnings.simplefilter(action='ignore', category=FutureWarning)
# 配置tensorflow的日志记录级别
logging.getLogger("tensorflow").setLevel(logging.ERROR)
# 设置TensorFlow的autograph模块的详细级别
tf.autograph.set_verbosity(0)
# 设置numpy的打印选项
np.set_printoptions(precision=2)
STEP3:加载数据集并分割测试集
# load dataset
def load_data():X = np.load("Handwritten_Digit_Recognition_Multiclass_data/X.npy")y = np.load("Handwritten_Digit_Recognition_Multiclass_data/y.npy")return X, y# load dataset
X, y = load_data()print ('The shape of X is: ' + str(X.shape))
print ('The shape of y is: ' + str(y.shape))
X_train, X_test, y_train, y_test = train_test_split(X, y, test_size=0.1, random_state=42)
原始的输入的数据集是5000* 400数组,共包含5000个手写数字的数据,其中400为20*20像素的图片,

STEP4:模型构建与训练
# 构建模型
tf.random.set_seed(1234)  # 设置随机种子以确保每次运行的结果是一致的
model = Sequential([### START CODE HERE ###  tf.keras.Input(shape=(400,)),  # 输入层,输入数据的形状是400维   Dense(100, activation='relu', name="L1"),  # 全连接层,100个神经元,使用ReLU激活函数,命名为"L1"  Dense(75, activation='relu', name="L2"),  # 全连接层,75个神经元,使用ReLU激活函数,命名为"L2"  Dense(10, activation='linear', name="L3"),  # 输出层,10个神经元,使用线性激活函数,命名为"L3"  ### END CODE HERE ###  ], name="my_model"
)  # 定义模型名称为"my_model"
model.summary()  # 打印模型的概述信息  # 配置模型的训练参数
model.compile(loss=tf.keras.losses.SparseCategoricalCrossentropy(from_logits=True),# 使用稀疏分类交叉熵作为损失函数,且输出是logits(即未经过softmax的原始输出)  optimizer=tf.keras.optimizers.Adam(learning_rate=0.001),  # 使用Adam优化器,并设置学习率为0.001
)# 训练模型
history = model.fit(X_train, y_train,  # 使用X_train作为输入数据,y_train作为目标数据  epochs=100  # 训练100轮
)
STEP5:结果可视化与打印准确度信息
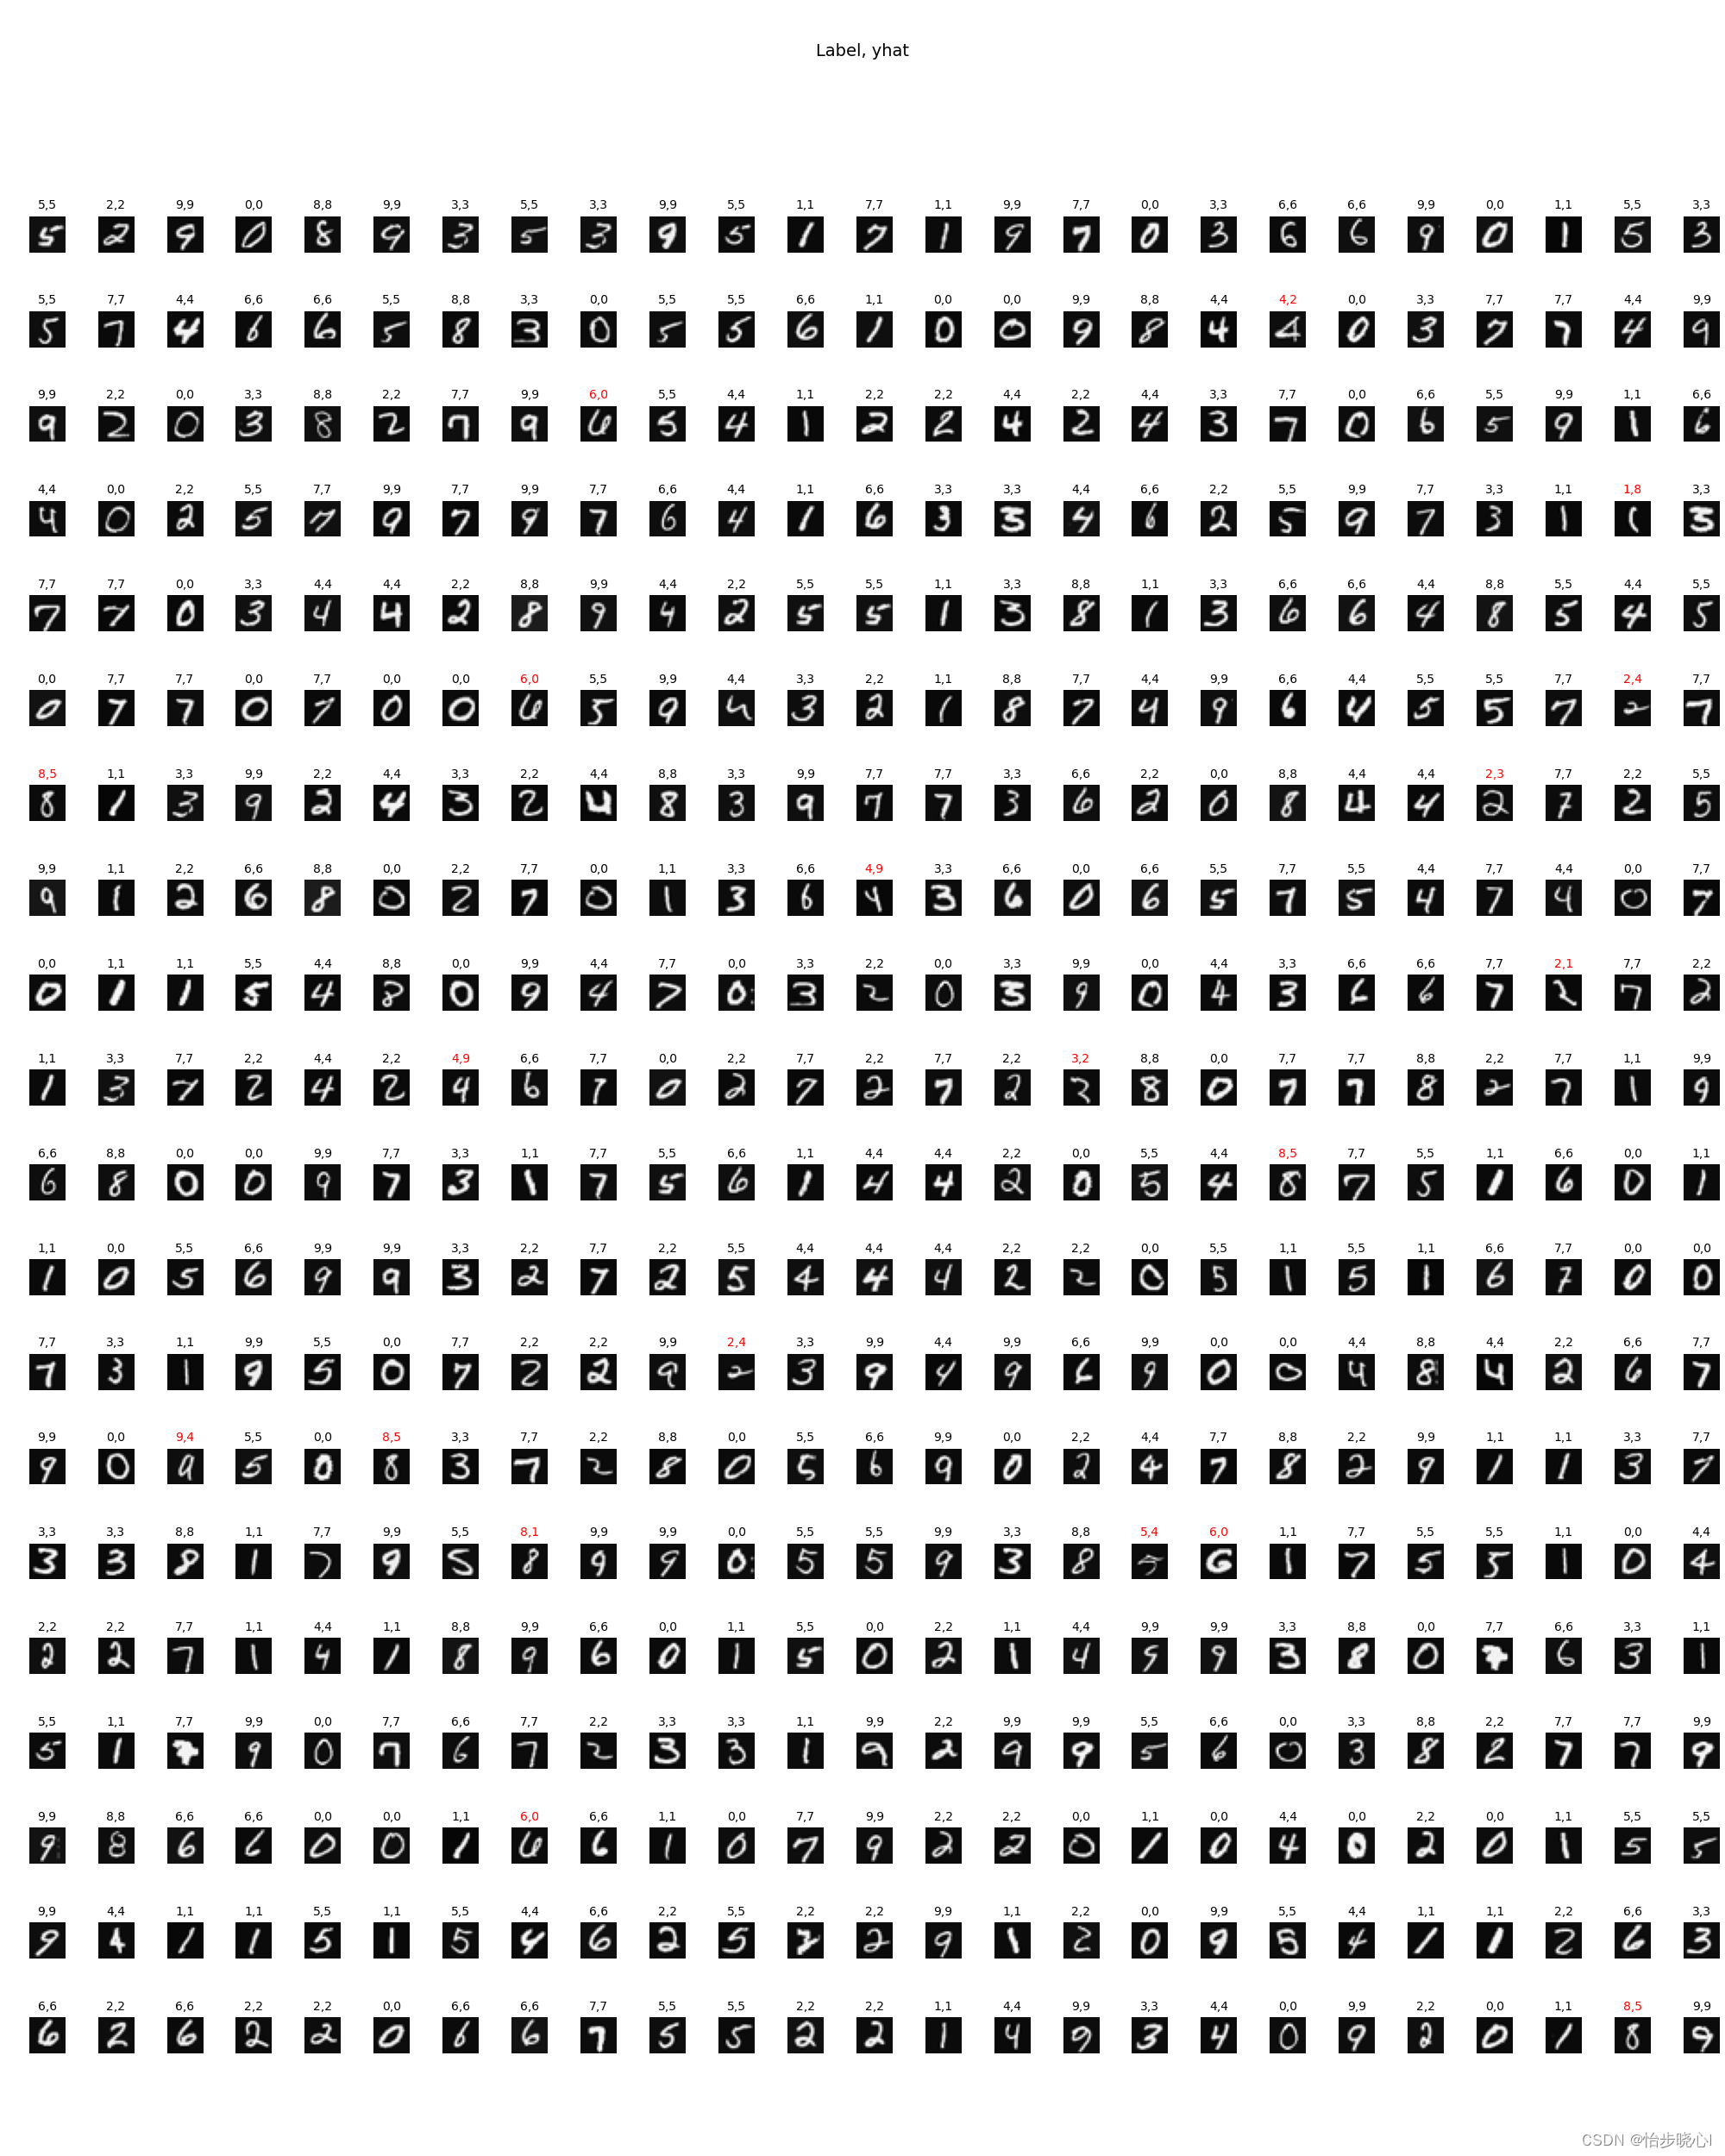
fig, axes = plt.subplots(20, 25, figsize=(20, 25))
fig.tight_layout(pad=0.13, rect=[0, 0.03, 1, 0.91])  # [left, bottom, right, top]
for i, ax in enumerate(axes.flat):# Select random indicesrandom_index = np.random.randint(X_test.shape[0])# Select rows corresponding to the random indices and# reshape the imageX_random_reshaped = X_test[random_index].reshape((20, 20)).T# Display the imageax.imshow(X_random_reshaped, cmap='gray')# Predict using the Neural Networkprediction = model.predict(X_test[random_index].reshape(1, 400))prediction_p = tf.nn.softmax(prediction)yhat = np.argmax(prediction_p)# 错误结果标红if y_test[random_index, 0] == yhat:ax.set_title(f"{y_test[random_index, 0]},{yhat}", fontsize=10)ax.set_axis_off()else:ax.set_title(f"{y_test[random_index, 0]},{yhat}", fontsize=10, color='red')ax.set_axis_off()fig.suptitle("Label, yhat", fontsize=14)
plt.show()# 给出预测的测试集误差
def evaluation(y_test, y_predict):accuracy=classification_report(y_test, y_predict,output_dict=True)['accuracy']s=classification_report(y_test, y_predict,output_dict=True)['weighted avg']precision=s['precision']recall=s['recall']f1_score=s['f1-score']#kappa=cohen_kappa_score(y_test, y_predict)return accuracy,precision,recall,f1_score #, kappay_pred=model.predict(X_test)
prediction_p = tf.nn.softmax(y_pred)
yhat = np.argmax(prediction_p, axis=1)
accuracy,precision,recall,f1_score=evaluation(y_test,yhat)print("测试数据集准确率为:", accuracy)
print("测试数据集精确率为:", precision)
print("测试数据集召回率为:", recall)
print("测试数据集F1_score为:", f1_score)
3、运行结果
4、工程下载与全部代码
工程链接:Tensorflow实现手写数字识别(数字0-9)
import numpy as np
import tensorflow as tf
from keras.models import Sequential
from keras.layers import Dense
from sklearn.model_selection import train_test_split
from sklearn.metrics import  classification_report
import matplotlib.pyplot as plt
import logging
import warnings# 使用warnings模块来忽略特定类型的警告
warnings.simplefilter(action='ignore', category=FutureWarning)
# 配置tensorflow的日志记录级别
logging.getLogger("tensorflow").setLevel(logging.ERROR)
# 设置TensorFlow的autograph模块的详细级别
tf.autograph.set_verbosity(0)
# 设置numpy的打印选项
np.set_printoptions(precision=2)# load dataset
def load_data():X = np.load("Handwritten_Digit_Recognition_Multiclass_data/X.npy")y = np.load("Handwritten_Digit_Recognition_Multiclass_data/y.npy")return X, y# load dataset
X, y = load_data()print ('The shape of X is: ' + str(X.shape))
print ('The shape of y is: ' + str(y.shape))
X_train, X_test, y_train, y_test = train_test_split(X, y, test_size=0.1, random_state=42)# # 绘图可选
# m, n = X.shape
# fig, axes = plt.subplots(8, 8, figsize=(5, 5))
# fig.tight_layout(pad=0.13, rect=[0, 0.03, 1, 0.91])  # [left, bottom, right, top]
# # fig.tight_layout(pad=0.5)
# for i, ax in enumerate(axes.flat):
#     # Select random indices
#     random_index = np.random.randint(m)
#     # Select rows corresponding to the random indices and
#     # reshape the image
#     X_random_reshaped = X[random_index].reshape((20, 20)).T
#     # Display the image
#     ax.imshow(X_random_reshaped, cmap='gray')
#     # Display the label above the image
#     ax.set_title(y[random_index, 0])
#     ax.set_axis_off()
#     fig.suptitle("Label, image", fontsize=14)
# plt.show()# 构建模型
tf.random.set_seed(1234)  # 设置随机种子以确保每次运行的结果是一致的
model = Sequential([### START CODE HERE ###tf.keras.Input(shape=(400,)),  # 输入层,输入数据的形状是400维Dense(100, activation='relu', name="L1"),  # 全连接层,100个神经元,使用ReLU激活函数,命名为"L1"Dense(75, activation='relu', name="L2"),  # 全连接层,75个神经元,使用ReLU激活函数,命名为"L2"Dense(10, activation='linear', name="L3"),  # 输出层,10个神经元,使用线性激活函数,命名为"L3"### END CODE HERE ###], name="my_model"
)  # 定义模型名称为"my_model"
model.summary()  # 打印模型的概述信息# 配置模型的训练参数
model.compile(loss=tf.keras.losses.SparseCategoricalCrossentropy(from_logits=True),# 使用稀疏分类交叉熵作为损失函数,且输出是logits(即未经过softmax的原始输出)optimizer=tf.keras.optimizers.Adam(learning_rate=0.001),  # 使用Adam优化器,并设置学习率为0.001
)# 训练模型
history = model.fit(X_train, y_train,  # 使用X_train作为输入数据,y_train作为目标数据epochs=100  # 训练100轮
)fig, axes = plt.subplots(20, 25, figsize=(20, 25))
fig.tight_layout(pad=0.13, rect=[0, 0.03, 1, 0.91])  # [left, bottom, right, top]
for i, ax in enumerate(axes.flat):# Select random indicesrandom_index = np.random.randint(X_test.shape[0])# Select rows corresponding to the random indices and# reshape the imageX_random_reshaped = X_test[random_index].reshape((20, 20)).T# Display the imageax.imshow(X_random_reshaped, cmap='gray')# Predict using the Neural Networkprediction = model.predict(X_test[random_index].reshape(1, 400))prediction_p = tf.nn.softmax(prediction)yhat = np.argmax(prediction_p)# Display the label above the imageif y_test[random_index, 0] == yhat:ax.set_title(f"{y_test[random_index, 0]},{yhat}", fontsize=10)ax.set_axis_off()else:ax.set_title(f"{y_test[random_index, 0]},{yhat}", fontsize=10, color='red')ax.set_axis_off()fig.suptitle("Label, yhat", fontsize=14)
plt.show()# 给出预测的测试集误差
def evaluation(y_test, y_predict):accuracy=classification_report(y_test, y_predict,output_dict=True)['accuracy']s=classification_report(y_test, y_predict,output_dict=True)['weighted avg']precision=s['precision']recall=s['recall']f1_score=s['f1-score']#kappa=cohen_kappa_score(y_test, y_predict)return accuracy,precision,recall,f1_score #, kappay_pred=model.predict(X_test)
prediction_p = tf.nn.softmax(y_pred)
yhat = np.argmax(prediction_p, axis=1)
accuracy,precision,recall,f1_score=evaluation(y_test,yhat)print("测试数据集准确率为:", accuracy)
print("测试数据集精确率为:", precision)
print("测试数据集召回率为:", recall)
print("测试数据集F1_score为:", f1_score)


![[pyqt5]pyqt5设置窗口背景图片后上面所有图片都会变成和背景图片一样](https://img-blog.csdnimg.cn/9f977000e848427cb49ce42f54f66cba.jpeg)