线性布局(Row/Column)
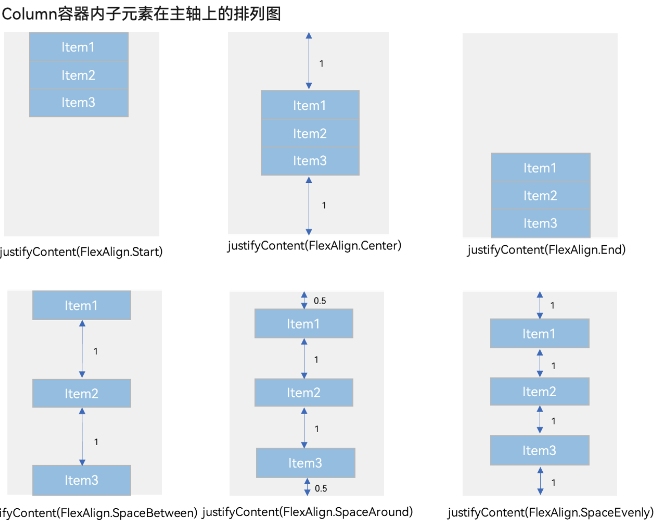
间距/主轴排列方式/交叉轴对齐方式
Column({}) {Column() {}.width('80%').height(50).backgroundColor(0xF5DEB3)Column() {}.width('80%').height(50).backgroundColor(0xD2B48C)Column() {}.width('80%').height(50).backgroundColor(0xF5DEB3)
}
.width('100%').alignItems(HorizontalAlign.End).backgroundColor('rgb(242,242,242)').justifyContent(FlexAlign.Start)
自适应拉伸
Blank,在容器主轴方向自动填充空白空间,达到自适应拉伸效果。
Row() {Text('Bluetooth').fontSize(18)Blank()Toggle({ type: ToggleType.Switch, isOn: true })}.backgroundColor(0xFFFFFF).borderRadius(15).padding({ left: 12 }).width('100%')
自适应缩放
父容器尺寸确定时,可使用layoutWeight属性设置子组件和兄弟元素在主轴上的权重;或者使用百分比设置子组件和兄弟元素的宽度。
layoutWeight属性:
Column() {Text('1:2:3').width('100%')Row() {Column() {Text('layoutWeight(1)').textAlign(TextAlign.Center)}.layoutWeight(1).backgroundColor(0xF5DEB3).height('100%')Column() {Text('layoutWeight(2)').textAlign(TextAlign.Center)}.layoutWeight(2).backgroundColor(0xD2B48C).height('100%')Column() {Text('layoutWeight(3)').textAlign(TextAlign.Center)}.layoutWeight(3).backgroundColor(0xF5DEB3).height('100%')}.backgroundColor(0xffd306).height('30%')}
百分比属性:
Column() {Row() {Column() {Text('left width 20%').textAlign(TextAlign.Center)}.width('20%').backgroundColor(0xF5DEB3).height('100%')Column() {Text('center width 50%').textAlign(TextAlign.Center)}.width('50%').backgroundColor(0xD2B48C).height('100%')Column() {Text('right width 30%').textAlign(TextAlign.Center)}.width('30%').backgroundColor(0xF5DEB3).height('100%')}.backgroundColor(0xffd306).height('30%')}
自适应延伸
在线性布局中,开发者可以进行竖向或者横向的布局。当一屏无法完全显示时,可以在Column或Row组件的外层包裹一个可滚动的容器组件Scroll来实现可滑动的线性布局。
@Entry
@Component
struct ScrollExample {scroller: Scroller = new Scroller();private arr: number[] = [0, 1, 2, 3, 4, 5, 6, 7, 8, 9];build() {Scroll(this.scroller) {Column() {ForEach(this.arr, (item) => {Text(item.toString()).width('90%').height(150).backgroundColor(0xFFFFFF).borderRadius(15).fontSize(16).textAlign(TextAlign.Center).margin({ top: 10 })}, item => item)}.width('100%')}.backgroundColor(0xDCDCDC).scrollable(ScrollDirection.Vertical) // 滚动方向纵向.scrollBar(BarState.On) // 滚动条常驻显示.scrollBarColor(Color.Gray) // 滚动条颜色.scrollBarWidth(10) // 滚动条宽度.edgeEffect(EdgeEffect.Spring) // 滚动到边沿后回弹}
}
层叠布局(Stack)
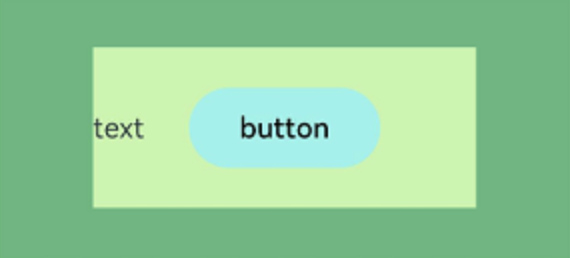
Stack组件为容器组件,其中子组件默认进行居中堆叠。
Column(){Stack({ }) {Column(){}.width('90%').height('100%').backgroundColor('#ff58b87c')Text('text').width('60%').height('60%').backgroundColor('#ffc3f6aa')Button('button').width('30%').height('30%').backgroundColor('#ff8ff3eb').fontColor('#000')}.width('100%').height(150).margin({ top: 50 })
}
对齐方式
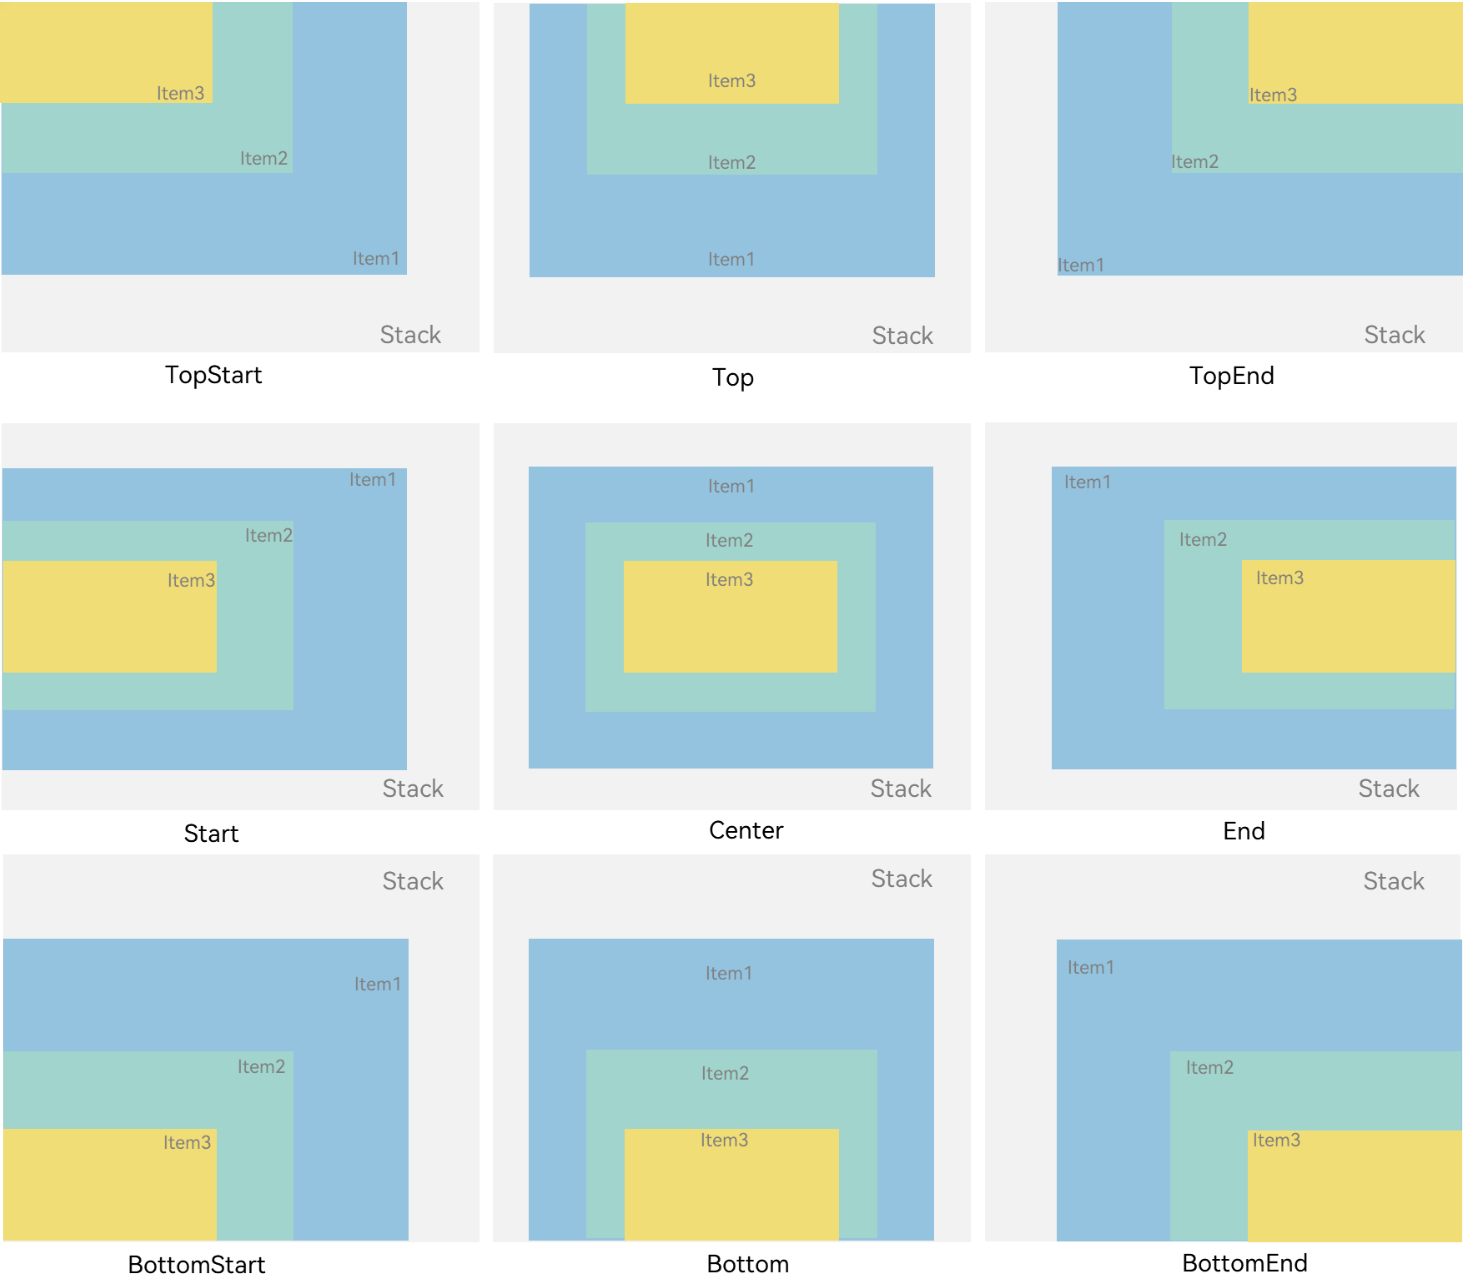
Stack组件通过alignContent参数实现位置的相对移动。如图2所示,支持九种对齐方式。
Z序控制
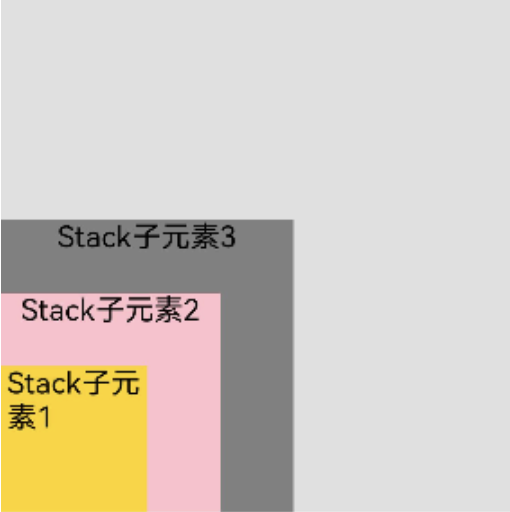
Stack容器中兄弟组件显示层级关系可以通过Z序控制的zIndex属性改变。zIndex值越大,显示层级越高,即zIndex值大的组件会覆盖在zIndex值小的组件上方。
Stack({ alignContent: Alignment.BottomStart }) {Column() {Text('Stack子元素1').fontSize(20)}.width(100).height(100).backgroundColor(0xffd306).zIndex(2)Column() {Text('Stack子元素2').fontSize(20)}.width(150).height(150).backgroundColor(Color.Pink).zIndex(1)Column() {Text('Stack子元素3').fontSize(20)}.width(200).height(200).backgroundColor(Color.Grey)
}.margin({ top: 100 }).width(350).height(350).backgroundColor(0xe0e0e0)
弹性布局(Flex)
布局方向
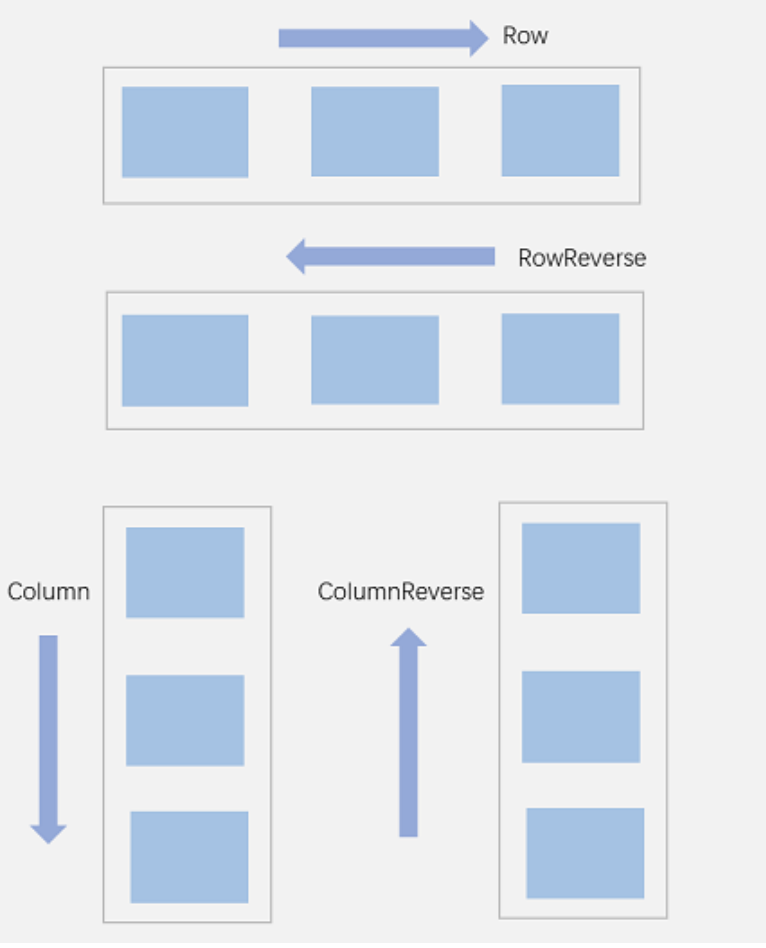
Flex({ direction: FlexDirection.Row }) {Text('1').width('33%').height(50).backgroundColor(0xF5DEB3)Text('2').width('33%').height(50).backgroundColor(0xD2B48C)Text('3').width('33%').height(50).backgroundColor(0xF5DEB3)
}
.height(70)
.width('90%')
.padding(10)
.backgroundColor(0xAFEEEE)

布局换行
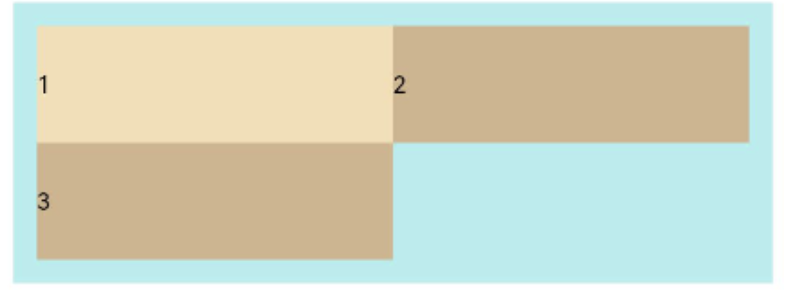
FlexWrap. Wrap:换行,每一行子组件按照主轴方向排列。
FlexWrap. NoWrap(默认值):不换行。如果子组件的宽度总和大于父元素的宽度,则子组件会被压缩宽度。
FlexWrap. WrapReverse:换行,每一行子组件按照主轴反方向排列。
Flex({ wrap: FlexWrap.Wrap }) {Text('1').width('50%').height(50).backgroundColor(0xF5DEB3)Text('2').width('50%').height(50).backgroundColor(0xD2B48C)Text('3').width('50%').height(50).backgroundColor(0xD2B48C)
}
.width('90%')
.padding(10)
.backgroundColor(0xAFEEEE)
主轴对齐方式
通过justifyContent参数设置在主轴方向的对齐方式。
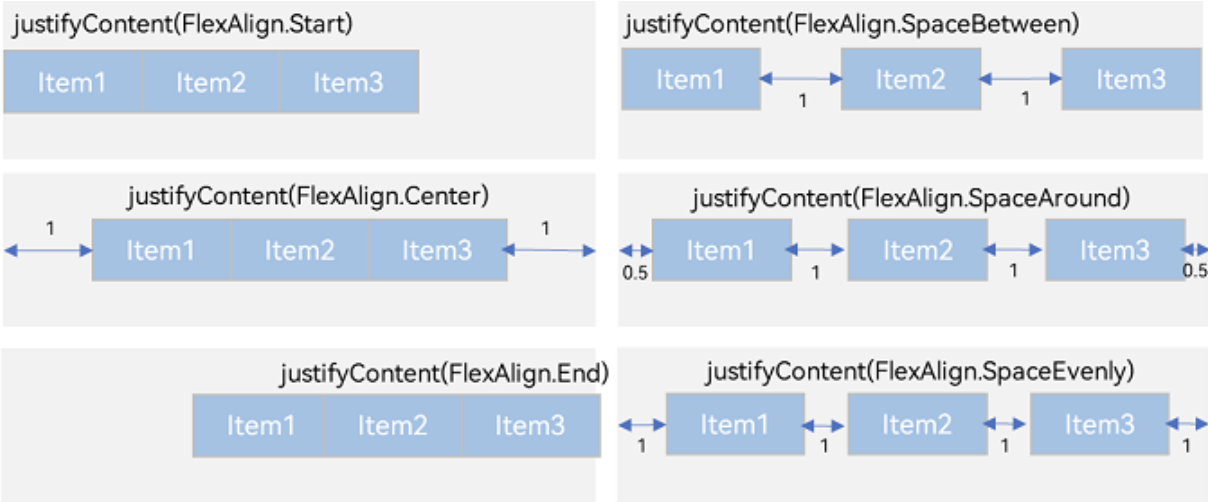
Flex({ justifyContent: FlexAlign.Start }) {  Text('1').width('20%').height(50).backgroundColor(0xF5DEB3)Text('2').width('20%').height(50).backgroundColor(0xD2B48C)    Text('3').width('20%').height(50).backgroundColor(0xF5DEB3)
}
.width('90%')
.padding({ top: 10, bottom: 10 })
.backgroundColor(0xAFEEEE)
交叉轴对齐方式
容器组件设置交叉轴对齐
ItemAlign.Auto:使用Flex容器中默认配置。
ItemAlign.Start:交叉轴方向首部对齐。
ItemAlign.Center:交叉轴方向居中对齐。
ItemAlign.End:交叉轴方向底部对齐。
ItemAlign.Stretch:交叉轴方向拉伸填充,在未设置尺寸时,拉伸到容器尺寸。
ItemAlign. Baseline:交叉轴方向文本基线对齐。
Flex({ alignItems: ItemAlign.Auto }) {  Text('1').width('33%').height(30).backgroundColor(0xF5DEB3)  Text('2').width('33%').height(40).backgroundColor(0xD2B48C)  Text('3').width('33%').height(50).backgroundColor(0xF5DEB3)
}
.size({ width: '90%', height: 80 })
.padding(10)
.backgroundColor(0xAFEEEE)
子组件设置交叉轴对齐
子组件的alignSelf属性也可以设置子组件在父容器交叉轴的对齐格式,且会覆盖Flex布局容器中alignItems配置。如下例所示:
Flex({ direction: FlexDirection.Row, alignItems: ItemAlign.Center }) { // 容器组件设置子组件居中Text('alignSelf Start').width('25%').height(80).alignSelf(ItemAlign.Start).backgroundColor(0xF5DEB3)Text('alignSelf Baseline').alignSelf(ItemAlign.Baseline).width('25%').height(80).backgroundColor(0xD2B48C)Text('alignSelf Baseline').width('25%').height(100).backgroundColor(0xF5DEB3).alignSelf(ItemAlign.Baseline)Text('no alignSelf').width('25%').height(100).backgroundColor(0xD2B48C)Text('no alignSelf').width('25%').height(100).backgroundColor(0xF5DEB3)}.width('90%').height(220).backgroundColor(0xAFEEEE)

内容对齐
可以通过alignContent参数设置子组件各行在交叉轴剩余空间内的对齐方式,只在多行的flex布局中生效,可选值有:
FlexAlign.Start:子组件各行与交叉轴起点对齐。
FlexAlign.Center:子组件各行在交叉轴方向居中对齐。
FlexAlign.End:子组件各行与交叉轴终点对齐。
FlexAlign.SpaceBetween:子组件各行与交叉轴两端对齐,各行间垂直间距平均分布。
FlexAlign.SpaceAround:子组件各行间距相等,是元素首尾行与交叉轴两端距离的两倍。
FlexAlign.SpaceEvenly: 子组件各行间距,子组件首尾行与交叉轴两端距离都相等。
Flex({ justifyContent: FlexAlign.SpaceBetween, wrap: FlexWrap.Wrap, alignContent: FlexAlign.Start }) {Text('1').width('30%').height(20).backgroundColor(0xF5DEB3)Text('2').width('60%').height(20).backgroundColor(0xD2B48C)Text('3').width('40%').height(20).backgroundColor(0xD2B48C)Text('4').width('30%').height(20).backgroundColor(0xF5DEB3)Text('5').width('20%').height(20).backgroundColor(0xD2B48C)
}
.width('90%')
.height(100)
.backgroundColor(0xAFEEEE)

自适应拉伸
flexBasis:设置子组件在父容器主轴方向上的基准尺寸。如果设置了该值,则子项占用的空间为设置的值;如果没设置该属性,那子项的空间为width/height的值。
flexGrow:设置父容器的剩余空间分配给此属性所在组件的比例。用于“瓜分”父组件的剩余空间。
flexShrink: 当父容器空间不足时,子组件的压缩比例。
Flex() {
Text('flexGrow(2)').flexGrow(2) .width(100).height(100).backgroundColor(0xF5DEB3)Text('flexGrow(3)').flexGrow(3).width(100).height(100).backgroundColor(0xD2B48C)Text('no flexGrow').width(100) .height(100).backgroundColor(0xF5DEB3)
}.width(400).height(120).padding(10).backgroundColor(0xAFEEEE)
场景实例
使用弹性布局,可以实现子组件沿水平方向排列,两端对齐,子组件间距平分,竖直方向上子组件居中的效果。
@Entry
@Component
struct FlexExample {build() {Column() {Column({ space: 5 }) {Flex({ direction: FlexDirection.Row, wrap: FlexWrap.NoWrap, justifyContent: FlexAlign.SpaceBetween, alignItems: ItemAlign.Center }) {Text('1').width('30%').height(50).backgroundColor(0xF5DEB3)Text('2').width('30%').height(50).backgroundColor(0xD2B48C)Text('3').width('30%').height(50).backgroundColor(0xF5DEB3)}.height(70).width('90%').backgroundColor(0xAFEEEE)}.width('100%').margin({ top: 5 })}.width('100%') }
}

相对布局(RelativeContainer)
基本概念
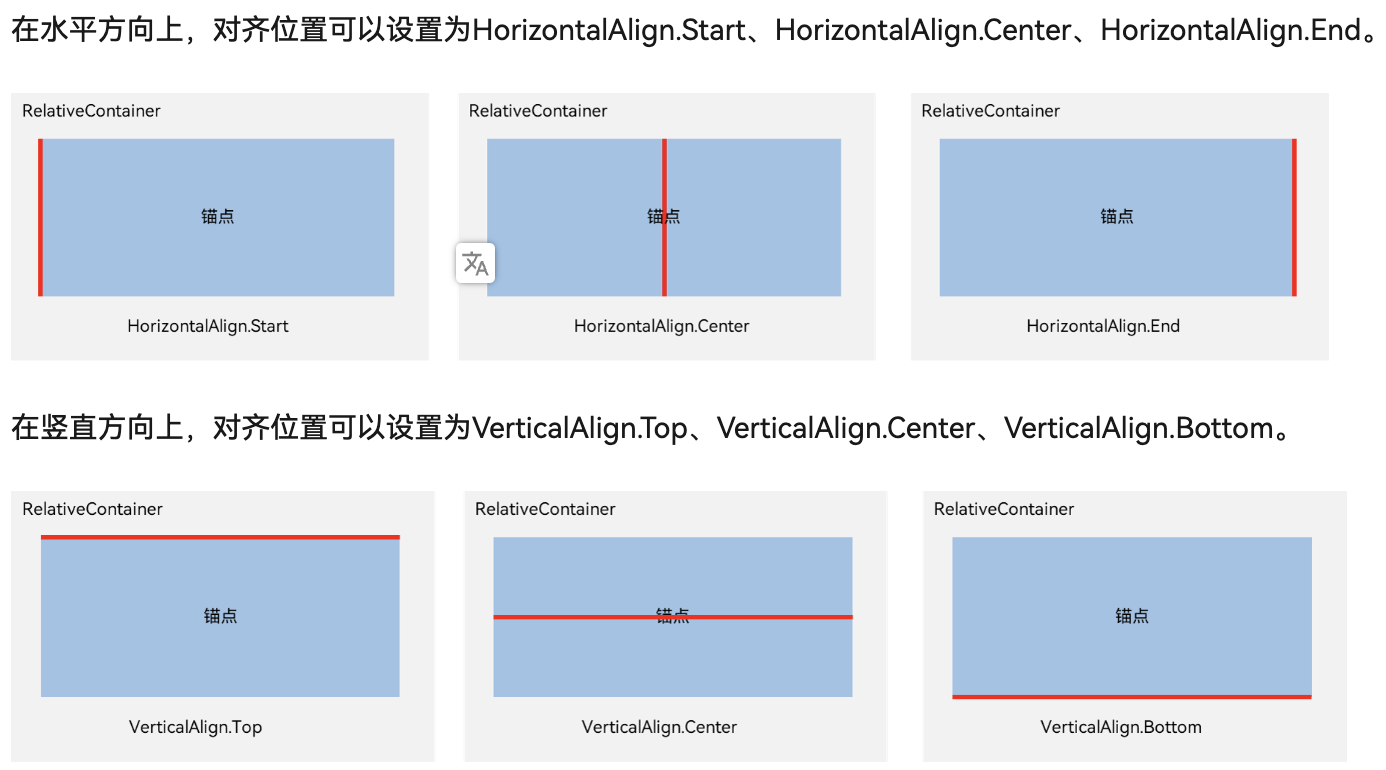
- 锚点:通过锚点设置当前元素基于哪个元素确定位置。
- 对齐方式:通过对齐方式,设置当前元素是基于锚点的上中下对齐,还是基于锚点的左中右对齐。
设置依赖关系
锚点设置
RelativeContainer父组件为锚点,__container__代表父容器的id,ID默认为“container”,其余子元素的ID通过id属性设置。未设置ID的子元素在RelativeContainer中不会显示。
设置相对于锚点的对齐位置
场景实例
@Entry
@Component
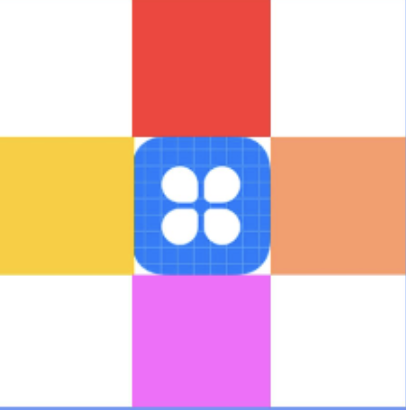
struct Index {build() {Row() {RelativeContainer() {Row().width(100).height(100).backgroundColor('#FF3333').alignRules({top: { anchor: '__container__', align: VerticalAlign.Top },  //以父容器为锚点,竖直方向顶头对齐middle: { anchor: '__container__', align: HorizontalAlign.Center }  //以父容器为锚点,水平方向居中对齐}).id('row1')  //设置锚点为row1Row() {Image($r('app.media.icon'))}.height(100).width(100).alignRules({top: { anchor: 'row1', align: VerticalAlign.Bottom },  //以row1组件为锚点,竖直方向低端对齐left: { anchor: 'row1', align: HorizontalAlign.Start }  //以row1组件为锚点,水平方向开头对齐}).id('row2')  //设置锚点为row2Row().width(100).height(100).backgroundColor('#FFCC00').alignRules({top: { anchor: 'row2', align: VerticalAlign.Top }}).id('row3')  //设置锚点为row3Row().width(100).height(100).backgroundColor('#FF9966').alignRules({top: { anchor: 'row2', align: VerticalAlign.Top },left: { anchor: 'row2', align: HorizontalAlign.End },}).id('row4')  //设置锚点为row4Row().width(100).height(100).backgroundColor('#FF66FF').alignRules({top: { anchor: 'row2', align: VerticalAlign.Bottom },middle: { anchor: 'row2', align: HorizontalAlign.Center }}).id('row5')  //设置锚点为row5}.width(300).height(300).border({ width: 2, color: '#6699FF' })}.height('100%').margin({ left: 30 })}
}
轮播(Swiper)
布局与约束
Swiper作为一个容器组件,在自身尺寸属性未被设置时,会自动根据子组件的大小设置自身的尺寸。如果开发者对Swiper组件设置了固定的尺寸,则在轮播显示过程中均以该尺寸生效;否则,在轮播过程中,会根据子组件的大小自动调整自身的尺寸。
private swiperController: SwiperController = new SwiperController();Swiper(this.swiperController) {Text("0").width('90%').height('100%').backgroundColor(Color.Gray).textAlign(TextAlign.Center).fontSize(30)Text("1").width('90%').height('100%').backgroundColor(Color.Green).textAlign(TextAlign.Center).fontSize(30)Text("2").width('90%').height('100%').backgroundColor(Color.Pink).textAlign(TextAlign.Center).fontSize(30)
}
.loop(true)
.autoPlay(true) // 轮播
.interval(1000) // 间隔
.vertical(false) //false:设置水平方向上轮播: true:设置垂直方向轮播:
.displayCount(2) //一个页面内同时显示多个子组件:设置一个页面内显示两个子组件
.indicatorStyle({size: 30,left: 0,color: Color.Red
}) // 自定义导航点样式(示例:导航点直径设为30VP,左边距为0,导航点颜色设为红色)...
this.swiperController.showNext(); // 通过controller切换到后一页
this.swiperController.showPrevious(); // 通过controller切换到前一页
创建网格(Grid/GridItem)
ArkUI提供了Grid容器组件和子组件GridItem,用于构建网格布局。Grid用于设置网格布局相关参数,GridItem定义子组件相关特征。Grid组件支持使用条件渲染、循环渲染、懒加载等渲染控制方式生成子组件。Grid的子组件必须是GridItem组件。
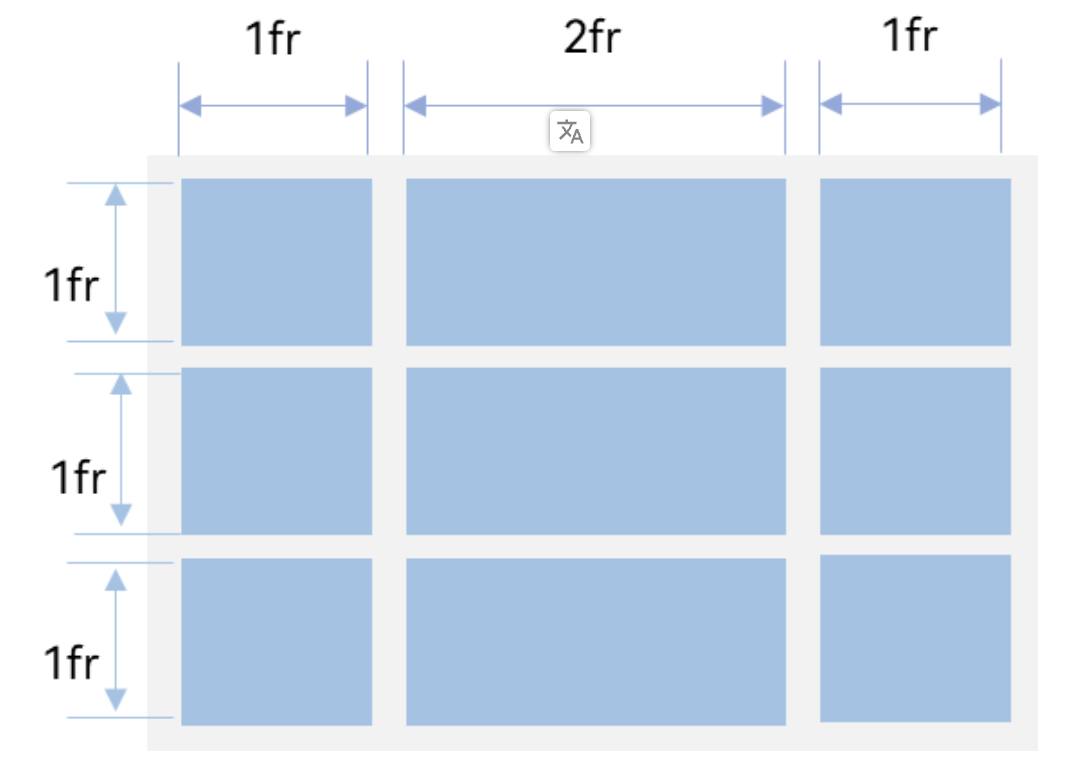
设置Grid行列数量与占比
Grid() {...
}
.rowsTemplate('1fr 1fr 1fr')
.columnsTemplate('1fr 2fr 1fr')
设置子组件所占行列数
GridItem() {Text(key)...
}
.columnStart(1)
.columnEnd(2)
.rowStart(5)
.rowEnd(6)
设置主轴方向
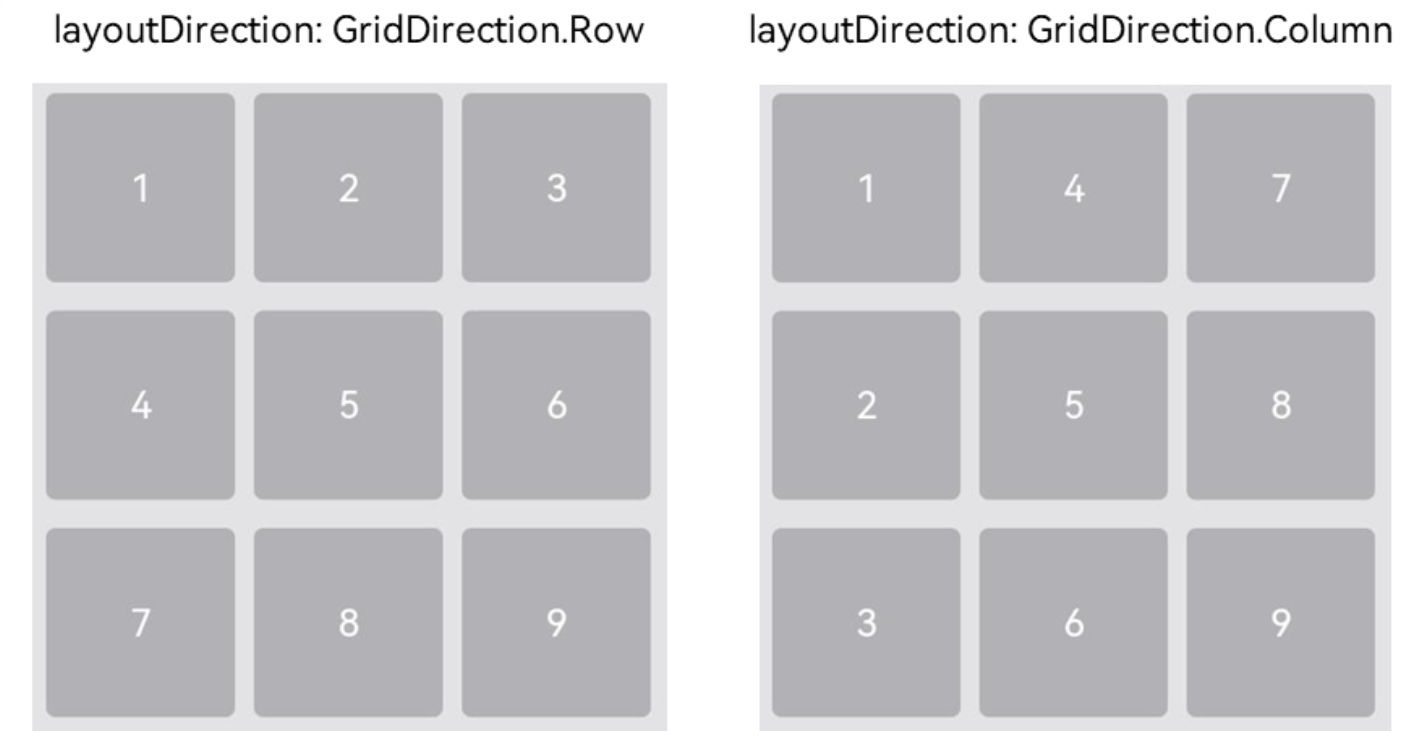
若没有设置行列数量与占比,可以通过layoutDirection可以设置网格布局的主轴方向,决定子组件的排列方式。此时可以结合minCount和maxCount属性来约束主轴方向上的网格数量。
-
layoutDirection属性仅在不设置rowsTemplate和columnsTemplate时生效,此时元素在layoutDirection方向上排列。
-
仅设置rowsTemplate时,Grid主轴为水平方向,交叉轴为垂直方向。
-
仅设置columnsTemplate时,Grid主轴为垂直方向,交叉轴为水平方向。
Grid() {...
}
.maxCount(3)
.layoutDirection(GridDirection.Row)
设置行列间距
Grid() {...
}
.columnsGap(10)
.rowsGap(15)
构建可滚动的网格布局
在设置Grid的行列数量与占比时,如果仅设置行、列数量与占比中的一个,即仅设置rowsTemplate或仅设置columnsTemplate属性,网格单元按照设置的方向排列,超出Grid显示区域后,Grid拥有可滚动能力。
@Component
struct Shopping {@State services: Array<string> = ['直播', '进口', ...]...build() {Column({ space: 5 }) {Grid() {ForEach(this.services, (service: string, index) => {GridItem() {...}.width('25%')}, service => service)}.rowsTemplate('1fr 1fr') // 只设置rowsTemplate属性,当内容超出Grid区域时,可水平滚动。.rowsGap(15)...}...}
}
控制滚动位置
Column({ space: 5 }) {Grid(this.scroller) {...}.columnsTemplate('1fr 1fr 1fr 1fr 1fr 1fr 1fr')...Row({space: 20}) {Button('上一页').onClick(() => {this.scroller.scrollPage({next: false})})Button('下一页').onClick(() => {this.scroller.scrollPage({next: true})})}
}
...
性能优化
适用于数据量较小的布局场景,当构建具有大量网格项的可滚动网格布局时,推荐使用数据懒加载方式实现按需迭代加载数据,从而提升列表性能。
当使用懒加载方式渲染网格时,为了更好的滚动体验,减少滑动时出现白块,Grid组件中也可通过cachedCount属性设置GridItem的预加载数量,只在懒加载LazyForEach中生效。
设置预加载数量后,会在Grid显示区域前后各缓存cachedCount*列数个GridItem,超出显示和缓存范围的GridItem会被释放。
Grid() {LazyForEach(this.dataSource, item => {GridItem() {...}})
}
.cachedCount(3)


