Vue实现可拖拽边界布局
在前端开发中,有时需要实现一种可拖拽边界的布局,通过拖动分隔线来调整不同区域大小。例如,下图是一个典型的可拖拽边界布局,它由左右两个区域组成,左边是一个树形菜单,右边是一个上下分割的内容区域。用户可以通过拖动水平和垂直的分隔线来改变左右区域和上下区域的宽度和高度。
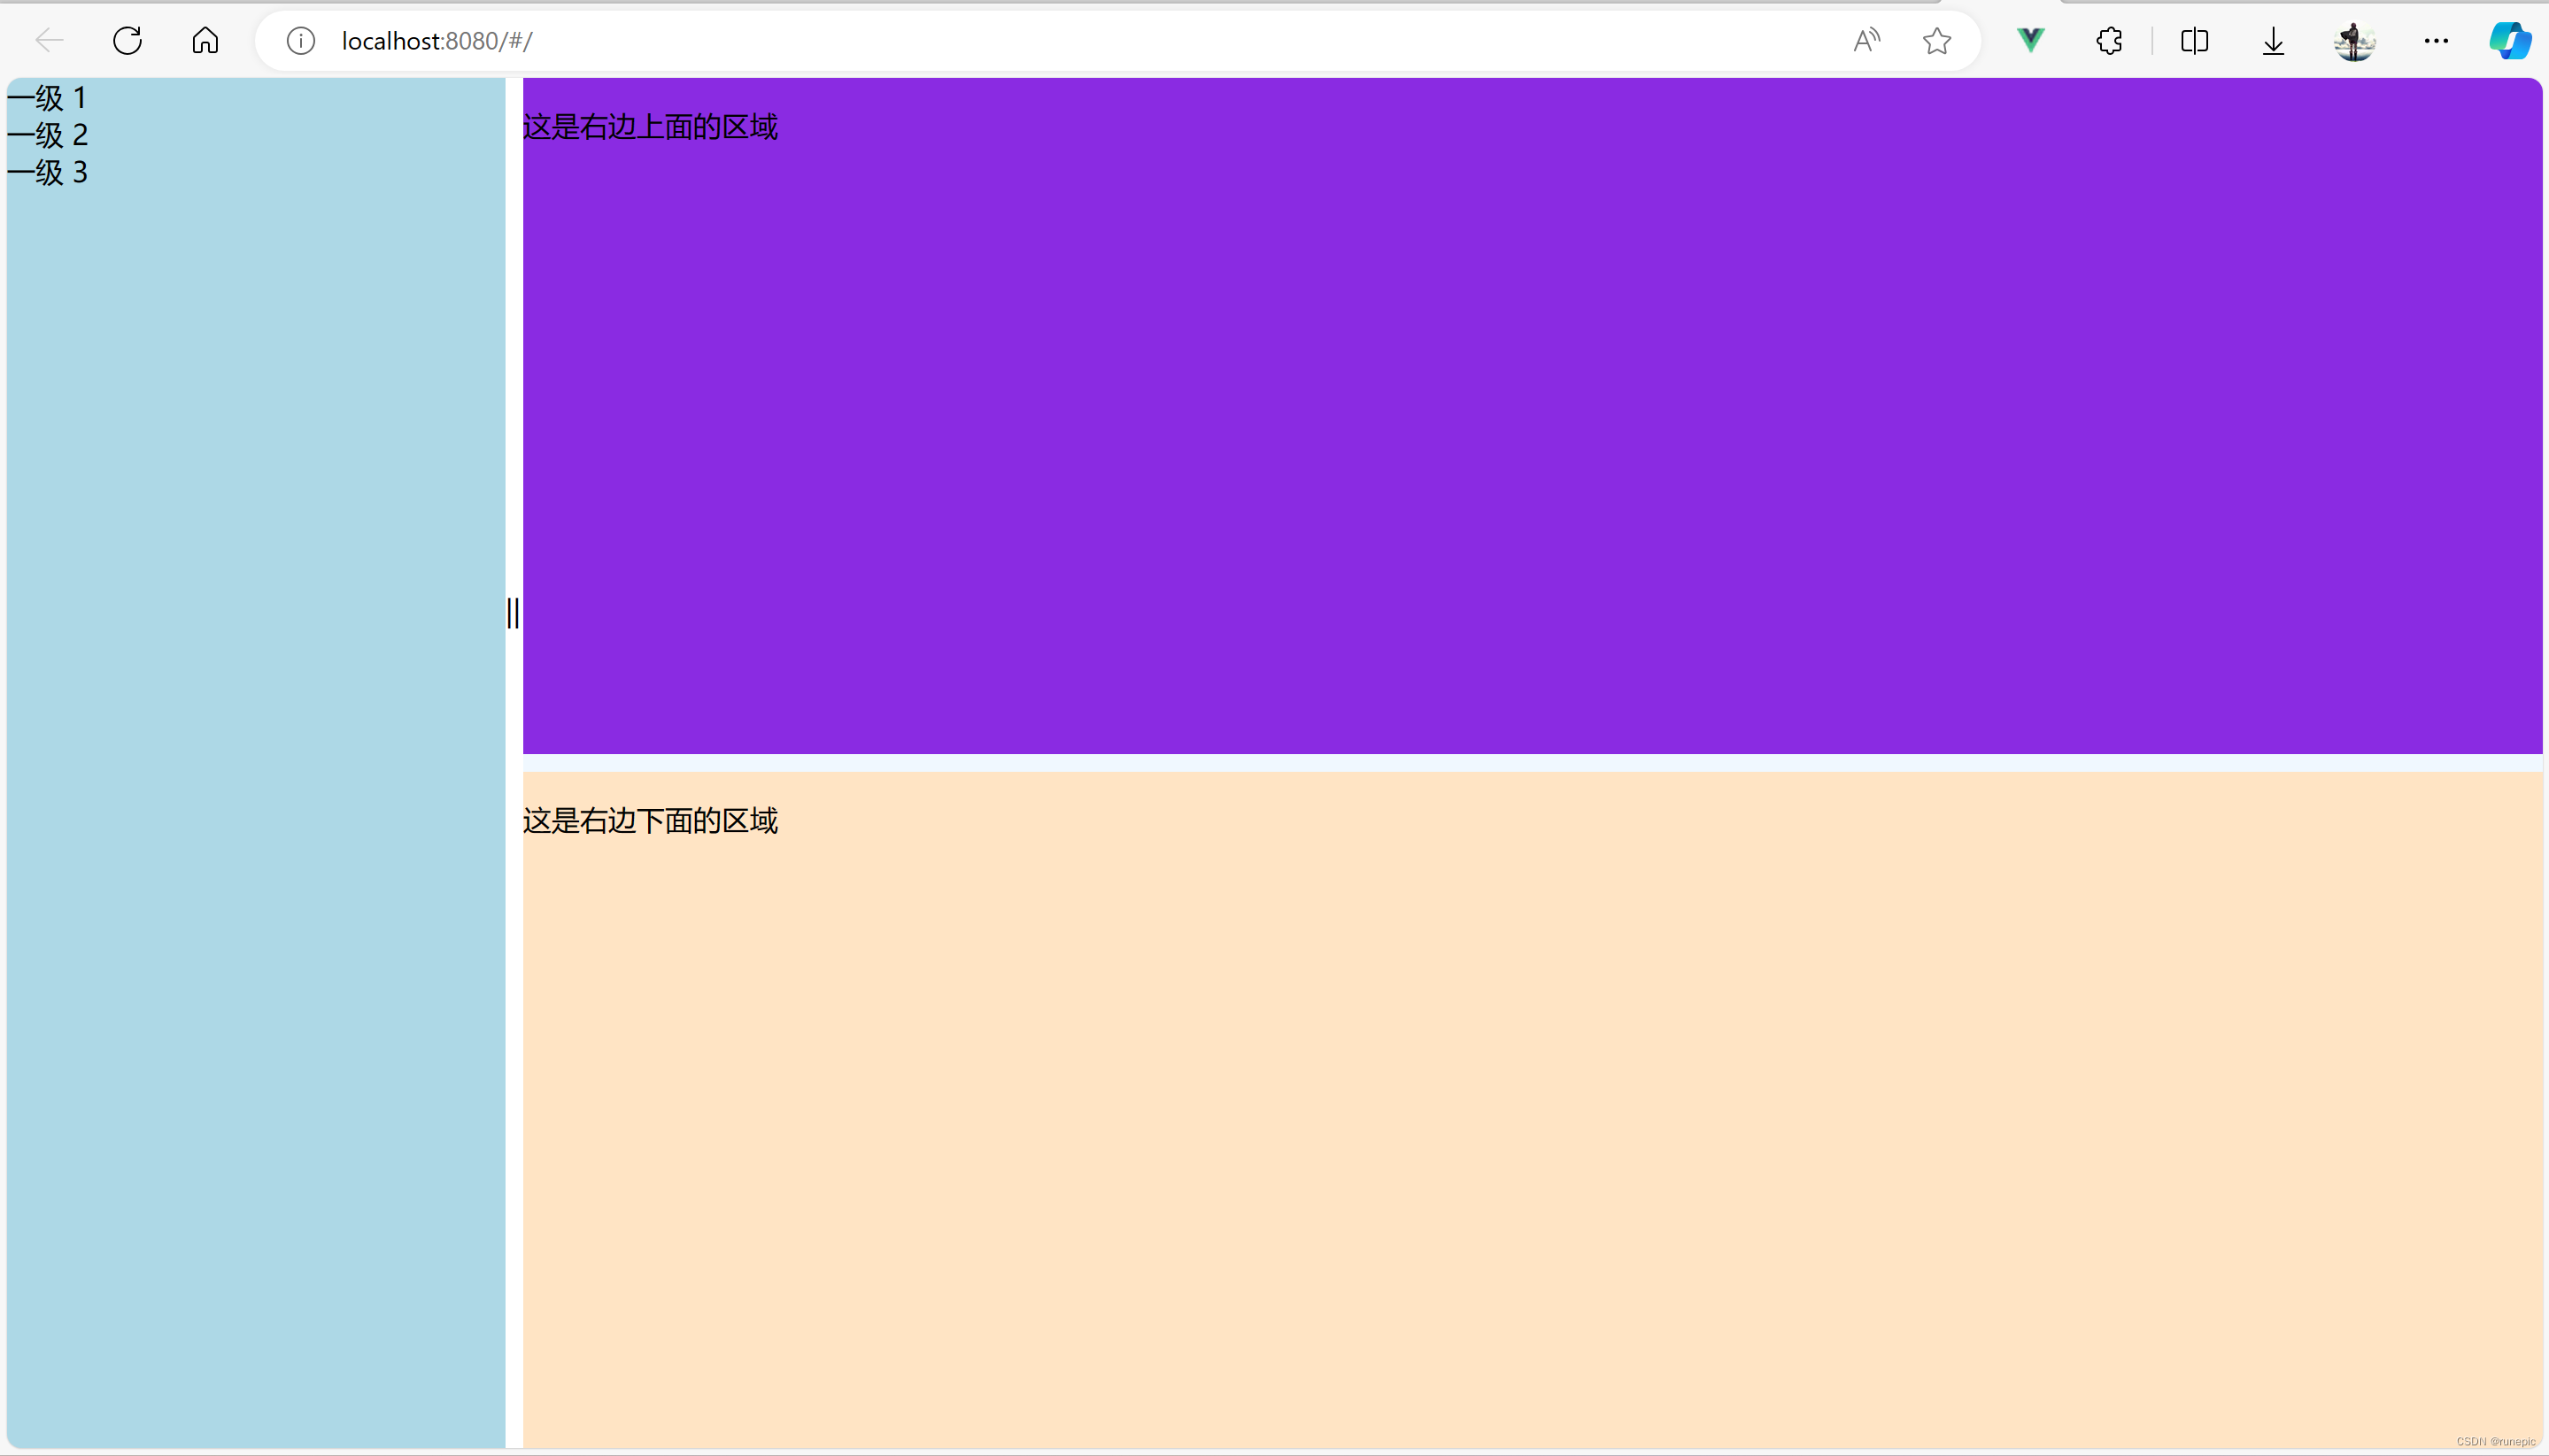
本文用Vue来实现这种可拖拽边界布局,只需要用到Vue的基本特性,如数据绑定、事件处理、样式绑定等(额外的el-tree基于elementui可不加)。主要涉及到以下几个方面:
- 布局结构:使用flex布局来实现容器和子元素的分配,使用style绑定来动态调整区域的大小,使用cursor属性来改变鼠标的形状。
- 数据定义:使用data选项来定义不同区域的宽度和高度,以及是否正在拖动分隔线,以及拖动开始时的鼠标位置和区域大小。
- 事件处理:使用methods选项来定义开始拖动、拖动中和结束拖动的函数,使用draggingH和draggingV来判断拖动的方向,使用startX和startY来记录拖动的起点,使用delta来计算拖动的距离,使用leftWidth、rightWidth、topHeight和bottomHeight来更新区域的大小。
- 事件绑定:使用v-on指令来绑定分隔线的mousedown事件,表示用户开始拖动分隔线,给document绑定mousemove事件,表示用户正在拖动分隔线,给document绑定mouseup事件,表示用户结束拖动分隔线。
布局结构
首先定义布局的结构,这里使用flex布局来实现。布局由一个容器div和四个子div组成,分别是左边区域、右边区域、水平分隔线和垂直分隔线。容器div的display属性设置为flex,表示它是一个弹性盒子,它的子元素可以按照一定的比例分配空间。左边区域和右边区域的flex-direction属性设置为column,表示它们是一个垂直方向的弹性盒子,它们的子元素可以按照一定的比例分配高度。右边区域又由上下两个子div组成,分别是上面区域和下面区域。水平分隔线和垂直分隔线的宽度和高度分别设置为10px,表示它们是分隔线的宽度。水平分隔线的cursor属性设置为col-resize,表示当鼠标移动到分隔线上时,鼠标的形状会变成一个水平方向的双箭头,表示可以拖动分隔线。垂直分隔线的cursor属性设置为row-resize,表示当鼠标移动到分隔线上时,鼠标的形状会变成一个垂直方向的双箭头,表示可以拖动分隔线。我们还可以给分隔线添加一些样式,如背景色、边框等,以增加视觉效果。以下是布局结构的代码:
<template><div id="app"><div class="container"><div class="left" :style="{ width: leftWidth + 'px' }"><el-tree class="tree" :data="treeData" :props="defaultProps" node-key="id"></el-tree></div><div class="divider-h" @mousedown="startDragH"><span>||</span></div><div class="right" :style="{ width: rightWidth + 'px' }"><div class="top" :style="{ height: topHeight + 'px' }"><p>这是右边上面的区域</p></div><div class="divider-v" @mousedown="startDragV"><!-- <span>==</span> --></div><div class="bottom" :style="{ height: bottomHeight + 'px' }"><p>这是右边下面的区域</p></div></div></div></div>
</template>
数据定义
接下来定义一些数据,用来表示不同区域的宽度和高度,以及是否正在拖动分隔线,以及拖动开始时的鼠标位置和区域大小。我们可以在Vue实例的data选项中定义这些数据,如下所示:
export default {name: "App",data() {return {containerWidth: 800, // 容器的宽度containerHeight: 600, // 容器的高度leftWidth: 400, // 左边区域的宽度rightWidth: 400, // 右边区域的宽度topHeight: 300, // 右边上面区域的高度bottomHeight: 300, // 右边下面区域的高度draggingH: false, // 是否正在水平拖动draggingV: false, // 是否正在垂直拖动startX: 0, // 水平拖动开始时的鼠标位置startY: 0, // 垂直拖动开始时的鼠标位置startLeftWidth: 0, // 水平拖动开始时的左边区域宽度startRightWidth: 0,startTopHeight: 0, // 垂直拖动开始时的右边上面区域高度startBottomHeight: 0,};},
};
事件处理
然后需要定义一些事件处理函数,用来实现拖动分隔线的逻辑。监听分隔线的mousedown事件,表示用户开始拖动分隔线,以及document的mousemove事件,表示用户正在拖动分隔线,以及document的mouseup事件,表示用户结束拖动分隔线。我们可以在Vue实例的methods选项中定义这些事件处理函数,如下所示:
methods: {// 开始水平拖动startDragH(e) {this.draggingH = true;this.startX = e.clientX;this.startLeftWidth = this.leftWidth;this.startRightWidth = this.rightWidth;},// 开始垂直拖动startDragV(e) {this.draggingV = true;this.startY = e.clientY;this.startTopHeight = this.topHeight;this.startBottomHeight = this.bottomHeight;},// 拖动中onDrag(e) {if (this.draggingH) {let delta = e.clientX - this.startX;// 更新左右区域的宽度this.leftWidth = this.startLeftWidth + delta;this.rightWidth = this.startRightWidth - delta;}if (this.draggingV) {let delta = e.clientY - this.startY;// 更新上下区域的高度this.topHeight = this.startTopHeight + delta;this.bottomHeight = this.startBottomHeight - delta;}},// 结束拖动endDrag() {this.draggingH = false;this.draggingV = false;},},
在开始水平拖动和开始垂直拖动的函数中,设置draggingH和draggingV为true,表示正在拖动分隔线,同时记录下鼠标的位置和区域的大小,作为拖动的起点。在拖动中的函数中,我们需要根据鼠标的位置和拖动的起点计算出拖动的距离,然后根据拖动的距离更新左右区域和上下区域的宽度和高度。在结束拖动的函数中,我们需要设置draggingH和draggingV为false,表示停止拖动分隔线。
事件绑定
最后给水平分隔线和垂直分隔线绑定mousedown事件,表示用户开始拖动分隔线,给document绑定mousemove事件
  mounted() {// 监听鼠标移动和松开事件document.addEventListener("mousemove", this.onDrag);document.addEventListener("mouseup", this.endDrag);},beforeDestroy() {// 移除事件监听document.removeEventListener("mousemove", this.onDrag);document.removeEventListener("mouseup", this.endDrag);},
};
样式定义
最后,我们需要给布局的元素添加一些样式,以增加辨识度。我们可以在Vue实例的style选项中定义这些样式
完整代码
以下是完整的代码,你可以复制到编辑器中运行
<template><div id="app"><div class="container"><div class="left" :style="{ width: leftWidth + 'px' }"><el-tree class="tree" :data="treeData" :props="defaultProps" node-key="id"></el-tree></div><div class="divider-h" @mousedown="startDragH"><span>||</span></div><div class="right" :style="{ width: rightWidth + 'px' }"><div class="top" :style="{ height: topHeight + 'px' }"><p>这是右边上面的区域</p></div><div class="divider-v" @mousedown="startDragV"><!-- <span>==</span> --></div><div class="bottom" :style="{ height: bottomHeight + 'px' }"><p>这是右边下面的区域</p></div></div></div></div>
</template><script>
export default {name: "App",data() {return {containerWidth: 800, // 容器的宽度containerHeight: 600, // 容器的高度leftWidth: 400, // 左边区域的宽度rightWidth: 400, // 右边区域的宽度topHeight: 300, // 右边上面区域的高度bottomHeight: 300, // 右边下面区域的高度draggingH: false, // 是否正在水平拖动draggingV: false, // 是否正在垂直拖动startX: 0, // 水平拖动开始时的鼠标位置startY: 0, // 垂直拖动开始时的鼠标位置startLeftWidth: 0, // 水平拖动开始时的左边区域宽度startRightWidth: 0,startTopHeight: 0, // 垂直拖动开始时的右边上面区域高度startBottomHeight: 0,treeData: [{id: 1,label: "一级 1",children: [{id: 4,label: "二级 1-1",children: [{id: 9,label: "三级 1-1-1",},{id: 10,label: "三级 1-1-2",},],},],},{id: 2,label: "一级 2",children: [{id: 5,label: "二级 2-1",},{id: 6,label: "二级 2-2",},],},{id: 3,label: "一级 3",children: [{id: 7,label: "二级 3-1",},{id: 8,label: "二级 3-2",},],},],defaultProps: {children: "children",label: "label",},};},methods: {// 开始水平拖动startDragH(e) {this.draggingH = true;this.startX = e.clientX;this.startLeftWidth = this.leftWidth;this.startRightWidth = this.rightWidth;},// 开始垂直拖动startDragV(e) {this.draggingV = true;this.startY = e.clientY;this.startTopHeight = this.topHeight;this.startBottomHeight = this.bottomHeight;},// 拖动中onDrag(e) {if (this.draggingH) {// 计算水平拖动的距离let delta = e.clientX - this.startX;// 更新左右区域的宽度this.leftWidth = this.startLeftWidth + delta;this.rightWidth = this.startRightWidth - delta;}if (this.draggingV) {// 计算垂直拖动的距离let delta = e.clientY - this.startY;// 更新上下区域的高度this.topHeight = this.startTopHeight + delta;this.bottomHeight = this.startBottomHeight - delta;}},// 结束拖动endDrag() {this.draggingH = false;this.draggingV = false;},onresize() {this.leftWidth = window.innerWidth * 0.3 - 5this.rightWidth = window.innerWidth * 0.7 - 5this.topHeight = window.innerHeight * 0.5 - 5this.bottomHeight = window.innerHeight * 0.5 - 5console.log(window.screen);}},mounted() {// 监听鼠标移动和松开事件document.addEventListener("mousemove", this.onDrag);document.addEventListener("mouseup", this.endDrag);window.addEventListener("resize", this.onresize);this.leftWidth = window.innerWidth * 0.2 - 5this.rightWidth = window.innerWidth * 0.8 - 5this.topHeight = window.innerHeight * 0.5 - 5this.bottomHeight = window.innerHeight * 0.5 - 5// },beforeDestroy() {// 移除事件监听document.removeEventListener("mousemove", this.onDrag);document.removeEventListener("mouseup", this.endDrag);},
};
</script><style>
html,
body {width: 100%;height: 100%;margin: 0;padding: 0;
}.container {display: flex;width: 100%;height: 100%;/* border: 1px solid black; */
}.left {display: flex;flex-direction: column;background-color: lightblue;height: 100%;width: 30%;
}.right {display: flex;flex-direction: column;background-color: lightgreen;height: 100%;width: 70%;}.top {background-color: blueviolet;
}.bottom {background-color: bisque;
}.divider-h {width: 10px;cursor: col-resize;
}.divider-h span {display: block;margin-top: 290px;
}.divider-v {height: 10px;cursor: row-resize;background-color: aliceblue;
}.divider-v span {display: block;margin-left: 190px;
}.tree {flex: 1;overflow: auto;cursor: pointer;
}</style>