目录
- 前言
- 版本
- 环境变量配置
- 引入的类型
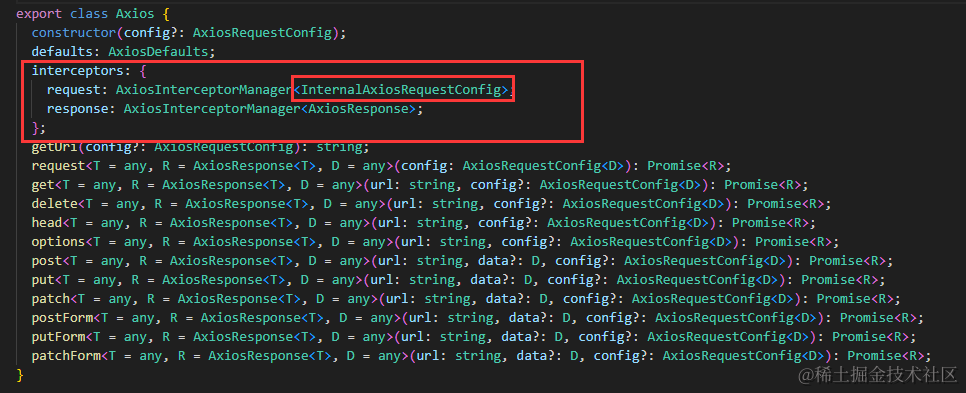
- 1、AxiosIntance: axios实例类型
- 2、InternalAxiosRequestConfig: 高版本下AxiosRequestConfig的拓展类型
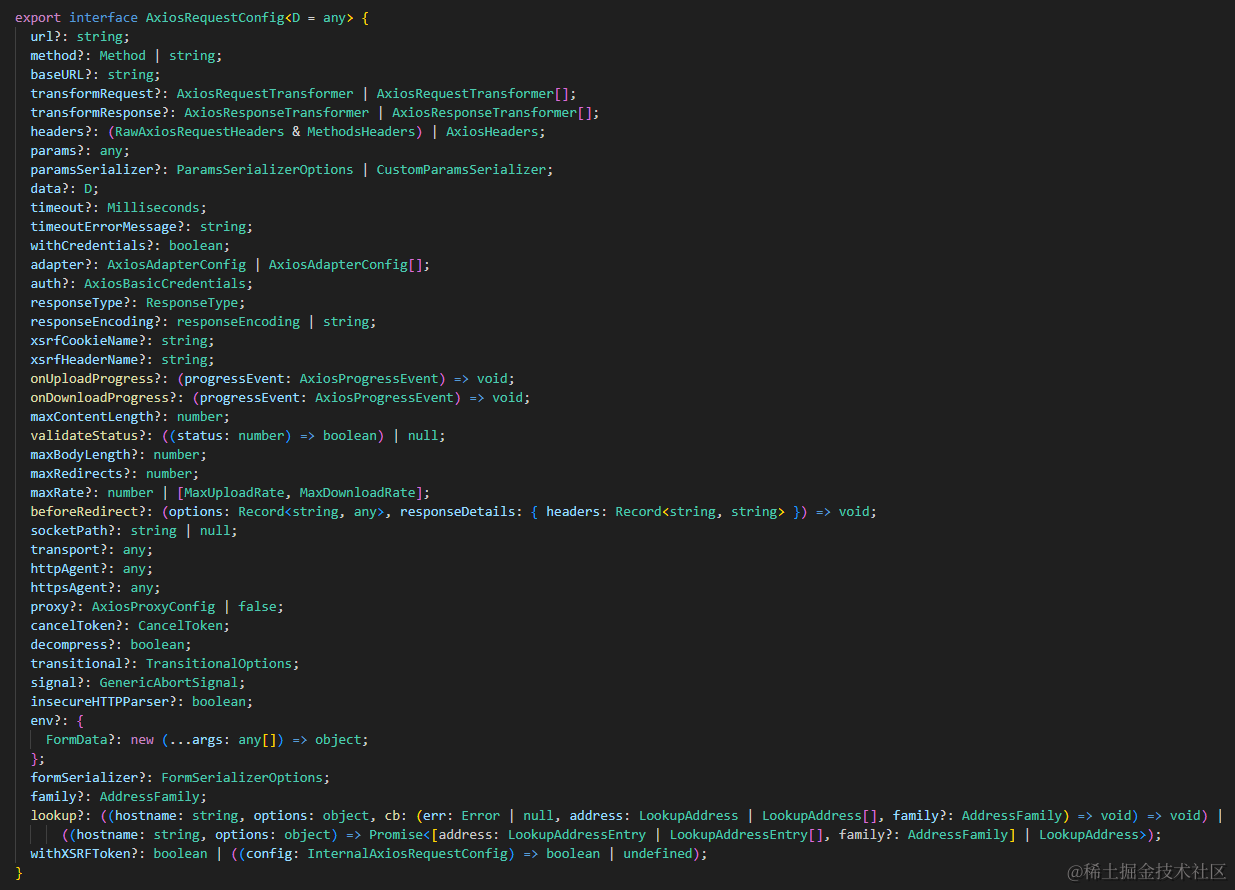
- 3、AxiosRequestConfig: 请求体配置参数类型
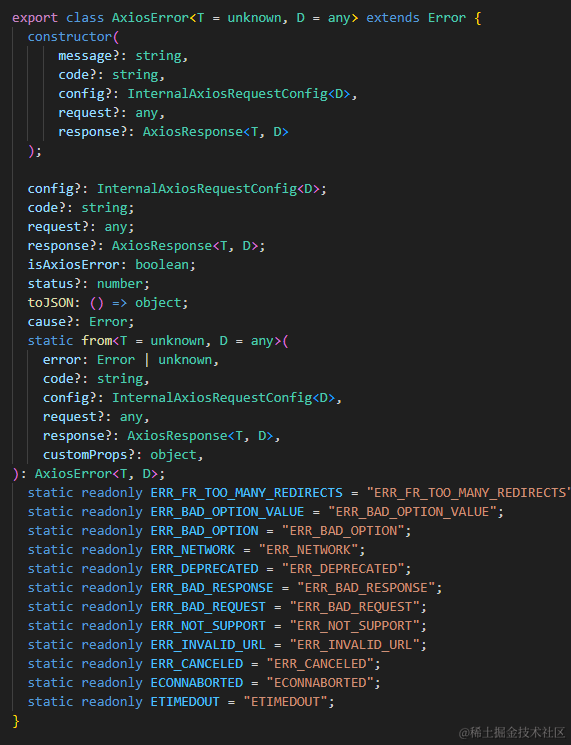
- 4、AxiosError: 错误对象类型
- 5、AxiosResponse: 完整原始响应体类型
- 目标效果
- 开始封装
- 骨架
- 在拦截器封装之前
- 全局请求拦截器
- 全局响应拦截器
- requst封装
- CRUD
- upload
- 完整代码:
- 类型文件
- code配置
- 封装的axios
- 使用
- 源码地址
前言
axios 是一个流行的网络请求库,简单易用。但实际上,我们开发时候经常会出于不同的需求对它进行各种程度的封装。
最近在制作自己的脚手架时,写了一个Vue3+ts+Vite项目模板,其中使用TypeScript对axios的基础请求功能进行了简单的封装,在这里梳理一下思路,也留作一个记录,为后续其他功能封装做准备。
希望这篇文章能够帮助到刚学习axios和ts的小伙伴们。同时,若文中存在一些错误或者设计不合理的地方,也欢迎大家指正。
版本
axios:1.6.2TypeScript:5.3.2
环境变量配置
一般我们会使用环境变量来统一管理一些数据,比如网络请求的 baseURL 。这个项目模板中,我将文件上传的接口地址、token的key也配置在了环境变量里。
.env.development
# .env.production 和这个一样
# the APP baseURL
VITE_APP_BASE_URL = 'your_base_url'# the token key
VITE_APP_TOKEN_KEY = 'your_token_key'# the upload url
VITE_UPLOAD_URL = 'your_upload_url'# app title
VITE_APP_TITLE = 'liushi_template'
环境变量类型声明文件 env.d.ts:
/// <reference types="vite/client" />export interface ImportMetaEnv {readonly VITE_APP_TITLE: stringreadonly VITE_APP_BASE_URL: stringreadonly VITE_APP_TOKEN_KEY?: stringreadonly VITE_UPLOAD_URL?: string
}interface ImportMeta {readonly env: ImportMetaEnv
}
然后,我们使用 类 来封装 axios
先引入 axios, 以及必要的类型
import axios, { AxiosInstance,InternalAxiosRequestConfig, AxiosRequestConfig, AxiosError, AxiosResponse,} from 'axios';
在这里,我们引入了 axios,以及一些本次封装中会使用到的类型,
使用ts进行二次封装时,最好
ctrl+左键看一下源码中对应的类型声明,这对我们有很大的帮助和指导作用。
引入的类型
1、AxiosIntance: axios实例类型
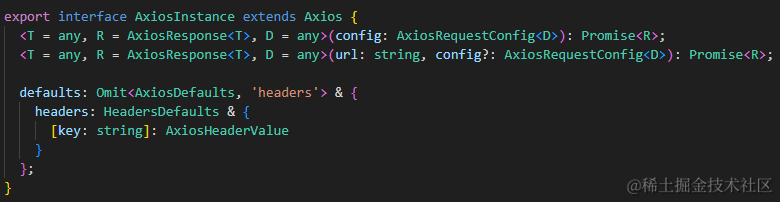
2、InternalAxiosRequestConfig: 高版本下AxiosRequestConfig的拓展类型

注意: 以前的版本下,请求拦截器的 use方法 第一个参数类型是 AxiosRequestConfig,但在高版本下,更改为了 InternalAxiosRequestConfig,如果发现使用 AxiosRequestConfig时报错, 请看一下自己版本下的相关类型声明。这里提供我的:

3、AxiosRequestConfig: 请求体配置参数类型
4、AxiosError: 错误对象类型
5、AxiosResponse: 完整原始响应体类型
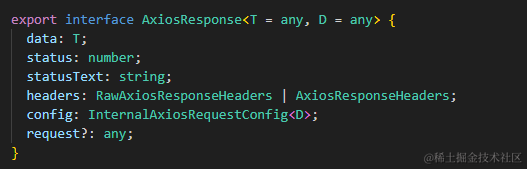
从源码提供的类型可以很清晰地看到各参数或者类、方法中对应的参数、方法类型定义,这可以非常直观地为我们指明路线
目标效果
通过这次基础封装,我们想要的实现的效果是:
- API的参数只填写接口和其他配置项、可以规定后端返回数据中
data的类型 - API直接返回后端返回的数据
- 错误码由响应拦截器统一处理
- 预留 扩展其他进阶功能的空间
- nice的代码提示
开始封装
骨架
axios 和其中的类型在前面已经引入, 这里就先写一个骨架
class HttpRequest {service: AxiosInstanceconstructor(){// 设置一些默认配置项this.service = axios.create({baseURL: import.meta.env.VITE_APP_BASE_URL,timeout: 5 * 1000});}
}const httpRequest = new HttpRequest()
export default httpRequest;
在拦截器封装之前
为了封装出更加合理的拦截器,为以及进阶封装时为 axios 配置更加强大的功能,你需要首先了解一下 axios 从发送一个请求到接收响应并处理,最后呈现给用户的流程。这样,对各部分的封装会有一个更加合理的设计。
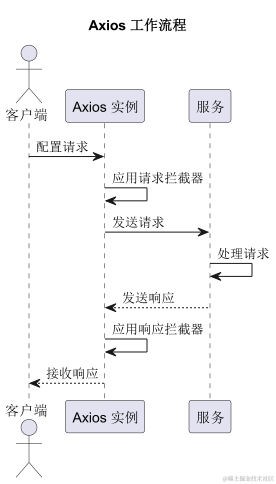
axios请求流程 - chatGPT绘制
全局请求拦截器
class HttpRequest {// ...constructor() {// ...this.service.interceptors.request.use(// ...);}
}
在 axios v1.6.2 中,根据上面的接口请求拦截器的 use方法 接受三个参数, 均是可传项

-
onFulfilled: 在请求发送前执行, 接受一个config对象并返回处理后的新config对象,一般在里面配置token等这里要注意一点, 高版本
axios将它的参数类型修改为了InternalAxiosRequestConfig -
onRejected:onFulfilled执行发生错误后执行,接收错误对象,一般我们请求没发送出去出现报错时,执行的就是这一步 -
options:其他配置参数,接收两个参数, 均是可传项,以后的进阶功能封装里可能会使用到 -
synchronous: 是否同步
-
runWhen: 接收一个类型为InternalAxiosRequestConfig的config参数,返回一个boolean。触发时机为每次请求触发拦截器之前,当runWhen返回true, 则执行作用在本次请求上的拦截器方法, 否则不执行
了解了三个参数之后,思路就清晰了,然后我们可以根据需求进行全局请求拦截器的封装
class HttpRequest {// ...constructor() {// ...this.service.interceptors.request.use((config: InternalAxiosRequestConfig) => {/*** set your config*/if (import.meta.env.VITE_APP_TOKEN_KEY && getToken()) {// carry tokenconfig.headers[import.meta.env.VITE_APP_TOKEN_KEY] = getToken()}return config},(error: AxiosError) => {console.log('requestError: ', error)return Promise.reject(error);},{synchronous: false,runWhen: ((config: InternalAxiosRequestConfig) => {// do something// if return true, axios will execution interceptor methodreturn true})});}
}
全局响应拦截器
同样是三个参数,后两个和请求拦截器差不多,说第一个就行。
类型定义如下:

第一个参数同样是 onFulfilled,在返回响应结果之前执行,我们需要在这里面取出后端返回的数据,同时还要进行状态码处理。
从类型定义上可以看到,参数类型是一个泛型接口, 第一个泛型 T 用来定义后端返回数据的类型
先定义一下和后端约定好的返回数据格式:
我一般做项目时候约定的是这种,可以根据实际情况进行修改
./types/index.ts
export interface ResponseModel<T = any> {success: boolean;message: string | null;code: number | string;data: T;
}
因为里面定义了 code,所以还需要配置一份和后端约定好的 code 表,来对返回的 code 进行分类处理
./codeConfig.ts
// set code cofig
export enum CodeConfig {success = 200,notFound = 404,noPermission = 403
}
其实axios本身也提供了一份 HttpStatusCode
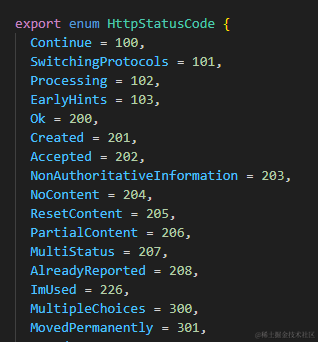
但最好根据项目组实际情况维护一份和后端约定好的 code
然后就可以开始封装响应拦截器了。要注意返回的类型
import { CodeConfig } from './codeConfig.ts'
import { ResponseModel } from './types/index.ts'
class HttpRequest {// ...constructor() {// ...this.service.interceptors.response.use((response: AxiosResponse<ResponseModel>): AxiosResponse['data'] => {const { data } = responseconst { code } = dataif (code) {if (code != HttpCodeConfig.success) {switch (code) {case HttpCodeConfig.notFound:// the method to handle this codebreak;case HttpCodeConfig.noPermission:// the method to handle this codebreak;default:break;}return Promise.reject(data.message)} else {return data}} else {return Promise.reject('Error! code missing!')}},(error: AxiosError) => {return Promise.reject(error);});}
}
在这个响应拦截器里,我们先通过解构赋值拿出了后端返回的响应数据 data, 然后提取出了里面约定好的 code,如果 code 是约定的表示一切成功的值,那么把响应数据返回, 否则根据 code 的不同值进行相应的处理。比如 把message里信息用 MessageBox 显示、登录过期清空token强制登出、无权限警告、重新请求等等
requst封装
重新封装 axios.request() 方法,传入一个config, 以后的进阶版本中,可能会修改传参,并在这个封装的 request() 中添加更多高级功能。但是在基础版本里,这一步看上去似乎有些冗余。
import { ResponseModel } from './types/index.ts'
class HttpRequest {// ...constructor(){/**/}request<T = any>(config: AxiosRequestConfig): Promise<ResponseModel<T>> {/*** TODO: execute other methods according to config*/return new Promise((resolve, reject) => {try {this.service.request<ResponseModel<T>>(config).then((res: AxiosResponse['data']) => {resolve(res as ResponseModel<T>);}).catch((err) => {reject(err)})} catch (err) {return Promise.reject(err)}})}
}
CRUD
调用我们已经封装好的 request() 来封装 crud 请求,而不是直接调用 axios 自带的, 原因上面已经说了
import { ResponseModel } from './types/index.ts'
class HttpRequest {// ...get<T = any>(config: AxiosRequestConfig): Promise<ResponseModel<T>> {return this.request({ method: 'GET', ...config })}post<T = any>(config: AxiosRequestConfig): Promise<ResponseModel<T>> {return this.request({ method: 'POST', ...config })}put<T = any>(config: AxiosRequestConfig): Promise<ResponseModel<T>> {return this.request({ method: 'PUT', ...config })}delete<T = any>(config: AxiosRequestConfig): Promise<ResponseModel<T>> {return this.request({ method: 'DELETE', ...config })}
}
upload
文件上传封装,一般是表单形式上传,它有特定的 Content-Type 和数据格式,需要单独拿出来封装
先定义需要传入的数据类型 —— 和后端约定好的 name, 以及上传的文件数据 —— 本地临时路径或者Blob。在这里我是设置的上传文件的接口唯一,所以希望把接口url配置在环境变量里,在文件上传接口中不允许用户在接口的配置项参数里修改url,于是新定义了一个 UploadFileItemModel 类型, 不允许用户在 options 里再传入 url 和 data
若有多个文件上传接口url, 可以根据实际情况进行修改
./types/index.ts
export interface UploadFileItemModel {name: string,value: string | Blob
}export type UploadRequestConfig = Omit<AxiosRequestConfig, 'url' | 'data'>
一般来说,文件上传完成后,后端返回的响应数据中的data是被上传文件的访问url,所以这里泛型 T 设置的默认值是 string
import { UploadFileItemModel } from './types/index.ts'
class HttpRequest {// ...upload<T = string>(fileItem: UploadFileItemModel, config?: UploadRequestConfig): Promise<ResponseModel<T>> | null {if (!import.meta.env.VITE_UPLOAD_URL) return nulllet fd = new FormData()fd.append(fileItem.name, fileItem.value)let configCopy: UploadRequestConfigif (!config) {configCopy = {headers: {'Content-Type': 'multipart/form-data'}}} else {config.headers!['Content-Type'] = 'multipart/form-data'configCopy = config}return this.request({ url: import.meta.env.VITE_UPLOAD_URL, data: fd, ...configCopy })}
完整代码:
类型文件
./types/index.ts
import { AxiosRequestConfig } from 'axios'
export interface ResponseModel<T = any> {success: boolean;message: string | null;code: number | string;data: T;
}export interface UploadFileItemModel {name: string,value: string | Blob
}/*** customize your uploadRequestConfig*/
export type UploadRequestConfig = Omit<AxiosRequestConfig, 'url' | 'data'>
code配置
./codeConfig.ts
// set code cofig
export enum CodeConfig {success = 200,notFound = 404,noPermission = 403
}
封装的axios
./axios.ts
import axios, { AxiosInstance,InternalAxiosRequestConfig, AxiosRequestConfig, AxiosError, AxiosResponse,} from 'axios';
import { CodeConfig } from './CodeConfig';
import { ResponseModel, UploadFileItemModel, UploadRequestConfig } from './types/index'
import { getToken } from '../token/index'class HttpRequest {service: AxiosInstanceconstructor() {this.service = axios.create({baseURL: import.meta.env.VITE_APP_BASE_URL,timeout: 5 * 1000});this.service.interceptors.request.use((config: InternalAxiosRequestConfig) => {/*** set your config*/if (import.meta.env.VITE_APP_TOKEN_KEY && getToken()) {config.headers[import.meta.env.VITE_APP_TOKEN_KEY] = getToken()}return config},(error: AxiosError) => {console.log('requestError: ', error)return Promise.reject(error);},{synchronous: falserunWhen: ((config: InternalAxiosRequestConfig) => {// do something// if return true, axios will execution interceptor methodreturn true})});this.service.interceptors.response.use((response: AxiosResponse<ResponseModel>): AxiosResponse['data'] => {const { data } = responseconst { code } = dataif (code) {if (code != HttpCodeConfig.success) {switch (code) {case HttpCodeConfig.notFound:// the method to handle this codebreak;case HttpCodeConfig.noPermission:// the method to handle this codebreak;default:break;}return Promise.reject(data.message)} else {return data}} else {return Promise.reject('Error! code missing!')}},(error: any) => {return Promise.reject(error);});}request<T = any>(config: AxiosRequestConfig): Promise<ResponseModel<T>> {/*** TODO: execute other methods according to config*/return new Promise((resolve, reject) => {try {this.service.request<ResponseModel<T>>(config).then((res: AxiosResponse['data']) => {resolve(res as ResponseModel<T>);}).catch((err) => {reject(err)})} catch (err) {return Promise.reject(err)}})}get<T = any>(config: AxiosRequestConfig): Promise<ResponseModel<T>> {return this.request({ method: 'GET', ...config })}post<T = any>(config: AxiosRequestConfig): Promise<ResponseModel<T>> {return this.request({ method: 'POST', ...config })}put<T = any>(config: AxiosRequestConfig): Promise<ResponseModel<T>> {return this.request({ method: 'PUT', ...config })}delete<T = any>(config: AxiosRequestConfig): Promise<ResponseModel<T>> {return this.request({ method: 'DELETE', ...config })}upload<T = string>(fileItem: UploadFileItemModel, config?: UploadRequestConfig): Promise<ResponseModel<T>> | null {if (!import.meta.env.VITE_UPLOAD_URL) return nulllet fd = new FormData()fd.append(fileItem.name, fileItem.value)let configCopy: UploadRequestConfigif (!config) {configCopy = {headers: {'Content-Type': 'multipart/form-data'}}} else {config.headers!['Content-Type'] = 'multipart/form-data'configCopy = config}return this.request({ url: import.meta.env.VITE_UPLOAD_URL, data: fd, ...configCopy })}
}const httpRequest = new HttpRequest()
export default httpRequest;
使用
拿历史上的今天开放API做个测试: https://api.vvhan.com/api/hotlist?type=history
拆分一下:
- baseURL: ‘https://api.vvhan.com/api’
- 接口url: ‘/hotlist?type=history’
把baseURL配置到环境变量里:
VITE_APP_BASE_URL = 'https://api.vvhan.com/api'
根据接口文档修改 ResponseModel, 因为这个接口的响应数据里没有code那些, 所以封装里的code相关逻辑就先注释了, 直接返回原始响应体中的 data
export interface ResponseModel<T> {data: Tsubtitle: stringsuccess: booleantitle: stringupdate_time: string
}
/src/api/types/hello.ts:定义后端返回给这个接口的数据中, data 的类型
export interface exampleModel {index: numbertitle: stringdesc: stringurl: stringmobilUrl: string
}
/src/api/example/index.ts:封装请求接口,使用 enum 枚举类型统一管理接口地址
import request from '@/utils/axios/axios'
import { exampleModel } from '../types/hello'enum API {example = '/hotlist?type=history'
}export const exampleAPI = () => {return request.get<exampleModel[]>({ url: API.example })
}
试一试:
<script setup lang="ts">
import HelloWorld from "../../components/HelloWorld.vue";
import { exampleAPI } from "@/api/hello";
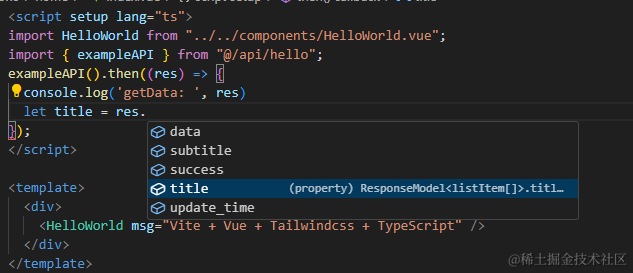
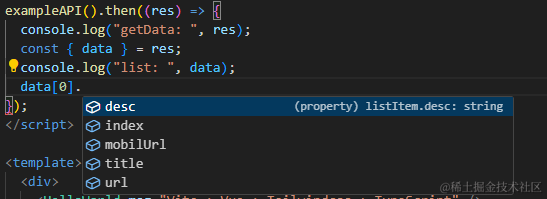
exampleAPI().then((res) => {console.log('getData: ', res)const title = res.titleconst { data } = resconsole.log('list: ', data)
});
</script><template><div><HelloWorld msg="Vite + Vue + Tailwindcss + TypeScript" /></div>
</template>
提示很舒服
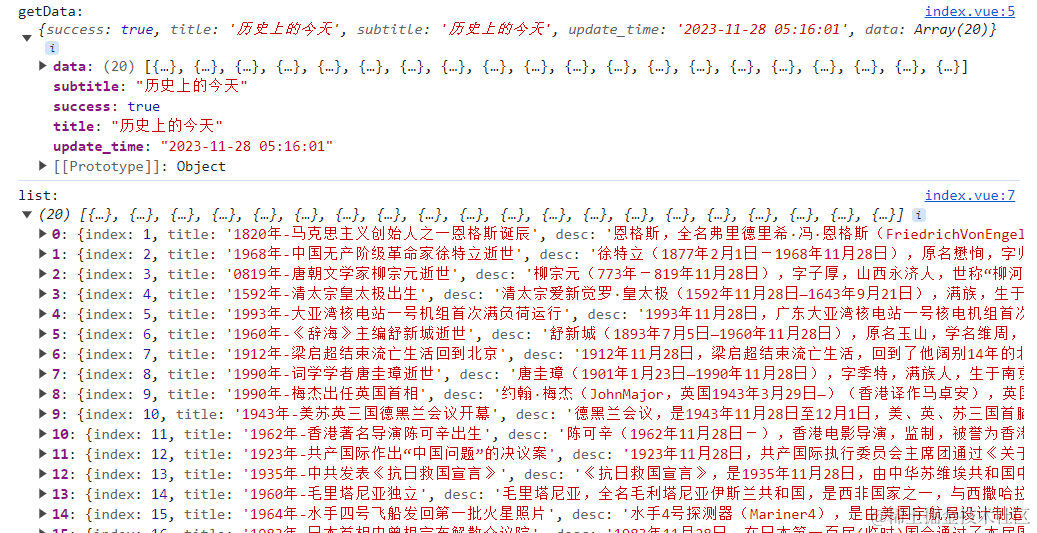
控制台打印的数据:
源码地址
v3-ts-tailwind-template中的axios封装文件