flutter开发实战-实现获取视频的缩略图封面video_thumbnail
在很多时候,我们查看视频的时候,视频没有播放时候,会显示一张封面,可能封面没有配置图片,这时候就需要通过获取视频的缩略图来显示封面了。这里使用了video_thumbnail来实现获取视频的缩略图。
一、引入video_thumbnail
在工程的pubspec.yaml中引入插件
# 视频缩略图video_thumbnail: ^0.5.3VideoThumbnail的属性如下
static Future<String?> thumbnailFile({required String video,Map<String, String>? headers,String? thumbnailPath,ImageFormat imageFormat = ImageFormat.PNG,int maxHeight = 0,int maxWidth = 0,int timeMs = 0,int quality = 10}) - thumbnailPath为本地存储的文件目录
- imageFormat格式 jpg,png等
- video视频地址
- timeMs
二、获取视频的缩略图
使用video_thumbnail来获取视频缩略图
定义视频缩略图信息
class VideoThumbInfo {String url; // 原视频地址File? thumbFile; // 缩略图本地fileint? width; // 缩略图的widthint? height; // 缩略图的heightVideoThumbInfo({required this.url,});
}
获取视频缩略图本地File
String path = (await getTemporaryDirectory()).path;String thumbnailPath = path + "/${DateTime.now().millisecond}.jpg";final fileName = await VideoThumbnail.thumbnailFile(video:"https://vd2.bdstatic.com/mda-maif0tt1rirqp27q/540p/h264_cae/1611052585/mda-maif0tt1rirqp27q.mp4",thumbnailPath: thumbnailPath,imageFormat: imageFormat,quality: quality,maxWidth: maxWidth,maxHeight: maxHeight,timeMs: timeMs,);File file = File(thumbnailPath);获取缩略图的宽高
Image image = Image.file(thumbFile!);image.image.resolve(const ImageConfiguration()).addListener(ImageStreamListener((ImageInfo imageInfo, bool synchronousCall) {int imageWidth = imageInfo.image.width;int imageHeight = imageInfo.image.height;VideoThumbInfo videoThumbInfo = VideoThumbInfo(url: url);videoThumbInfo.thumbFile = thumbFile;videoThumbInfo.width = imageWidth;videoThumbInfo.height = imageHeight;VideoThumb.setThumbInfo(url, videoThumbInfo);onVideoThumbInfoListener(videoThumbInfo);},onError: (exception, stackTrace) {print("getVideoThumbInfoByFile imageStreamListener onError exception:${exception.toString()},stackTrace:${stackTrace}");onVideoThumbInfoListener(null);},),);完整代码如下
import 'dart:io';
import 'package:flutter/material.dart';
import 'package:path_provider/path_provider.dart';
import 'package:video_thumbnail/video_thumbnail.dart';// ignore: non_constant_identifier_names
VideoThumbManager get VideoThumb => VideoThumbManager.instance;class VideoThumbManager {static VideoThumbManager get instance {return _singleton;}//保存单例static VideoThumbManager _singleton = VideoThumbManager._internal();//工厂构造函数factory VideoThumbManager() => _singleton;//私有构造函数VideoThumbManager._internal();// 保存url对应的本地缩略图filefinal _thumbMap = Map<String, File>();// url对应本地缩略图的信息final _thumbInfoMap = Map<String, VideoThumbInfo>();Future<void> setThumb(String url, File file) async {if (url.isEmpty) {return;}bool exist = await file.exists();if (exist == false) {return;}_thumbMap[url] = file;}Future<File?> getThumb(String url, {ImageFormat imageFormat = ImageFormat.JPEG,int maxHeight = 0,int maxWidth = 0,int timeMs = 0,int quality = 100,}) async {File? thumbFile = _thumbMap[url];if (thumbFile != null) {return thumbFile;}String path = (await getTemporaryDirectory()).path;String thumbnailPath = path + "/${DateTime.now().millisecond}.jpg";final fileName = await VideoThumbnail.thumbnailFile(video:"https://vd2.bdstatic.com/mda-maif0tt1rirqp27q/540p/h264_cae/1611052585/mda-maif0tt1rirqp27q.mp4",thumbnailPath: thumbnailPath,imageFormat: imageFormat,quality: quality,maxWidth: maxWidth,maxHeight: maxHeight,timeMs: timeMs,);File file = File(thumbnailPath);setThumb(url, file);return file;}// 获取缩略图的大小void getVideoThumbInfo(String url, {ImageFormat imageFormat = ImageFormat.JPEG,int maxHeight = 0,int maxWidth = 0,int timeMs = 0,int quality = 100,required Function(VideoThumbInfo?) onVideoThumbInfoListener,}) async {try {VideoThumbInfo? thumbInfo = VideoThumb.getThumbInfo(url);if (thumbInfo != null) {onVideoThumbInfoListener(thumbInfo);return;}await VideoThumb.getThumb(url,imageFormat: imageFormat,maxWidth: maxWidth,maxHeight: maxHeight,timeMs: timeMs,quality: quality,).then((value) {File? thumbFile = value;if (thumbFile != null) {VideoThumb.getVideoThumbInfoByFile(url: url,thumbFile: thumbFile,onVideoThumbInfoListener: onVideoThumbInfoListener,);} else {onVideoThumbInfoListener(null);}}).onError((error, stackTrace) {print("getVideoThumbInfo error:${error.toString()}");onVideoThumbInfoListener(null);}).whenComplete(() {print("getVideoThumbInfo whenComplete");});} catch (e) {print("getVideoThumbInfo catch error:${e.toString()}");onVideoThumbInfoListener(null);}}/// 根据file获取缩略图信息void getVideoThumbInfoByFile({required String url,required File thumbFile,required Function(VideoThumbInfo?) onVideoThumbInfoListener,}) async {try {VideoThumbInfo? thumbInfo = VideoThumb.getThumbInfo(url);if (thumbInfo != null) {onVideoThumbInfoListener(thumbInfo);return;}Image image = Image.file(thumbFile!);image.image.resolve(const ImageConfiguration()).addListener(ImageStreamListener((ImageInfo imageInfo, bool synchronousCall) {int imageWidth = imageInfo.image.width;int imageHeight = imageInfo.image.height;VideoThumbInfo videoThumbInfo = VideoThumbInfo(url: url);videoThumbInfo.thumbFile = thumbFile;videoThumbInfo.width = imageWidth;videoThumbInfo.height = imageHeight;VideoThumb.setThumbInfo(url, videoThumbInfo);onVideoThumbInfoListener(videoThumbInfo);},onError: (exception, stackTrace) {print("getVideoThumbInfoByFile imageStreamListener onError exception:${exception.toString()},stackTrace:${stackTrace}");onVideoThumbInfoListener(null);},),);} catch (e) {print("getVideoThumbInfoByFile catch error:${e.toString()}");onVideoThumbInfoListener(null);}}void removeThumb(String url) {if (url.isEmpty) {return;}_thumbMap.remove(url);}/// 获取存储缩略图信息VideoThumbInfo? getThumbInfo(String url) {if (url.isEmpty) {return null;}VideoThumbInfo? thumbInfo = _thumbInfoMap[url];return thumbInfo;}/// 存储缩略图信息void setThumbInfo(String url, VideoThumbInfo videoThumbInfo) async {if (url.isEmpty) {return;}_thumbInfoMap[url] = videoThumbInfo;}void removeThumbInfo(String url) {if (url.isEmpty) {return;}_thumbInfoMap.remove(url);}void clear() {_thumbMap.clear();_thumbInfoMap.clear();}
}class VideoThumbInfo {String url; // 原视频地址File? thumbFile; // 缩略图本地fileint? width; // 缩略图的widthint? height; // 缩略图的heightVideoThumbInfo({required this.url,});
}
三、显示视频缩略图的Widget
用于显示视频缩略图的Widget
/// 用于显示视频缩略图的Widget
class VideoThumbImage extends StatefulWidget {const VideoThumbImage({super.key, required this.url, this.maxWidth, this.maxHeight});final String url;final double? maxWidth;final double? maxHeight;@overrideState<VideoThumbImage> createState() => _VideoThumbImageState();
}class _VideoThumbImageState extends State<VideoThumbImage> {VideoThumbInfo? _videoThumbInfo;@overridevoid initState() {// TODO: implement initStatesuper.initState();VideoThumb.getVideoThumbInfo(widget.url,onVideoThumbInfoListener: (VideoThumbInfo? thumbInfo) {if (mounted) {setState(() {_videoThumbInfo = thumbInfo;});}});}@overridevoid dispose() {// TODO: implement disposesuper.dispose();}// 根据VideoThumb来显示图片Widget buildVideoThumb(BuildContext context) {if (_videoThumbInfo != null && _videoThumbInfo!.thumbFile != null) {double? imageWidth;double? imageHeight;if (_videoThumbInfo!.width != null && _videoThumbInfo!.height != null) {imageWidth = _videoThumbInfo!.width!.toDouble();imageWidth = _videoThumbInfo!.height!.toDouble();}return Container(width: imageWidth,height: imageHeight,clipBehavior: Clip.hardEdge,decoration: const BoxDecoration(color: Colors.transparent,),child: Image.file(_videoThumbInfo!.thumbFile!,width: imageWidth,height: imageHeight,),);}return Container();}@overrideWidget build(BuildContext context) {return ConstrainedBox(constraints: BoxConstraints(maxWidth: widget.maxWidth ?? double.infinity,maxHeight: widget.maxHeight ?? double.infinity,),child: buildVideoThumb(context),);}
}
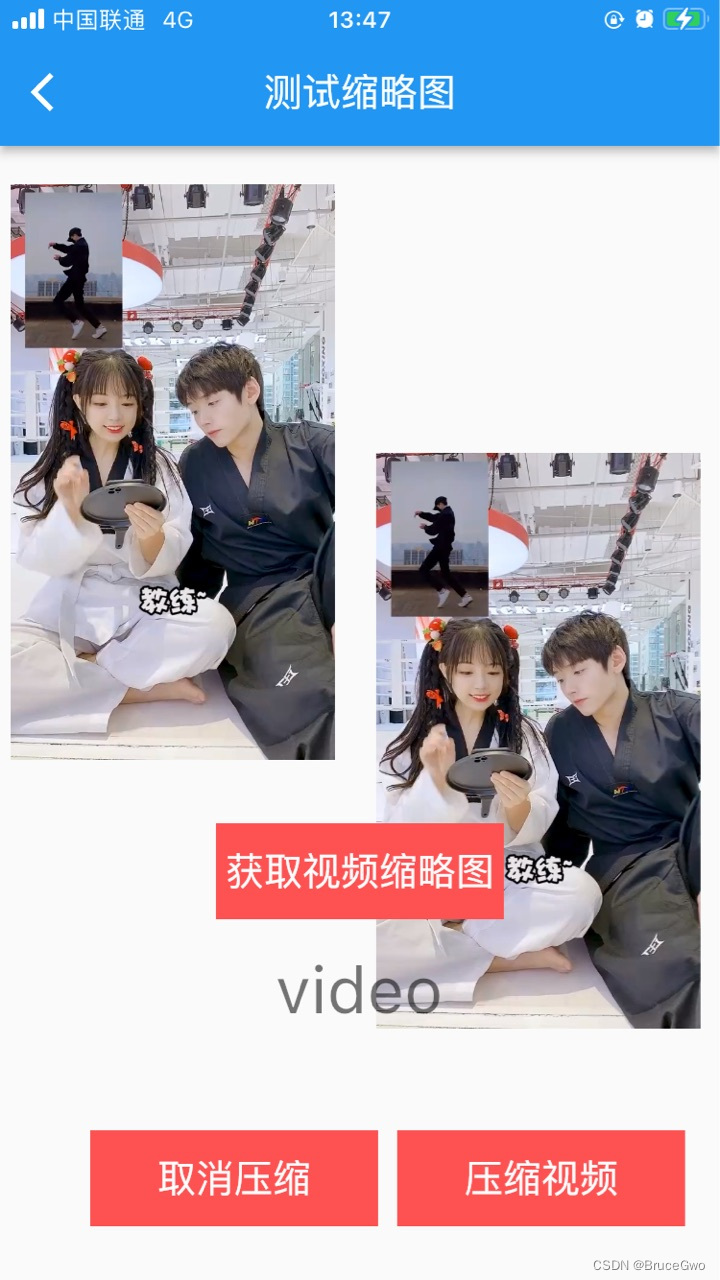
效果图如下:
四、小结
flutter开发实战-实现获取视频的缩略图封面video_thumbnail
学习记录,每天不停进步。
