文章目录
- 一、实验节点规划表👇
- 二、实验版本说明📃
- 三、实验拓扑📊
- 四、实验详细操作步骤🕹️
- 1. 安装Rocky Linux开源企业操作系统
- 2. 所有主机系统初始化
- 3. 所有master节点部署keepalived
- 4. 所有master节点部署haproxy
- 5. 所有节点配置阿里云Docker,kubernetes镜像
- 6. 所有节点安装Docker,kubelet,kubeadm,kubectl等K8S组件
- 7. 在master01节点上部署Kubernetes Master
- 8. 在master01节点上部署集群网络
- 9. 将master02,master03节点加入K8S集群
- 10. 将Node01,Node02,Node03三个工作节点加入到K8S集群
- 11. 创建Pod测试kubernetes集群可用性
- 12. 安装Kubernetes Dashboard
- 13. 模拟管理节点出故障(master01宕机)
- 五、 K9S安装与体验(可选)✨
一、实验节点规划表👇
| 角色 | 主机名 | IP地址 | 系统版本 | CPU/MEM |
|---|---|---|---|---|
| master | m1 | 192.168.200.61 | Rocky Linux 8.5 | 2C/2GB |
| master | m2 | 192.168.200.62 | Rocky Linux 8.5 | 2C/2GB |
| master | m3 | 192.168.200.63 | Rocky Linux 8.5 | 2C/2GB |
| node | n1 | 192.168.200.64 | Rocky Linux 8.5 | 2C/4GB |
| node | n2 | 192.168.200.65 | Rocky Linux 8.5 | 2C/4GB |
| node | n3 | 192.168.200.66 | Rocky Linux 8.5 | 2C/4GB |
| VIP | 192.168.200.68 |
二、实验版本说明📃
!!!注意:docker与K8S版本的兼容性问题!!!
以下是本实验版本选型情况:
系统版本:Rocky Linux 8.5
Docker版本:20.10.14
Kubernetes版本:1.18.0
三、实验拓扑📊
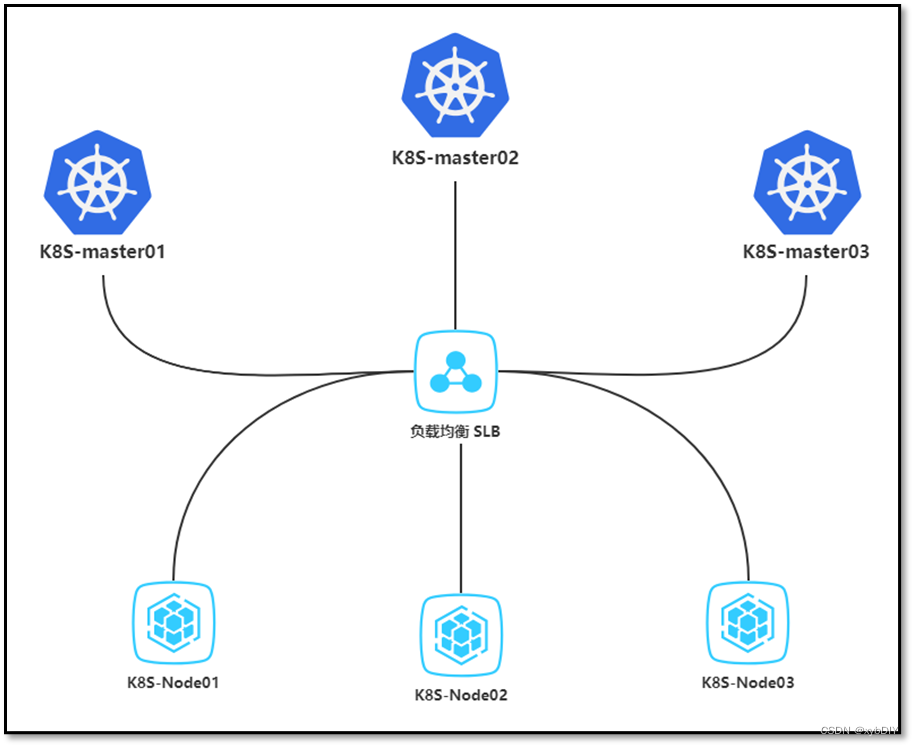
四、实验详细操作步骤🕹️
1. 安装Rocky Linux开源企业操作系统
略。详细安装部署配置等内容请参考本篇博文。
🔗参考链接:Rocky Linux 8.5版本全新图文安装教程并更换阿里镜像源等配置操作
2. 所有主机系统初始化
系统版本查询
[root@m1 ~]# cat /etc/redhat-release
Rocky Linux release 8.5 (Green Obsidian)[root@m1 ~]# hostnamectlStatic hostname: m1Icon name: computer-vmChassis: vmMachine ID: f7786fc1a38647e78e4a0c25671b5fe1Boot ID: dd692b53139a4eb0a07a7b9977e16dffVirtualization: vmwareOperating System: Rocky Linux 8.5 (Green Obsidian)CPE OS Name: cpe:/o:rocky:rocky:8:GAKernel: Linux 4.18.0-348.20.1.el8_5.x86_64Architecture: x86-64
1、修改主机名
hostnamectl set-hostname <主机名称>2、添加主机名
cat >> /etc/hosts << EOF
192.168.200.68  master.k8s.io   k8s-vip
192.168.200.61  master01.k8s.io m1
192.168.200.62  master02.k8s.io m2
192.168.200.63  master03.k8s.io m3
192.168.200.64  node01.k8s.io   n1
192.168.200.65  node02.k8s.io   n2
192.168.200.66  node03.k8s.io   n3
EOF3、关闭防火墙
systemctl stop firewalld && systemctl disable firewalld
systemctl status firewalld4、关闭selinux
sed  -i "s/SELINUX=enforcing/SELINUX=permissive/g" /etc/selinux/config 5、关闭swap分区
sed  -ri 's/.*swap.*/#&/' /etc/fstab		# 重启生效6、配置网卡联网
cat /etc/sysconfig/network-scripts/ifcfg-ens160!!!修改网卡信息重启网络生效命令!!!
systemctl restart NetworkManager
nmcli connection up ens1607、配置阿里云镜像
链接:https://developer.aliyun.com/mirror/rockylinux?spm=a2c6h.13651102.0.0.79fa1b112sSnLq
cd /etc/yum.repos.d/ && mkdir bak &&  cp Rocky-* bak/
sed -e 's|^mirrorlist=|#mirrorlist=|g' \-e 's|^#baseurl=http://dl.rockylinux.org/$contentdir|baseurl=https://mirrors.aliyun.com/rockylinux|g' \-i.bak \/etc/yum.repos.d/Rocky-*.repo8、生成本地缓存
yum makecache 或 dnf makecache9、更新YUM源软件包
yum update -y	10、将桥接的 IPv4 流量传递到 iptables 的链
cat > /etc/sysctl.d/k8s.conf << EOF
#开启网桥模式,可将网桥的流量传递给iptables链
net.bridge.bridge-nf-call-ip6tables=1
net.bridge.bridge-nf-call-iptables=1
#关闭ipv6协议
net.ipv6.conf.all.disable_ipv6=1
net.ipv4.ip_forward=1
EOFsysctl --system# 加载 ip_vs 模块
for i in $(ls /usr/lib/modules/$(uname -r)/kernel/net/netfilter/ipvs|grep -o "^[^.]*");do echo $i; /sbin/modinfo -F filename $i >/dev/null 2>&1 && /sbin/modprobe $i;done11、设置主机之间时间同步
参考链接:https://chegva.com/3265.html
yum install -y chronychronyc -a makestepsystemctl enable chronyd.service && systemctl restart chronyd.service && systemctl status chronyd.service
3. 所有master节点部署keepalived
keepalived是一个类似于layer3, 4 & 5交换机制的软件,也就是平时说的第3层、第4层和第5层交换。Keepalived是自动完成,不需人工干涉。
Keepalived的作用是检测服务器的状态,如果有一台服务器宕机,或工作出现故障,Keepalived将检测到,并将有故障的服务器从系统中剔除,同时使用其他服务器代替该服务器的工作,当服务器工作正常后Keepalived自动将服务器加入到服务器群中,这些工作全部自动完成,不需要人工干涉,需要人工做的只是修复故障的服务器。
安装相关依赖包和keepalived
yum install -y conntrack-tools libseccomp libtool-ltdl && yum install -y keepalived
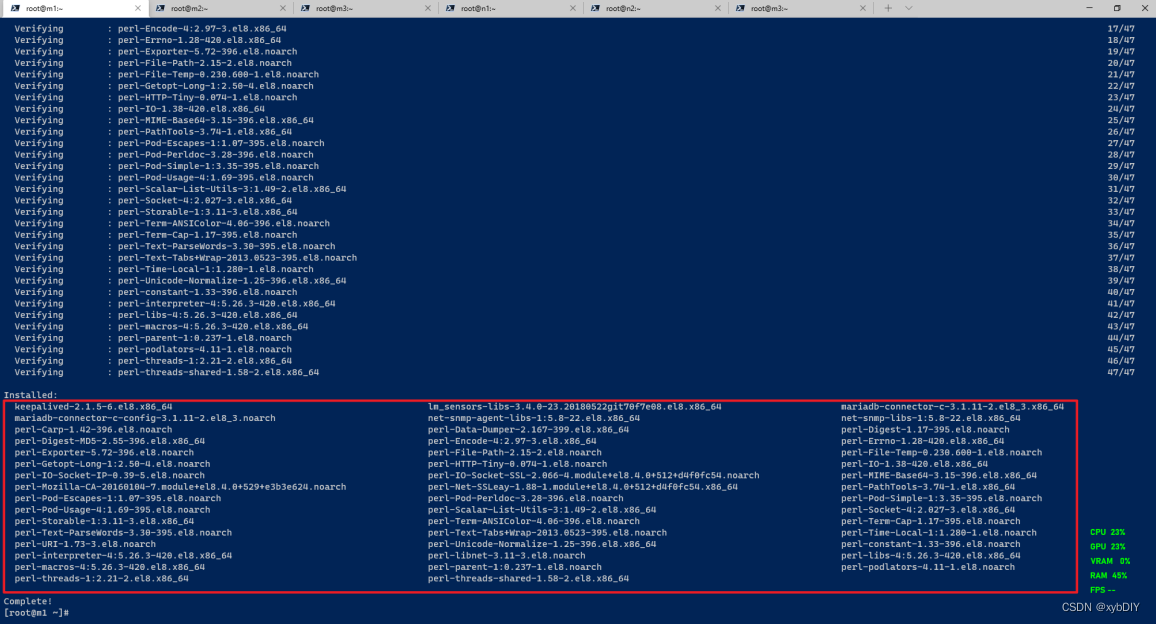
配置keepalived.conf配置文件(master01、master02、master03配置文件几乎相同)
# cat /etc/keepalived/keepalived.conf
! Configuration File for keepalivedglobal_defs {notification_email {acassen@firewall.locfailover@firewall.locsysadmin@firewall.loc}notification_email_from Alexandre.Cassen@firewall.locsmtp_server 192.168.200.1smtp_connect_timeout 30router_id LVS_DEVELvrrp_skip_check_adv_addrvrrp_strictvrrp_garp_interval 0vrrp_gna_interval 0
}vrrp_instance VI_1 {state MASTERinterface ens160virtual_router_id 51priority 90advert_int 1authentication {auth_type PASSauth_pass 1111}virtual_ipaddress {192.168.200.68}
}
启动keepalived服务
systemctl start keepalived.service && systemctl enable keepalived.service && systemctl status keepalived.service
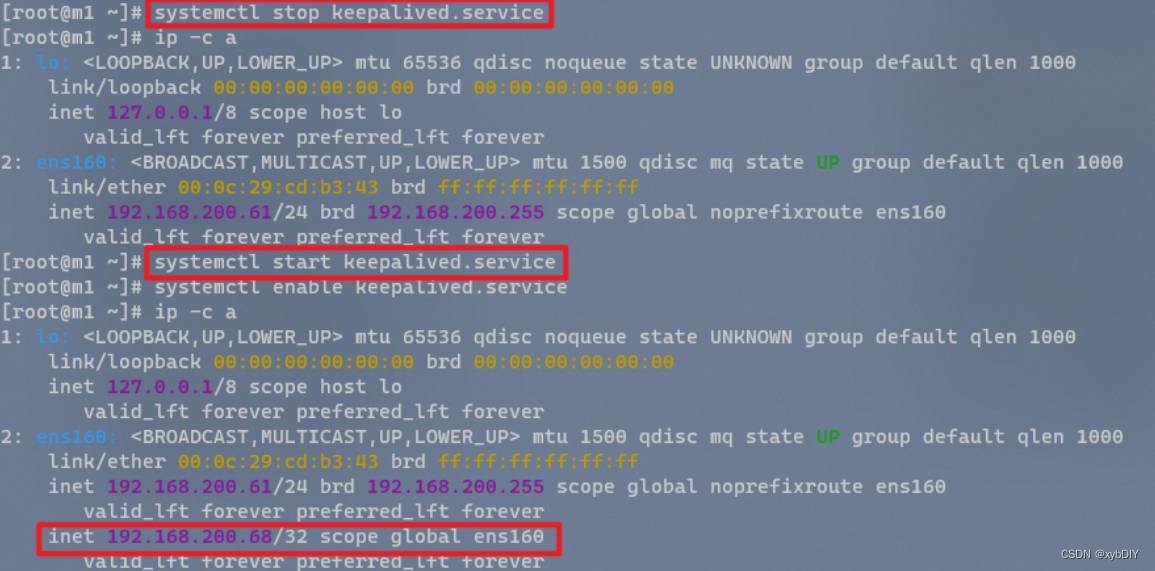
查看并验证VIP地址
# 发现VIP在主机master01上。
[root@m1 ~]# ip -c a
1: lo: <LOOPBACK,UP,LOWER_UP> mtu 65536 qdisc noqueue state UNKNOWN group default qlen 1000link/loopback 00:00:00:00:00:00 brd 00:00:00:00:00:00inet 127.0.0.1/8 scope host lovalid_lft forever preferred_lft forever
2: ens160: <BROADCAST,MULTICAST,UP,LOWER_UP> mtu 1500 qdisc mq state UP group default qlen 1000link/ether 00:0c:29:cd:b3:43 brd ff:ff:ff:ff:ff:ffinet 192.168.200.61/24 brd 192.168.200.255 scope global noprefixroute ens160valid_lft forever preferred_lft foreverinet 192.168.200.68/32 scope global ens160valid_lft forever preferred_lft forever#当关闭master01节点的keepalived服务,查看VIP是否在其他master节点上,如果发现,则表示配置成功。
[root@m1 ~]# systemctl stop keepalived.service
[root@m2 ~]# ip -c a
1: lo: <LOOPBACK,UP,LOWER_UP> mtu 65536 qdisc noqueue state UNKNOWN group default qlen 1000link/loopback 00:00:00:00:00:00 brd 00:00:00:00:00:00inet 127.0.0.1/8 scope host lovalid_lft forever preferred_lft forever
2: ens160: <BROADCAST,MULTICAST,UP,LOWER_UP> mtu 1500 qdisc mq state UP group default qlen 1000link/ether 00:0c:29:d2:4d:2e brd ff:ff:ff:ff:ff:ffinet 192.168.200.62/24 brd 192.168.200.255 scope global noprefixroute ens160valid_lft forever preferred_lft foreverinet 192.168.200.68/32 scope global ens160valid_lft forever preferred_lft forever# 当重新启动master01节点的keepalived服务,VIP重新漂移到master01节点上。因为设置了主机优先级,所以漂移到master01节点上。
[root@m1 ~]# ip -c a
1: lo: <LOOPBACK,UP,LOWER_UP> mtu 65536 qdisc noqueue state UNKNOWN group default qlen 1000link/loopback 00:00:00:00:00:00 brd 00:00:00:00:00:00inet 127.0.0.1/8 scope host lovalid_lft forever preferred_lft forever
2: ens160: <BROADCAST,MULTICAST,UP,LOWER_UP> mtu 1500 qdisc mq state UP group default qlen 1000link/ether 00:0c:29:cd:b3:43 brd ff:ff:ff:ff:ff:ffinet 192.168.200.61/24 brd 192.168.200.255 scope global noprefixroute ens160valid_lft forever preferred_lft foreverinet 192.168.200.68/32 scope global ens160valid_lft forever preferred_lft forever
4. 所有master节点部署haproxy
安装haproxy
yum install -y haproxy
配置haproxy.cfg配置文件
三台master节点的配置均相同,配置中声明了后端代理的三个master节点服务器,指定了haproxy运行的端口为6443等,因此6443端口为集群的入口。
cat > /etc/haproxy/haproxy.cfg << EOF
#---------------------------------------------------------------------
# Global settings
#---------------------------------------------------------------------
global# to have these messages end up in /var/log/haproxy.log you will# need to:# 1) configure syslog to accept network log events.  This is done#    by adding the '-r' option to the SYSLOGD_OPTIONS in#    /etc/sysconfig/syslog# 2) configure local2 events to go to the /var/log/haproxy.log#   file. A line like the following can be added to#   /etc/sysconfig/syslog##    local2.*                       /var/log/haproxy.log#log         127.0.0.1 local2chroot      /var/lib/haproxypidfile     /var/run/haproxy.pidmaxconn     4000user        haproxygroup       haproxydaemon # turn on stats unix socketstats socket /var/lib/haproxy/stats
#---------------------------------------------------------------------
# common defaults that all the 'listen' and 'backend' sections will
# use if not designated in their block
#---------------------------------------------------------------------
defaultsmode                    httplog                     globaloption                  httplogoption                  dontlognulloption http-server-closeoption forwardfor       except 127.0.0.0/8option                  redispatchretries                 3timeout http-request    10stimeout queue           1mtimeout connect         10stimeout client          1mtimeout server          1mtimeout http-keep-alive 10stimeout check           10smaxconn                 3000
#---------------------------------------------------------------------
# kubernetes apiserver frontend which proxys to the backends
#---------------------------------------------------------------------
frontend kubernetes-apiservermode                 tcpbind                 *:16443option               tcplogdefault_backend      kubernetes-apiserver
#---------------------------------------------------------------------
# round robin balancing between the various backends
#---------------------------------------------------------------------
backend kubernetes-apiservermode        tcpbalance     roundrobinserver      master01.k8s.io   192.168.200.61:6443 checkserver      master02.k8s.io   192.168.200.62:6443 checkserver      master03.k8s.io   192.168.200.63:6443 check
#---------------------------------------------------------------------
# collection haproxy statistics message
#---------------------------------------------------------------------
listen statsbind                 *:1080stats auth           admin:awesomePasswordstats refresh        5sstats realm          HAProxy\ Statisticsstats uri            /admin?stats
EOF
启动haproxy服务
systemctl start haproxy && systemctl enable haproxy && systemctl status haproxy
验证haproxy服务
[root@m1 ~]# netstat -lntup|grep haproxy
tcp        0      0 0.0.0.0:1080            0.0.0.0:*               LISTEN      4193/haproxy
tcp        0      0 0.0.0.0:16443           0.0.0.0:*               LISTEN      4193/haproxy
udp        0      0 0.0.0.0:50288           0.0.0.0:*                           4191/haproxy[root@m2 ~]# netstat -lntup|grep haproxy
tcp        0      0 0.0.0.0:1080            0.0.0.0:*               LISTEN      4100/haproxy
tcp        0      0 0.0.0.0:16443           0.0.0.0:*               LISTEN      4100/haproxy
udp        0      0 0.0.0.0:39062           0.0.0.0:*                           4098/haproxy[root@m3 ~]# netstat -lntup|grep haproxy
tcp        0      0 0.0.0.0:1080            0.0.0.0:*               LISTEN      4185/haproxy
tcp        0      0 0.0.0.0:16443           0.0.0.0:*               LISTEN      4185/haproxy
udp        0      0 0.0.0.0:47738           0.0.0.0:*                           4183/haproxy
5. 所有节点配置阿里云Docker,kubernetes镜像
配置docker镜像
# 安装需要的依赖包
yum install -y yum-utils# 设置阿里云docker镜像
yum-config-manager \--add-repo \https://mirrors.aliyun.com/docker-ce/linux/centos/docker-ce.repo# 生成本地缓存
yum makecache# 配置阿里云docker镜像加速
参考链接:https://blog.csdn.net/shida_csdn/article/details/104054041sudo mkdir -p /etc/dockersudo tee /etc/docker/daemon.json <<-'EOF'
{"registry-mirrors": ["https://xxxxxxxx.mirror.aliyuncs.com"],"exec-opts": ["native.cgroupdriver=systemd"]	# 修改 Docker Cgroup Driver 为 systemd
}
EOFsudo systemctl daemon-reload# 查看docker所有版本信息
yum list docker-ce --showduplicates | sort -r
[root@m1 ~]# yum list docker-ce --showduplicates | sort -r
Last metadata expiration check: 0:01:17 ago on Fri 01 Apr 2022 10:57:15 PM CST.
docker-ce.x86_64                3:20.10.9-3.el8                 docker-ce-stable
docker-ce.x86_64                3:20.10.8-3.el8                 docker-ce-stable
docker-ce.x86_64                3:20.10.7-3.el8                 docker-ce-stable
docker-ce.x86_64                3:20.10.6-3.el8                 docker-ce-stable
docker-ce.x86_64                3:20.10.5-3.el8                 docker-ce-stable
docker-ce.x86_64                3:20.10.4-3.el8                 docker-ce-stable
docker-ce.x86_64                3:20.10.3-3.el8                 docker-ce-stable
docker-ce.x86_64                3:20.10.2-3.el8                 docker-ce-stable
docker-ce.x86_64                3:20.10.14-3.el8                docker-ce-stable
docker-ce.x86_64                3:20.10.1-3.el8                 docker-ce-stable
docker-ce.x86_64                3:20.10.13-3.el8                docker-ce-stable
docker-ce.x86_64                3:20.10.12-3.el8                docker-ce-stable
docker-ce.x86_64                3:20.10.11-3.el8                docker-ce-stable
docker-ce.x86_64                3:20.10.10-3.el8                docker-ce-stable
docker-ce.x86_64                3:20.10.0-3.el8                 docker-ce-stable
docker-ce.x86_64                3:19.03.15-3.el8                docker-ce-stable
docker-ce.x86_64                3:19.03.14-3.el8                docker-ce-stable
docker-ce.x86_64                3:19.03.13-3.el8                docker-ce-stable
Available Packages
配置kubernetes镜像
# 配置阿里云Kubernetes 镜像
cat >> /etc/yum.repos.d/kubernetes.repo << EOF
[kubernetes]
name=Kubernetes
baseurl=https://mirrors.aliyun.com/kubernetes/yum/repos/kubernetes-el7-x86_64/
enabled=1
gpgcheck=1
repo_gpgcheck=1
gpgkey=https://mirrors.aliyun.com/kubernetes/yum/doc/yum-key.gpg https://mirrors.aliyun.com/kubernetes/yum/doc/rpm-package-key.gpg
EOF# 生成本地缓存
yum makecache -y# 查看K8S所有版本信息
yum list kubelet --showduplicates | sort -r
[root@m1 ~]# yum list kubelet --showduplicates | sort -r
Last metadata expiration check: 0:00:37 ago on Fri 01 Apr 2022 11:03:29 PM CST.
kubelet.x86_64                       1.18.9-0                         kubernetes
kubelet.x86_64                       1.18.8-0                         kubernetes
kubelet.x86_64                       1.18.6-0                         kubernetes
kubelet.x86_64                       1.18.5-0                         kubernetes
kubelet.x86_64                       1.18.4-1                         kubernetes
kubelet.x86_64                       1.18.4-0                         kubernetes
kubelet.x86_64                       1.18.3-0                         kubernetes
kubelet.x86_64                       1.18.2-0                         kubernetes
kubelet.x86_64                       1.18.20-0                        kubernetes
kubelet.x86_64                       1.18.19-0                        kubernetes
kubelet.x86_64                       1.18.18-0                        kubernetes
kubelet.x86_64                       1.18.17-0                        kubernetes
kubelet.x86_64                       1.18.16-0                        kubernetes
kubelet.x86_64                       1.18.15-0                        kubernetes
kubelet.x86_64                       1.18.14-0                        kubernetes
kubelet.x86_64                       1.18.13-0                        kubernetes
kubelet.x86_64                       1.18.12-0                        kubernetes
kubelet.x86_64                       1.18.1-0                         kubernetes
kubelet.x86_64                       1.18.10-0                        kubernetes
kubelet.x86_64                       1.18.0-0                         kubernetes
Available Packages
[root@m1 ~]#
6. 所有节点安装Docker,kubelet,kubeadm,kubectl等K8S组件
安装docker
# 安装docker  docker-ce   ee企业版
yum install -y docker-ce docker-ce-cli containerd.io# 启动Docker
systemctl start docker && systemctl enable docker && systemctl status docker# 查看docker版本信息
# docker version
Client: Docker Engine - CommunityVersion:           20.10.14API version:       1.41Go version:        go1.16.15Git commit:        a224086Built:             Thu Mar 24 01:47:44 2022OS/Arch:           linux/amd64Context:           defaultExperimental:      trueServer: Docker Engine - CommunityEngine:Version:          20.10.14API version:      1.41 (minimum version 1.12)Go version:       go1.16.15Git commit:       87a90dcBuilt:            Thu Mar 24 01:46:10 2022OS/Arch:          linux/amd64Experimental:     falsecontainerd:Version:          1.5.11GitCommit:        3df54a852345ae127d1fa3092b95168e4a88e2f8runc:Version:          1.0.3GitCommit:        v1.0.3-0-gf46b6badocker-init:Version:          0.19.0GitCommit:        de40ad0

安装kubelet、kubeadm、kubectl
由于K8S版本更新频繁,所以选择K8S的一个版本进行安装。这里指定版本号部署:
yum install -y kubelet-1.18.0 kubeadm-1.18.0 kubectl-1.18.0
systemctl enable kubelet

7. 在master01节点上部署Kubernetes Master
在含有VIP的master节点上操作,kubeadm.conf为初始化的配置文件。
# 创建目录并进入此目录
mkdir /usr/local/kubernetes/manifests -p && cd /usr/local/kubernetes/manifests/# 生成kubeadm-config配置文件
kubeadm config print init-defaults > /usr/local/kubernetes/manifests/kubeadm-config.yaml# 配置kubeadm-config配置文件
cat > kubeadm-config.yaml <<EOF
apiServer:certSANs:- m1- m2- m3- n1- n2- n3- master.k8s.io- 192.168.200.68- 192.168.200.61- 192.168.200.62- 192.168.200.63- 192.168.200.64- 192.168.200.65- 192.168.200.66- 127.0.0.1extraArgs:authorization-mode: Node,RBACtimeoutForControlPlane: 4m0s
apiVersion: kubeadm.k8s.io/v1beta1
certificatesDir: /etc/kubernetes/pki
clusterName: kubernetes
controlPlaneEndpoint: "master.k8s.io:16443"
controllerManager: {}
dns: type: CoreDNS
etcd:local:    dataDir: /var/lib/etcd
imageRepository: registry.aliyuncs.com/google_containers
kind: ClusterConfiguration
kubernetesVersion: v1.18.0
networking: dnsDomain: cluster.local  podSubnet: 10.244.0.0/16serviceSubnet: 10.1.0.0/16
scheduler: {}
EOF
在master1节点执行初始化操作,此过程漫长,需要耐心等待。
kubeadm init --config kubeadm-config.yaml
!!!记录以下命令,后续需要使用!!!
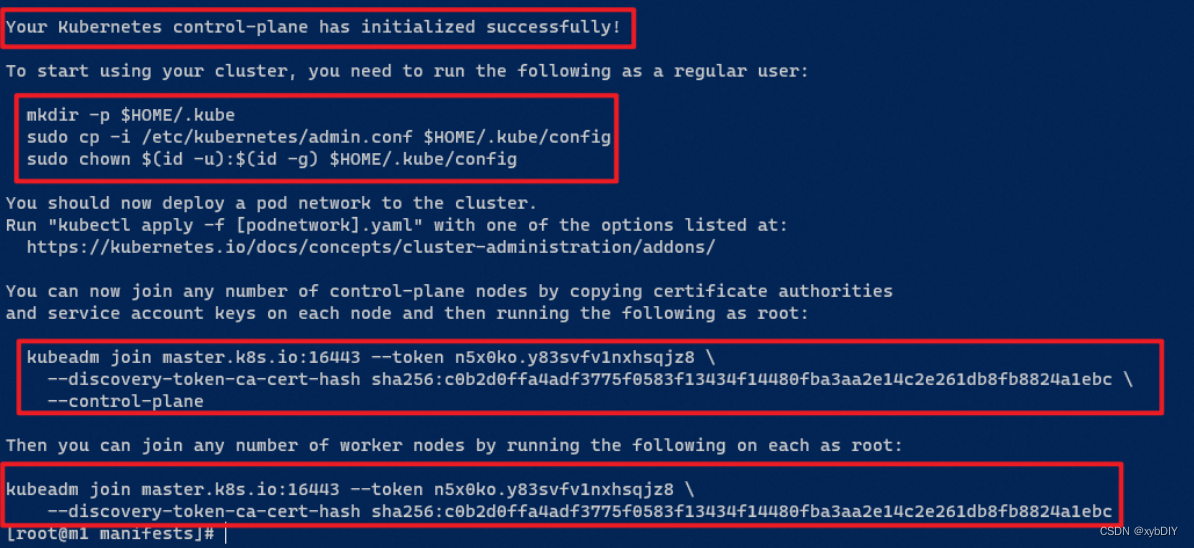
!!!保存好以下信息,待用!!!
Your Kubernetes control-plane has initialized successfully!To start using your cluster, you need to run the following as a regular user:mkdir -p $HOME/.kubesudo cp -i /etc/kubernetes/admin.conf $HOME/.kube/configsudo chown $(id -u):$(id -g) $HOME/.kube/configYou should now deploy a pod network to the cluster.
Run "kubectl apply -f [podnetwork].yaml" with one of the options listed at:https://kubernetes.io/docs/concepts/cluster-administration/addons/You can now join any number of control-plane nodes by copying certificate authorities
and service account keys on each node and then running the following as root:kubeadm join master.k8s.io:16443 --token n5x0ko.y83svfv1nxhsqjz8 \--discovery-token-ca-cert-hash sha256:c0b2d0ffa4adf3775f0583f13434f14480fba3aa2e14c2e261db8fb8824a1ebc \--control-planeThen you can join any number of worker nodes by running the following on each as root:kubeadm join master.k8s.io:16443 --token n5x0ko.y83svfv1nxhsqjz8 \--discovery-token-ca-cert-hash sha256:c0b2d0ffa4adf3775f0583f13434f14480fba3aa2e14c2e261db8fb8824a1ebc
master01节点上加载环境变量
mkdir -p $HOME/.kube
sudo cp -i /etc/kubernetes/admin.conf $HOME/.kube/config
sudo chown $(id -u):$(id -g) $HOME/.kube/config
使用以下命令查询相关信息
kubectl get nodes -o wide

kubeadm config images pull

docker images

docker ps

8. 在master01节点上部署集群网络
在master01上新建flannel网络
# 下载kube-flannel.yml
wget -c https://raw.githubusercontent.com/coreos/flannel/master/Documentation/kube-flannel.yml# 运行kube-flannel.yml
kubectl apply -f kube-flannel.yml# 检查运行状态,状态全部为Running
kubectl get pods -n kube-system# 查看master01节点状态,状态为Ready
kubectl get nodes
9. 将master02,master03节点加入K8S集群
!!!复制密钥及相关文件!!!
# 从master0复制密钥及相关文件到master02、master03
ssh root@192.168.200.62 mkdir -p /etc/kubernetes/pki/etcd
scp /etc/kubernetes/admin.conf root@192.168.200.62:/etc/kubernetes
scp /etc/kubernetes/pki/{ca.*,sa.*,front-proxy-ca.*} root@192.168.200.62:/etc/kubernetes/pki
scp /etc/kubernetes/pki/etcd/ca.* root@192.168.200.62:/etc/kubernetes/pki/etcdssh root@192.168.200.63 mkdir -p /etc/kubernetes/pki/etcd
scp /etc/kubernetes/admin.conf root@192.168.200.63:/etc/kubernetes
scp /etc/kubernetes/pki/{ca.*,sa.*,front-proxy-ca.*} root@192.168.200.63:/etc/kubernetes/pki
scp /etc/kubernetes/pki/etcd/ca.* root@192.168.200.63:/etc/kubernetes/pki/etcd
分别在master02和master03节点上执行执行在master1上init后输出的join命令,需要带上参数
--control-plane表示把master控制节点加入集群
kubeadm join master.k8s.io:16443 --token n5x0ko.y83svfv1nxhsqjz8 \--discovery-token-ca-cert-hash sha256:c0b2d0ffa4adf3775f0583f13434f14480fba3aa2e14c2e261db8fb8824a1ebc \--control-plane
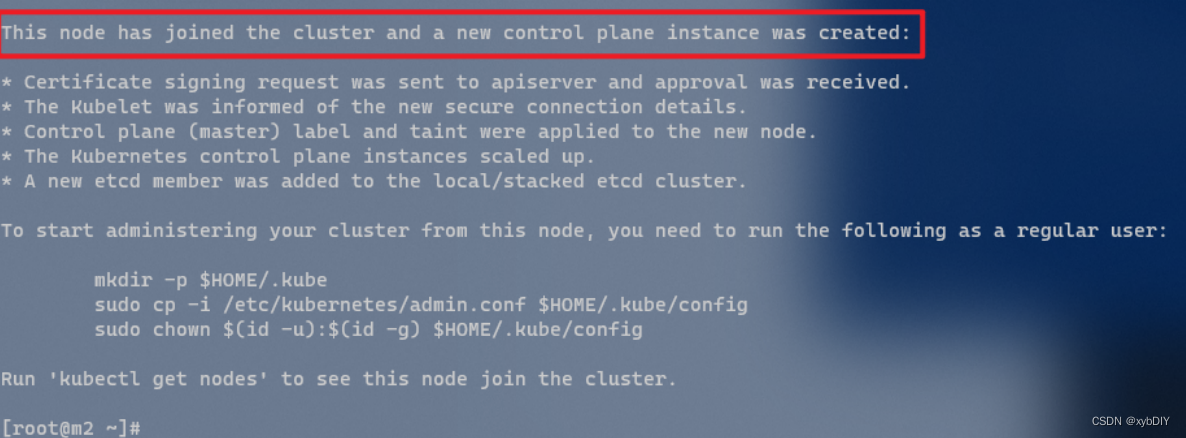
This node has joined the cluster and a new control plane instance was created:* Certificate signing request was sent to apiserver and approval was received.
* The Kubelet was informed of the new secure connection details.
* Control plane (master) label and taint were applied to the new node.
* The Kubernetes control plane instances scaled up.
* A new etcd member was added to the local/stacked etcd cluster.To start administering your cluster from this node, you need to run the following as a regular user:mkdir -p $HOME/.kubesudo cp -i /etc/kubernetes/admin.conf $HOME/.kube/configsudo chown $(id -u):$(id -g) $HOME/.kube/configRun 'kubectl get nodes' to see this node join the cluster.
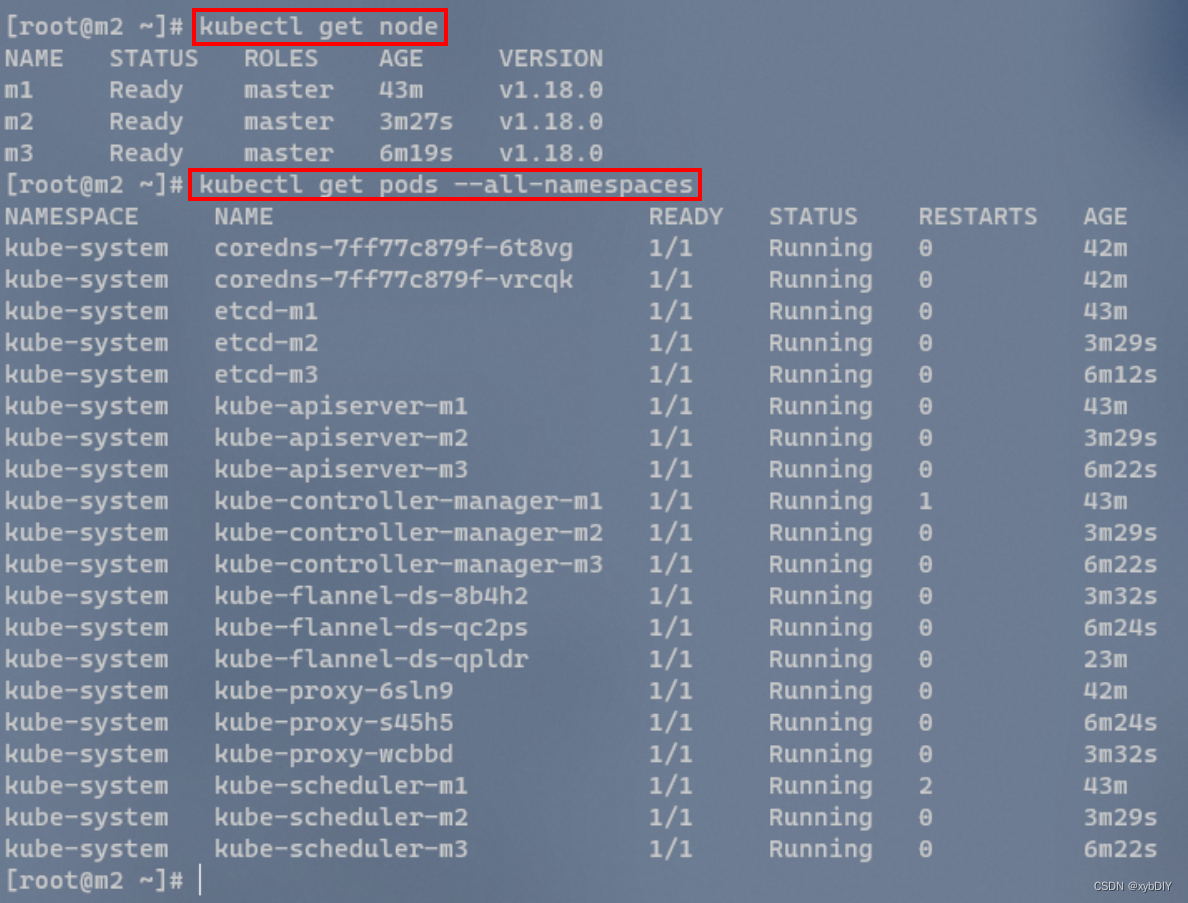
检查集群状态
kubectl get node
kubectl get pods --all-namespaces
10. 将Node01,Node02,Node03三个工作节点加入到K8S集群
分别在node1和node02节点上执行向集群添加新节点,执行在kubeadm init输出的kubeadm join命令:不需要添加
--control-plane
kubeadm join master.k8s.io:16443 --token n5x0ko.y83svfv1nxhsqjz8 \--discovery-token-ca-cert-hash sha256:c0b2d0ffa4adf3775f0583f13434f14480fba3aa2e14c2e261db8fb8824a1ebc

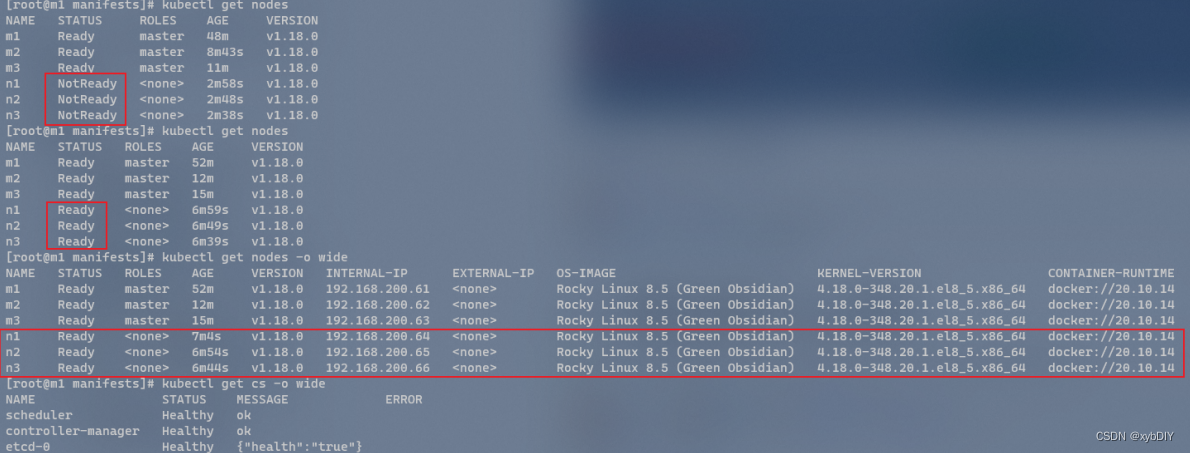
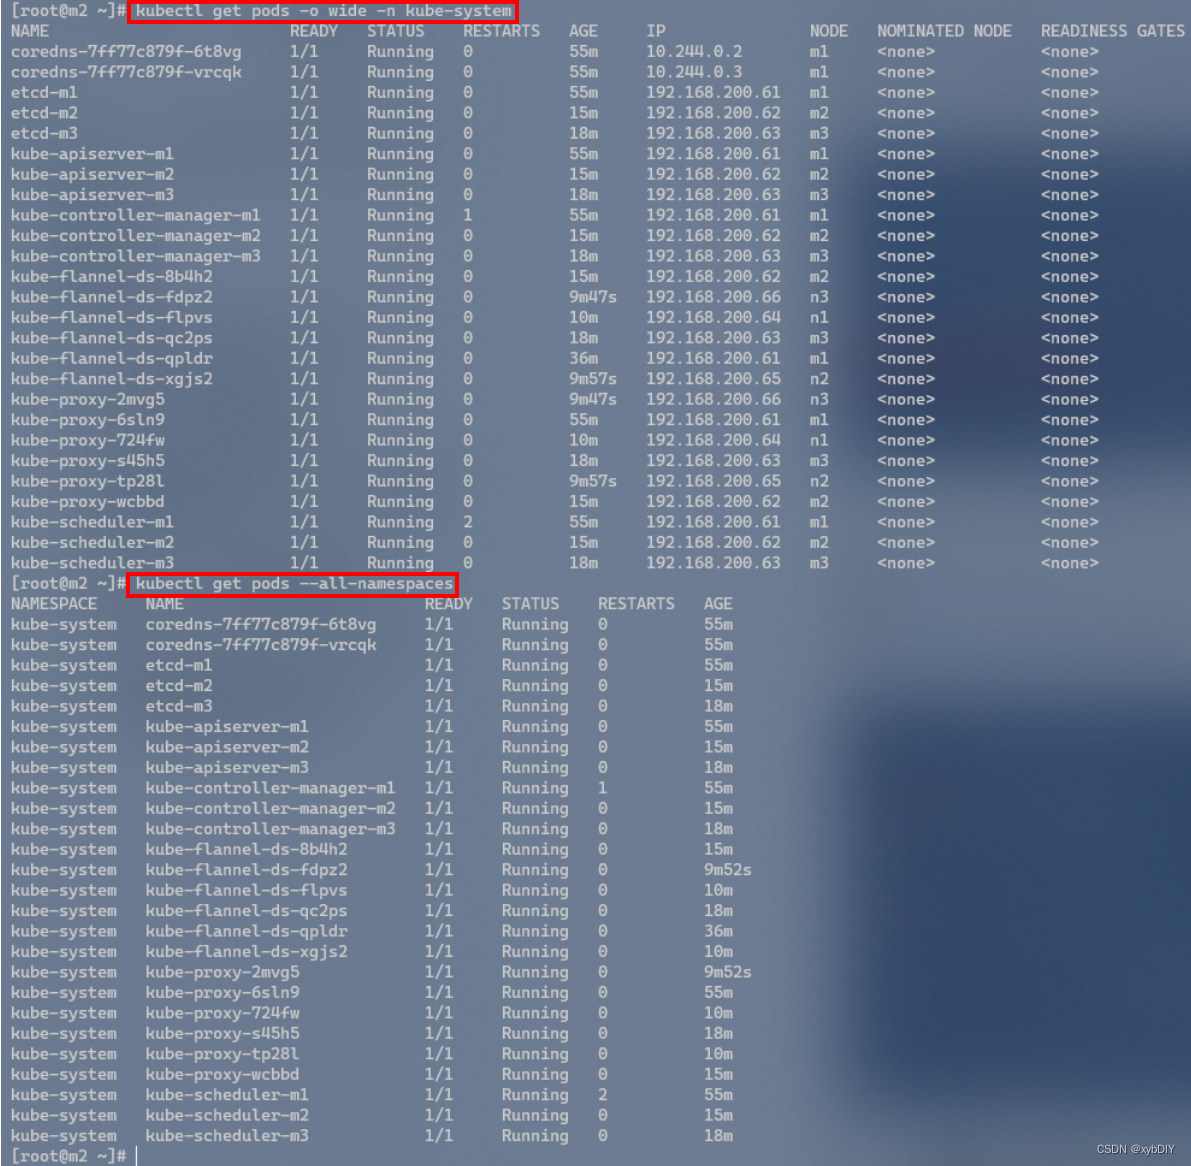
在三个任意一个控制节点上检查节点状态信息
kubectl get nodes
kubectl get cs -o wide
kubectl get pods -o wide -n kube-system
kubectl get pods --all-namespaces
11. 创建Pod测试kubernetes集群可用性
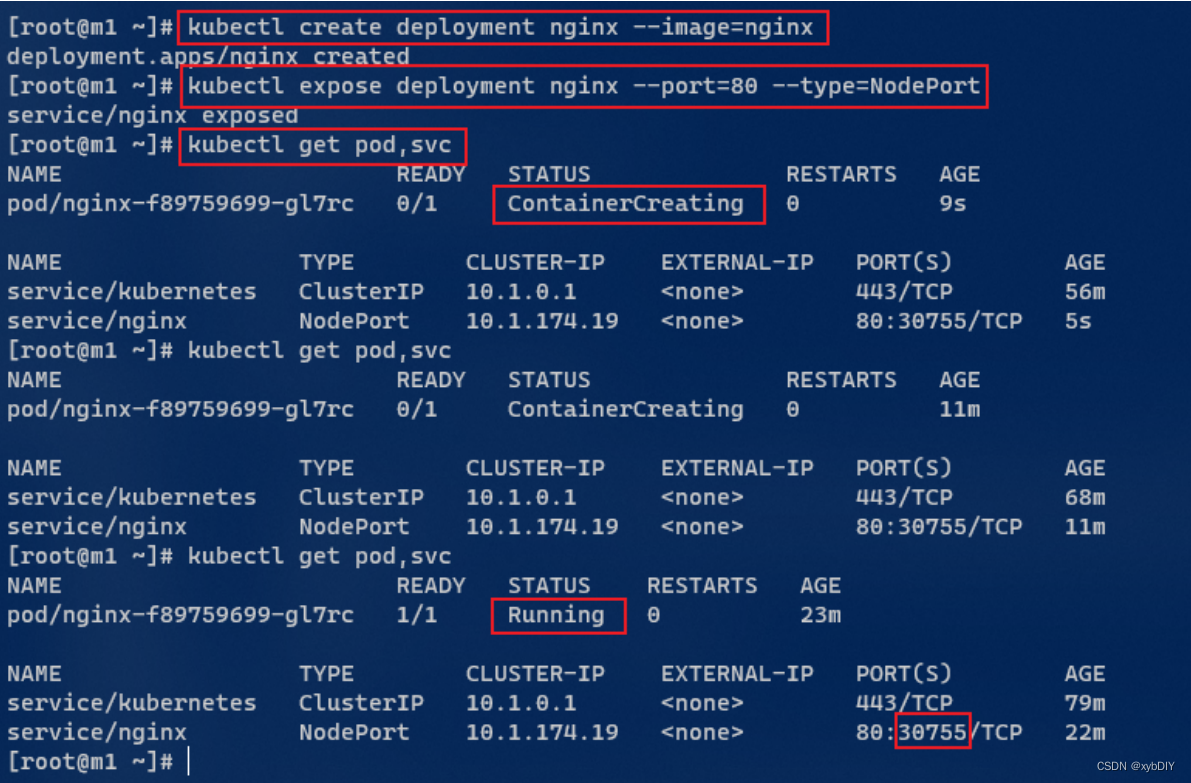
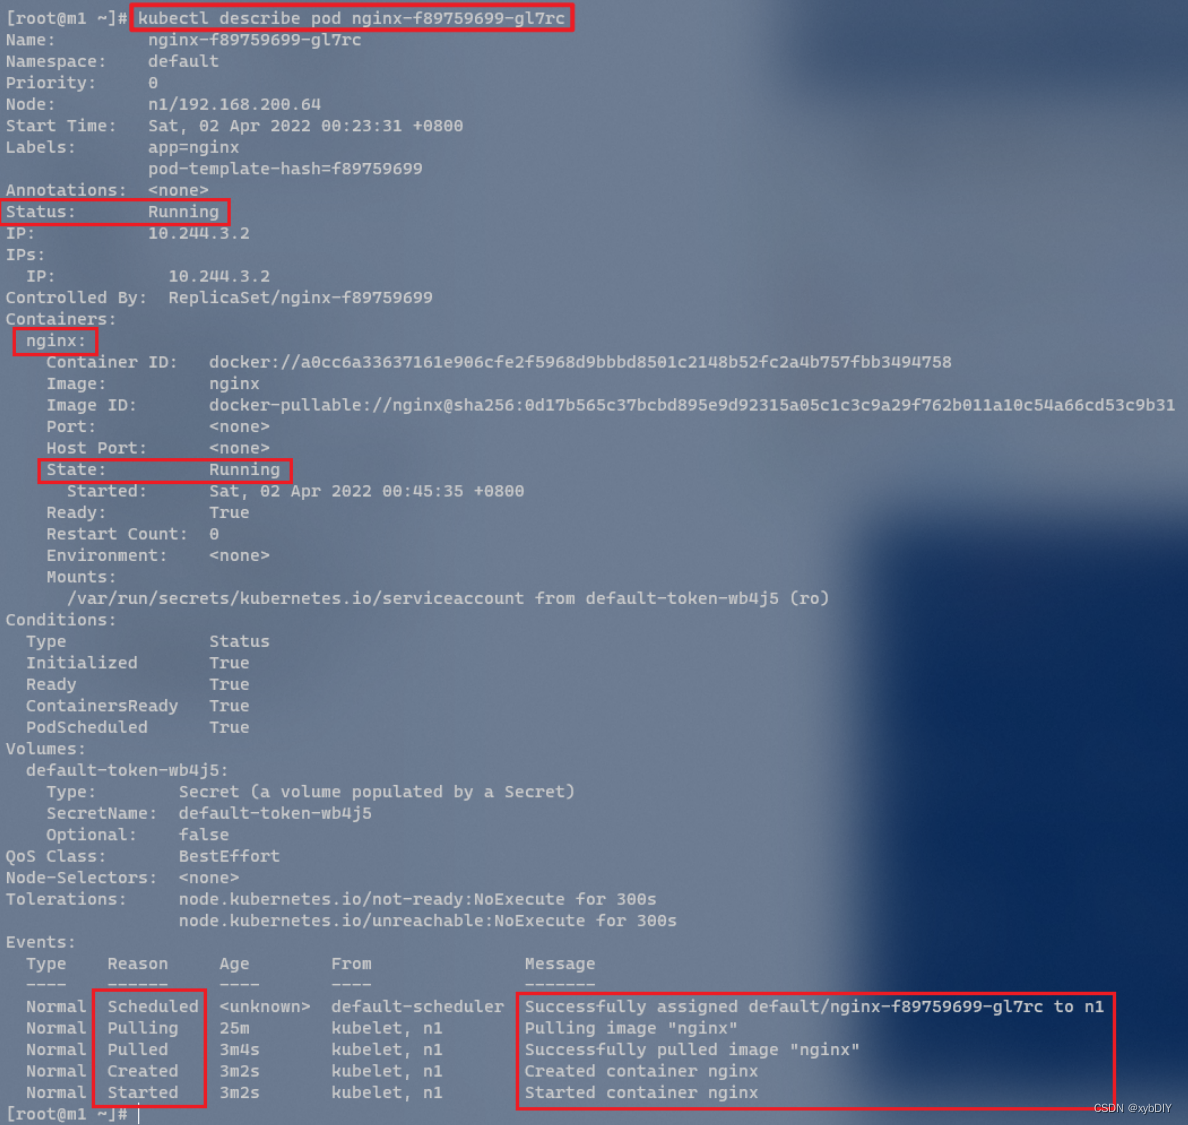
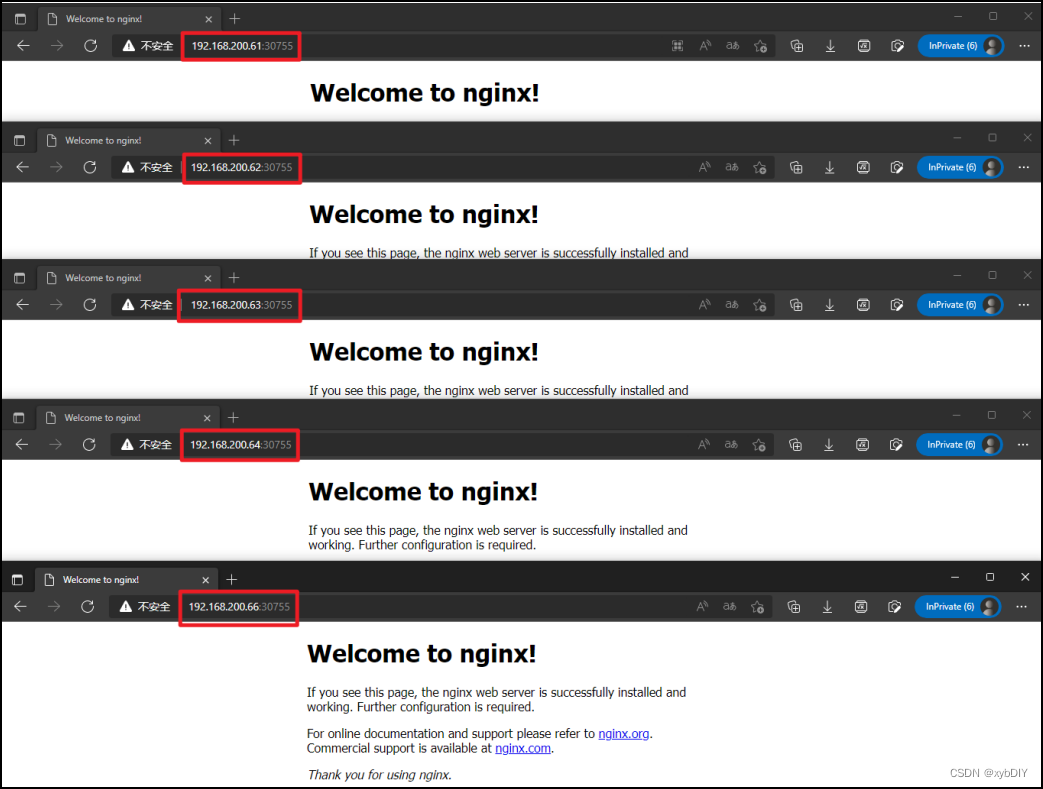
在Kubernetes集群中创建一个pod,验证是否正常运行:以下命令基于任意控制节点操作:
kubectl create deployment nginx --image=nginx
kubectl expose deployment nginx --port=80 --type=NodePort
kubectl get pod,svc
# 查看Pod详细信息
kubectl describe pod nginx-f89759699-gl7rc
访问地址:http://NodeIP:Port
12. 安装Kubernetes Dashboard
安装Kubernetes Dashboard
# 下载recommended.yaml
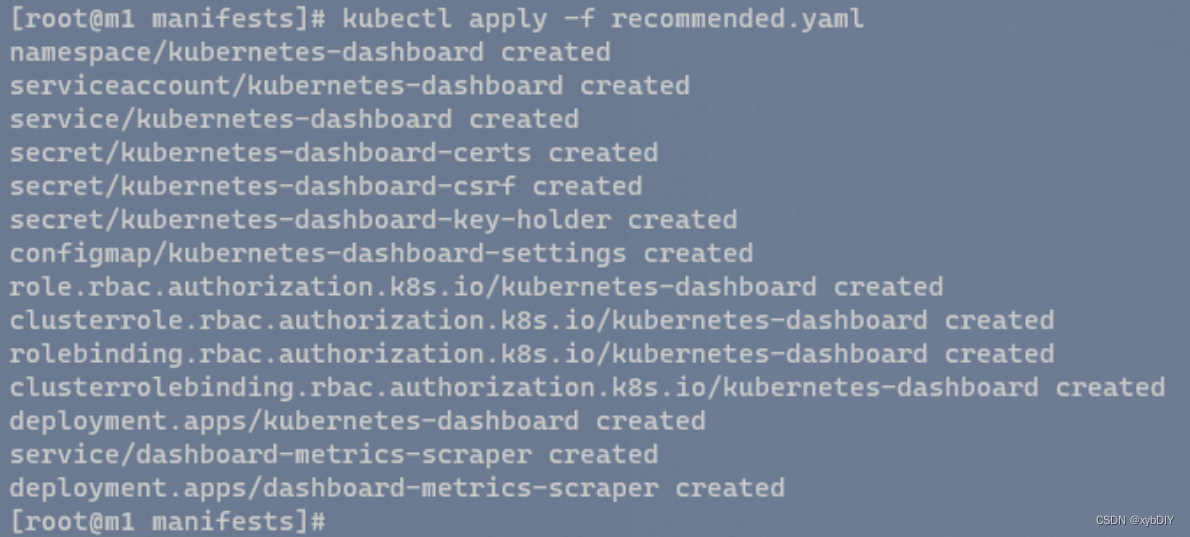
wget https://raw.githubusercontent.com/kubernetes/dashboard/v2.0.3/aio/deploy/recommended.yaml# 执行recommended.yaml
kubectl apply -f recommended.yaml
kubectl get pods -n kubernetes-dashboard
kubectl get svc -n kubernetes-dashboard

# kubectl patch svc kubernetes-dashboard -p '{"spec":{"type":"NodePort"}}' -n kubernetes-dashboard
service/kubernetes-dashboard patched
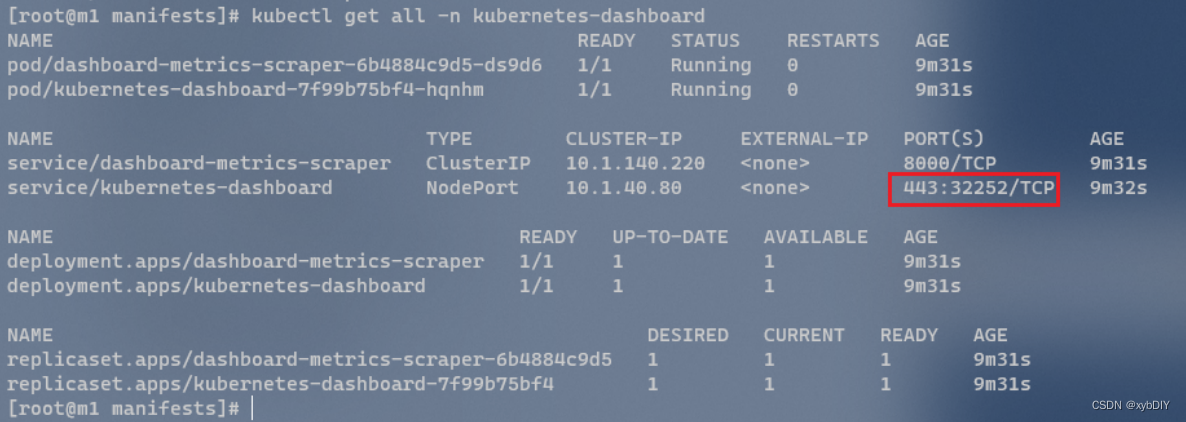
# 检查Kubernetes Dashboard运行情况,查看关于kubernetes-dashboard的所有信息
kubectl get all -n kubernetes-dashboard
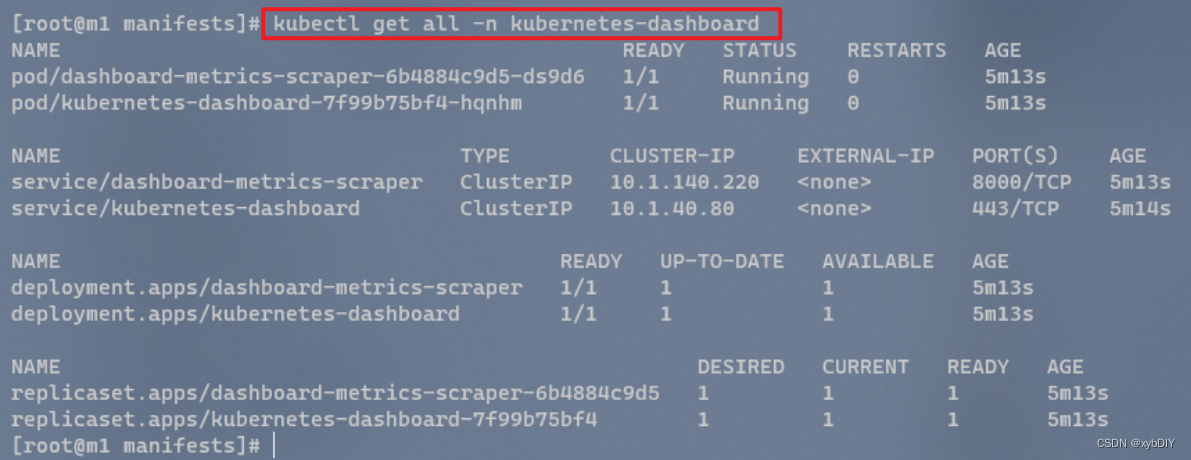
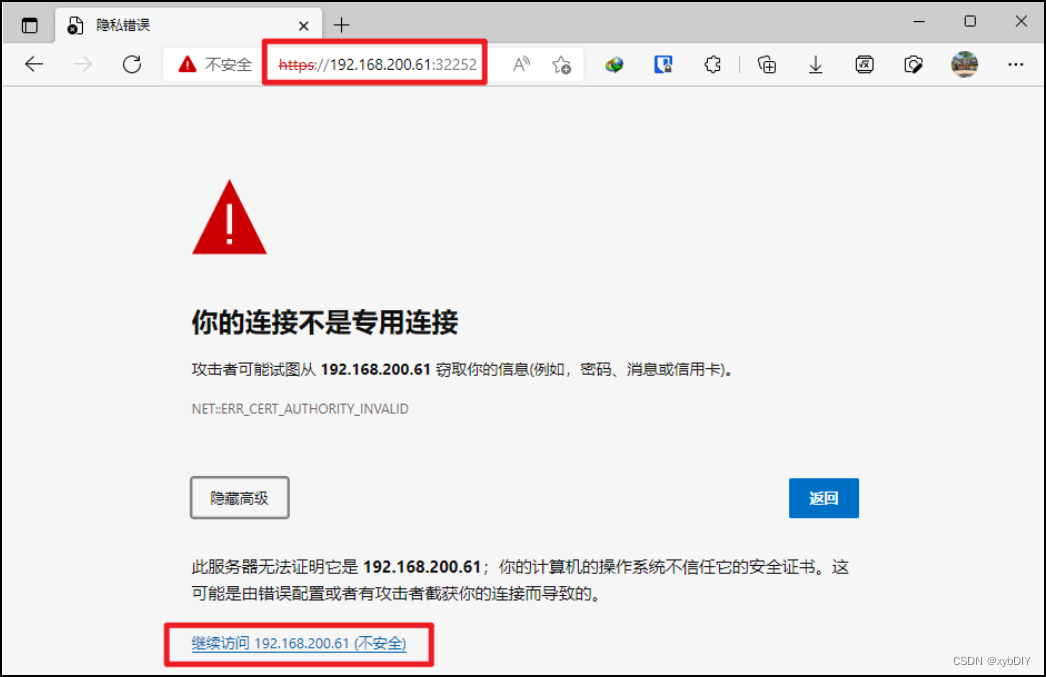
访问Kubernetes Dashboard
# K8S集群中任意一台服务器地址+端口号
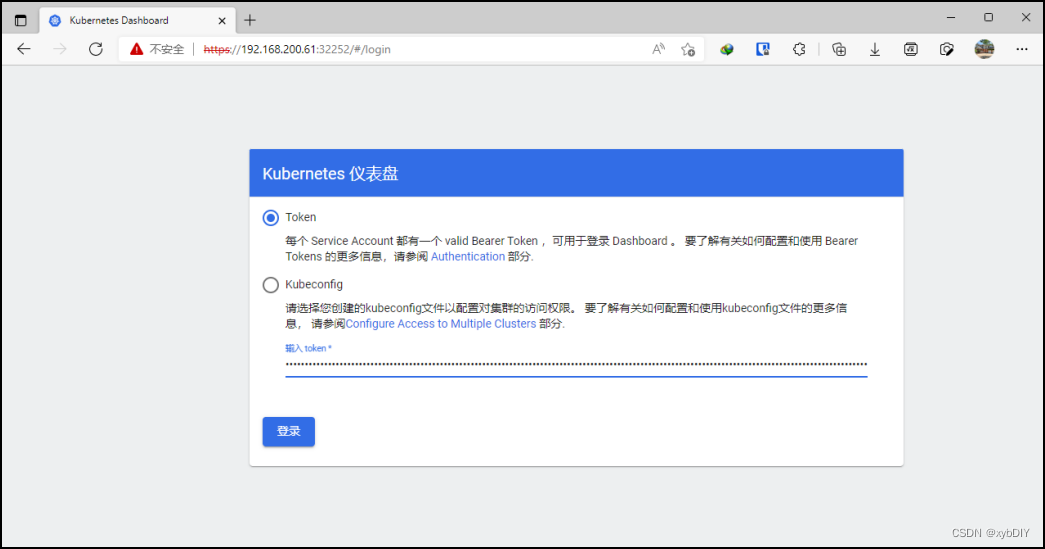
https://192.168.200.61:32252
采用Token认证方式登录Dashboard
[root@m1 ~]# kubectl create serviceaccount dashboard -n kubernetes-dashboard[root@m1 ~]# kubectl create rolebinding def-ns-admin --clusterrole=admin --serviceaccount=default:def-ns-admin[root@m1 ~]# kubectl create clusterrolebinding dashboard-cluster-admin --clusterrole=cluster-admin --serviceaccount=kubernetes-dashboard:dashboard[root@m1 ~]# kubectl describe sa dashboard -n kubernetes-dashboard
Name:                dashboard
Namespace:           kubernetes-dashboard
Labels:              <none>
Annotations:         <none>
Image pull secrets:  <none>
Mountable secrets:   dashboard-token-pm2r4
Tokens:              dashboard-token-pm2r4
Events:              <none>
[root@m1 ~]# kubectl describe secret dashboard-token-pm2r4 -n kubernetes-dashboard
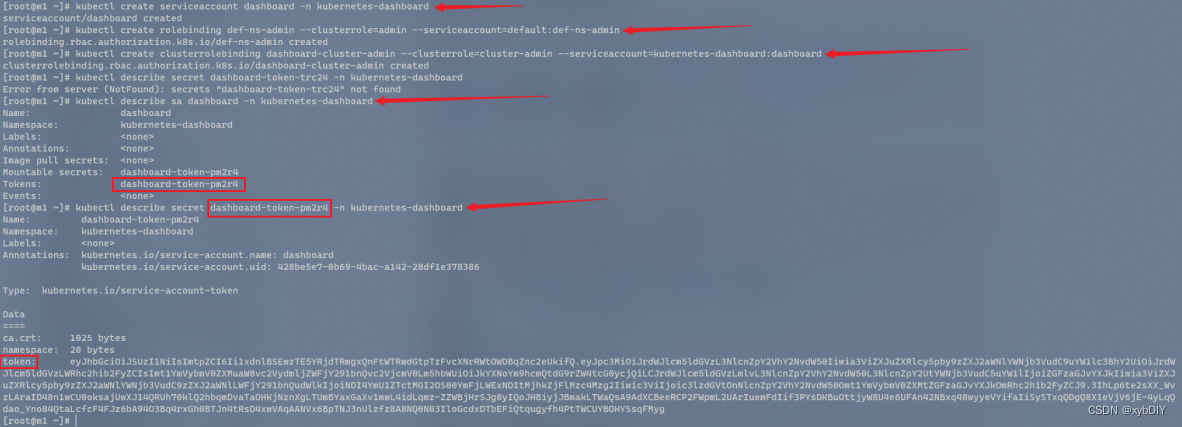
获得token值后,填入登录。
登录成功,查看集群状态
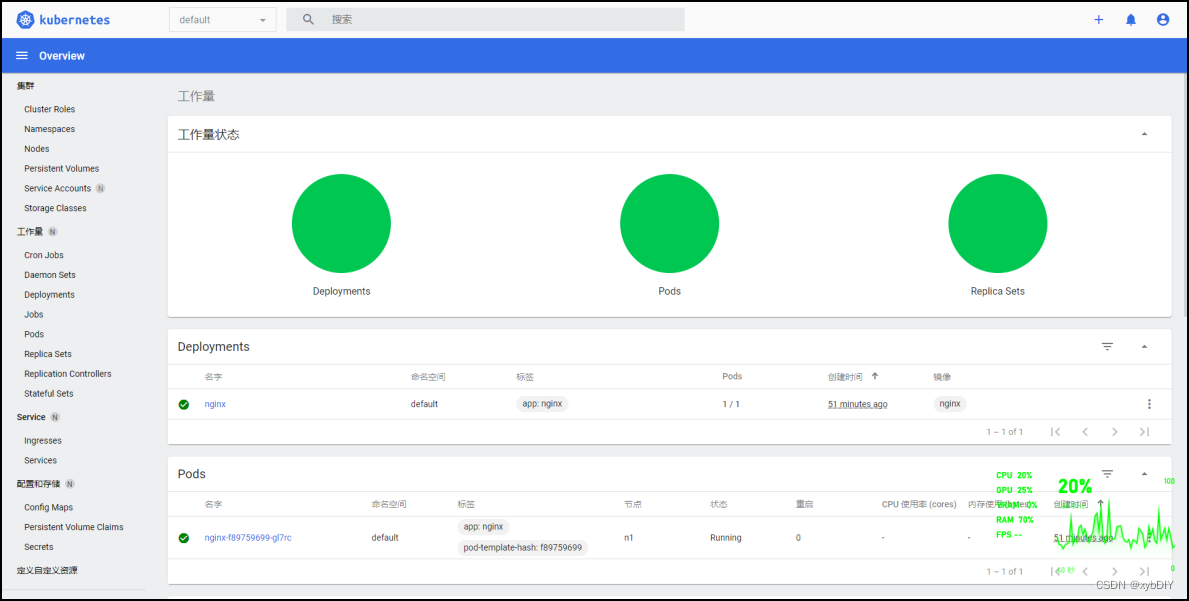
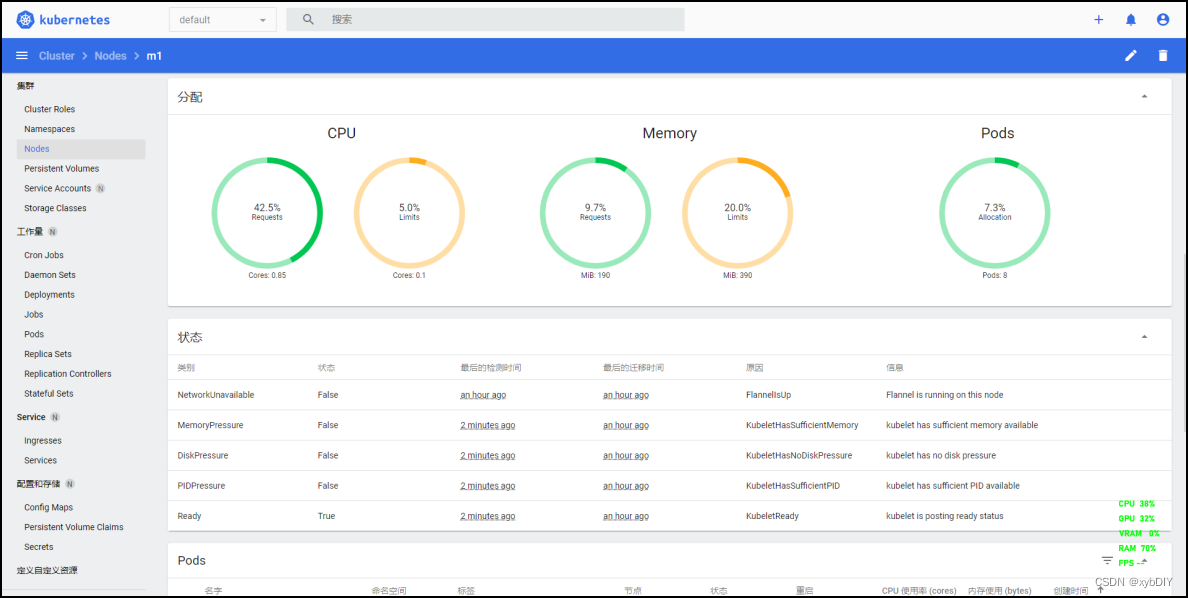
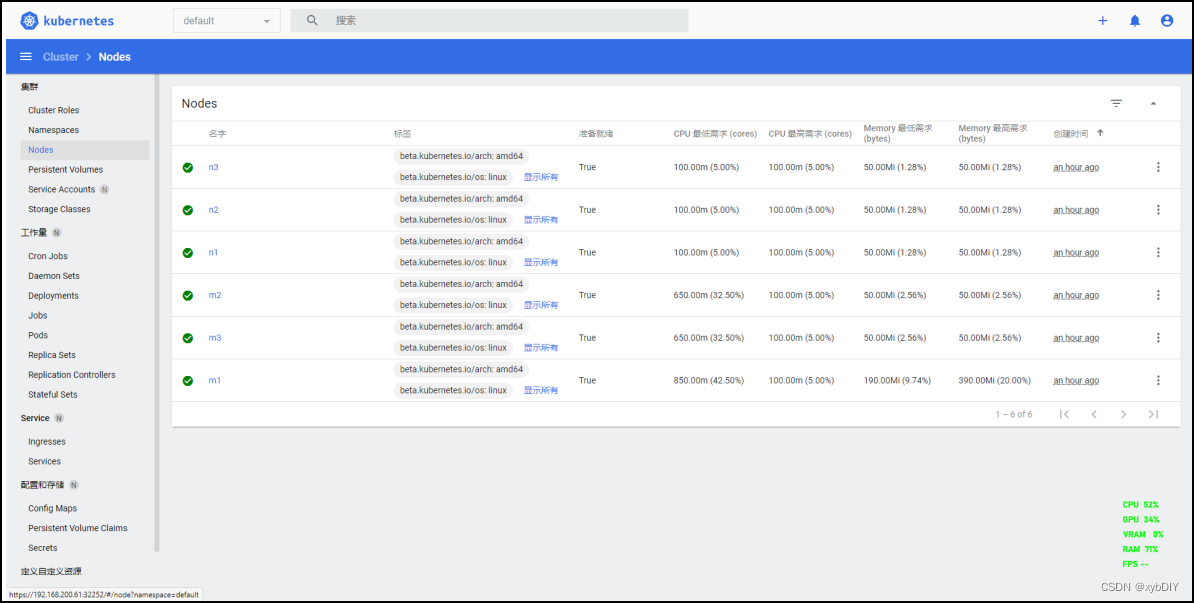
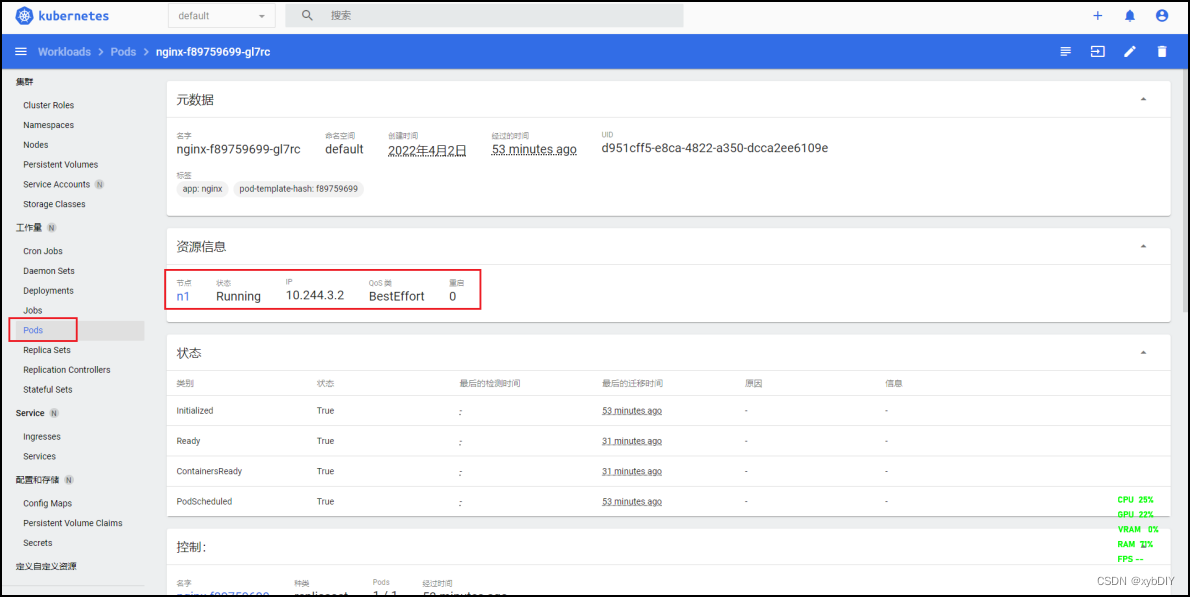
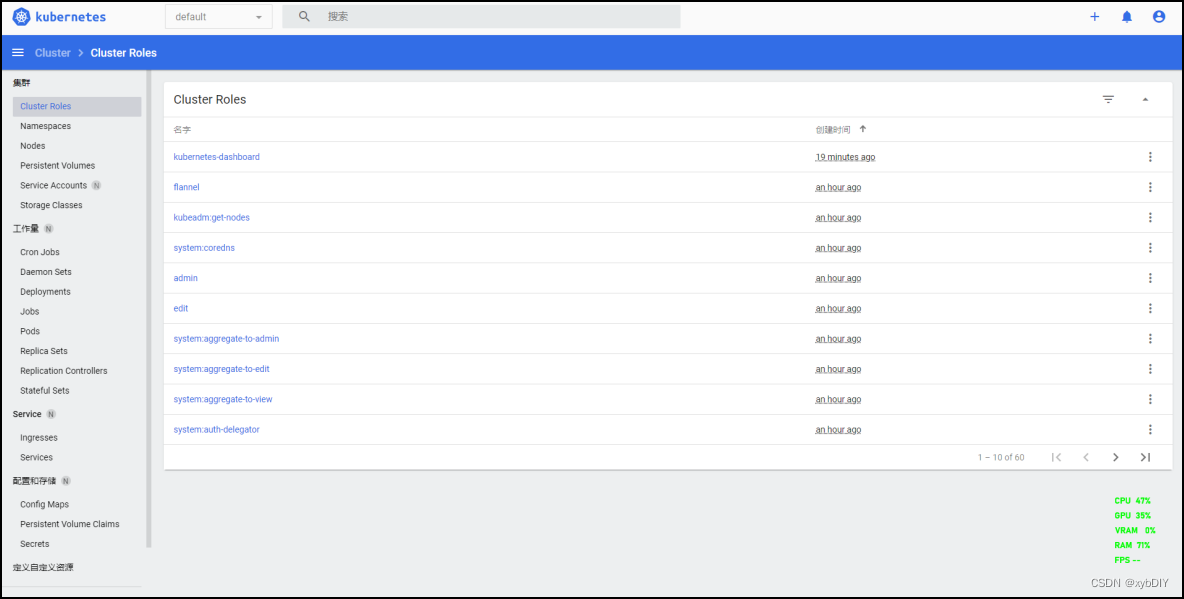
13. 模拟管理节点出故障(master01宕机)
当master01主机宕机,nginx服务是否能够正常工作,不受影响。查看VIP转移至哪个master节点上。
master01关机,模拟master出现故障。

继续访问nginx服务,发现除master01节点无法正常访问,其余节点都可以正常访问,不受影响。实现了K8S集群的高可用性。

查看各个node、pod工作状况。除master01节点出故障外,其余节点和容器均正常运行。
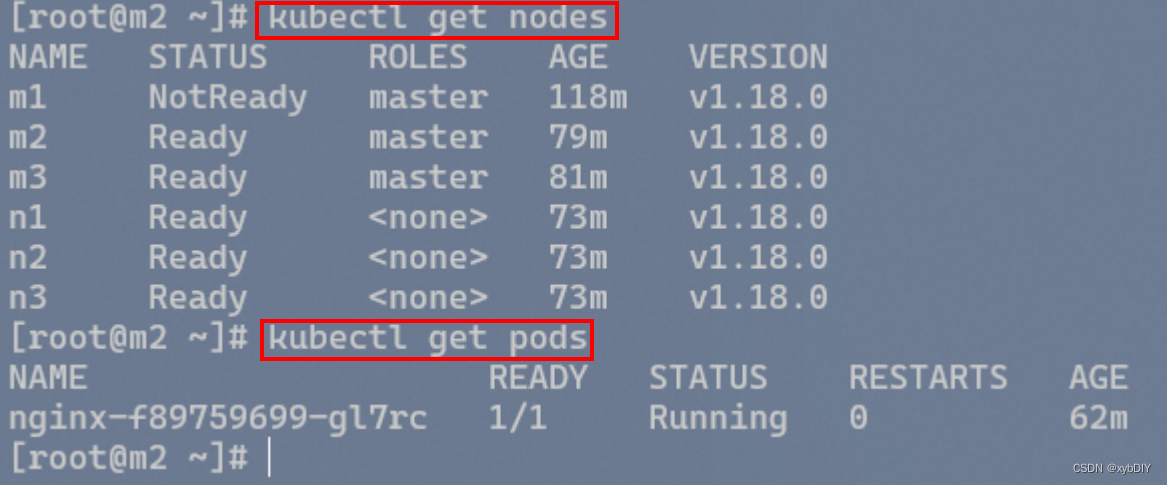
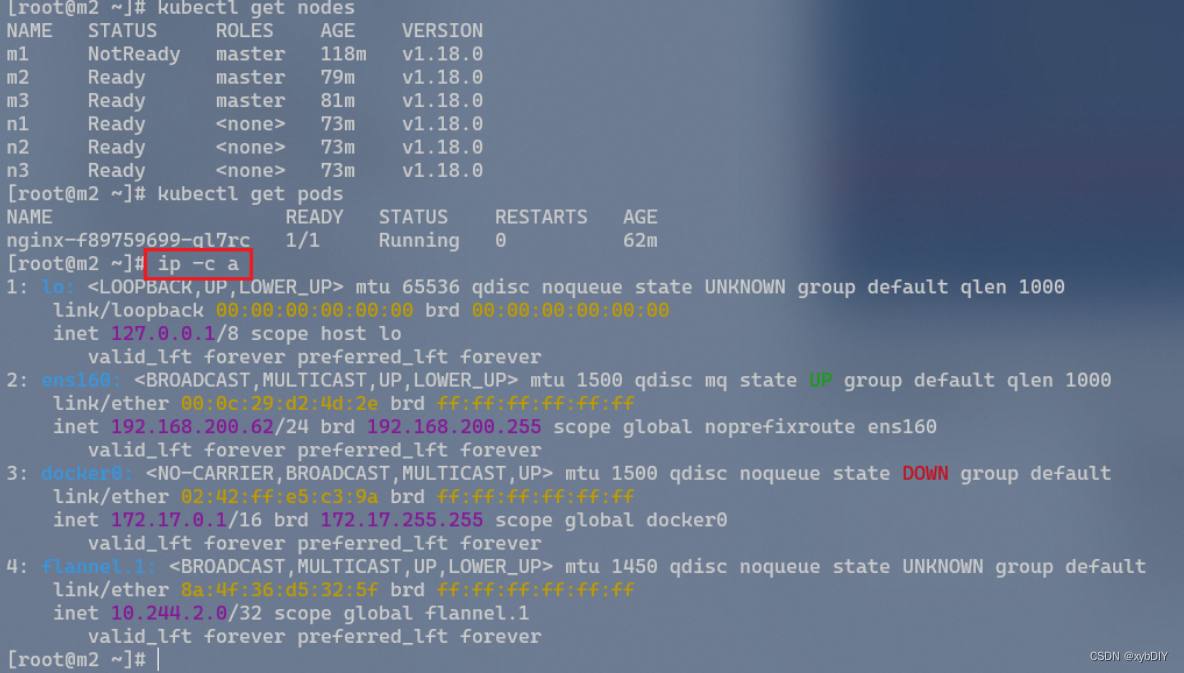
发现VIP漂移到了master02节点上。实现了网络的负载均衡。
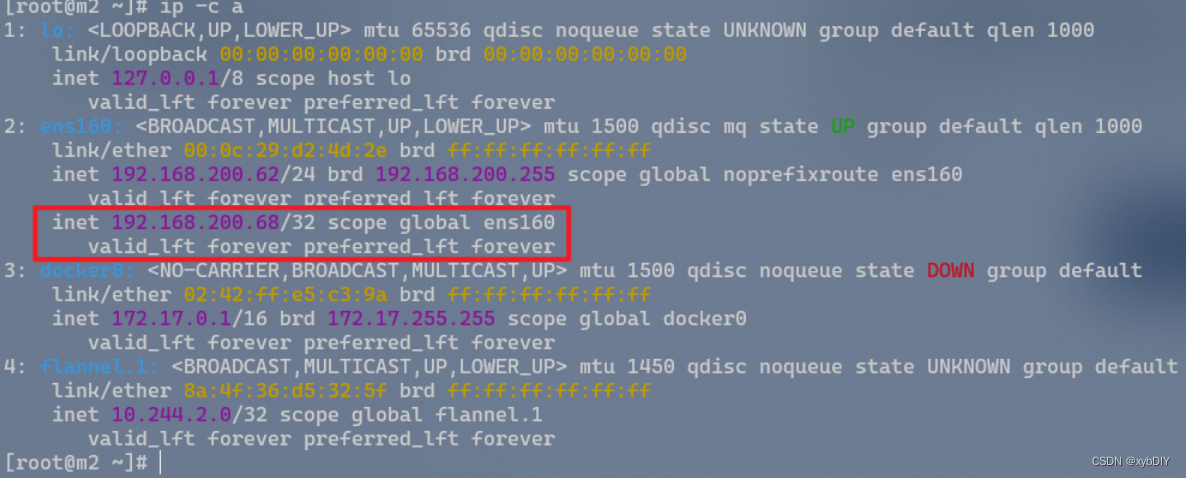
重启master01主机,查看服务是否能够正常运行,VIP节点是否能够重新漂移回去。
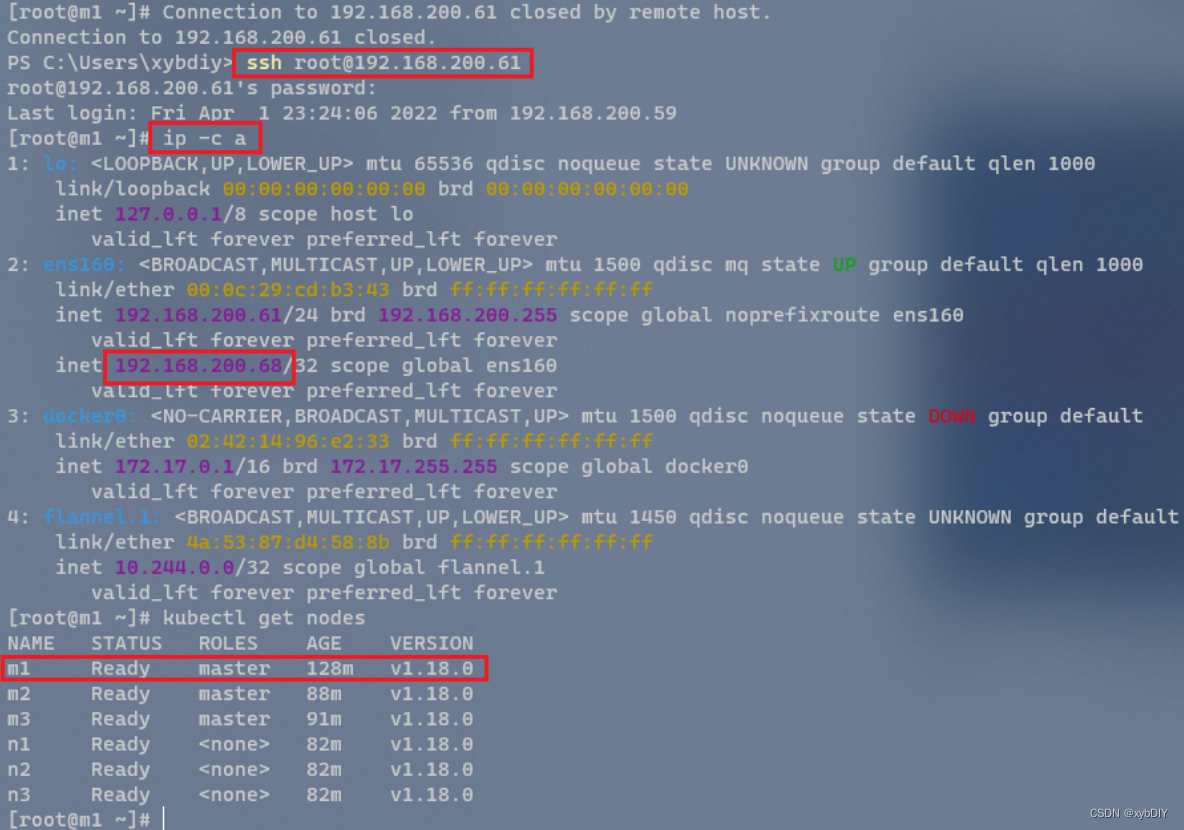

发现master02主机节点上的VIP已经漂移。
五、 K9S安装与体验(可选)✨
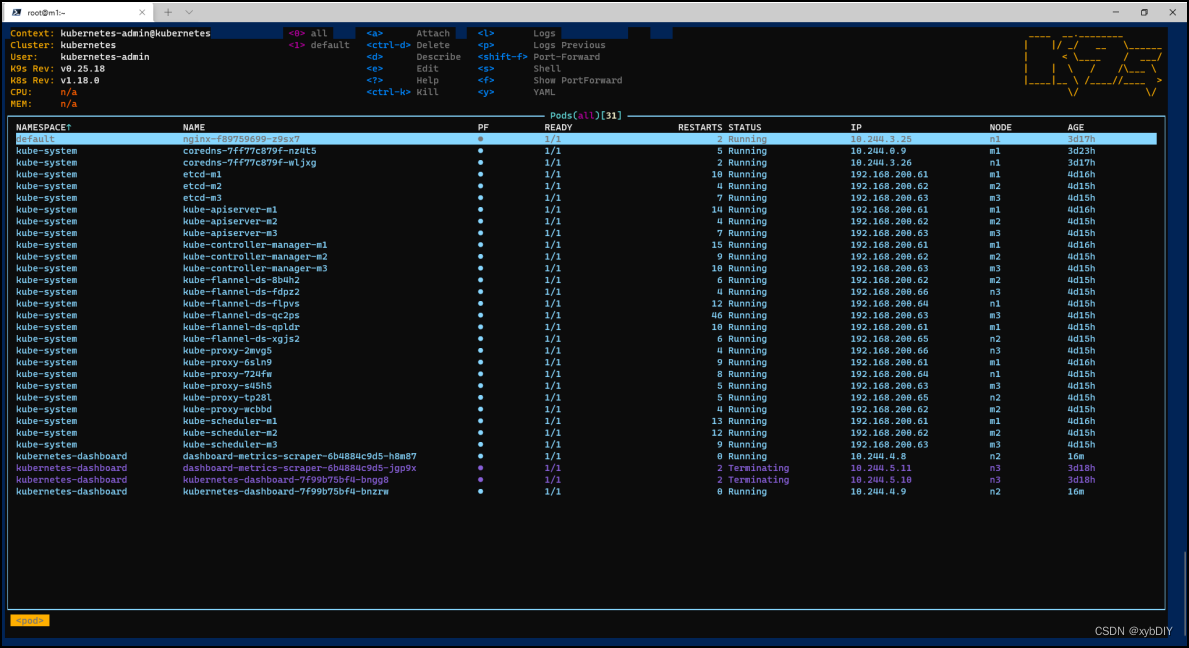
k9s是一个基于终端的UI,用于与你的Kubernetes集群互动。这个项目的目的是使其更容易导航、观察和管理你在kubernetes集群部署的应用程序。k9s持续观察Kubernetes的变化,并提供后续的命令来与你观察到的资源进行互动。
下载K9S
[root@m1 ~]# curl -sS https://webinstall.dev/k9s | bashThanks for using webi to install 'k9s@stable' on 'Linux/x86_64'.
Have a problem? Experience a bug? Please let us know:https://github.com/webinstall/webi-installers/issuesLovin' it? Say thanks with a Star on GitHub:https://github.com/webinstall/webi-installersDownloading k9s from
https://github.com/derailed/k9s/releases/download/v0.25.18/k9s_Linux_x86_64.tar.gzSaved as /root/Downloads/webi/k9s/0.25.18/k9s_Linux_x86_64.tar.gz
Extracting /root/Downloads/webi/k9s/0.25.18/k9s_Linux_x86_64.tar.gz
Installing to /root/.local/opt/k9s-v0.25.18/bin/k9s
Installed 'k9s v0.25.18' as /root/.local/bin/k9sYou need to update your PATH to use k9s:export PATH="/root/.local/bin:$PATH"
[root@m1 ~]# export PATH="/root/.local/bin:$PATH"
查看K9S版本信息
[root@m1 ~]# k9s version____  __.________
|    |/ _/   __   \______
|      < \____    /  ___/
|    |  \   /    /\___ \
|____|__ \ /____//____  >\/            \/Version:    v0.25.18
Commit:     6085039f83cd5e8528c898cc1538f5b3287ce117
Date:       2021-12-28T16:53:21Z
[root@m1 ~]#[root@m1 ~]# k9s info____  __.________
|    |/ _/   __   \______
|      < \____    /  ___/
|    |  \   /    /\___ \
|____|__ \ /____//____  >\/            \/Configuration:   /root/.config/k9s/config.yml
Logs:            /tmp/k9s-root.log
Screen Dumps:    /tmp/k9s-screens-root
[root@m1 ~]#
查看K9S帮助命令
[root@m1 ~]# k9s help
K9s is a CLI to view and manage your Kubernetes clusters.Usage:k9s [flags]k9s [command]Available Commands:completion  generate the autocompletion script for the specified shellhelp        Help about any commandinfo        Print configuration infoversion     Print version/build infoFlags:-A, --all-namespaces                 Launch K9s in all namespaces--as string                      Username to impersonate for the operation--as-group stringArray           Group to impersonate for the operation--certificate-authority string   Path to a cert file for the certificate authority--client-certificate string      Path to a client certificate file for TLS--client-key string              Path to a client key file for TLS--cluster string                 The name of the kubeconfig cluster to use-c, --command string                 Overrides the default resource to load when the application launches--context string                 The name of the kubeconfig context to use--crumbsless                     Turn K9s crumbs off--headless                       Turn K9s header off-h, --help                           help for k9s--insecure-skip-tls-verify       If true, the server's caCertFile will not be checked for validity--kubeconfig string              Path to the kubeconfig file to use for CLI requests--logFile string                 Specify the log file (default "/tmp/k9s-root.log")-l, --logLevel string                Specify a log level (info, warn, debug, trace, error) (default "info")--logoless                       Turn K9s logo off-n, --namespace string               If present, the namespace scope for this CLI request--readonly                       Sets readOnly mode by overriding readOnly configuration setting-r, --refresh int                    Specify the default refresh rate as an integer (sec) (default 2)--request-timeout string         The length of time to wait before giving up on a single server request--screen-dump-dir string         Sets a path to a dir for a screen dumps--token string                   Bearer token for authentication to the API server--user string                    The name of the kubeconfig user to use--write                          Sets write mode by overriding the readOnly configuration settingUse "k9s [command] --help" for more information about a command.
[root@m1 ~]#
