文章目录
- 一、层和块
- 1.自定义块
- 2.顺序块
- 3.在前向传播函数中执行代码
- 二、参数管理
- 1.参数访问
- 2.参数初始化
- 3.参数绑定
- 三、自定义层
- 1.不带参数的层
- 2.带参数的层
- 四、读写文件
- 1.加载和保存张量
- 2.加载和保存模型参数
- 五、使用GPU
- [相关总结]
- state_dict()
一、层和块

为了实现复杂神经网络块,引入了神经网络块的概念。使用块进行抽象的一个好处是可以将一些块组合成更大的组件。
从编程的角度来看,块由类表示。
import torch
from torch import nn
from torch.nn import functional as Fnet = nn.Sequential(nn.Linear(20, 256), nn.ReLU(), nn.Linear(256, 10))
# nn.Sequential定义了一种特殊的ModuleX = torch.rand(2, 20)
# print(X)
net(X)
tensor([[ 0.0479, 0.0093, -0.0509, 0.0863, -0.0410, -0.0043, -0.1234, -0.0119,
0.0347, -0.0381],
[ 0.1190, 0.0932, -0.0282, 0.2016, -0.0204, -0.0272, -0.1753, 0.0427,
-0.1553, -0.0589]], grad_fn=)
1.自定义块
每个块必须提供的基本功能:
- 1.将输入数据作为其前向传播函数的参数。
- 2.通过前向传播函数来生成输出
- 3.计算其输出关于输入的梯度,可通过其反向传播函数进行访问。通常这是自动发生的。
- 4.存储和访问前向传播计算所需的参数。
- 5.根据需要初始化模型参数。
ex:编写块
class MLP(nn.Module):def __init__(self):# 用模型参数声明层super().__init__() #调用父类self.hidden = nn.Linear(20, 256) #隐藏层self.out = nn.Linear(256, 10) #输出层def forward(self, X):return self.out(F.relu(self.hidden(X)))#  实例化多层感知机的层, 然后在每次调用正向传播函数时调用这些层
net = MLP()
net(X)
tensor([[-0.1158, -0.1282, -0.1533, 0.0258, 0.0228, 0.0202, -0.0638, -0.1078,0.0511, 0.0913],[-0.1663, -0.0860, -0.2551, 0.1551, -0.0917, -0.0747, -0.2828, -0.2308,0.1149, 0.1360]], grad_fn=<AddmmBackward>)2.顺序块
class MySequential(nn.Module):def __init__(self, *args):super().__init__()for block in args:
#             _module的类型是OrderedDictself._modules[block] = blockdef forward(self, X):
#       OrderedDict保证了按照成员添加的顺序遍历它们for block in self._modules.values():X = block(X)return Xnet = MySequential(nn.Linear(20, 256), nn.ReLU(), nn.Linear(256, 10))
net(X)
当MySequential的前向传播函数被调用时, 每个添加的块都按照它们被添加的顺序执行。
3.在前向传播函数中执行代码
self.rand_weight在实例化中被随机初始化,之后为常量,因此它永远不会被反向传播
class FixedHiddenMLP(nn.Module):def __init__(self):super().__init__()
#       rand_weight不参加训练self.rand_weight = torch.rand((20, 20), requires_grad=False)self.linear = nn.Linear(20, 20)def forward(self, X):X = self.linear(X)
#       将X和rand_weight做矩阵乘法X = F.relu(torch.mm(X, self.rand_weight) + 1)X = self.linear(X)while X.abs().sum() > 1:X /= 2
#       矩阵求和return X.sum()net = FixedHiddenMLP()
net(X)
tensor(-0.1869, grad_fn=<SumBackward0>)
混合搭配各种组合块
class NestMLP(nn.Module):def __init__(self):super().__init__()self.net = nn.Sequential(nn.Linear(20, 64), nn.ReLU(),nn.Linear(64, 32), nn.ReLU())self.linear = nn.Linear(32, 16)def forward(self, X):return self.linear(self.net(X))chimera = nn.Sequential(NestMLP(), nn.Linear(16, 20), FixedHiddenMLP())
chimera(X)
tensor(-0.1363, grad_fn=<SumBackward0>)
二、参数管理
在选择了架构并设置完超参数后,我们就进入了训练阶段。此时,我们的目标是找到损失函数最小的模型参数值。
# 首先关注具有单隐层的多层感知机
import torch
from torch import nn
#                    net[0]           net[1]       net[2]
net = nn.Sequential(nn.Linear(4, 8), nn.ReLU(), nn.Linear(8, 1))
X = torch.rand(size=(2, 4))
net(X)tensor([[ 0.0699],[-0.0591]], grad_fn=<AddmmBackward>)
1.参数访问
当通过Sequential类定义模型时, 我们可以通过索引来访问模型的任意层。 这就像模型是一个列表一样,每层的参数都在其属性中。 如下所示,我们可以检查第二个全连接层的参数
# net[2]为最后一个输出层
print(net[2].state_dict())
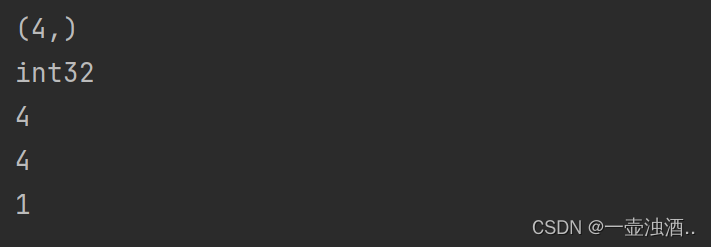
目标参数
# 目标参数
# 访问具体参数
print(type(net[2].bias))
print(net[2].bias)
print(net[2].bias.data)
参数是复合的对象,包含值、梯度和额外信息。 这就是我们需要显式参数值的原因。
net[2].weight.grad == None
# 未进行反向传播,所以没有梯度
True
一次性访问所有参数
# 访问第一个全连接层的参数
print(*[(name, param.shape) for name, param in net[0].named_parameters()])
# 访问所有层
print(*[(name, param.shape) for name, param in net.named_parameters()])
# ReLU没有参数
('weight', torch.Size([8, 4])) ('bias', torch.Size([8]))
('0.weight', torch.Size([8, 4])) ('0.bias', torch.Size([8])) ('2.weight', torch.Size([1, 8])) ('2.bias', torch.Size([1]))
# net 根据名字获取参数
net.state_dict()['2.bias'].data
tensor([0.1021])
从嵌套块收集参数
def block1():return nn.Sequential(nn.Linear(4, 8), nn.ReLU(), nn.Linear(8, 4), nn.ReLU())
def block2():net = nn.Sequential()for i in range(4):
#       向nn.Sequential中添加4个block1net.add_module(f'block {i}', block1())return netrgnet = nn.Sequential(block2(), nn.Linear(4, 1))
rgnet(X)
tensor([[-0.2192],[-0.2192]], grad_fn=<AddmmBackward>)
# 通过print了解网络结构
print(rgnet)
Sequential((0): Sequential((block 0): Sequential((0): Linear(in_features=4, out_features=8, bias=True)(1): ReLU()(2): Linear(in_features=8, out_features=4, bias=True)(3): ReLU())(block 1): Sequential((0): Linear(in_features=4, out_features=8, bias=True)(1): ReLU()(2): Linear(in_features=8, out_features=4, bias=True)(3): ReLU())(block 2): Sequential((0): Linear(in_features=4, out_features=8, bias=True)(1): ReLU()(2): Linear(in_features=8, out_features=4, bias=True)(3): ReLU())(block 3): Sequential((0): Linear(in_features=4, out_features=8, bias=True)(1): ReLU()(2): Linear(in_features=8, out_features=4, bias=True)(3): ReLU()))(1): Linear(in_features=4, out_features=1, bias=True)
)
2.参数初始化
1.内置初始化
# _:表示替换函数
def init_normal(m):if type(m) == nn.Linear:nn.init.normal_(m.weight, mean=0, std=0.01)nn.init.zeros_(m.bias)net.apply(init_normal)
net[0].weight.data[0], net[0].bias.data[0]
(tensor([0.0033, 0.0066, 0.0160, 0.0042]), tensor(0.))
我们还可以将所有参数初始化为给定的常数
def init_constant(m):if type(m) == nn.Linear:nn.init.constant_(m.weight, 1)nn.init.zeros_(m.bias)net.apply(init_constant)
net[0].weight.data[0], net[0].bias.data[0]
(tensor([1., 1., 1., 1.]), tensor(0.))
对某些块应用不同的初始化方法
def xavier(m):if type(m) == nn.Linear:nn.init.xavier_normal(m.weight)def init_42(m):if type(m) == nn.Linear:nn.init.constant_(m.weight, 42)net[0].apply(xavier)
net[2].apply(init_42)
print(net[0].weight.data[0])
print(net[2].weight.data)
tensor([ 0.6464,  0.5056, -0.7737, -0.7057])
tensor([[42., 42., 42., 42., 42., 42., 42., 42.]])
2.自定义初始化
有时,深度学习框架没有需要的初始化方法,如下:

# 自定义初始化
def my_init(m):if type(m) == nn.Linear:print("Init",*[(name, param.shape) for name, param in m.named_parameters()][0])nn.init.uniform_(m.weight, -10, 10)m.weight.data *= m.weight.data.abs() >= 5net.apply(my_init)
net[0].weight[:2]
Init weight torch.Size([8, 4])
Init weight torch.Size([1, 8])
tensor([[-0.0000, -0.0000,  0.0000,  0.0000],[ 6.8114,  0.0000, -7.4551, -9.6630]], grad_fn=<SliceBackward>)
也可以直接设置参数
net[0].weight.data[:] += 1
net[0].weight.data[0, 0] = 42
net[0].weight.data[0]
3.参数绑定
# 参数绑定
shared = nn.Linear(8, 8)
net = nn.Sequential(nn.Linear(4, 8), nn.ReLU(), shared, nn.ReLU(), shared,nn.ReLU(), nn.Linear(8, 1))
net(X)
print(net[2].weight.data[0] == net[4].weight.data[0])
net[2].weight.data[0, 0] = 100
print(net[2].weight.data[0] == net[4].weight.data[0])
tensor([True, True, True, True, True, True, True, True])
tensor([True, True, True, True, True, True, True, True])
三、自定义层
1.不带参数的层
import torch
import torch.nn.functional as F
from torch import nnclass CenteredLayer(nn.Module):def __init__(self):super().__init__()def forward(self, X):return X - X.mean()layer = CenteredLayer()
layer(torch.FloatTensor([1, 2, 3, 4, 5]))
tensor([-2., -1., 0., 1., 2.])
将层作为组件合并到更复杂的模型中
# 将层作为组件合并到构建更复杂的模型中
net = nn.Sequential(nn.Linear(8, 128), CenteredLayer())Y = net(torch.rand(4, 8))
# print(Y)
Y.mean()
tensor(3.2596e-09, grad_fn=<MeanBackward0>)
2.带参数的层
# 带参数的图层
class MyLinear(nn.Module):def __init__(self, in_units, units):super().__init__()self.weight = nn.Parameter(torch.randn(in_units, units))self.bias = nn.Parameter(torch.randn(units,))def forward(self, X):linear = torch.matmul(X, self.weight.data) + self.bias.datareturn F.relu(linear)dense = MyLinear(5, 3)
dense.weight
Parameter containing:
tensor([[ 0.7481,  0.6183,  0.0382],[ 0.6040,  2.3991,  1.3484],[-0.3165,  0.0117, -0.4763],[-1.3920,  0.6106,  0.9668],[ 1.4701,  0.3283, -2.1701]], requires_grad=True)
# 使用自定义层直接执行正向传播计算
dense(torch.rand(2,5))
tensor([[1.5235, 2.6890, 0.0000],
[0.9825, 0.3581, 0.0000]])
# 使用自定义层构建模型
net = nn.Sequential(MyLinear(64, 8), MyLinear(8, 1))
net(torch.rand(2, 64))
tensor([[11.0573],
[25.9441]])
四、读写文件
有时我们希望保存训练的模型, 以备将来在各种环境中使用(比如在部署中进行预测)。 此外,当运行一个耗时较长的训练过程时, 最佳的做法是定期保存中间结果, 以确保在服务器电源被不小心断掉时,不会损失几天的计算结果。
1.加载和保存张量
单个张量:直接调用load和save进行读写,
# 这两个函数都要求我们提供一个名称,save要求将要保存的变量作为输入
import torch
from torch import nn
from torch.nn import functional as Fx = torch.arange(4)
torch.save(x, 'x-file')
# 将存储在文件中的数据读回内存
x2 = torch.load('x-file')
x2
tensor([0, 1, 2, 3])
存储一个张量列表,读回内存
y = torch.zeros(4)
torch.save([x, y], 'x-files')
x2, y2 = torch.load('x-files')
(x2, y2)
(tensor([0, 1, 2, 3]), tensor([0., 0., 0., 0.]))
写入或读取从字符串映射到张量的字典
# 写入或读取从字符串映射到张量的字
# 读取或写入模型中的所有权重时,这很方便
mydict = {'x':x, 'y': y}
torch.save(mydict, 'mydict')
mydict2 = torch.load('mydict')
mydict2
{‘x’: tensor([0, 1, 2, 3]), ‘y’: tensor([0., 0., 0., 0.])}
2.加载和保存模型参数
# 深度学习框架提供了内置函数来保存和加载整个网络# 保存模型的参数而不是保存整个模型# 模型本身难以序列化,为了恢复模型,我们需要用代码生成架构class MLP(nn.Module):def __init__(self):super().__init__()self.hidden = nn.Linear(20, 256)self.output = nn.Linear(256, 10)def forward(self, x):return self.output(F.relu(self.hidden(x)))net = MLP()X = torch.randn(size=(2, 20))Y = net(X)
将模型的参数存储在一个叫做“mlp.params”的文件中
# print(net.state_dict())
torch.save(net.state_dict(), 'mlp.params')
# 恢复模型,我们需要实例化原始多层感知机模型的一个备份
clone = MLP()
clone.load_state_dict(torch.load('mlp.params'))
# 从train模式调整为test模式
clone.eval()
MLP(
(hidden): Linear(in_features=20, out_features=256, bias=True)
(output): Linear(in_features=256, out_features=10, bias=True)
)
Y_clone = clone(X)
Y_clone == Y
tensor([[True, True, True, True, True, True, True, True, True, True],
[True, True, True, True, True, True, True, True, True, True]])
五、使用GPU
查看是否有GPU
!nvidia-smi
计算设备
import torch
from torch import nntorch.device('cpu'), torch.cuda.device('cuda')
(device(type='cpu'), <torch.cuda.device at 0x221b068ce50>)
查看可用gpu的数量
torch.cuda.device_count()
1
这两个函数允许我们在请求的GPU不存在的情况下运行代码
def try_gpu(i=0): #@save"""如果存在,则返回gpu(i),否则返回cpu()"""if torch.cuda.device_count() >= i + 1:return torch.device(f'cuda:{i}')return torch.device('cpu')def try_all_gpus(): #@save"""返回所有可用的GPU,如果没有GPU,则返回[cpu(),]"""devices = [torch.device(f'cuda:{i}')for i in range(torch.cuda.device_count())]return devices if devices else [torch.device('cpu')]try_gpu(), try_gpu(10), try_all_gpus()
(device(type=‘cuda’, index=0),
device(type=‘cpu’),
[device(type=‘cuda’, index=0)])
查询张量所在的设备
x = torch.tensor([1, 2, 3])
x.device
device(type=‘cpu’)
# 存储在GPU上
X = torch.ones(2, 3, device=try_gpu())
X
tensor([[1., 1., 1.],
[1., 1., 1.]], device=‘cuda:0’)
# 第二个GPU上创建一个随机张量
Y = torch.rand(2, 3, device=try_gpu(1))
Y
tensor([[0.0755, 0.4800, 0.4188],
[0.7192, 0.1506, 0.8517]])
# 要计算X+Y,我们需要决定在哪里执行这个操作
Z = Y.cuda(0)
print(Y)
print(Z)
tensor([[0.0755, 0.4800, 0.4188],
[0.7192, 0.1506, 0.8517]])
tensor([[0.0755, 0.4800, 0.4188],
[0.7192, 0.1506, 0.8517]], device=‘cuda:0’)
# 现在数据在同一个GPU上,我们可以将它们相加
X + Z
tensor([[1.0755, 1.4800, 1.4188],
[1.7192, 1.1506, 1.8517]], device=‘cuda:0’)
Z.cuda(0) is Z
True
神经网络与GPU
net = nn.Sequential(nn.Linear(3, 1))
net = net.to(device=try_gpu())net(X)
tensor([[0.7477],
[0.7477]], device=‘cuda:0’, grad_fn=)
# 确认模型参数存储在同一个GPU上
net[0].weight.data.device
device(type=‘cuda’, index=0)
[相关总结]
state_dict()
torch.nn.Module模块中的state_dict可以用来存放训练过程中需要学习的权重和偏执系数,(模型参数,超参数,优化器等的状态信息),但是需要注意只有具有学习参数的层才有,比如:卷积层和线性层等





![配置应用程序监听器[org.springframework.web.context.ContextLoaderListener]错误](https://img-blog.csdnimg.cn/direct/062bd992ca8f438bb8addf1da4ff91b5.png)

