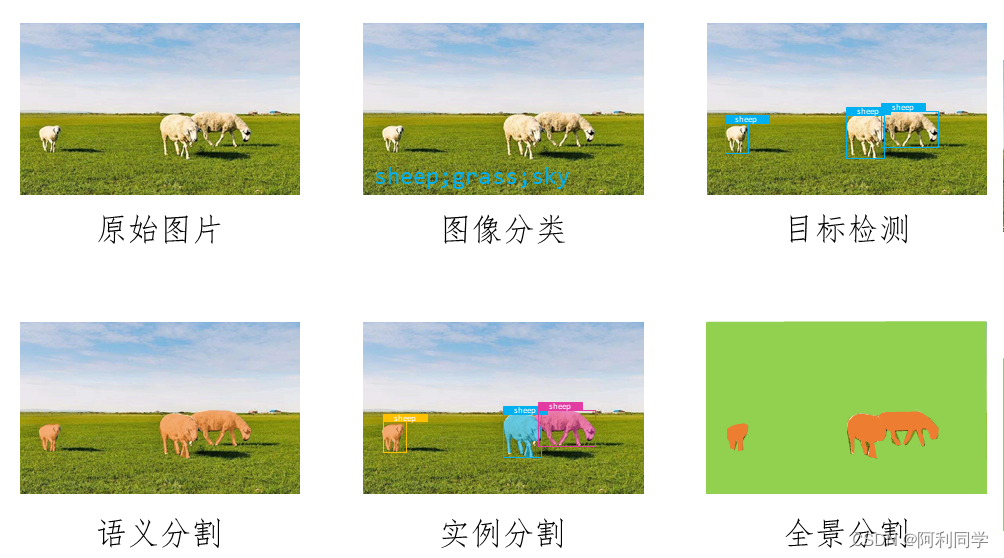
今天讲一下图像入门学习教程---------图像分类。
图像分类是目标检测任务的基础,学会以下操作,打下良好基础!

数据布置
以三分类为例,数据布置放置示例,也就是dataset下有两个文件夹:val和train。train和val文件夹下分别是三个文件夹class1/2/3,记住相同类别的图像放在一个文件夹!!!
,多类别一样道理布置!!!
dataset/train/class1/image1.jpgimage2.jpg...class2/image1.jpgimage2.jpg...class3/image1.jpgimage2.jpg...val/class1/image1.jpgimage2.jpg...class2/image1.jpgimage2.jpg...class3/image1.jpgimage2.jpg...网络搭建
如果你要手动搭建ResNet和MobileNet网络以及实现反向传播,你需要了解网络的结构和反向传播的原理。下面是一个使用PyTorch手动搭建ResNet和MobileNet网络的示例代码:
如果你想手动搭建神经网络并进行反向传播,可以按照以下步骤进行:
- 首先,定义你的神经网络架构。你需要决定有多少个层以及每个层有多少个神经元。在这里,
- 定义初始化权重的函数。在反向传播过程中,你需要随机初始化权重。你可以使用高斯分布来初始化你的权重,并为每个神经元添加一个偏置项。
- 定义前向传播函数。前向传播是指将输入数据向前通过网络,并将结果传递给下一层的过程。在前向传播期间,你需要计算每个神经元的输出并将其传递到下一层。
- 定义损失函数、优化函数
- 保存权重
import torch
import torch.nn as nn
import torch.nn.functional as F# 定义Residual Block
class ResidualBlock(nn.Module):def __init__(self, in_channels, out_channels, stride=1):super(ResidualBlock, self).__init__()self.conv1 = nn.Conv2d(in_channels, out_channels, kernel_size=3, stride=stride, padding=1, bias=False)self.bn1 = nn.BatchNorm2d(out_channels)self.relu = nn.ReLU(inplace=True)self.conv2 = nn.Conv2d(out_channels, out_channels, kernel_size=3, stride=1, padding=1, bias=False)self.bn2 = nn.BatchNorm2d(out_channels)self.downsample = nn.Sequential(nn.Conv2d(in_channels, out_channels, kernel_size=1, stride=stride, bias=False),nn.BatchNorm2d(out_channels))def forward(self, x):identity = xout = self.conv1(x)out = self.bn1(out)out = self.relu(out)out = self.conv2(out)out = self.bn2(out)if self.downsample is not None:identity = self.downsample(x)out += identityout = self.relu(out)return out# 定义ResNet网络
class ResNet(nn.Module):def __init__(self, block, num_blocks, num_classes=3):super(ResNet, self).__init__()self.in_channels = 64self.conv1 = nn.Conv2d(3, 64, kernel_size=7, stride=2, padding=3, bias=False)self.bn1 = nn.BatchNorm2d(64)self.relu = nn.ReLU(inplace=True)self.maxpool = nn.MaxPool2d(kernel_size=3, stride=2, padding=1)self.layer1 = self._make_layer(block, 64, num_blocks[0], stride=1)self.layer2 = self._make_layer(block, 128, num_blocks[1], stride=2)self.layer3 = self._make_layer(block, 256, num_blocks[2], stride=2)self.layer4 = self._make_layer(block, 512, num_blocks[3], stride=2)self.avgpool = nn.AdaptiveAvgPool2d((1, 1))self.fc = nn.Linear(512, num_classes)def _make_layer(self, block, out_channels, num_blocks, stride):strides = [stride] + [1] * (num_blocks - 1)layers = []for stride in strides:layers.append(block(self.in_channels, out_channels, stride))self.in_channels = out_channelsreturn nn.Sequential(*layers)def forward(self, x):out = self.conv1(x)out = self.bn1(out)out = self.relu(out)out = self.maxpool(out)out = self.layer1(out)out = self.layer2(out)out = self.layer3(out)out = self.layer4(out)out = self.avgpool(out)out = torch.flatten(out, 1)out = self.fc(out)return out# 定义MobileNet网络
class MobileNet(nn.Module):def __init__(self, num_classes=3):super(MobileNet, self).__init__()self.conv1 = nn.Conv2d(3, 32, kernel_size=3, stride=2, padding=1, bias=False)self.bn1 = nn.BatchNorm2d(32)self.relu = nn.ReLU(inplace=True)self.conv2 = nn.Conv2d(32, 64, kernel_size=3, stride=1, padding=1, bias=False)self.bn2 = nn.BatchNorm2d(64)self.conv3 = nn.Conv2d(64, 128, kernel_size=3, stride=2, padding=1, bias=False)self.bn3 = nn.BatchNorm2d(128)self.conv4 = nn.Conv2d(128, 128, kernel_size=3, stride=1, padding=1, bias=False)self.bn4 = nn.BatchNorm2d(128)self.conv5 = nn.Conv2d(128, 256, kernel_size=3, stride=2, padding=1, bias=False)self.bn5 = nn.BatchNorm2d(256)self.conv6 = nn.Conv2d(256, 256, kernel_size=3, stride=1, padding=1, bias=False)self.bn6 = nn.BatchNorm2d(256)self.conv7 = nn.Conv2d(256, 512, kernel_size=3, stride=2, padding=1, bias=False)self.bn7 = nn.BatchNorm2d(512)self.conv8 = nn.Conv2d(512, 512, kernel_size=3, stride=1, padding=1, bias=False)self.bn8 = nn.BatchNorm2d(512)self.conv9 = nn.Conv2d(512, 1024, kernel_size=3, stride=2, padding=1, bias=False)self.bn9 = nn.BatchNorm2d(1024)self.conv10 = nn.Conv2d(1024, 1024, kernel_size=3, stride=1, padding=1, bias=False)self.bn10 = nn.BatchNorm2d(1024)self.avgpool = nn.AdaptiveAvgPool2d((1, 1))self.fc = nn.Linear(1024, num_classes)def forward(self, x):out = self.conv1(x)out = self.bn1(out)out = self.relu(out)out = self.conv2(out)out = self.bn2(out)out = self.relu(out)out = self.conv3(out)out = self.bn3(out)out = self.relu(out)out = self.conv4(out)out = self.bn4(out)out = self.relu(out)out = self.conv5(out)out = self.bn5(out)out = self.relu(out)out = self.conv6(out)out = self.bn6(out)out = self.relu(out)out = self.conv7(out)out = self.bn7(out)out = self.relu(out)out = self.conv8(out)out = self.bn8(out)out = self.relu(out)out = self.conv9(out)out = self.bn9(out)out = self.relu(out)out = self.conv10(out)out = self.bn10(out)out = self.relu(out)out = self.avgpool(out)out = torch.flatten(out, 1)out = self.fc(out)return out# 创建ResNet网络
resnet = ResNet(ResidualBlock, [2, 2, 2, 2])# 创建MobileNet网络
mobilenet = MobileNet()# 定义输入数据
x = torch.randn(1, 3, 224, 224)  # 假设输入图像尺寸为224x224,通道数为3# 使用网络进行前向传播
resnet_output = resnet(x)
mobilenet_output = mobilenet(x)# 打印输出尺寸
print("ResNet Output Shape:", resnet_output.shape)
print("MobileNet Output Shape:", mobilenet_output.shape)
上述代码中定义了Residual Block、ResNet和MobileNet的网络结构,并使用输入数据进行了前向传播。你可以根据需要调整网络的深度和宽度。
这只是一个简单的示例,如果你要实现完整的反向传播过程,你需要定义损失函数并手动计算梯度,然后使用优化算法更新网络参数。这超出了一个简单的示例的范围。如果你对PyTorch中的反向传播原理感兴趣,可以参考PyTorch的文档和教程。
这个教程带你了解神经网络的各个必要模块!,虽然复杂,但是可学的部分很多,需要手动调节的也很多!
调用包进行图像分类
为了简单快速训练分类,你也可以调用现成的框架模型
要使用Python编写一个图像分类项目,可以使用深度学习框架如TensorFlow或PyTorch。下面是一个使用PyTorch实现三分类的ResNet和MobileNet网络的示例代码:
首先,确保你已经安装了PyTorch和torchvision库。
import torch
import torchvision
from torchvision import transforms# 定义数据预处理
transform = transforms.Compose([transforms.Resize(256),transforms.CenterCrop(224),transforms.ToTensor(),transforms.Normalize(mean=[0.485, 0.456, 0.406], std=[0.229, 0.224, 0.225])
])# 加载数据集
train_dataset = torchvision.datasets.ImageFolder(root='path_to_train_data', transform=transform)
test_dataset = torchvision.datasets.ImageFolder(root='path_to_test_data', transform=transform)# 创建数据加载器
train_loader = torch.utils.data.DataLoader(train_dataset, batch_size=32, shuffle=True)
test_loader = torch.utils.data.DataLoader(test_dataset, batch_size=32, shuffle=False)# 定义模型
model_resnet = torchvision.models.resnet18(pretrained=True)
model_mobilenet = torchvision.models.mobilenet_v2(pretrained=True)# 替换最后一层分类器(适应三分类任务)
num_ftrs = model_resnet.fc.in_features
model_resnet.fc = torch.nn.Linear(num_ftrs, 3)num_ftrs = model_mobilenet.classifier[1].in_features
model_mobilenet.classifier[1] = torch.nn.Linear(num_ftrs, 3)# 定义损失函数和优化器
criterion = torch.nn.CrossEntropyLoss()
optimizer_resnet = torch.optim.SGD(model_resnet.parameters(), lr=0.001, momentum=0.9)
optimizer_mobilenet = torch.optim.SGD(model_mobilenet.parameters(), lr=0.001, momentum=0.9)# 训练模型
num_epochs = 10device = torch.device("cuda" if torch.cuda.is_available() else "cpu")
model_resnet.to(device)
model_mobilenet.to(device)for epoch in range(num_epochs):model_resnet.train()model_mobilenet.train()for images, labels in train_loader:images = images.to(device)labels = labels.to(device)optimizer_resnet.zero_grad()optimizer_mobilenet.zero_grad()outputs_resnet = model_resnet(images)outputs_mobilenet = model_mobilenet(images)loss_resnet = criterion(outputs_resnet, labels)loss_mobilenet = criterion(outputs_mobilenet, labels)loss_resnet.backward()loss_mobilenet.backward()optimizer_resnet.step()optimizer_mobilenet.step()# 在测试集上评估模型model_resnet.eval()model_mobilenet.eval()total_correct_resnet = 0total_correct_mobilenet = 0total_samples = 0with torch.no_grad():for images, labels in test_loader:images = images.to(device)labels = labels.to(device)outputs_resnet = model_resnet(images)_, predicted_resnet = torch.max(outputs_resnet, 1)total_correct_resnet += (predicted_resnet == labels).sum().item()outputs_mobilenet = model_mobilenet(images)_, predicted_mobilenet = torch.max(outputs_mobilenet, 1)total_correct_mobilenet += (predicted_mobilenet == labels).sum().item()total_samples += labels.size(0)accuracy_resnet = total_correct_resnet / total_samplesaccuracy_mobilenet = total_correct_mobilenet / total_samplesprint(f"Epoch [{epoch+1}/{num_epochs}], ResNet Accuracy: {accuracy_resnet:.4f}, MobileNet Accuracy: {accuracy_mobilenet:.4f}")
请注意,上述代码中的 path_to_train_data 和 path_to_test_data 需要替换为你数据集的实际路径。此外,还可以根据需要调整超参数和其他模型细节。
保存权重,并进行单幅图推理
好的,你可以使用PyTorch提供的模型保存和加载功能来保存和加载网络的权重。
首先,保存模型的权重可以使用以下代码:
# 保存 ResNet 权重
torch.save(resnet.state_dict(), 'resnet_weights.pth')# 保存 MobileNet 权重
torch.save(mobilenet.state_dict(), 'mobilenet_weights.pth')
这将把ResNet网络的权重保存在resnet_weights.pth文件中,把MobileNet网络的权重保存在mobilenet_weights.pth文件中。
接下来,你可以使用以下代码加载模型的权重,并对单张图片进行推理:
import torch
import torch.nn.functional as F
from PIL import Image# 加载 ResNet 权重
resnet = ResNet(ResidualBlock, [2, 2, 2, 2])
resnet.load_state_dict(torch.load('resnet_weights.pth'))# 加载 MobileNet 权重
mobilenet = MobileNet()
mobilenet.load_state_dict(torch.load('mobilenet_weights.pth'))# 对单张图片进行推理
image = Image.open('test.jpg')  # 假设要推理的图像为test.jpg
image = image.resize((224, 224))  # 将图像缩放到网络输入尺寸
image_tensor = F.to_tensor(image)  # 将图像转化为张量
image_tensor = image_tensor.unsqueeze(0)  # 添加批次维度# 使用 ResNet 进行推理
resnet.eval()
with torch.no_grad():resnet_output = resnet(image_tensor)# 使用 MobileNet 进行推理
mobilenet.eval()
with torch.no_grad():mobilenet_output = mobilenet(image_tensor)# 打印输出结果
print("ResNet Output:", resnet_output)
print("MobileNet Output:", mobilenet_output)
这将加载保存的权重,并使用ResNet和MobileNet网络对单张图片进行推理。你需要将test.jpg替换为你要推理的图像,并根据需要调整图像缩放大小。
注意,这里使用了eval()方法,来告诉PyTorch模型不需要进行反向传播,仅仅是前向计算,因此在推理过程中可以加快运行速度。此外,还使用了torch.no_grad()上下文管理器,以避免在推理过程中计算梯度和更新权重。
如需帮助,见下方推广或私信!!!!!!!!!!!!!!


