Linux(CentOS7)下PostgreSQL安装手册
文章目录
- 一、准备PostgreSQL
- 二、安装PostgreSQL
- 2.1解压安装包
- 2.2编译PG
- 2.3查看PG安装目录
- 2.4配置PG环境变量
- 2.5查看PG版本
- 2.6创建postgres用户
- 2.7创建PG数据库数据存放目录
- 2.8授权PG数据库数据存放目录
- 2.9切换postgres用户
- 2.10初始化PG数据库
- 2.11启动PG数据库服务
- 2.12查看PG数据库服务状态
- 2.13登录PG数据库
- 2.14查看现有数据库
- 2.15查看PG数据库版本
- 2.16配置PG数据库postgres用户密码
- 2.17退出PG数据库
- 2.18停止PG数据库服务
- 2.19查看PG数据库服务状态
- 三、配置PostgreSQL
- 3.1修改关键配置文件:
- 3.2重启PG数据库
- 3.3本地登录PG数据库
- 3.4远程连接PG数据库
- 3.5停止PG数据库
- 3.6编写PG数据库系统服务配置文件
- 3.7加载系统配置文件
- 3.8查看PG数据库系统服务
- 3.9启动PG数据库系统服务
- 3.10设置PG数据库系统服务开机自启动
- 3.11停止PG数据库系统服务
一、准备PostgreSQL
下载地址:
https://www.postgresql.org/ftp/source/v13.10/
源码包:
https://ftp.postgresql.org/pub/source/v13.10/postgresql-13.10.tar.gz
由于官网提供下载方式在国外,国内下载速度慢
所以使用国内阿里云镜像站下载
下载地址:
https://mirrors.aliyun.com/postgresql/source/v13.10/
源码包:
https://mirrors.aliyun.com/postgresql/source/v13.10/postgresql-13.10.tar.gz
前提:有/opt/software目录
如果没有,则需要创建
mkdir /opt/software
在服务器下载:(我们使用阿里云下载)
wget https://mirrors.aliyun.com/postgresql/source/v13.10/postgresql-13.10.tar.gz -P /opt/software
[root@dw3 ~]# wget https://mirrors.aliyun.com/postgresql/source/v13.10/postgresql-13.10.tar.gz -P /opt/software
--2023-04-09 22:06:18--  https://mirrors.aliyun.com/postgresql/source/v13.10/postgresql-13.10.tar.gz
正在解析主机 mirrors.aliyun.com (mirrors.aliyun.com)... 8.132.50.95, 8.132.50.94, 8.132.50.96, ...
正在连接 mirrors.aliyun.com (mirrors.aliyun.com)|8.132.50.95|:443... 已连接。
已发出 HTTP 请求,正在等待回应... 200 OK
长度:28117237 (27M) [application/octet-stream]
正在保存至: “/opt/software/postgresql-13.10.tar.gz”100%[======================================>] 28,117,237  5.44MB/s 用时 5.0s   2023-04-09 22:06:23 (5.41 MB/s) - 已保存 “/opt/software/postgresql-13.10.tar.gz” [28117237/28117237])[root@dw3 ~]#
二、安装PostgreSQL
2.1解压安装包
(1)先来创建解压之后存放的目录
[root@dw3 ~]# mkdir -p /opt/module/
(2)再来解压
[root@dw3 ~]# tar -zxf /opt/software/postgresql-13.10.tar.gz -C /opt/module/
[root@dw3 ~]#
(3)进入解压后的目录
[root@dw3 ~]# cd /opt/module/postgresql-13.10/
[root@dw3 postgresql-13.10]# ls
aclocal.m4  configure     contrib    doc             HISTORY  Makefile  src
config      configure.in  COPYRIGHT  GNUmakefile.in  INSTALL  README
[root@dw3 postgresql-13.10]#
2.2编译PG
注意:
编译PG之前,先安装两个依赖包,否则后边会遇到报错
yum install readline-devel zlib-devel -y
下面详细编译过程(有遇到报错)
[root@dw3 postgresql-13.10]# ./configure --prefix=/usr/local/pg13
遇到报错:
If you have readline already installed, see config.log for details on the
failure.  It is possible the compiler isn't looking in the proper directory.
Use --without-readline to disable readline support.
[root@dw3 postgresql-13.10]#
如何解决?
上面这个报错说明:操作系统缺少readline-devel这个包,那么我们来安装它
yum install readline-devel -y
[root@dw3 postgresql-13.10]# yum install readline-devel -y
已加载插件:fastestmirror
Loading mirror speeds from cached hostfile
正在解决依赖关系
--> 正在检查事务
---> 软件包 readline-devel.x86_64.0.6.2-11.el7 将被 安装
--> 正在处理依赖关系 ncurses-devel,它被软件包 readline-devel-6.2-11.el7.x86_64 需要
--> 正在检查事务
---> 软件包 ncurses-devel.x86_64.0.5.9-14.20130511.el7_4 将被 安装
--> 解决依赖关系完成依赖关系解决===============================================================================Package             架构        版本                          源         大小
===============================================================================
正在安装:readline-devel      x86_64      6.2-11.el7                    base      139 k
为依赖而安装:ncurses-devel       x86_64      5.9-14.20130511.el7_4         base      712 k事务概要
===============================================================================
安装  1 软件包 (+1 依赖软件包)总下载量:851 k
安装大小:2.4 M
Downloading packages:
(1/2): readline-devel-6.2-11.el7.x86_64.rpm               | 139 kB   00:00
(2/2): ncurses-devel-5.9-14.20130511.el7_4.x86_64.rpm     | 712 kB   00:00
-------------------------------------------------------------------------------
总计                                              4.2 MB/s | 851 kB  00:00
Running transaction check
Running transaction test
Transaction test succeeded
Running transaction
警告:RPM 数据库已被非 yum 程序修改。正在安装    : ncurses-devel-5.9-14.20130511.el7_4.x86_64                 1/2 正在安装    : readline-devel-6.2-11.el7.x86_64                           2/2 验证中      : readline-devel-6.2-11.el7.x86_64                           1/2 验证中      : ncurses-devel-5.9-14.20130511.el7_4.x86_64                 2/2 已安装:readline-devel.x86_64 0:6.2-11.el7                                           作为依赖被安装:ncurses-devel.x86_64 0:5.9-14.20130511.el7_4                                 完毕!
[root@dw3 postgresql-13.10]#
下面我们重新编译PG
[root@dw3 postgresql-13.10]# ./configure --prefix=/usr/local/pg13
又遇到报错:
configure: error: zlib library not found
If you have zlib already installed, see config.log for details on the
failure.  It is possible the compiler isn't looking in the proper directory.
Use --without-zlib to disable zlib support.
[root@dw3 postgresql-13.10]#
如何解决?
上面这个报错说明:操作系统缺少zlib-devel这个包,那么我们来安装它
yum install zlib-devel -y
[root@dw3 postgresql-13.10]# yum install zlib-devel -y
已加载插件:fastestmirror
Loading mirror speeds from cached hostfile
正在解决依赖关系
--> 正在检查事务
---> 软件包 zlib-devel.x86_64.0.1.2.7-21.el7_9 将被 安装
--> 解决依赖关系完成依赖关系解决===============================================================================Package           架构          版本                     源              大小
===============================================================================
正在安装:zlib-devel        x86_64        1.2.7-21.el7_9           updates         50 k事务概要
===============================================================================
安装  1 软件包总下载量:50 k
安装大小:132 k
Downloading packages:
zlib-devel-1.2.7-21.el7_9.x86_64.rpm                      |  50 kB   00:00
Running transaction check
Running transaction test
Transaction test succeeded
Running transaction正在安装    : zlib-devel-1.2.7-21.el7_9.x86_64                           1/1 验证中      : zlib-devel-1.2.7-21.el7_9.x86_64                           1/1 已安装:zlib-devel.x86_64 0:1.2.7-21.el7_9                                           完毕!
[root@dw3 postgresql-13.10]#
下面我们重新编译PG
[root@dw3 postgresql-13.10]# ./configure --prefix=/usr/local/pg13
编译成功如下所示:
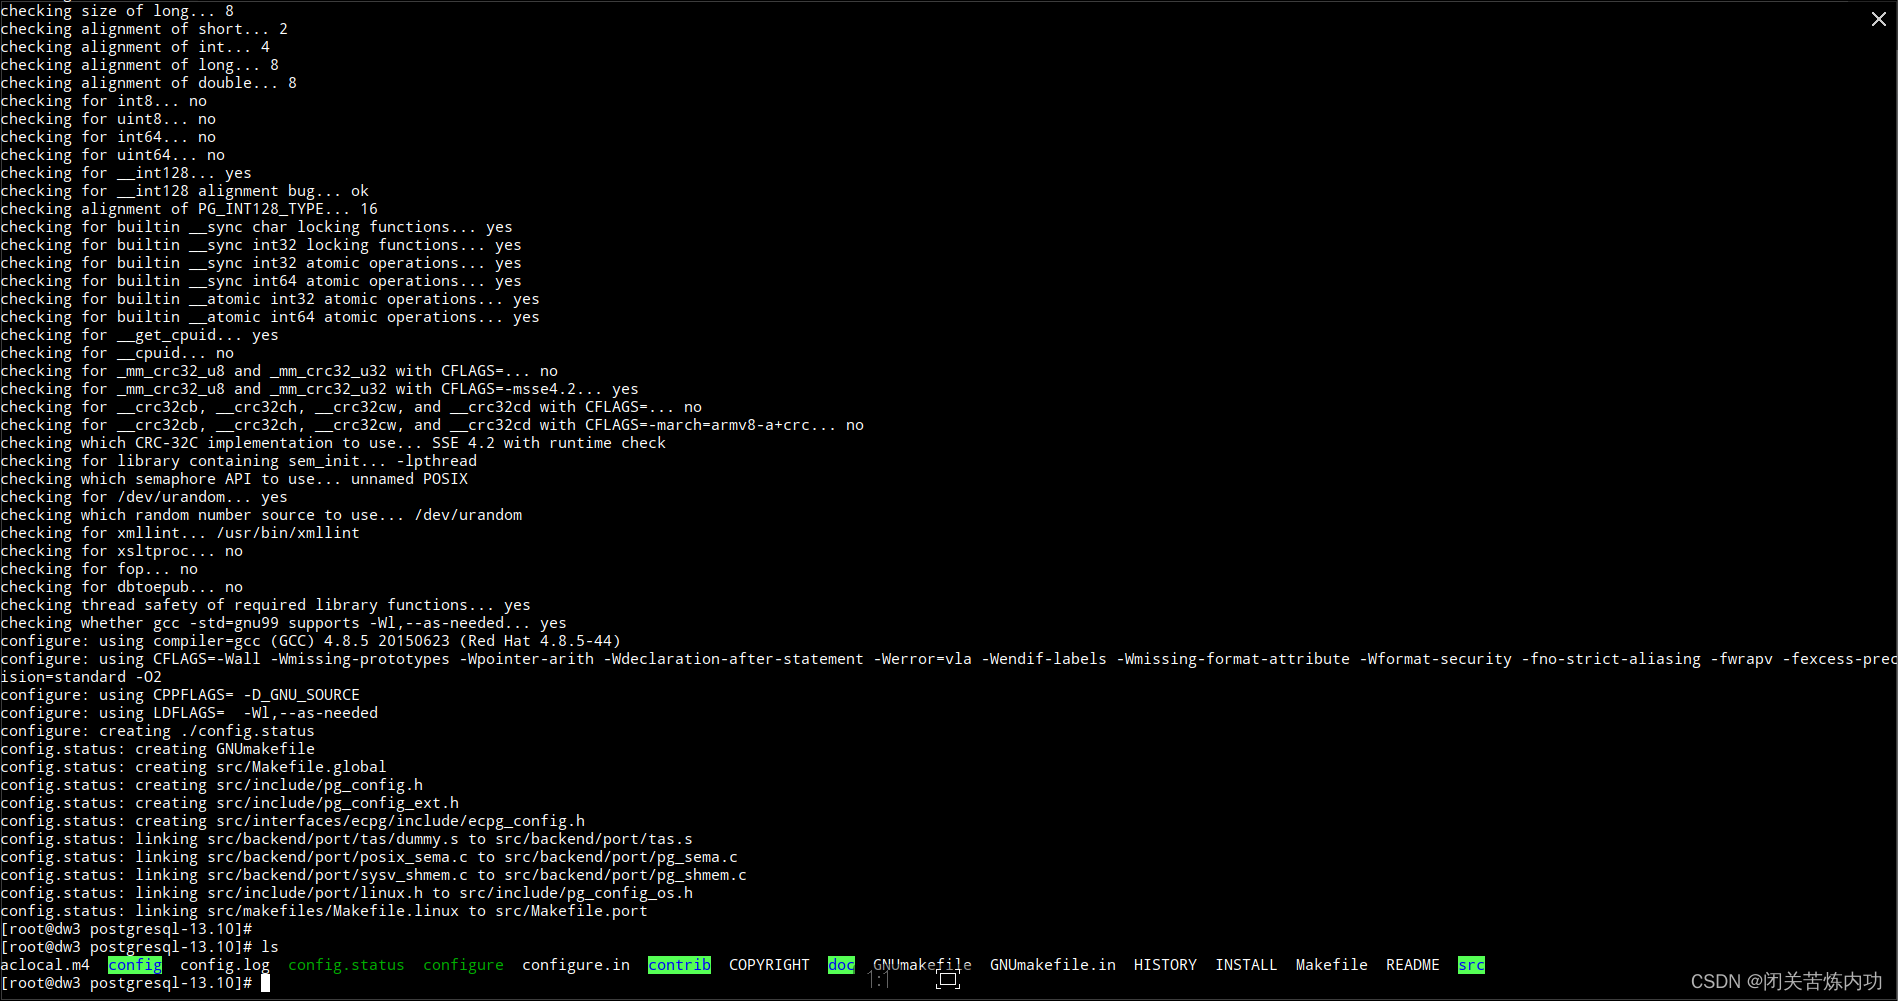
然后
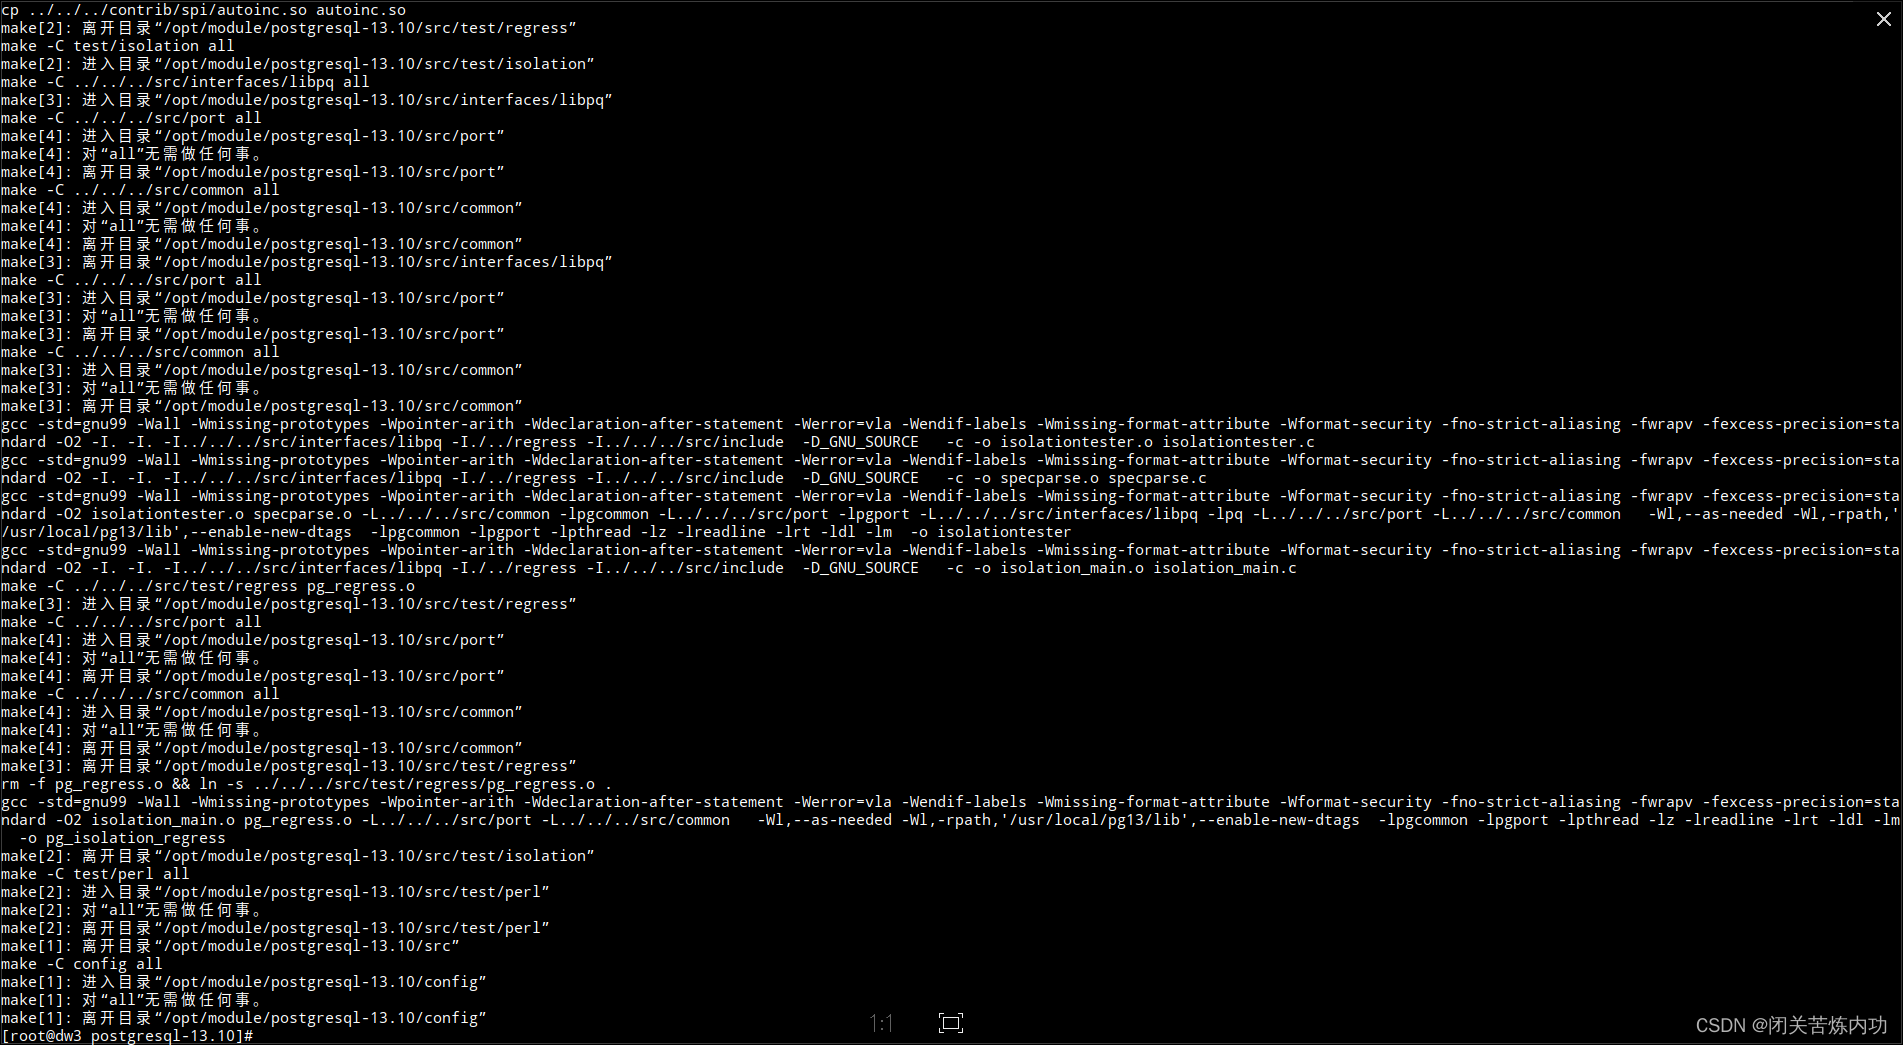
make编译
[root@dw3 postgresql-13.10]# make
由于CPU是单核,所以-j参数无需使用
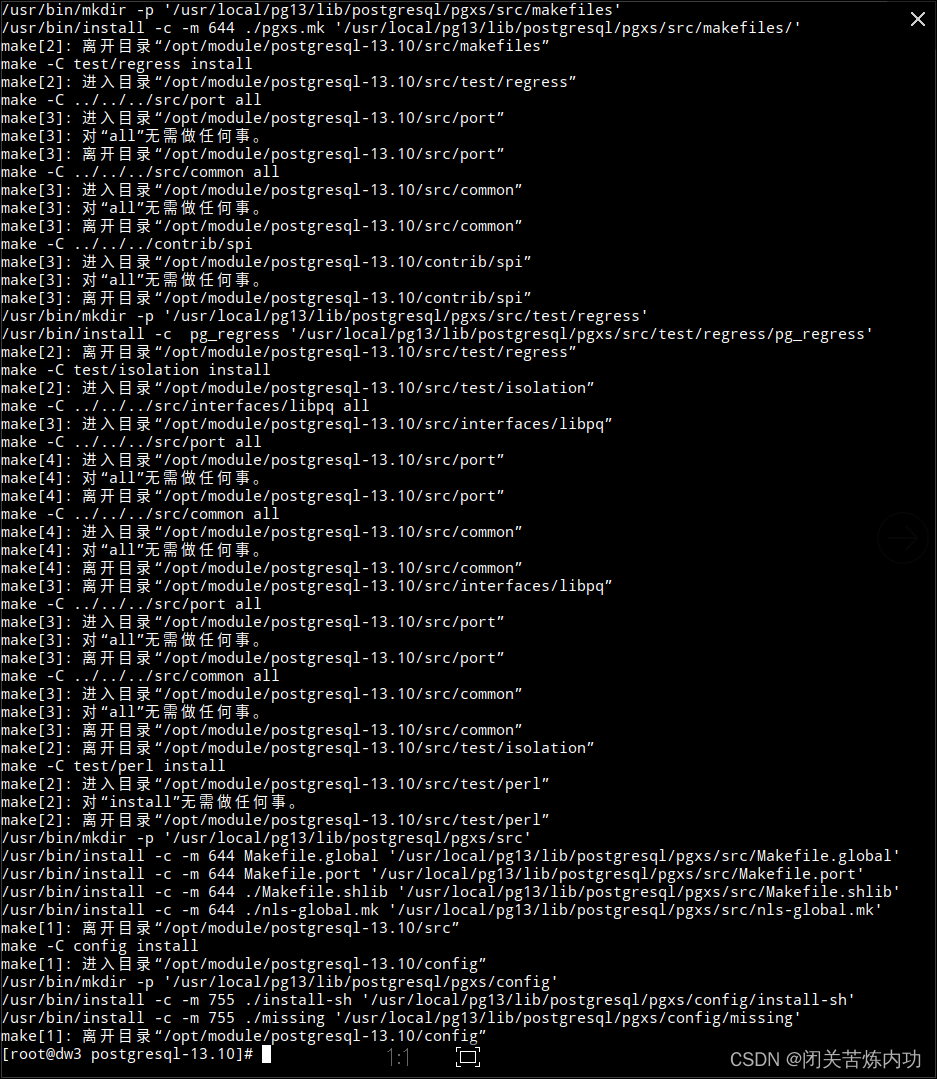
make install安装
[root@dw3 postgresql-13.10]# make install
编译安装完成
2.3查看PG安装目录
先进入安装目录
cd /usr/local/pg13/
[root@dw3 postgresql-13.10]# cd /usr/local/pg13/
然后查看
[root@dw3 pg13]# ls
bin  include  lib  share
[root@dw3 pg13]#
2.4配置PG环境变量
vim /etc/profile.d/pg.sh
复制下列内容到文件
export PG_HOME=/usr/local/pg13
export PATH=$PG_HOME/bin:$PATH
export LD_LIBRARY_PATH=$PG_HOME/lib
注意:
LD_LIBRARY_PATH 为PG数据库源码编译出来之后的动态库存放的位置
[root@dw3 pg13]# vim /etc/profile.d/pg.sh
[root@dw3 pg13]#
[root@dw3 pg13]# cat /etc/profile.d/pg.sh
export PG_HOME=/usr/local/pg13
export PATH=$PG_HOME/bin:$PATH
export LD_LIBRARY_PATH=$PG_HOME/lib
[root@dw3 pg13]#
[root@dw3 pg13]# source /etc/profile.d/pg.sh
[root@dw3 pg13]#
2.5查看PG版本
psql -V
[root@dw3 pg13]# psql -V
psql (PostgreSQL) 13.10
[root@dw3 pg13]#
2.6创建postgres用户
useradd postgres
[root@dw3 pg13]# useradd postgres
[root@dw3 pg13]#
2.7创建PG数据库数据存放目录
mkdir -p /usr/local/pg13/data
[root@dw3 pg13]# mkdir -p /usr/local/pg13/data
[root@dw3 pg13]# ls
bin  data  include  lib  share
[root@dw3 pg13]#
2.8授权PG数据库数据存放目录
chown -R postgres. /usr/local/pg13
[root@dw3 pg13]# chown -R postgres. /usr/local/pg13
[root@dw3 pg13]#
2.9切换postgres用户
su postgres
[root@dw3 pg13]# su postgres
[postgres@dw3 pg13]$
[postgres@dw3 pg13]$ ls -l
总用量 20
drwxr-xr-x 2 postgres postgres 4096 4月  10 00:03 bin
drwxr-xr-x 2 postgres postgres 4096 4月  10 00:16 data
drwxr-xr-x 4 postgres postgres 4096 4月  10 00:03 include
drwxr-xr-x 4 postgres postgres 4096 4月  10 00:03 lib
drwxr-xr-x 3 postgres postgres 4096 4月  10 00:03 share
[postgres@dw3 pg13]$
2.10初始化PG数据库
./bin/initdb -D /usr/local/pg13/data
[postgres@dw3 pg13]$ ./bin/initdb -D /usr/local/pg13/data
The files belonging to this database system will be owned by user "postgres".
This user must also own the server process.The database cluster will be initialized with locale "zh_CN.UTF-8".
The default database encoding has accordingly been set to "UTF8".
initdb: could not find suitable text search configuration for locale "zh_CN.UTF-8"
The default text search configuration will be set to "simple".Data page checksums are disabled.fixing permissions on existing directory /usr/local/pg13/data ... ok
creating subdirectories ... ok
selecting dynamic shared memory implementation ... posix
selecting default max_connections ... 100
selecting default shared_buffers ... 128MB
selecting default time zone ... Asia/Shanghai
creating configuration files ... ok
running bootstrap script ... ok
performing post-bootstrap initialization ... ok
syncing data to disk ... okinitdb: warning: enabling "trust" authentication for local connections
You can change this by editing pg_hba.conf or using the option -A, or
--auth-local and --auth-host, the next time you run initdb.Success. You can now start the database server using:./bin/pg_ctl -D /usr/local/pg13/data -l logfile start[postgres@dw3 pg13]$
2.11启动PG数据库服务
[postgres@dw3 pg13]$ ./bin/pg_ctl -D /usr/local/pg13/data -l logfile start
waiting for server to start.... done
server started
[postgres@dw3 pg13]$
2.12查看PG数据库服务状态
[postgres@dw3 pg13]$ ./bin/pg_ctl -D /usr/local/pg13/data -l logfile status
pg_ctl: server is running (PID: 15401)
/usr/local/pg13/bin/postgres "-D" "/usr/local/pg13/data"
[postgres@dw3 pg13]$
2.13登录PG数据库
psql
[postgres@dw3 pg13]$ psql
psql (13.10)
Type "help" for help.postgres=#
2.14查看现有数据库
\l
postgres=# \lList of databasesName    |  Owner   | Encoding |   Collate   |    Ctype    |   Access privileges
-----------+----------+----------+-------------+-------------+-----------------------postgres  | postgres | UTF8     | zh_CN.UTF-8 | zh_CN.UTF-8 | template0 | postgres | UTF8     | zh_CN.UTF-8 | zh_CN.UTF-8 | =c/postgres          +|          |          |             |             | postgres=CTc/postgrestemplate1 | postgres | UTF8     | zh_CN.UTF-8 | zh_CN.UTF-8 | =c/postgres          +|          |          |             |             | postgres=CTc/postgres
(3 rows)postgres=#
2.15查看PG数据库版本
postgres=# select version();version
----------------------------------------------------------------------------------------------------------PostgreSQL 13.10 on x86_64-pc-linux-gnu, compiled by gcc (GCC) 4.8.5 20150623 (Red Hat 4.8.5-44), 64-bit
(1 row)postgres=#
2.16配置PG数据库postgres用户密码
默认没有密码,设置密码为:Pg_10.24!
\password
postgres=# \password
Enter new password for user "postgres":
Enter it again:
postgres=#
2.17退出PG数据库
\q
postgres=# \q
[postgres@dw3 pg13]$
2.18停止PG数据库服务
[postgres@dw3 pg13]$ ./bin/pg_ctl -D /usr/local/pg13/data -l logfile stop
waiting for server to shut down.... done
server stopped
[postgres@dw3 pg13]$
2.19查看PG数据库服务状态
[postgres@dw3 pg13]$ ./bin/pg_ctl -D /usr/local/pg13/data -l logfile status
pg_ctl: no server running
[postgres@dw3 pg13]$
三、配置PostgreSQL
3.1修改关键配置文件:
(1)配置用户权限、远程权限
vim /usr/local/pg13/data/pg_hba.conf
配置下列内容
host    all             all             127.0.0.1/32            md5
host    all             all             0.0.0.0/0              md5
(2)修改访问地址、最大连接数
vim /usr/local/pg13/data/postgresql.conf
配置下列内容
listen_addresses = '*'          # what IP address(es) to listen on;
port = 5432                             # (change requires restart)
max_connections = 1000                  # (change requires restart)
logging_collector = on          # Enable capturing of stderr and csvlog
log_directory = '/usr/local/pg13/log'                   # directory where log files are written,
[postgres@dw3 pg13]$ ll /usr/local/pg13/data/pg_hba.conf
-rw------- 1 postgres postgres 4760 4月  10 00:25 /usr/local/pg13/data/pg_hba.conf
[postgres@dw3 pg13]$
[postgres@dw3 pg13]$ ll /usr/local/pg13/data/postgresql.conf
-rw------- 1 postgres postgres 28093 4月  10 00:25 /usr/local/pg13/data/postgresql.conf
[postgres@dw3 pg13]$
3.2重启PG数据库
[postgres@dw3 pg13]$ pg_ctl -D /usr/local/pg13/data restart
waiting for server to shut down.... done
server stopped
waiting for server to start....2023-04-10 01:08:22.214 CST [15646] LOG:  redirecting log output to logging collector process
2023-04-10 01:08:22.214 CST [15646] HINT:  Future log output will appear in directory "/usr/local/pg13/log".done
server started
[postgres@dw3 pg13]$
[postgres@dw3 pg13]$ ll
总用量 28
drwxr-xr-x  2 postgres postgres 4096 4月  10 00:03 bin
drwx------ 19 postgres postgres 4096 4月  10 01:08 data
drwxr-xr-x  4 postgres postgres 4096 4月  10 00:03 include
drwxr-xr-x  4 postgres postgres 4096 4月  10 00:03 lib
drwx------  2 postgres postgres 4096 4月  10 01:08 log
-rw-------  1 postgres postgres 3911 4月  10 01:08 logfile
drwxr-xr-x  3 postgres postgres 4096 4月  10 00:03 share
[postgres@dw3 pg13]$ ll log
总用量 4
-rw------- 1 postgres postgres 605 4月  10 01:08 postgresql-2023-04-10_010822.log
[postgres@dw3 pg13]$
3.3本地登录PG数据库
注意:这次登录需要输入密码了
[postgres@dw3 pg13]$ psql -U postgres -d postgres -h 127.0.0.1 -p 5432
Password for user postgres:
psql (13.10)
Type "help" for help.postgres=#
3.4远程连接PG数据库
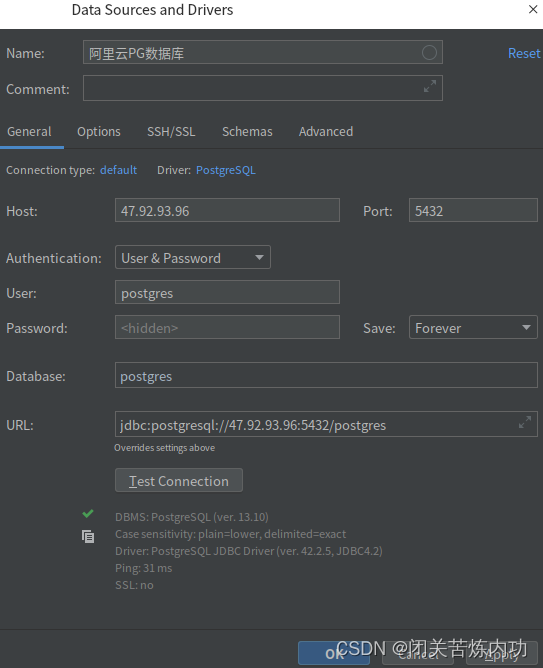
服务器公网IP:47.92.93.96
PG默认端口号:5432
PG远程用户:postgres
PG远程用户密码:Pg_10.24!
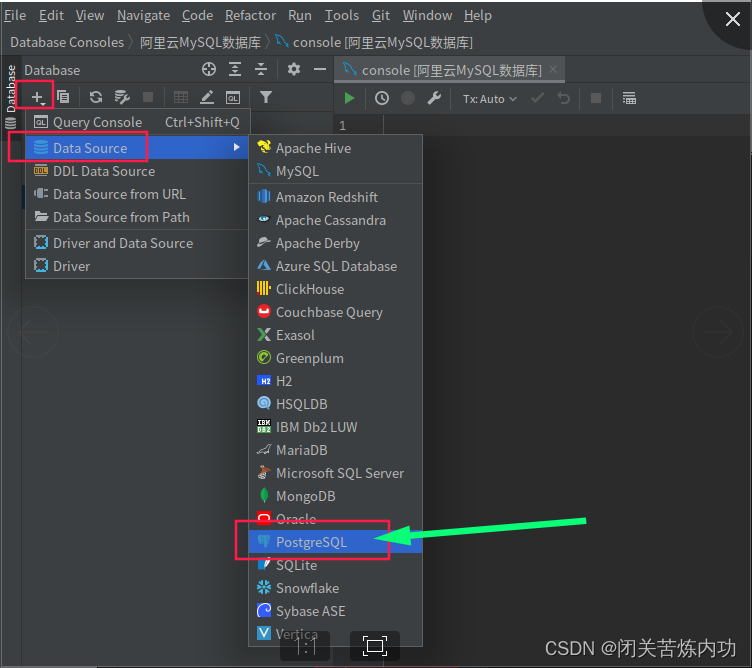
使用远程工具,连接测试,以DataGrip工具为例:
3.5停止PG数据库
[postgres@dw3 pg13]$ ./bin/pg_ctl -D /usr/local/pg13/data -l logfile stop
waiting for server to shut down.... done
server stopped
[postgres@dw3 pg13]$
3.6编写PG数据库系统服务配置文件
注意:root用户下编写
vim /lib/systemd/system/postgres.service
[root@dw3 pg13]# cat /lib/systemd/system/postgres.service
[Unit]
Description=postgresql-13.10
After=network.target
After=syslog.target[Install]
WantedBy=multi-user.target[Service]
Type=forking
User=postgres
Group=postgres
ExecStart=/usr/local/pg13/bin/pg_ctl -D /usr/local/pg13/data start
ExecStop=/usr/local/pg13/bin/pg_ctl -D /usr/local/pg13/data stop
PrivateTmp=true
[root@dw3 pg13]#
3.7加载系统配置文件
[root@dw3 pg13]# systemctl daemon-reload
3.8查看PG数据库系统服务
[root@dw3 pg13]# systemctl status postgres.service
● postgres.service - postgresql-13.10Loaded: loaded (/usr/lib/systemd/system/postgres.service; disabled; vendor preset: disabled)Active: inactive (dead)
[root@dw3 pg13]#
3.9启动PG数据库系统服务
[root@dw3 ~]# systemctl start postgres.service
[root@dw3 ~]# systemctl status postgres.service
● postgres.service - postgresql-13.10Loaded: loaded (/usr/lib/systemd/system/postgres.service; disabled; vendor preset: disabled)Active: active (running) since 一 2023-04-10 01:38:05 CST; 2s agoProcess: 16123 ExecStart=/usr/local/pg13/bin/pg_ctl -D /usr/local/pg13/data start (code=exited, status=0/SUCCESS)Main PID: 16125 (postgres)Tasks: 8Memory: 41.0MCGroup: /system.slice/postgres.service├─16125 /usr/local/pg13/bin/postgres -D /usr/local/pg13/data├─16126 postgres: logger ├─16128 postgres: checkpointer ├─16129 postgres: background writer ├─16130 postgres: walwriter ├─16131 postgres: autovacuum launcher ├─16132 postgres: stats collector └─16133 postgres: logical replication launcher 4月 10 01:38:05 dw3 systemd[1]: Starting postgresql-13.10...
4月 10 01:38:05 dw3 pg_ctl[16123]: waiting for server to start....2023-04-10 01:38:05.439 CST [1612...ocess
4月 10 01:38:05 dw3 pg_ctl[16123]: 2023-04-10 01:38:05.439 CST [16125] HINT:  Future log output wil...log".
4月 10 01:38:05 dw3 systemd[1]: Started postgresql-13.10.
Hint: Some lines were ellipsized, use -l to show in full.
[root@dw3 ~]#
3.10设置PG数据库系统服务开机自启动
[root@dw3 ~]# systemctl enable postgres.service
Created symlink from /etc/systemd/system/multi-user.target.wants/postgres.service to /usr/lib/systemd/system/postgres.service.
[root@dw3 ~]#
[root@dw3 ~]# systemctl status postgres.service
● postgres.service - postgresql-13.10Loaded: loaded (/usr/lib/systemd/system/postgres.service; enabled; vendor preset: disabled)Active: active (running) since 一 2023-04-10 01:38:05 CST; 2min 56s agoMain PID: 16125 (postgres)CGroup: /system.slice/postgres.service├─16125 /usr/local/pg13/bin/postgres -D /usr/local/pg13/data├─16126 postgres: logger ├─16128 postgres: checkpointer ├─16129 postgres: background writer ├─16130 postgres: walwriter ├─16131 postgres: autovacuum launcher ├─16132 postgres: stats collector └─16133 postgres: logical replication launcher 4月 10 01:38:05 dw3 systemd[1]: Starting postgresql-13.10...
4月 10 01:38:05 dw3 pg_ctl[16123]: waiting for server to start....2023-04-10 01:38:05.439 CST [16125] LOG:  redirecting log o... process
4月 10 01:38:05 dw3 pg_ctl[16123]: 2023-04-10 01:38:05.439 CST [16125] HINT:  Future log output will appear in directory "/us...13/log".
4月 10 01:38:05 dw3 systemd[1]: Started postgresql-13.10.
Hint: Some lines were ellipsized, use -l to show in full.
[root@dw3 ~]#
3.11停止PG数据库系统服务
[root@dw3 ~]# systemctl stop postgres.service
[root@dw3 ~]# systemctl status postgres.service
● postgres.service - postgresql-13.10Loaded: loaded (/usr/lib/systemd/system/postgres.service; enabled; vendor preset: disabled)Active: inactive (dead) since 一 2023-04-10 01:48:55 CST; 1s agoProcess: 16303 ExecStop=/usr/local/pg13/bin/pg_ctl -D /usr/local/pg13/data stop (code=exited, status=0/SUCCESS)Process: 16285 ExecStart=/usr/local/pg13/bin/pg_ctl -D /usr/local/pg13/data start (code=exited, status=0/SUCCESS)Main PID: 16287 (code=exited, status=0/SUCCESS)4月 10 01:48:44 dw3 systemd[1]: Starting postgresql-13.10...
4月 10 01:48:44 dw3 pg_ctl[16285]: waiting for server to start....2023-04-10 01:48:44.728 CST [16287] LOG:  redirecting log o... process
4月 10 01:48:44 dw3 pg_ctl[16285]: 2023-04-10 01:48:44.728 CST [16287] HINT:  Future log output will appear in directory "/us...13/log".
4月 10 01:48:44 dw3 systemd[1]: Started postgresql-13.10.
4月 10 01:48:55 dw3 systemd[1]: Stopping postgresql-13.10...
4月 10 01:48:55 dw3 systemd[1]: Stopped postgresql-13.10.
Hint: Some lines were ellipsized, use -l to show in full.
[root@dw3 ~]#
PG数据库安装到此结束!
我们下期见,拜拜!

