零、源码
- GitHub - ITC-AI/Opencv_Chinese: C++ 的 Opencv绘制中文
一、代码编写
- 参考
- https://blog.csdn.net/long630576366/article/details/131440684
1、cvxFont.h
#ifndef OPENCVUNICODE_CVXFONT_H
#define OPENCVUNICODE_CVXFONT_H#include <ft2build.h>
#include FT_FREETYPE_H
#include <opencv2/opencv.hpp>#include <typeinfo>
#include <codecvt>
#include <string>
#include <locale>namespace cvx {struct FontProperty {int fontSize;           // font size (pixel)double spaceRatio;       // ratio of distance when meet a space, base on font sizedouble fontRatio;        // ratio of distance between each character, base on font sizedouble fontRotateAngle;  // rotate angledouble fontDiaphaneity;  // merge ratiobool fontIsUnderline;   // underlinebool fontIsVertical;    // put text in vertical};class CvxFont{public:explicit CvxFont(const cv::String& fontType);virtual ~CvxFont();void setFontSize(int fontSize);void setSpaceRatio(const double spaceRatio) { m_font->spaceRatio = spaceRatio; }void setFontRatio(const double fontRatio) { m_font->fontRatio = fontRatio; }void setRotateAngle(const double angle) { m_font->fontRotateAngle = angle; }void setUnderline(const bool isUnderline) { m_font->fontIsUnderline = isUnderline; }void setDiaphaneity(const double diaphaneity) { m_font->fontDiaphaneity = diaphaneity; }void setVertical(const bool vertical) { m_font->fontIsVertical = vertical; }[[nodiscard]] int getFontSize() const { return m_font->fontSize; }[[nodiscard]] double getSpaceRatio() const { return m_font->spaceRatio; }[[nodiscard]] double getFontRatio() const { return m_font->fontRatio; }[[nodiscard]] double getAngle() const { return m_font->fontRotateAngle; }[[nodiscard]] bool getUnderline() const { return m_font->fontIsUnderline; }[[nodiscard]] double getDiaphaneity() const { return m_font->fontDiaphaneity; }[[nodiscard]] bool getVertical() const { return m_font->fontIsVertical; }private:void initFont();void rotateFont(double angle);void putTextStr(cv::Mat& img, const cv::String& text, cv::Point pos, const cv::Scalar& color);void putWChar(cv::Mat& img, uint32_t wc, cv::Point& pos, const cv::Scalar& color);friend void putText(cv::Mat&, const std::string&, cv::Point, cvx::CvxFont&, int, const cv::Scalar&);FT_Library   m_library{};   // font libraryFT_Face      m_face{};      // font typeFT_Matrix    m_matrix{};FT_Vector    m_pen{};FT_Error     m_error;FontProperty* m_font;long m_maxDiffHeight{ 0 };};void putText(cv::Mat& img, const std::string& text, cv::Point pos, cvx::CvxFont& fontFace, int fontSize, const cv::Scalar& color);void putSymbols(cv::Mat& img, std::vector<uint32_t>& symbols, cv::Point pos, cvx::CvxFont& fontFace, int fontSize, const cv::Scalar& color);void putOneSymbol(cv::Mat& img, uint32_t symbol, cv::Point pos, cvx::CvxFont& fontFace, int fontSize, const cv::Scalar& color);
}#endif //OPENCVUNICODE_CVXFONT_H
2、 cvxFont.cpp
#include "cvxFont.h"
#include <cassert>
#include <clocale>
#include <utility>
#include <sstream>
#include <cstdlib>cvx::CvxFont::CvxFont(const cv::String& fontType)
{assert(!fontType.empty());m_error = FT_Init_FreeType(&m_library);if (m_error){std::cerr << "library initial error!" << std::endl;return;}m_error = FT_New_Face(m_library, fontType.c_str(), 0, &m_face);if (m_error == FT_Err_Unknown_File_Format){std::cerr << "unsupported font format!" << std::endl;return;}else if (m_error){std::cerr << " can not open font files" << std::endl;return;}// use default parametersm_font = new FontProperty;initFont();setlocale(LC_ALL, "");
}// release freetype resource
cvx::CvxFont::~CvxFont()
{delete m_font;FT_Done_Face(m_face);FT_Done_FreeType(m_library);
}void cvx::CvxFont::setFontSize(const int fontSize)
{m_font->fontSize = fontSize;FT_Set_Pixel_Sizes(m_face, fontSize, 0);
}// initial font
void cvx::CvxFont::initFont()
{setFontSize(16);setSpaceRatio(0.5);setFontRatio(0);setRotateAngle(0);setDiaphaneity(1);setUnderline(false);setVertical(false);// set fontFT_Set_Pixel_Sizes(m_face, getFontSize(), 0);
}void cvx::CvxFont::rotateFont(double angle) {angle = (angle / 360) * 3.14159 * 2;/* set up matrix */m_matrix.xx = static_cast<FT_Fixed>(cos(angle) * 0x10000L);m_matrix.xy = static_cast<FT_Fixed>(-sin(angle) * 0x10000L);m_matrix.yx = static_cast<FT_Fixed>(sin(angle) * 0x10000L);m_matrix.yy = static_cast<FT_Fixed>(cos(angle) * 0x10000L);FT_Set_Transform(m_face, &m_matrix, nullptr);
}void cvx::CvxFont::putTextStr(cv::Mat& img, const cv::String& text, cv::Point pos, const cv::Scalar& color)
{CV_Assert(!img.empty());CV_Assert(!text.empty());int xStart = pos.x;int yStart = pos.y;m_maxDiffHeight = 0;const char* ptr = text.c_str();std::mbtowc(nullptr, nullptr, 0); // reset the conversion stateconst char* end = ptr + std::strlen(ptr);int ret;for (wchar_t wc; (ret = std::mbtowc(&wc, ptr, end - ptr)) > 0; ptr += ret) {putWChar(img, (wc & 0xffffffff), pos, color);}int xEnd = pos.x;int yEnd = pos.y;if (getUnderline()) {if (getVertical()) {cv::line(img, cv::Point(xStart + m_maxDiffHeight, yStart), cv::Point(xStart + m_maxDiffHeight, yEnd), color, 2);}else {cv::line(img, cv::Point(xStart, yStart + m_maxDiffHeight), cv::Point(xEnd, yStart + m_maxDiffHeight), color, 2);}}}void cvx::CvxFont::putWChar(cv::Mat& img, uint32_t wc, cv::Point& pos, const cv::Scalar& color)
{rotateFont(getAngle());const auto vertical = getVertical();const auto size = getFontSize();// Converting a Character Code Into a Glyph IndexFT_UInt glyph_index = FT_Get_Char_Index(m_face, wc);FT_Load_Glyph(m_face, glyph_index, FT_LOAD_DEFAULT);FT_Render_Glyph(m_face->glyph, FT_RENDER_MODE_MONO);FT_GlyphSlot slot = m_face->glyph;FT_Bitmap bitmap = slot->bitmap;bool isSpace = wc == ' ';// get rows and cols of current wide charauto rows = bitmap.rows;auto cols = bitmap.width;cv::Point gPos = pos;//gPos.y += m_font->fontSize;if (vertical){gPos.x += (slot->metrics.vertBearingX >> 6);gPos.y += (slot->metrics.vertBearingY >> 6);m_maxDiffHeight = std::max(m_maxDiffHeight, rows - (slot->metrics.vertBearingY >> 6));}else{gPos.x += (slot->metrics.horiBearingX >> 6);gPos.y -= (slot->metrics.horiBearingY >> 6);m_maxDiffHeight = std::max(m_maxDiffHeight, rows - (slot->metrics.horiBearingY >> 6));}// https://stackoverflow.com/questions/52254639/how-to-access-pixels-state-in-monochrome-bitmap-using-freetype2for (auto i = 0; i < rows; ++i){for (auto j = 0; j < cols; ++j){int off = i * slot->bitmap.pitch + j / 8;if (slot->bitmap.buffer[off] & (0x80 >> (j % 8))){const auto r = gPos.y + i; //vertical ? pos.y + i : pos.y + i + (size - rows); // to make align to bottomconst auto c = gPos.x + j;if (r >= 0 && r < img.rows && c >= 0 && c < img.cols){cv::Vec3b scalar = img.at<cv::Vec3b>(cv::Point(c, r));// merge set color with origin colordouble p = getDiaphaneity();for (int k = 0; k < 3; ++k){scalar.val[k] = static_cast<uchar>(scalar.val[k] * (1 - p) + color.val[k] * p);}img.at<cv::Vec3b>(cv::Point(c, r)) = cv::Vec3b(scalar[0], scalar[1], scalar[2]);}}}}// modify position to next characterconst auto space = static_cast<int>(size * getSpaceRatio());const auto sep = static_cast<int>(size * getFontRatio());// vertical string or not, default not verticalif (vertical){const auto moveX = (static_cast<int>(getAngle()) == 0) ?  (slot->metrics.vertAdvance >> 6) : rows + 1;pos.y += isSpace ? space : moveX + sep;}else{const auto moveY = (static_cast<int>(getAngle()) == 0) ? (slot->metrics.horiAdvance >> 6) : cols + 1;pos.x += isSpace ? space : moveY + sep;}
}void cvx::putText(cv::Mat& img, const std::string& text, cv::Point pos, cvx::CvxFont& fontFace, int fontSize, const cv::Scalar& color) {fontFace.setFontSize(fontSize);fontFace.putTextStr(img, text, std::move(pos), color);fontFace.initFont();
}
3、main.cpp
#include "cvxFont.h"
using namespace cvx;
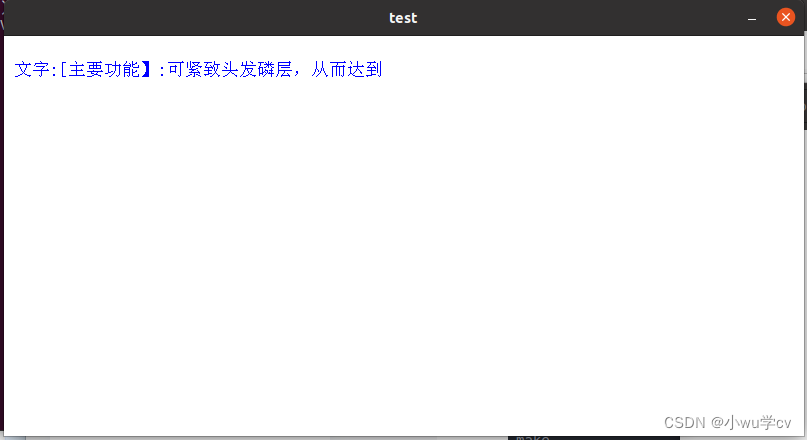
int main(int argc, char *argv[])
{cvx::CvxFont font("../simsun.ttc");cv::Mat img(400, 800, CV_8UC3, cv::Scalar(255, 255, 255)); // create a black backgroundcv::String msg6 = "文字:[主要功能】:可紧致头发磷层,从而达到";// be careful to use the font that support ChineseputText(img, msg6, cv::Point(10, 40), font, 18, cv::Scalar(255, 0, 0));cv::imshow("test", img);cv::waitKey(0);return 0;
}
4、CMakeLists.txt
- X64的编译链
cmake_minimum_required(VERSION 3.10)
project(OpenCVUnicode)set(CMAKE_CXX_STANDARD 14)find_package(OpenCV REQUIRED)
message(STATUS "OpenCV library status:")
message(STATUS "    version: ${OpenCV_VERSION}")
message(STATUS "    libraries: ${OpenCV_LIBS}")
message(STATUS "    include path: ${OpenCV_INCLUDE_DIRS}")
include_directories(${OpenCV_INCLUDE_DIRS})find_package(Freetype REQUIRED)
message(STATUS "Freetype library status")
message(STATUS "    ${FREETYPE_INCLUDE_DIRS}")
message(STATUS "    ${FREETYPE_INCLUDE_DIR_ft2build}")
message(STATUS "    ${FREETYPE_INCLUDE_DIR_freetype2}")
include_directories(${FREETYPE_INCLUDE_DIRS})set(SRCmain.cppcvxFont.cpp
)
include_directories (cvxFont.h) add_executable(OpenCVUnicode ${SRC})
target_link_libraries(OpenCVUnicode ${OpenCV_LIBS})
target_link_libraries(OpenCVUnicode ${FREETYPE_LIBRARIES})
- Arm的编译链
#工程名称
project (OcrChinese)
#版本限定
cmake_minimum_required(VERSION 3.10.2)
set(CMAKE_SYSTEM_NAME Linux)
set(CMAKE_SYSTEM_PROCESSOR aarch64)
#设置编译链
SET(CMAKE_C_COMPILER "aarch64-buildroot-linux-gnu-gcc")
SET(CMAKE_CXX_COMPILER "aarch64-buildroot-linux-gnu-g++")
SET(CMAKE_AR "aarch64-buildroot-linux-gnu-ar")
SET(CMAKE_LINKER "aarch64-buildroot-linux-gnu-ld")link_directories(${SYS_LIB_PATH}/link)#opencv库路径
set(OpenCV_DIR ${CMAKE_CURRENT_LIST_DIR}/source/rk3588_opencv455/lib/cmake/opencv4)
find_package(OpenCV REQUIRED COMPONENTS imgproc core imgcodecs)  # 指定需要的 OpenCV 组件if (OpenCV_FOUND)message("OpenCV found: ${OpenCV_VERSION}")include_directories(${OpenCV_INCLUDE_DIRS})
else()message(FATAL_ERROR "OpenCV not found")
endif()# FreeType
link_directories(${CMAKE_CURRENT_LIST_DIR}/FreeType/lib)
include_directories(${CMAKE_CURRENT_LIST_DIR}/FreeType/include)#源文件
set (SRC_PATH${CMAKE_CURRENT_LIST_DIR}${CMAKE_CURRENT_LIST_DIR}/Font/src
)
foreach(item ${SRC_PATH})aux_source_directory (${item} SRC_LIST)
endforeach()
#头文件
set (STREAM_INCLUDE${CMAKE_CURRENT_LIST_DIR}/Font/include
)
foreach(item ${STREAM_INCLUDE})include_directories ( ${item} )
endforeach()add_compile_options(-Wall)#添加库
set (LIBS pthread stdc++)add_executable(OcrChinese ${SRC_LIST})
target_link_libraries (OcrChinese  ${LIBS} ${OpenCV_LIBS})
二、C++编译
1、X64系统
(1) 安装opencv
- 在 Ubuntu 上安装 OpenCV,你可以使用以下命令:
sudo apt update
sudo apt install libopencv-dev python3-opencv
- 在 CentOS 上安装 OpenCV,你可以使用以下命令:
sudo yum install epel-release
sudo yum install opencv opencv-devel
(2) 安装FreeType
- 在 Ubuntu 上安装 FreeType,可以使用以下命令:
sudo apt update
sudo apt install libfreetype6 libfreetype6-dev
- 在 CentOS 上安装 FreeType,可以使用以下命令:
sudo yum install freetype freetype-devel(3) 编译
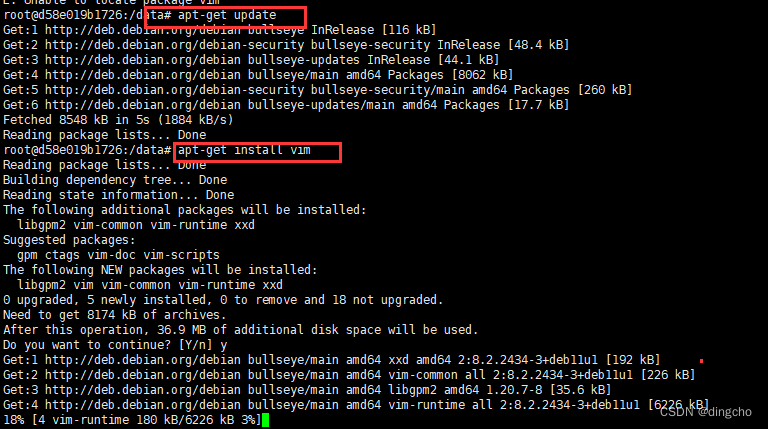
# 1、建一个build文件用于编译
mkdir build && cd build
# 2、编译
cmake .. && make -j8
2、Arm系统 (这个中文没成功,可能是系统文字编码问题)
- 参考:
- freetype的交叉编译及在嵌入式linux上的简单使用 - 代码先锋网
(1) 交叉编译 opencv
- 参考
- RK3588移植-opencv交叉编译aarch64_arm64 opencv-CSDN博客
(2) 交叉编译FreeType
- 参考
- freetype的交叉编译及在嵌入式linux上的简单使用 - 代码先锋网
-
freetype源码下载地址:
-
The FreeType Project - Browse /freetype2/2.8.1 at SourceForge.net
-
(官网) The FreeType Project
-
- 交叉编译
# 1、解压
tar zxvf freetype-2.8.1.tar.gzcd freetype-2.8.1/# 2、选定交叉编译侗剧,进行编译
./configure CC=/home/yang/b503/ctools/gcc-linaro-arm-linux-gnueabihf-4.9-2014.09_linux/bin/arm-linux-gnueabihf-gcc --host=arm-linux --prefix=$PWD/INSTALL --with-zlib=no --with-png=n# 3、编译
make
make install
(3) 编译
# 1、建一个build文件用于编译
mkdir build && cd build
# 2、编译
cmake .. && make -j8