基于STM32的数字小键盘
自己的键盘小键盘数字键坏了几个,准备自己用STM32做一个数字键盘。
硬件
· 找了一些资料,感谢知乎老哥。
原理图

采用的是主控是STM32F103RBT6,上拉1.5K接高速USB。按键采用的是矩阵按键。轴位可以自己选择。还接了一块0.91寸的OLED屏幕,一个EC11编码器,晶振采用的是16M晶振。
PCB
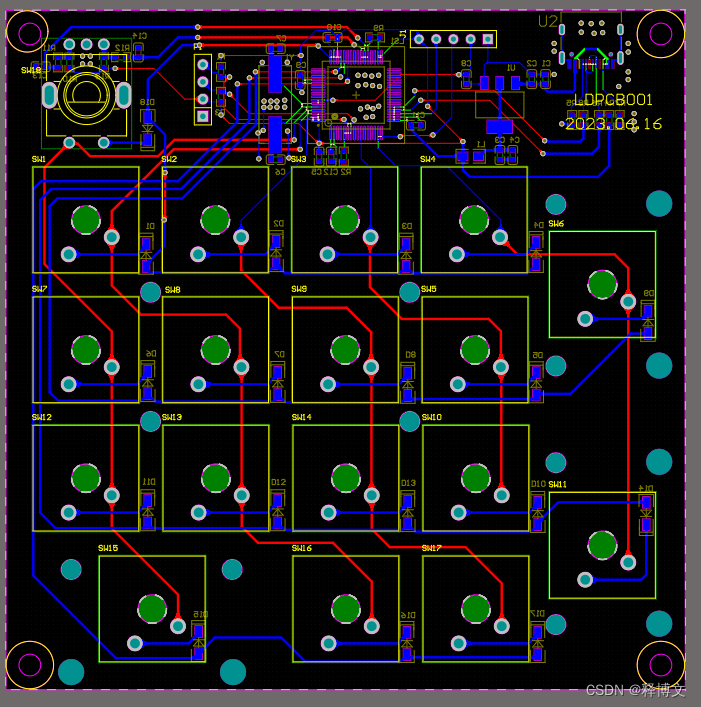
按键布局是这样的。
注意:所有的二极管封装都反了。
3D图
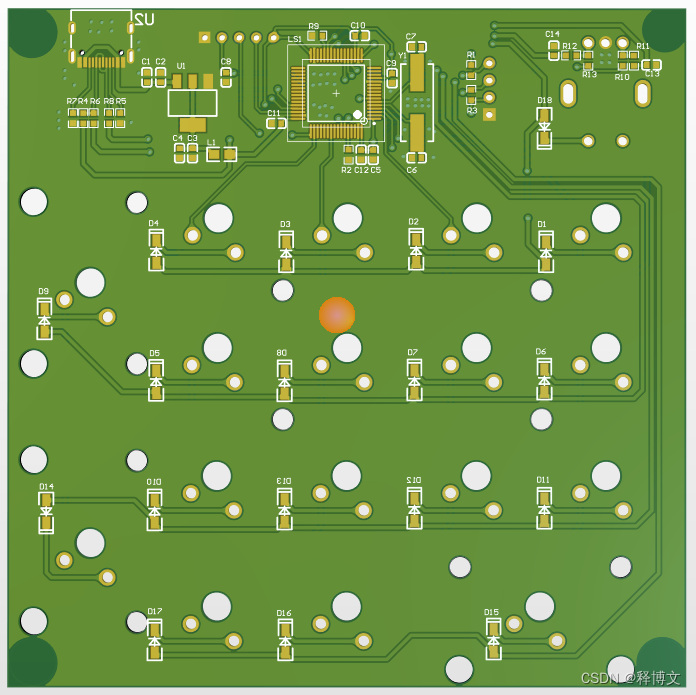
实物图
软件
初始化函数
void System_Init(void)
{u8 show_level;delay_init();	    	 //延时函数初始化	I2C_Configuration();OLED_Init();			//初始化OLED NVIC_Config();SysInit_TIM(); OLED_CLS();OLED_ShowStr1(0,++show_level,(char *)"OLED Ready",1);uart_init(9600);OLED_ShowStr1(0,++show_level,(char *)"UART1 Ready",1);KEY_Init();OLED_ShowStr1(0,++show_level,(char *)"KEY   Ready",1);delay_ms(1800);usb_port_set(0); 	//USB先断开delay_ms(300);usb_port_set(1);	//USB再次连接//USB键盘初始化USB_Interrupts_Config();   Set_USBClock();   USB_Init();	  OLED_ShowStr1(0,++show_level,(char *)"USB   Ready",1);delay_ms(500);delay_ms(500);OLED_CLS();
}
矩阵键盘
u32 Key(void)
{u32 Keyinbuf;u32 ReadValue;GPIO_InitTypeDef GPIO_InitStructure;RCC_APB2PeriphClockCmd(RCC_APB2Periph_GPIOC,ENABLE);//使能PORTA,PORTE时钟//扫KEY0GPIO_InitStructure.GPIO_Pin = IO_Key_COL1;GPIO_InitStructure.GPIO_Speed = GPIO_Speed_2MHz;GPIO_InitStructure.GPIO_Mode = GPIO_Mode_Out_PP;  	//推拉输出GPIO_Init(GPIOC, &GPIO_InitStructure);GPIO_SetBits(GPIOC,IO_Key_COL1);						//KEY0输出低ReadValue = (GPIO_ReadInputData(GPIOA)>>3)&0x0F; 	//bit2~4Keyinbuf = ReadValue;GPIO_ResetBits(GPIOC,IO_Key_COL1);GPIO_InitStructure.GPIO_Pin = IO_Key_COL1;GPIO_InitStructure.GPIO_Mode = GPIO_Mode_IPD;  		//KEY0输入上拉GPIO_Init(GPIOC, &GPIO_InitStructure);//扫KEY1GPIO_InitStructure.GPIO_Pin = IO_Key_COL2;GPIO_InitStructure.GPIO_Speed = GPIO_Speed_2MHz;GPIO_InitStructure.GPIO_Mode = GPIO_Mode_Out_PP;  	//推拉输出GPIO_Init(GPIOC, &GPIO_InitStructure);GPIO_SetBits(GPIOC,IO_Key_COL2);						//KEY1输出低ReadValue = (GPIO_ReadInputData(GPIOA)>>3)&0x0F; 	//bit2~4Keyinbuf |= ReadValue<<4;GPIO_ResetBits(GPIOC,IO_Key_COL2);GPIO_InitStructure.GPIO_Pin = IO_Key_COL2;GPIO_InitStructure.GPIO_Mode = GPIO_Mode_IPD;  		//KEY1输入上拉GPIO_Init(GPIOC, &GPIO_InitStructure);//扫KEY2GPIO_InitStructure.GPIO_Pin = IO_Key_COL3;GPIO_InitStructure.GPIO_Speed = GPIO_Speed_2MHz;GPIO_InitStructure.GPIO_Mode = GPIO_Mode_Out_PP;  	//推拉输出GPIO_Init(GPIOC, &GPIO_InitStructure);GPIO_SetBits(GPIOC,IO_Key_COL3);						//KEY1输出低ReadValue = (GPIO_ReadInputData(GPIOA)>>3)&0x0F; 	//bit2~4Keyinbuf |= ReadValue<<8;GPIO_ResetBits(GPIOC,IO_Key_COL3);GPIO_InitStructure.GPIO_Pin = IO_Key_COL3;GPIO_InitStructure.GPIO_Mode = GPIO_Mode_IPD;  		//KEY1输入上拉GPIO_Init(GPIOC, &GPIO_InitStructure);//扫KEY3GPIO_InitStructure.GPIO_Pin = IO_Key_COL4;GPIO_InitStructure.GPIO_Speed = GPIO_Speed_2MHz;GPIO_InitStructure.GPIO_Mode = GPIO_Mode_Out_PP;  	//推拉输出GPIO_Init(GPIOB, &GPIO_InitStructure);GPIO_SetBits(GPIOB,IO_Key_COL4);						//KEY1输出低ReadValue = (GPIO_ReadInputData(GPIOA)>>3)&0x0F; 	//bit2~4Keyinbuf |= ReadValue<<12;GPIO_ResetBits(GPIOB,IO_Key_COL4);GPIO_InitStructure.GPIO_Pin = IO_Key_COL4;GPIO_InitStructure.GPIO_Mode = GPIO_Mode_IPD;  		//KEY1输入上拉GPIO_Init(GPIOB, &GPIO_InitStructure);//扫KEY4GPIO_InitStructure.GPIO_Pin = IO_Key_COL5;GPIO_InitStructure.GPIO_Speed = GPIO_Speed_2MHz;GPIO_InitStructure.GPIO_Mode = GPIO_Mode_Out_PP;  	//推拉输出GPIO_Init(GPIOA, &GPIO_InitStructure);GPIO_SetBits(GPIOA,IO_Key_COL5);						//KEY1输出低ReadValue = (GPIO_ReadInputData(GPIOA)>>3)&0x0F; 	//bit2~4Keyinbuf |= ReadValue<<16;GPIO_ResetBits(GPIOA,IO_Key_COL5);GPIO_InitStructure.GPIO_Pin = IO_Key_COL5;GPIO_InitStructure.GPIO_Mode = GPIO_Mode_IPD;  		//KEY1输入上拉GPIO_Init(GPIOA, &GPIO_InitStructure);//初始化indexkeys_index[0]=30;keys_index[1]=31;keys_index[2]=32;keys_index[3]=33;keys_index[4]=34;keys_index[5]=35;keys_index[6]=36;keys_index[7]=37;keys_index[8]=38;keys_index[9]=39;keys_index[10]=40;keys_index[11]=42;keys_index[12]=55;keys_index[13]=84;keys_index[14]=85;keys_index[15]=86;keys_index[16]=87;keys_index[17]=83;keys_index[18]=Key_Test;keys_index[19]=KEY_BackSpace;keys_index[20]=KEY_Space;return Keyinbuf;
}
实物测试
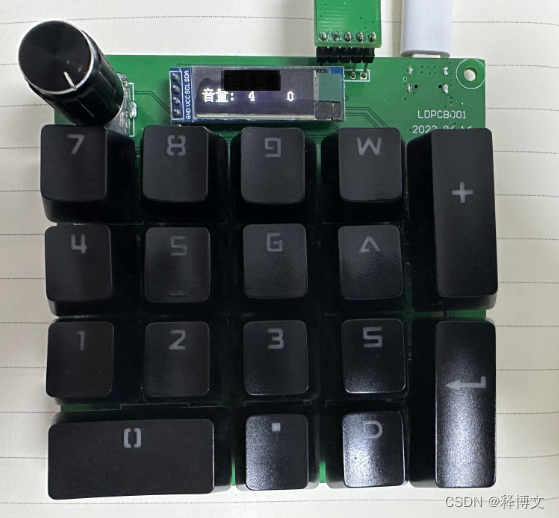
实际测试也是可以用的。
完工。
v:shiboven
