前言
上一篇文章《JavaCV之rtmp推流(FLV和M3U8)》介绍了javacv的基本使用,今天来讲讲如何实现推流复用。
以监控摄像头的直播为例,通常分为三步:
- 从设备获取音视频流
- 利用javacv进行解码(例如flv或m3u8)
- 将视频解码后数据推送到前端页面播放
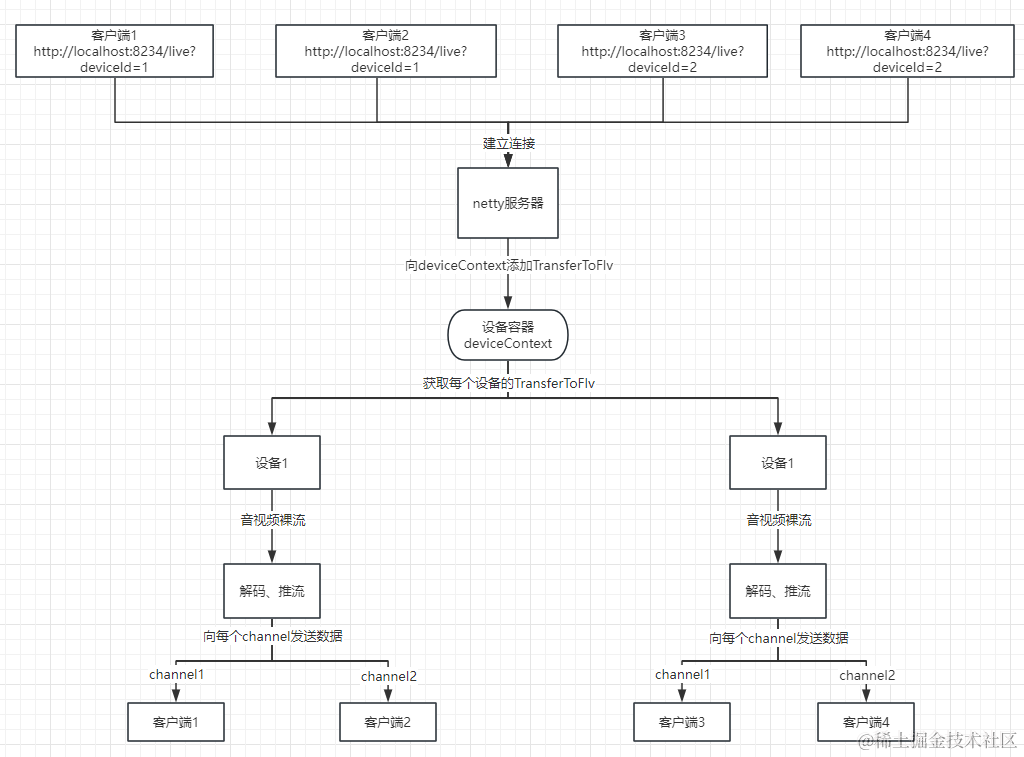
推流直播复用,是指假如该设备某一个channel已经在解码直播了,其他channel只需要直接拿该设备解码后的视频帧数据进行播放即可,而无需重复上面三步。实现一次解码,多客户端播放。
什么是channel?
在Netty中,每个Channel实例代表一个与远程对等方的通信链接。在网络编程中,一个Channel通常对应于一个网络连接,可以是客户端到服务器的连接,也可以是服务器接受的客户端连接。
上述大概的推流复用流程如下图所示:
代码实例
MediaServer
负责创建Netty服务器。关键的步骤包括创建EventLoopGroup、配置ServerBootstrap、指定服务器的Channel类型为NioServerSocketChannel、设置服务器的处理器等。
这个服务器的实际处理逻辑是在LiveHandler类中实现的,这是一个自定义的ChannelHandler,它继承自SimpleChannelInboundHandler。在实际应用中,可以根据业务需求实现自己的ChannelHandler来处理接收到的消息。
这里维护了一个deviceContext设备容器,存放各个设备的TransferToFlv实例。
@Slf4j
@Component
public class MediaServer implements CommandLineRunner {@Autowiredprivate LiveHandler liveHandler;public static ConcurrentHashMap<String, TransferToFlv> deviceContext = new ConcurrentHashMap<>();public final static String  YOUR_VIDEO_PATH = "D:\灌篮高手.mp4";public final static int PORT = 8234;public void start() {InetSocketAddress socketAddress = new InetSocketAddress("0.0.0.0", PORT);//主线程组EventLoopGroup bossGroup = new NioEventLoopGroup(1);//工作线程组EventLoopGroup workGroup = new NioEventLoopGroup(200);ServerBootstrap bootstrap = new ServerBootstrap().group(bossGroup, workGroup).channel(NioServerSocketChannel.class).childHandler(new ChannelInitializer<SocketChannel>() {@Overrideprotected void initChannel(SocketChannel socketChannel) {CorsConfig corsConfig = CorsConfigBuilder.forAnyOrigin().allowNullOrigin().allowCredentials().build();socketChannel.pipeline().addLast(new HttpResponseEncoder()).addLast(new HttpRequestDecoder()).addLast(new ChunkedWriteHandler()).addLast(new HttpObjectAggregator(64 * 1024)).addLast(new CorsHandler(corsConfig)).addLast(liveHandler);}}).localAddress(socketAddress).option(ChannelOption.SO_BACKLOG, 128)//选择直接内存.option(ChannelOption.ALLOCATOR, PreferredDirectByteBufAllocator.DEFAULT).childOption(ChannelOption.TCP_NODELAY, true).childOption(ChannelOption.SO_KEEPALIVE, true).childOption(ChannelOption.SO_RCVBUF, 128 * 1024).childOption(ChannelOption.SO_SNDBUF, 1024 * 1024).childOption(ChannelOption.WRITE_BUFFER_WATER_MARK, new WriteBufferWaterMark(1024 * 1024 / 2, 1024 * 1024));//绑定端口,开始接收进来的连接try {ChannelFuture future = bootstrap.bind(socketAddress).sync();future.channel().closeFuture().sync();} catch (InterruptedException e) {throw new RuntimeException(e);} finally {//关闭主线程组bossGroup.shutdownGracefully();//关闭工作线程组workGroup.shutdownGracefully();}}@Overridepublic void run(String... args) {this.start();}
}
LiveHandler
继承于SimpleChannelInboundHandler,它是Netty中的一个特殊类型的Channel处理器,用于处理从通道中读取的数据,提供了一个简化的channelRead0方法,用于处理接收到的消息,而不必担心消息的释放。
这里实现的是判断请求地址是否为/live,并且获取地址中的deviceId,并将channel加入到设备的httpClients。
@Service
@ChannelHandler.Sharable
public class LiveHandler extends SimpleChannelInboundHandler<Object> {@Overrideprotected void channelRead0(ChannelHandlerContext ctx, Object msg) {FullHttpRequest req = (FullHttpRequest) msg;QueryStringDecoder decoder = new QueryStringDecoder(req.uri());// 判断请求uriif (!"/live".equals(decoder.path())) {sendError(ctx, HttpResponseStatus.BAD_REQUEST);return;}QueryStringDecoder queryStringDecoder = new QueryStringDecoder(req.uri());List<String> parameters = queryStringDecoder.parameters().get("deviceId");if(parameters == null || parameters.isEmpty()){sendError(ctx, HttpResponseStatus.BAD_REQUEST);return;}String deviceId = parameters.get(0);sendFlvResHeader(ctx);Device device = new Device(deviceId, MediaServer.YOUR_VIDEO_PATH);playForHttp(device, ctx);}public void playForHttp(Device device, ChannelHandlerContext ctx) {try {TransferToFlv mediaConvert = new TransferToFlv();if (MediaServer.deviceContext.containsKey(device.getDeviceId())) {mediaConvert = MediaServer.deviceContext.get(device.getDeviceId());mediaConvert.getMediaChannel().addChannel(ctx, true);return;}mediaConvert.setCurrentDevice(device);MediaChannel mediaChannel = new MediaChannel(device);mediaConvert.setMediaChannel(mediaChannel);MediaServer.deviceContext.put(device.getDeviceId(), mediaConvert);//注册事件mediaChannel.getEventBus().register(mediaConvert);new Thread(mediaConvert).start();mediaConvert.getMediaChannel().addChannel(ctx, false);} catch (InterruptedException | FFmpegFrameRecorder.Exception e) {throw new RuntimeException(e);}}/*** 错误请求响应** @param ctx* @param status*/private void sendError(ChannelHandlerContext ctx, HttpResponseStatus status) {FullHttpResponse response = new DefaultFullHttpResponse(HttpVersion.HTTP_1_1, status,Unpooled.copiedBuffer("请求地址有误: " + status + "\r\n", CharsetUtil.UTF_8));response.headers().set(HttpHeaderNames.CONTENT_TYPE, "text/plain; charset=UTF-8");ctx.writeAndFlush(response).addListener(ChannelFutureListener.CLOSE);}/*** 发送req header,告知浏览器是flv格式** @param ctx*/private void sendFlvResHeader(ChannelHandlerContext ctx) {HttpResponse rsp = new DefaultHttpResponse(HttpVersion.HTTP_1_1, HttpResponseStatus.OK);rsp.headers().set(HttpHeaderNames.CONNECTION, HttpHeaderValues.CLOSE).set(HttpHeaderNames.CONTENT_TYPE, "video/x-flv").set(HttpHeaderNames.ACCEPT_RANGES, "bytes").set(HttpHeaderNames.PRAGMA, "no-cache").set(HttpHeaderNames.CACHE_CONTROL, "no-cache").set(HttpHeaderNames.TRANSFER_ENCODING, HttpHeaderValues.CHUNKED).set(HttpHeaderNames.SERVER, "测试");ctx.writeAndFlush(rsp);}
}
MediaChannel
主要负责每个设备的channel添加、关闭,以及向channel发送数据。利用newScheduledThreadPool进行周期性检查channel的在线情况,如果全部channel下线,则使用事件总线eventBus通知关闭解码推流。
@Data
@AllArgsConstructor
public class MediaChannel {private Device currentDevice;public ConcurrentHashMap<String, ChannelHandlerContext> httpClients;private ScheduledFuture<?> checkFuture;private final ScheduledExecutorService scheduler;protected EventBus eventBus;public MediaChannel(Device currentDevice) {this.currentDevice = currentDevice;this.httpClients = new ConcurrentHashMap<>();this.scheduler = Executors.newScheduledThreadPool(1);this.eventBus = new EventBus();}public void addChannel(ChannelHandlerContext ctx, boolean needSendFlvHeader) throws InterruptedException, FFmpegFrameRecorder.Exception {if (ctx.channel().isWritable()) {ChannelFuture channelFuture = null;if (needSendFlvHeader) {//如果当前设备正在有channel播放,则先发送flvheader,再发送视频数据。byte[] flvHeader = MediaServer.deviceContext.get(currentDevice.getDeviceId()).getFlvHeader();channelFuture = ctx.writeAndFlush(Unpooled.copiedBuffer(flvHeader));} else {channelFuture = ctx.writeAndFlush(Unpooled.copiedBuffer(new ByteArrayOutputStream().toByteArray()));}channelFuture.addListener(future -> {if (future.isSuccess()) {httpClients.put(ctx.channel().id().toString(), ctx);}});this.checkFuture = scheduler.scheduleAtFixedRate(this::checkChannel, 0, 10, TimeUnit.SECONDS);System.out.println(currentDevice.getDeviceId() + ":channel:" + ctx.channel().id() + "创建成功");}Thread.sleep(50);}/*** 检查是否存在channel*/private void checkChannel() {if (httpClients.isEmpty()) {System.out.println("通知关闭推流");eventBus.post(this.currentDevice);this.checkFuture = null;scheduler.shutdown();}}/*** 关闭通道*/public void closeChannel() {for (Map.Entry<String, ChannelHandlerContext> entry : httpClients.entrySet()) {entry.getValue().close();}}/*** 发送数据** @param data*/public void sendData(byte[] data) {for (Map.Entry<String, ChannelHandlerContext> entry : httpClients.entrySet()) {if (entry.getValue().channel().isWritable()) {entry.getValue().writeAndFlush(Unpooled.copiedBuffer(data));} else {httpClients.remove(entry.getKey());System.out.println(currentDevice.getDeviceId() + ":channel:" + entry.getKey() + "已被去除");}}}}
TransferToFlv
流的解码、推送部分就是在这个类里面,使用的是javacv封装的ffmpeg库,将音视频流转换为flv格式。实际的参数可以根据业务调整。
这里增加了一个获取flv格式header数据方法,因为flv格式视频必须要包含flv header才能播放。复用推流数据的时候,先向前端发送flv格式header,再发送流数据。
@Slf4j
@Data
public class TransferToFlv implements Runnable {private volatile boolean running = false;private FFmpegFrameGrabber grabber;private FFmpegFrameRecorder recorder;public ByteArrayOutputStream bos = new ByteArrayOutputStream();private Device currentDevice;private MediaChannel mediaChannel;public ConcurrentHashMap<String, ChannelHandlerContext> httpClients = new ConcurrentHashMap<>();/*** 创建拉流器** @return*/protected void createGrabber(String url) throws FFmpegFrameGrabber.Exception {grabber = new FFmpegFrameGrabber(url);//拉流超时时间(10秒)grabber.setOption("stimeout", "10000000");grabber.setOption("threads", "1");grabber.setPixelFormat(avutil.AV_PIX_FMT_YUV420P);// 设置缓存大小,提高画质、减少卡顿花屏grabber.setOption("buffer_size", "1024000");// 读写超时,适用于所有协议的通用读写超时grabber.setOption("rw_timeout", "15000000");// 探测视频流信息,为空默认5000000微秒// grabber.setOption("probesize", "5000000");// 解析视频流信息,为空默认5000000微秒//grabber.setOption("analyzeduration", "5000000");grabber.start();}/*** 创建录制器** @return*/protected void createTransterOrRecodeRecorder() throws FFmpegFrameRecorder.Exception {recorder = new FFmpegFrameRecorder(bos, grabber.getImageWidth(), grabber.getImageHeight(),grabber.getAudioChannels());setRecorderParams(recorder);recorder.start();}/*** 设置录制器参数** @param fFmpegFrameRecorder*/private void setRecorderParams(FFmpegFrameRecorder fFmpegFrameRecorder) {fFmpegFrameRecorder.setFormat("flv");// 转码fFmpegFrameRecorder.setInterleaved(false);fFmpegFrameRecorder.setVideoOption("tune", "zerolatency");fFmpegFrameRecorder.setVideoOption("preset", "ultrafast");fFmpegFrameRecorder.setVideoOption("crf", "23");fFmpegFrameRecorder.setVideoOption("threads", "1");fFmpegFrameRecorder.setFrameRate(25);// 设置帧率fFmpegFrameRecorder.setGopSize(25);// 设置gop,与帧率相同//recorder.setVideoBitrate(500 * 1000);// 码率500kb/sfFmpegFrameRecorder.setVideoCodec(avcodec.AV_CODEC_ID_H264);fFmpegFrameRecorder.setPixelFormat(avutil.AV_PIX_FMT_YUV420P);fFmpegFrameRecorder.setAudioCodec(avcodec.AV_CODEC_ID_AAC);fFmpegFrameRecorder.setOption("keyint_min", "25");  //gop最小间隔fFmpegFrameRecorder.setTrellis(1);fFmpegFrameRecorder.setMaxDelay(0);// 设置延迟}/*** 获取flv格式header数据** @return* @throws FFmpegFrameRecorder.Exception*/public byte[] getFlvHeader() throws FFmpegFrameRecorder.Exception {ByteArrayOutputStream byteArrayOutputStream = new ByteArrayOutputStream();FFmpegFrameRecorder fFmpegFrameRecorder = new FFmpegFrameRecorder(byteArrayOutputStream, grabber.getImageWidth(), grabber.getImageHeight(),grabber.getAudioChannels());setRecorderParams(fFmpegFrameRecorder);fFmpegFrameRecorder.start();return byteArrayOutputStream.toByteArray();}/*** 将视频源转换为flv*/protected void transferToFlv() {//创建拉流器try {createGrabber(currentDevice.getRtmpUrl());//创建录制器createTransterOrRecodeRecorder();grabber.flush();running = true;// 时间戳计算long startTime = 0;long lastTime = System.currentTimeMillis();while (running) {// 转码Frame frame = grabber.grab();if (frame != null && frame.image != null) {lastTime = System.currentTimeMillis();recorder.setTimestamp((1000 * (System.currentTimeMillis() - startTime)));recorder.record(frame);if (bos.size() > 0) {byte[] b = bos.toByteArray();bos.reset();sendFrameData(b);continue;}}//10秒内读不到视频帧,则关闭连接if ((System.currentTimeMillis() / 1000 - lastTime / 1000) > 10) {System.out.println(currentDevice.getDeviceId() + ":10秒内读不到视频帧");break;}}} catch (FFmpegFrameRecorder.Exception | FrameGrabber.Exception e) {throw new RuntimeException(e);} finally {try {recorder.close();grabber.close();bos.close();closeMedia();} catch (IOException e) {throw new RuntimeException(e);}}}/*** 发送帧数据** @param data*/private void sendFrameData(byte[] data) {mediaChannel.sendData(data);}/*** 关闭流媒体*/private void closeMedia() {running = false;MediaServer.deviceContext.remove(currentDevice.getDeviceId());mediaChannel.closeChannel();}/*** 通知关闭推流** @param device*/@Subscribepublic void checkChannel(Device device) {if (device.getDeviceId().equals(currentDevice.getDeviceId())) {closeMedia();System.out.println("关闭推流完成");}}@Overridepublic void run() {transferToFlv();}}
演示
前端就简单用flv.js进行演示,首次进行设备1和设备2播放,都需要进行解码推流,当设备1建立一个新channel(第三个视频画面)进行播放时,只需拿前面的第一个channel数据即可,无需进行再次进行解码。
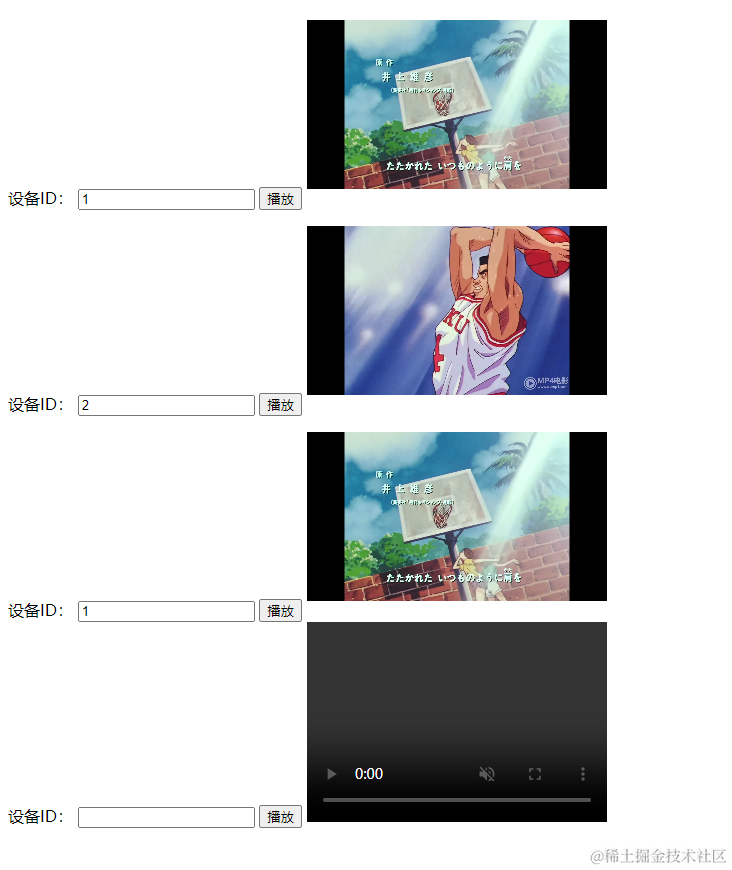
可以看出,第三个视频播放的时候,跟第一个视频画面进度是同步的。
结束
附上代码地址: https://gitee.com/zhouxiaoben/keep-learning.git
这次分享就到这,大家有什么好的优化建议可以放在评论区。
