文章目录
- 环境
- 步骤
- 准备
- 例1:基本用法
- 例2:缓存layer
- 例3:Multi-stage
- 例4:Mount
- cache mount
- bind mount
- 例5:参数
- 例6:Export文件
- 例7:测试
- 参考
环境
- RHEL 9.3
- Docker Community 24.0.7
步骤
在Docker的官网上( https://docs.docker.com/build/guide/ ),有一个现成的hands-on例子。
准备
首先克隆 buildme 项目:
git clone https://github.com/dockersamples/buildme.git
其结构如下:
➜  buildme git:(main) tree
.
├── chapters
│   ├── 1.Dockerfile
│   ├── 2.Dockerfile
│   ├── 3.Dockerfile
│   ├── 4.Dockerfile
│   ├── 5.Dockerfile
│   ├── 6.Dockerfile
│   ├── 7.Dockerfile
│   └── 8.Dockerfile
├── cmd
│   ├── client
│   │   ├── main.go
│   │   ├── request.go
│   │   └── ui.go
│   └── server
│       ├── main.go
│       └── translate.go
├── Dockerfile
├── go.mod
├── go.sum
├── README.md
└── Taskfile.yml4 directories, 18 files
注: chapters 目录和 Taskfile.yml 文件只是为了方便快速切换 Dockerfile 文件的内容。它使用了 task 工具,这是一个基于Go的构建工具,其安装和用法参见 https://taskfile.dev。
实际上, task 工具和本例中的Go项目并没有直接关联。对于本例来说,使用该工具只是为了方便把 chapters 目录下的某个Dockerfile文件覆盖到项目的根目录下。具体命令为: task goto:<N> 。若不想用该工具,可以直接无视之。
例1:基本用法
打开 Dockerfile 文件,如下:
# syntax=docker/dockerfile:1
FROM golang:1.20-alpine
WORKDIR /src
COPY . .
RUN go mod download
RUN go build -o /bin/client ./cmd/client
RUN go build -o /bin/server ./cmd/server
ENTRYPOINT [ "/bin/server" ]
基本上,每一行就是一条指令:
-
# syntax=docker/dockerfile:1
这是一个解析器指令(parser directive),指定了Dockerfile的语法版本。 -
FROM golang:1.20-alpine
指定base image(golang)和其版本(1.20-alpine)。 -
WORKDIR /src
容器的工作目录(即操作容器时的当前目录),若目录不存在则会被创建。 -
COPY . .
从宿主机复制文件/目录到容器里。目标地址可以是绝对路径或相对路径,若是相对路径,则以前面指定的工作目录为基础。 -
RUN go mod download
运行命令(下载所需的Go module)。 -
RUN go build -o /bin/client ./cmd/client
同上(构建client程序)。 -
RUN go build -o /bin/server ./cmd/server
同上(构建server程序)。 -
ENTRYPOINT [ "/bin/server" ]
指定当启动容器时运行的命令。本例中就是启动server。
接下来,开始构建:
docker build --tag=buildme .
运行报错了,试了几次都报错,如下:
➜  buildme git:(main) docker build --tag=buildme .
[+] Building 151.9s (10/12)                                                                                                                                                                                                   docker:default=> [internal] load .dockerignore                                                                                                                                                                                                       0.0s=> => transferring context: 2B                                                                                                                                                                                                         0.0s=> [internal] load build definition from Dockerfile                                                                                                                                                                                    0.0s=> => transferring dockerfile: 304B                                                                                                                                                                                                    0.0s=> resolve image config for docker.io/docker/dockerfile:1                                                                                                                                                                              0.7s=> CACHED docker-image://docker.io/docker/dockerfile:1@sha256:ac85f380a63b13dfcefa89046420e1781752bab202122f8f50032edf31be0021                                                                                                         0.0s=> [internal] load metadata for docker.io/library/golang:1.20-alpine                                                                                                                                                                   0.7s=> [1/6] FROM docker.io/library/golang:1.20-alpine@sha256:3ae92bcab3301033767e8c13d401394e53ad2732f770c313a34630193ed009b8                                                                                                             0.0s=> [internal] load build context                                                                                                                                                                                                       0.0s=> => transferring context: 6.46kB                                                                                                                                                                                                     0.0s=> CACHED [2/6] WORKDIR /src                                                                                                                                                                                                           0.0s=> CACHED [3/6] COPY . .                                                                                                                                                                                                               0.0s=> ERROR [4/6] RUN go mod download                                                                                                                                                                                                   150.3s
------> [4/6] RUN go mod download:
150.3 go: github.com/atotto/clipboard@v0.1.4: Get "https://proxy.golang.org/github.com/atotto/clipboard/@v/v0.1.4.mod": dial tcp 142.251.43.17:443: i/o timeout
------
Dockerfile:5
--------------------3 |     WORKDIR /src4 |     COPY . .5 | >>> RUN go mod download6 |     RUN go build -o /bin/client ./cmd/client7 |     RUN go build -o /bin/server ./cmd/server
--------------------
ERROR: failed to solve: process "/bin/sh -c go mod download" did not complete successfully: exit code: 1
注:有些步骤是 CACHED ,是因为运行了好几次,而这些步骤在之前构建时是成功的。关于缓存,详见例2。
从报错信息可以判断处,网站连接有问题,解决方法是设置代理。
编辑 Dockerfile 文件,如下:
......
COPY . .
RUN go env -w GOPROXY=https://goproxy.cn # 添加这一行
RUN go mod download
......
保存,再次运行 docker build --tag=buildme . ,这次成功了。
查看image:
➜  buildme git:(main) ✗ docker images
REPOSITORY                          TAG       IMAGE ID       CREATED         SIZE
buildme                             latest    773f384bf110   2 minutes ago   416MB
......
接下来,运行容器:
➜  buildme git:(main) ✗ docker run --name=buildme --rm --detach buildme
f1d6e9038ee74d6524fa6c614e7ff133852ab7fd24e59f7c188438949b7bb828
其中:
--rm:在退出容器时,自动将其删除。--detach:在后台运行容器。
查看容器:
➜  buildme git:(main) ✗ docker ps
CONTAINER ID   IMAGE     COMMAND         CREATED          STATUS         PORTS     NAMES
f1d6e9038ee7   buildme   "/bin/server"   10 seconds ago   Up 9 seconds             buildme
进入容器:
docker exec -it buildme /bin/client
如下:
> Translate a message...╭─────────────────────────╮│ Hit Enter to translate. │╰─────────────────────────╯Ctrl+C to exit.
输入 hello world ,回车,如下:
> Translate a message...╭───────────────────────────────────────╮│ Input: hello world ││ Translation: hohelollolo wowororloldo │╰───────────────────────────────────────╯Ctrl+C to exit.
测试完毕,按 Ctrl + C 退出。
停止容器:
docker stop buildme
例2:缓存layer
粗略的讲,每一条build指令会转换为一个image layer。
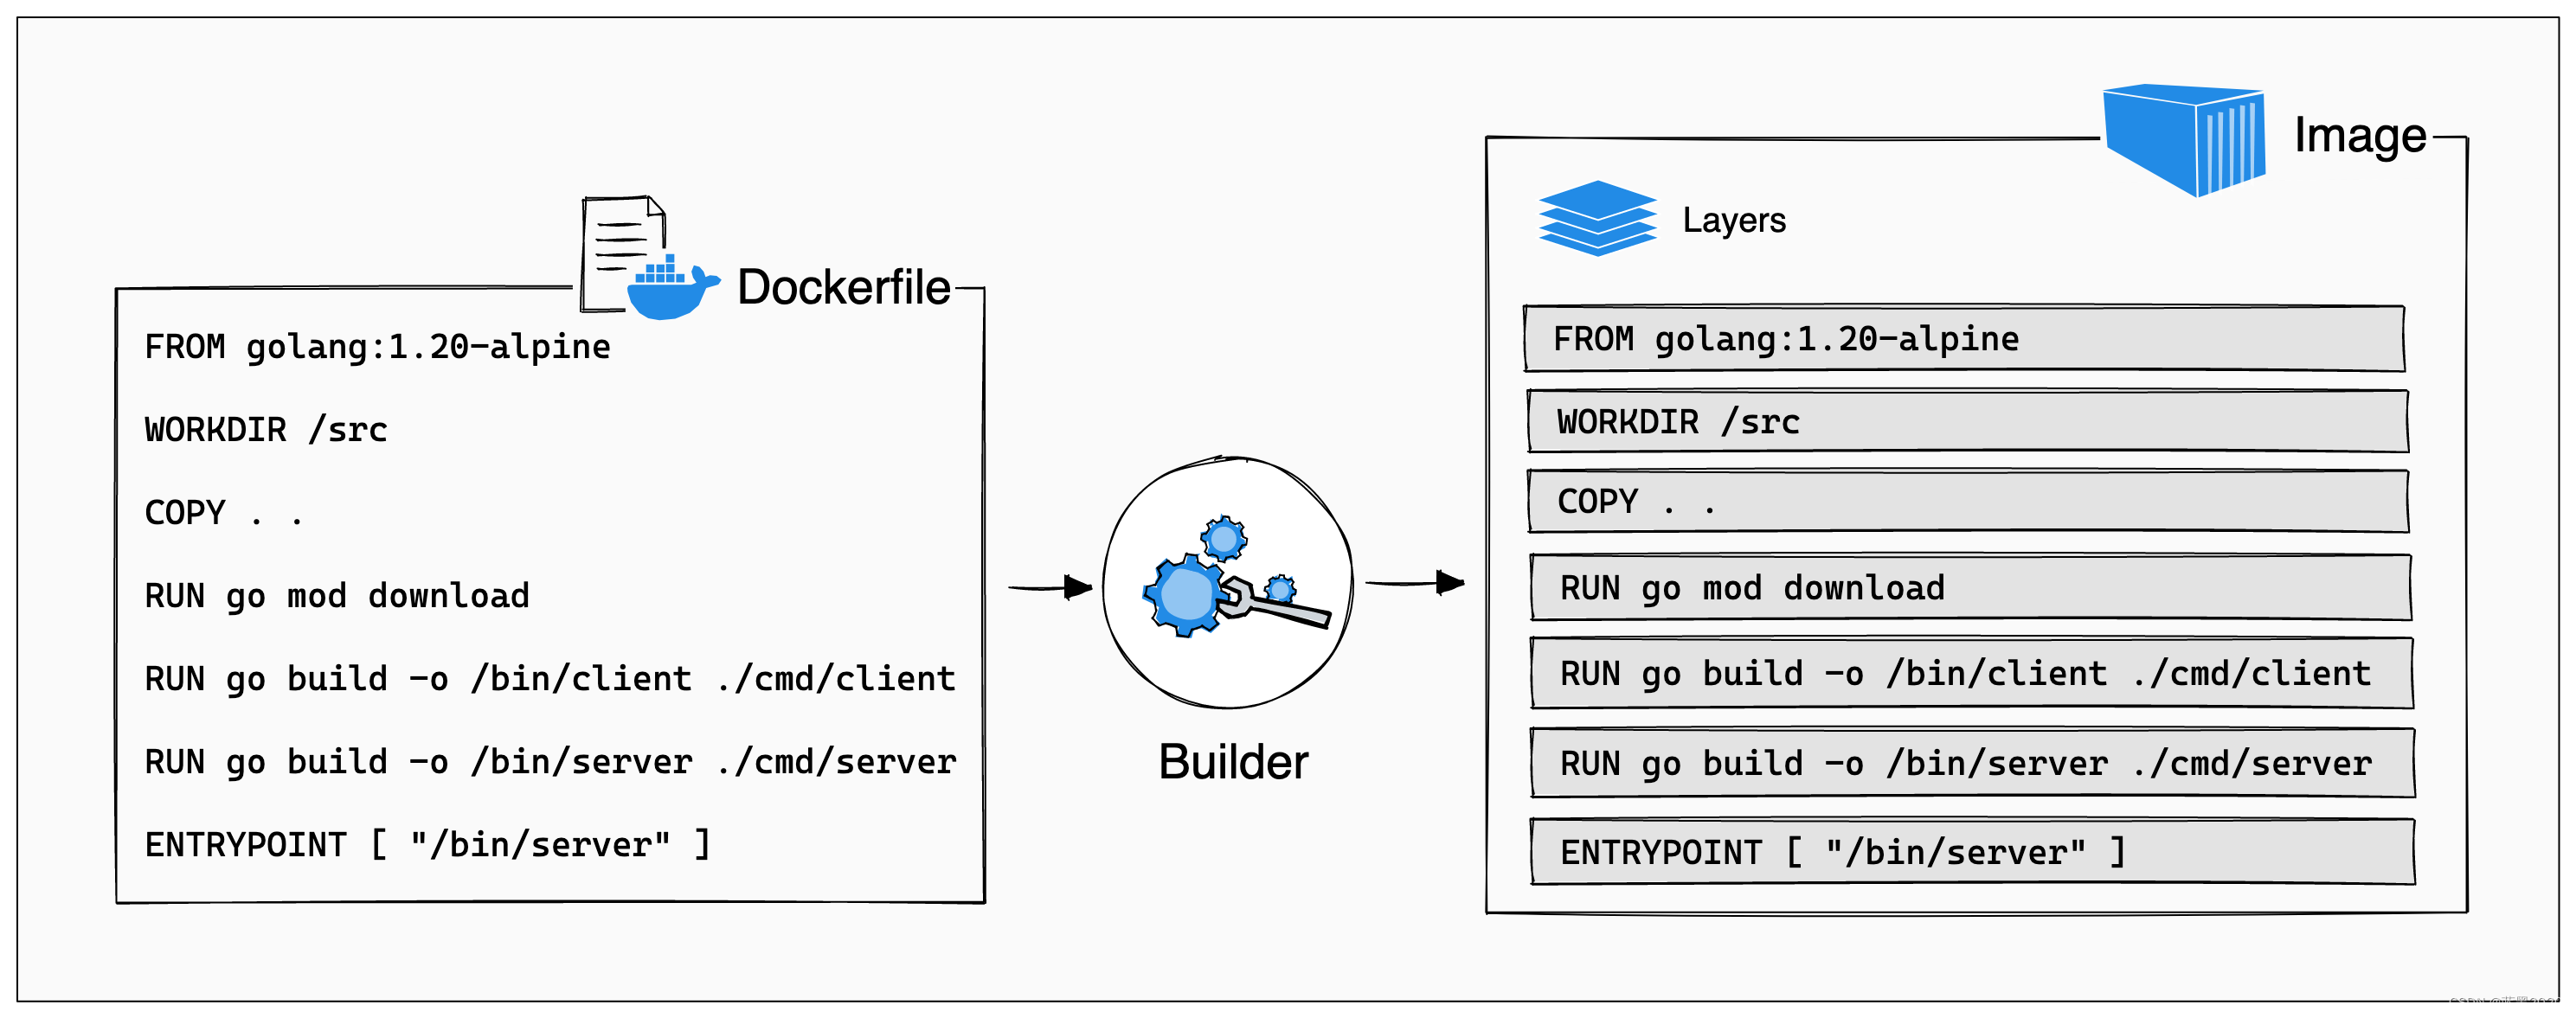
构建时,会尽量重用之前已经构建好的layer。如果一个layer没有修改过,则builder会从build cache里获取,但如果layer有修改,则它和随后的layer都会重新build。
本例中,如果 COPY 指令的源没有发生变化,则再次构建时,会从cache里获取,速度快很多。
➜  buildme git:(main) ✗ docker build --tag=buildme .
[+] Building 3.0s (14/14) FINISHED                                                                                                                                                                                            docker:default=> [internal] load build definition from Dockerfile                                                                                                                                                                                    0.0s=> => transferring dockerfile: 345B                                                                                                                                                                                                    0.0s=> [internal] load .dockerignore                                                                                                                                                                                                       0.0s=> => transferring context: 2B                                                                                                                                                                                                         0.0s=> resolve image config for docker.io/docker/dockerfile:1                                                                                                                                                                              1.7s=> CACHED docker-image://docker.io/docker/dockerfile:1@sha256:ac85f380a63b13dfcefa89046420e1781752bab202122f8f50032edf31be0021                                                                                                         0.0s=> [internal] load metadata for docker.io/library/golang:1.20-alpine                                                                                                                                                                   1.2s=> [1/7] FROM docker.io/library/golang:1.20-alpine@sha256:3ae92bcab3301033767e8c13d401394e53ad2732f770c313a34630193ed009b8                                                                                                             0.0s=> [internal] load build context                                                                                                                                                                                                       0.0s=> => transferring context: 6.46kB                                                                                                                                                                                                     0.0s=> CACHED [2/7] WORKDIR /src                                                                                                                                                                                                           0.0s=> CACHED [3/7] COPY . .                                                                                                                                                                                                               0.0s=> CACHED [4/7] RUN go env -w GOPROXY=https://goproxy.cn                                                                                                                                                                               0.0s=> CACHED [5/7] RUN go mod download                                                                                                                                                                                                    0.0s=> CACHED [6/7] RUN go build -o /bin/client ./cmd/client                                                                                                                                                                               0.0s=> CACHED [7/7] RUN go build -o /bin/server ./cmd/server                                                                                                                                                                               0.0s=> exporting to image                                                                                                                                                                                                                  0.0s=> => exporting layers                                                                                                                                                                                                                 0.0s=> => writing image sha256:773f384bf110eaaf76123cec3e6072cef7868780da02929875e37909eee60c83                                                                                                                                            0.0s=> => naming to docker.io/library/buildme
可以看到,从第1步到第7步,都是 CACHED 。
查看image:
➜  buildme git:(main) ✗ docker images
REPOSITORY                          TAG       IMAGE ID       CREATED          SIZE
buildme                             latest    773f384bf110   45 minutes ago   416MB
......
从 CREATED 的值可见,实际上并没有重新构建image,因为每一步都没有发生变化。
接下来,我们修改源文件,比如对 cmd/client/main.go 文件添加一个注释,然后再次构建:
➜  buildme git:(main) ✗ docker build --tag=buildme .
[+] Building 26.8s (14/14) FINISHED                                                                                                                                                                                           docker:default=> [internal] load .dockerignore                                                                                                                                                                                                       0.0s=> => transferring context: 2B                                                                                                                                                                                                         0.0s=> [internal] load build definition from Dockerfile                                                                                                                                                                                    0.0s=> => transferring dockerfile: 345B                                                                                                                                                                                                    0.0s=> resolve image config for docker.io/docker/dockerfile:1                                                                                                                                                                              1.4s=> CACHED docker-image://docker.io/docker/dockerfile:1@sha256:ac85f380a63b13dfcefa89046420e1781752bab202122f8f50032edf31be0021                                                                                                         0.0s=> [internal] load metadata for docker.io/library/golang:1.20-alpine                                                                                                                                                                   1.0s=> [1/7] FROM docker.io/library/golang:1.20-alpine@sha256:3ae92bcab3301033767e8c13d401394e53ad2732f770c313a34630193ed009b8                                                                                                             0.0s=> [internal] load build context                                                                                                                                                                                                       0.0s=> => transferring context: 6.69kB                                                                                                                                                                                                     0.0s=> CACHED [2/7] WORKDIR /src                                                                                                                                                                                                           0.0s=> [3/7] COPY . .                                                                                                                                                                                                                      0.0s=> [4/7] RUN go env -w GOPROXY=https://goproxy.cn                                                                                                                                                                                      0.2s=> [5/7] RUN go mod download                                                                                                                                                                                                           3.2s=> [6/7] RUN go build -o /bin/client ./cmd/client                                                                                                                                                                                     19.1s=> [7/7] RUN go build -o /bin/server ./cmd/server                                                                                                                                                                                      1.2s=> exporting to image                                                                                                                                                                                                                  0.6s=> => exporting layers                                                                                                                                                                                                                 0.6s=> => writing image sha256:05c59ce84ab98012b090ee3a6a67f6e1f2e9e998f81c56b18fdca04fe1dc6d6a                                                                                                                                            0.0s=> => naming to docker.io/library/buildme
可见,第3步没有从cache获取,因为 COPY 指令的源发生变化了。注意,随后的所有步骤,也都重新构建了。
查看image:
➜  buildme git:(main) ✗ docker images
REPOSITORY                          TAG       IMAGE ID       CREATED              SIZE
buildme                             latest    05c59ce84ab9   About a minute ago   416MB
<none>                              <none>    773f384bf110   47 minutes ago       416MB
......
显然,如果指令之间没有依赖关系,那么应该尽量把不变的步骤放在前面。
本例中, go mod download 是不变的,且非常耗时,但问题是, go mod download 下载的package,是在源代码里指定的,所以不能把它放在 COPY 指令前面。
解决办法:Go有两个记录项目依赖的文件,叫做 go.mod 和 go.sum (注:这两个文件的作用,类似于JavaScript里的 package.json 和 package-lock.json )。我们可以利用这两个文件,来判断 go mod download 是否需要重新构建。
修改 Dockerfile 文件如下:
# syntax=docker/dockerfile:1
FROM golang:1.20-alpine
WORKDIR /src
COPY go.mod go.sum .
RUN go env -w GOPROXY=https://goproxy.cn
RUN go mod download
COPY . .
RUN go build -o /bin/client ./cmd/client
RUN go build -o /bin/server ./cmd/server
ENTRYPOINT [ "/bin/server" ]
添加了 COPY go.mod go.sum . 。如果只是修改了源代码, go.mod 和 go.sum 没有变化,则 go mod download 无需重新构建。
构建一下,修改源代码,然后再次构建,就可以看到效果:
➜  buildme git:(main) ✗ docker build --tag=buildme .
[+] Building 14.6s (15/15) FINISHED                                                                                                                                                                                           docker:default=> [internal] load .dockerignore                                                                                                                                                                                                       0.0s=> => transferring context: 2B                                                                                                                                                                                                         0.0s=> [internal] load build definition from Dockerfile                                                                                                                                                                                    0.0s=> => transferring dockerfile: 366B                                                                                                                                                                                                    0.0s=> resolve image config for docker.io/docker/dockerfile:1                                                                                                                                                                              0.7s=> CACHED docker-image://docker.io/docker/dockerfile:1@sha256:ac85f380a63b13dfcefa89046420e1781752bab202122f8f50032edf31be0021                                                                                                         0.0s=> [internal] load metadata for docker.io/library/golang:1.20-alpine                                                                                                                                                                   0.7s=> [1/8] FROM docker.io/library/golang:1.20-alpine@sha256:3ae92bcab3301033767e8c13d401394e53ad2732f770c313a34630193ed009b8                                                                                                             0.0s=> [internal] load build context                                                                                                                                                                                                       0.0s=> => transferring context: 6.70kB                                                                                                                                                                                                     0.0s=> CACHED [2/8] WORKDIR /src                                                                                                                                                                                                           0.0s=> CACHED [3/8] COPY go.mod go.sum .                                                                                                                                                                                                   0.0s=> CACHED [4/8] RUN go env -w GOPROXY=https://goproxy.cn                                                                                                                                                                               0.0s=> CACHED [5/8] RUN go mod download                                                                                                                                                                                                    0.0s=> [6/8] COPY . .                                                                                                                                                                                                                      0.0s=> [7/8] RUN go build -o /bin/client ./cmd/client                                                                                                                                                                                     11.1s=> [8/8] RUN go build -o /bin/server ./cmd/server                                                                                                                                                                                      1.3s=> exporting to image                                                                                                                                                                                                                  0.5s=> => exporting layers                                                                                                                                                                                                                 0.5s=> => writing image sha256:fb86a9ea452afaec4f0c4f58248feef5a4447348fa90df089f5fc28abc8b4309                                                                                                                                            0.0s=> => naming to docker.io/library/buildme
可见,从第1步到第5步都是从cache获取。
例3:Multi-stage
优点:
- 并行构建,更快更高效
- 最小化image,只包含必需的东西
先前的例子里只用了一个stage,image大小为416MB,但实际上里面有很多东西是不需要的。
修改 Dockerfile 文件,添加一个 scratch stage(注:“from scratch”是“从零开始”的意思),如下:
# syntax=docker/dockerfile:1
FROM golang:1.20-alpine
WORKDIR /src
COPY go.mod go.sum .
RUN go env -w GOPROXY=https://goproxy.cn
RUN go mod download
COPY . .
RUN go build -o /bin/client ./cmd/client
RUN go build -o /bin/server ./cmd/serverFROM scratch
COPY --from=0 /bin/client /bin/server /bin/
ENTRYPOINT [ "/bin/server" ]
在最终的image里,只保留 client 和 server 两个文件。
重新构建,然后查看image:
➜  buildme git:(main) ✗ docker images buildme
REPOSITORY   TAG       IMAGE ID       CREATED          SIZE
buildme      latest    c8582385a23d   23 seconds ago   15.9MB
可见,image从原先的416MB减小到了15.9MB。
测试image,确保其工作正常。
接下来继续优化。本例中,client和server是串行构建的。由于构建client和构建server相互独立,为了提高效率,可以改为并行构建。
修改 Dockerfile 文件如下:
# syntax=docker/dockerfile:1
FROM golang:1.20-alpine AS base
WORKDIR /src
COPY go.mod go.sum .
RUN go env -w GOPROXY=https://goproxy.cn
RUN go mod download
COPY . .FROM base AS build-client
RUN go build -o /bin/client ./cmd/clientFROM base AS build-server
RUN go build -o /bin/server ./cmd/serverFROM scratch
COPY --from=build-client /bin/client /bin/
COPY --from=build-server /bin/server /bin/
ENTRYPOINT [ "/bin/server" ]
重新构建,观察构建过程,可见client和server是一起构建的。
测试image,确保其工作正常。
经过上述优化,image小了很多,client和server是并行构建的。接下来,还可以进一步优化,把client和server分成两个不同的image。
同一个Dockerfile可以构建不同的image,方法是在构建时,通过 --target 选项指定目标stage。
修改 Dockerfile 文件如下:
# syntax=docker/dockerfile:1
FROM golang:1.20-alpine AS base
WORKDIR /src
COPY go.mod go.sum .
RUN go env -w GOPROXY=https://goproxy.cn
RUN go mod download
COPY . .FROM base AS build-client
RUN go build -o /bin/client ./cmd/clientFROM base AS build-server
RUN go build -o /bin/server ./cmd/serverFROM scratch AS client
COPY --from=build-client /bin/client /bin/
ENTRYPOINT [ "/bin/client" ]FROM scratch AS server
COPY --from=build-server /bin/server /bin/
ENTRYPOINT [ "/bin/server" ]
然后用不同的命令构建client和server:
- client:
docker build --tag=buildme-client --target=client .
- server:
docker build --tag=buildme-server --target=server .
查看image:
➜  buildme git:(main) ✗ docker images "buildme*"
REPOSITORY       TAG       IMAGE ID       CREATED         SIZE
buildme-server   latest    f26347f19b1e   3 seconds ago   7.91MB
buildme-client   latest    f92304f7b995   9 minutes ago   7.98MB
buildme          latest    36bf26ddaf59   9 minutes ago   15.9MB
可见,把client和server分开后,各自的image更小了。
注意:如果指定了目标stage,则Docker只运行相关的stage。本例中,如果指定构建client,则 build-server 和 server stage会被略过。同理,如果指定构建server,则 build-client 和 client stage会被略过。
注:把client和server分开后,server能够运行,但是client无法连接到server,因为指定的是 http://localhost 。需要做一些额外处理才行,已超出本文范围,不做赘述。
例4:Mount
本例将涉及以下两种mount:
- cache mount
- bind mount
cache mount
顾名思义,就是把文件做缓存。我感觉它像是一个全局的目录,大家都可以访问它,向其做读写操作。
修改 Dockerfile 文件如下:
# syntax=docker/dockerfile:1
FROM golang:1.20-alpine AS base
WORKDIR /src
COPY go.mod go.sum .
RUN go env -w GOPROXY=https://goproxy.cn
RUN --mount=type=cache,target=/go/pkg/mod/ \go mod download -x
COPY . .FROM base AS build-client
RUN --mount=type=cache,target=/go/pkg/mod/ \go build -o /bin/client ./cmd/clientFROM base AS build-server
RUN --mount=type=cache,target=/go/pkg/mod/ \go build -o /bin/server ./cmd/serverFROM scratch AS client
COPY --from=build-client /bin/client /bin/
ENTRYPOINT [ "/bin/client" ]FROM scratch AS server
COPY --from=build-server /bin/server /bin/
ENTRYPOINT [ "/bin/server" ]
注: go mod download 命令的 -x 选项会打印出下载的情况。感觉有点类似bash的 -x 选项。
在重新构建之前,先清掉cache:
docker builder prune -af
其中:
-a:表示all-f:表示force
注:可以用 docker builder prune --help 命令查看帮助。
重新构建:
docker build --target=client --progress=plain . 2> log1.txt
注意:添加了 --progress=plain 选项,同时把输出(貌似 2 代表错误输出stderr)重定向到 log1.txt 文件。
查看 log1.txt 文件:
......
#12 0.299 # get https://goproxy.cn/github.com/charmbracelet/bubbletea/@v/v0.23.1.mod
#12 0.299 # get https://goproxy.cn/github.com/aymanbagabas/go-osc52/@v/v1.0.3.mod
#12 0.299 # get https://goproxy.cn/github.com/charmbracelet/bubbles/@v/v0.14.0.mod
#12 0.300 # get https://goproxy.cn/github.com/atotto/clipboard/@v/v0.1.4.mod
#12 0.361 # get https://goproxy.cn/github.com/atotto/clipboard/@v/v0.1.4.mod: 200 OK (0.061s)
#12 0.361 # get https://goproxy.cn/github.com/charmbracelet/bubbletea/@v/v0.23.1.mod: 200 OK (0.062s)
#12 0.361 # get https://goproxy.cn/github.com/charmbracelet/bubbles/@v/v0.14.0.mod: 200 OK (0.062s)
#12 0.362 # get https://goproxy.cn/github.com/aymanbagabas/go-osc52/@v/v1.0.3.mod: 200 OK (0.062s)
#12 0.363 # get https://goproxy.cn/github.com/charmbracelet/lipgloss/@v/v0.6.0.mod
#12 0.363 # get https://goproxy.cn/github.com/go-chi/chi/v5/@v/v5.0.0.mod
#12 0.363 # get https://goproxy.cn/github.com/containerd/console/@v/v1.0.3.mod
#12 0.364 # get https://goproxy.cn/github.com/lucasb-eyer/go-colorful/@v/v1.2.0.mod
#12 0.379 # get https://goproxy.cn/github.com/go-chi/chi/v5/@v/v5.0.0.mod: 200 OK (0.016s)
......
把package chi 的版本改为 v5.0.8 :
docker run -v $PWD:$PWD -w $PWD golang:1.20-alpine \go get github.com/go-chi/chi/v5@v5.0.8
注意:原文档上是 golang:1.21-alpine ,但是git里都是 golang:1.20-alpine ,所以我用了后者。
由于网络连接问题,运行报错如下:
go: github.com/atotto/clipboard@v0.1.4: Get "https://proxy.golang.org/github.com/atotto/clipboard/@v/v0.1.4.mod": dial tcp 172.217.163.49:443: i/o timeout
解决办法还是添加代理。
查看 docker run 的帮助,如下:
➜  buildme git:(main) ✗ docker help runUsage:  docker run [OPTIONS] IMAGE [COMMAND] [ARG...]
......
只能运行一条命令。要想运行多条命令,需要迂回一下:
docker run -v $PWD:$PWD -w $PWD golang:1.20-alpine \sh -c "go env -w GOPROXY=https://goproxy.cn; go get github.com/go-chi/chi/v5@v5.0.8"
查看 go.mod :
......github.com/go-chi/chi/v5 v5.0.8
......
注:原先是 v5.0.0 。
查看image:
➜  buildme git:(main) ✗ docker images golang
REPOSITORY   TAG           IMAGE ID       CREATED       SIZE
golang       1.20-alpine   f62d76c5566c   2 weeks ago   255MB
并没有变化。
现在,再构建一次:
docker build --target=client --progress=plain . 2> log2.txt
查看 log2.txt 文件:
......
#12 [base 6/7] RUN --mount=type=cache,target=/go/pkg/mod/     go mod download -x
#12 0.283 # get https://goproxy.cn/github.com/go-chi/chi/v5/@v/v5.0.8.mod
#12 0.353 # get https://goproxy.cn/github.com/go-chi/chi/v5/@v/v5.0.8.mod: 200 OK (0.071s)
#12 0.354 # get https://goproxy.cn/github.com/go-chi/chi/v5/@v/v5.0.8.info
#12 0.372 # get https://goproxy.cn/github.com/go-chi/chi/v5/@v/v5.0.8.info: 200 OK (0.018s)
#12 0.374 # get https://goproxy.cn/github.com/go-chi/chi/v5/@v/v5.0.8.zip
#12 0.393 # get https://goproxy.cn/github.com/go-chi/chi/v5/@v/v5.0.8.zip: 200 OK (0.019s)
#12 DONE 0.5s
......
可见,只下载了和 chi 相关的package。
注:这应该是与Go的module管理机制有关,它用到了 /go/pkg/mod/ 目录,不然它怎么知道这次只需下载 chi 的 v5.0.8 版本呢。
bind mount
在构建期,把宿主机或者其它stage里的文件/目录mount过来。
本例中, go.mod 和 go.sum ,这两个文件是复制到容器里的。通过bind mount,可使容器直接访问宿主机上的文件,从而省略所对应的 COPY 指令。
修改 Dockerfile 文件如下:
# syntax=docker/dockerfile:1
FROM golang:1.20-alpine AS base
WORKDIR /src
RUN go env -w GOPROXY=https://goproxy.cn
RUN --mount=type=cache,target=/go/pkg/mod/ \--mount=type=bind,source=go.sum,target=go.sum \--mount=type=bind,source=go.mod,target=go.mod \go mod download -x
COPY . .FROM base AS build-client
RUN --mount=type=cache,target=/go/pkg/mod/ \go build -o /bin/client ./cmd/clientFROM base AS build-server
RUN --mount=type=cache,target=/go/pkg/mod/ \go build -o /bin/server ./cmd/serverFROM scratch AS client
COPY --from=build-client /bin/client /bin/
ENTRYPOINT [ "/bin/client" ]FROM scratch AS server
COPY --from=build-server /bin/server /bin/
ENTRYPOINT [ "/bin/server" ]
本例中, source=go.sum :这是宿主机上的文件,貌似只能用相对路径(以宿主机当前目录为基础),不能用绝对路径,否则会报错找不到。
另外,source也可以指定为其它stage,要加上 from=<stage> 选项。
mount的文件/目录只在构建期的当前指令范围内可见。
本例中挂载的是文件,若挂载的是目录,则该目录是只读的。
注:docker run 命令也可以做bind mount,当mount宿主机的目录时,该目录并不是只读的。
同理,也可以把下面的 COPY 指令做相同处理。
修改 Dockerfile 文件如下:
# syntax=docker/dockerfile:1
FROM golang:1.20-alpine AS base
WORKDIR /src
RUN go env -w GOPROXY=https://goproxy.cn
RUN --mount=type=cache,target=/go/pkg/mod/ \--mount=type=bind,source=go.sum,target=go.sum \--mount=type=bind,source=go.mod,target=go.mod \go mod download -xFROM base AS build-client
RUN --mount=type=cache,target=/go/pkg/mod/ \--mount=type=bind,target=. \go build -o /bin/client ./cmd/clientFROM base AS build-server
RUN --mount=type=cache,target=/go/pkg/mod/ \--mount=type=bind,target=. \go build -o /bin/server ./cmd/serverFROM scratch AS client
COPY --from=build-client /bin/client /bin/
ENTRYPOINT [ "/bin/client" ]FROM scratch AS server
COPY --from=build-server /bin/server /bin/
ENTRYPOINT [ "/bin/server" ]
注意:本例中没有指定source,我在官网文档没有查到其默认值是什么,不过通过试验可知,source的默认值应该是 . (宿主机的当前目录)。
例5:参数
本例中,base image指定为 golang:1.20-alpine 。为了随时想切换到别的版本,我们可以在Dockerfile里使用变量,而在构建时传入所需的版本号。
修改 Dockerfile 文件如下:
# syntax=docker/dockerfile:1
ARG GO_VERSION=1.20
FROM golang:${GO_VERSION}-alpine AS base
WORKDIR /src
RUN go env -w GOPROXY=https://goproxy.cn
RUN --mount=type=cache,target=/go/pkg/mod/ \--mount=type=bind,source=go.sum,target=go.sum \--mount=type=bind,source=go.mod,target=go.mod \go mod download -xFROM base AS build-client
RUN --mount=type=cache,target=/go/pkg/mod/ \--mount=type=bind,target=. \go build -o /bin/client ./cmd/clientFROM base AS build-server
RUN --mount=type=cache,target=/go/pkg/mod/ \--mount=type=bind,target=. \go build -o /bin/server ./cmd/serverFROM scratch AS client
COPY --from=build-client /bin/client /bin/
ENTRYPOINT [ "/bin/client" ]FROM scratch AS server
COPY --from=build-server /bin/server /bin/
ENTRYPOINT [ "/bin/server" ]
可以在构建时通过 --build-arg 选项传入参数:
docker build --target=client --build-arg="GO_VERSION=1.19" .
如果不传入参数,则使用其缺省值 1.20 。
同理,也可以在构建时把参数传到源代码里。
本例中, cmd/server/main.go 文件内容如下:
......
var version stringfunc main() {if version != "" {log.Printf("Version: %s", version)}
......
在Go语言中,通过 -ldflags 选项传入参数。例如:
go build -ldflags "-X main.version=v0.0.1" -o /bin/server ./cmd/server
因此,在Dockerfile里,可以设置变量 APP_VERSION ,在构建时传入参数。
修改 Dockerfile 文件如下:
# syntax=docker/dockerfile:1
ARG GO_VERSION=1.20
FROM golang:${GO_VERSION}-alpine AS base
WORKDIR /src
RUN go env -w GOPROXY=https://goproxy.cn
RUN --mount=type=cache,target=/go/pkg/mod/ \--mount=type=bind,source=go.sum,target=go.sum \--mount=type=bind,source=go.mod,target=go.mod \go mod download -xFROM base AS build-client
RUN --mount=type=cache,target=/go/pkg/mod/ \--mount=type=bind,target=. \go build -o /bin/client ./cmd/clientFROM base AS build-server
ARG APP_VERSION="v0.0.0+unknown"
RUN --mount=type=cache,target=/go/pkg/mod/ \--mount=type=bind,target=. \go build -ldflags "-X main.version=$APP_VERSION" -o /bin/server ./cmd/serverFROM scratch AS client
COPY --from=build-client /bin/client /bin/
ENTRYPOINT [ "/bin/client" ]FROM scratch AS server
COPY --from=build-server /bin/server /bin/
ENTRYPOINT [ "/bin/server" ]
构建server:
docker build --target=server --build-arg="APP_VERSION=v0.0.1" --tag=buildme-server .
运行server:
➜  buildme git:(main) ✗ docker run buildme-server
2023/12/29 14:39:02 Version: v0.0.1
2023/12/29 14:39:02 Starting server...
2023/12/29 14:39:02 Listening on HTTP port 3000
例6:Export文件
docker build 默认的输出是容器image。image被载入image store,你可以为该image启动一个容器,或者把它push到registry。这种行为使用的是缺省的exporter,称为 docker exporter。
你也可以使用 local exporter,其构建结果为文件。在构建时,传入 --output 选项,指定目标路径。例如:
docker build --output=. --target=server .
本例中,指定目标路径为当前目录。注意实际export的路径为宿主机的 ./bin/server ,这是因为Dockerfile指定的目标路径是 /bin/server 。
查看文件:
➜  buildme git:(main) ✗ ll bin
total 7.6M
-rwxr-xr-x. 1 ding ding 7.6M Dec 29 22:52 server
如果想要把client和server一起export,可以在 Dockerfile 文件里添加一个stage,如下:
......
FROM scratch AS binaries
COPY --from=build-client /bin/client /
COPY --from=build-server /bin/server /
重新构建:
docker build --output=bin --target=binaries .
注:为了使export的文件仍然在 ./bin 目录下,因为Dockerfile里的目标路径是 / ,所以构建时指定的output路径是 bin 。
查看文件:
➜  buildme git:(main) ✗ ll bin
total 16M
-rwxr-xr-x. 1 ding ding 7.7M Dec 29 23:02 client
-rwxr-xr-x. 1 ding ding 7.6M Dec 29 23:02 server
例7:测试
本例中,源代码是Go语言,所以,接下来我们使用 golangci-lint 来做检查,比如代码中是否有错误、语法和注释是否规范等。
golangci-lint 有现成的image,我们先来试用一下:
docker run -v $PWD:/test -w /test \golangci/golangci-lint golangci-lint run
报错如下:
level=error msg="Running error: context loading failed: failed to load packages: timed out to load packages: context deadline exceeded"
level=error msg="Timeout exceeded: try increasing it by passing --timeout option"
解决办法:按提示,增加超时时间:
docker run -v $PWD:/test -w /test \golangci/golangci-lint golangci-lint run --timeout=10m
运行结果如下:
cmd/client/ui.go:5:2: "strings" imported and not used (typecheck)"strings"^
cmd/server/main.go:18:7: undefined: chi (typecheck)r := chi.NewRouter()^
注:和官网文档中的不太一样。我在其它几个机器(操作系统分别是 Ubuntu 22.04 和 RHEL 9.2 )上测试,和官网文档所说的报错是一致的:
cmd/server/main.go:23:10: Error return value of `w.Write` is not checked (errcheck)w.Write([]byte(translated))^
我仔细对比了一下环境,也没看出有何不同,有待继续研究。
注:这可能是个false alarm。如果想要修复,可以把代码修改如下:
......// w.Write([]byte(translated))if _, err := w.Write([]byte(translated)); err != nil {log.Println(err)
......
不过为了下面的例子演示,还是先别修复了。
接下来,我们将其加入到Dockerfile里。
修改 Dockerfile 文件如下:
# syntax=docker/dockerfile:1
ARG GO_VERSION=1.20
ARG GOLANGCI_LINT_VERSION=v1.52
FROM golang:${GO_VERSION}-alpine AS base
WORKDIR /src
RUN go env -w GOPROXY=https://goproxy.cn
RUN --mount=type=cache,target=/go/pkg/mod/ \--mount=type=bind,source=go.sum,target=go.sum \--mount=type=bind,source=go.mod,target=go.mod \go mod download -xFROM base AS build-client
RUN --mount=type=cache,target=/go/pkg/mod/ \--mount=type=bind,target=. \go build -o /bin/client ./cmd/clientFROM base AS build-server
ARG APP_VERSION="v0.0.0+unknown"
RUN --mount=type=cache,target=/go/pkg/mod/ \--mount=type=bind,target=. \go build -ldflags "-X main.version=$APP_VERSION" -o /bin/server ./cmd/serverFROM scratch AS client
COPY --from=build-client /bin/client /bin/
ENTRYPOINT [ "/bin/client" ]FROM scratch AS server
COPY --from=build-server /bin/server /bin/
ENTRYPOINT [ "/bin/server" ]FROM scratch AS binaries
COPY --from=build-client /bin/client /
COPY --from=build-server /bin/server /FROM golangci/golangci-lint:${GOLANGCI_LINT_VERSION} as lint
WORKDIR /test
RUN --mount=type=bind,target=. \golangci-lint run --timeout=10m
注意:别忘了加 --timeout=10m 。
构建:
docker build --target=lint .
运行结果如下:
➜  buildme git:(main) ✗ docker build --target=lint .
[+] Building 84.5s (9/9) FINISHED                                                                                                                                                                                             docker:default=> [internal] load .dockerignore                                                                                                                                                                                                       0.0s=> => transferring context: 2B                                                                                                                                                                                                         0.0s=> [internal] load build definition from Dockerfile                                                                                                                                                                                    0.0s=> => transferring dockerfile: 1.25kB                                                                                                                                                                                                  0.0s=> resolve image config for docker.io/docker/dockerfile:1                                                                                                                                                                              1.5s=> CACHED docker-image://docker.io/docker/dockerfile:1@sha256:ac85f380a63b13dfcefa89046420e1781752bab202122f8f50032edf31be0021                                                                                                         0.0s=> [internal] load metadata for docker.io/golangci/golangci-lint:v1.52                                                                                                                                                                 1.0s=> [lint 1/3] FROM docker.io/golangci/golangci-lint:v1.52@sha256:3d2f4240905054c7efa7f4e98ba145c12a16995bbc3e605300e21400a1665cb6                                                                                                      0.0s=> [internal] load build context                                                                                                                                                                                                       0.0s=> => transferring context: 7.00kB                                                                                                                                                                                                     0.0s=> CACHED [lint 2/3] WORKDIR /test                                                                                                                                                                                                     0.0s=> ERROR [lint 3/3] RUN --mount=type=bind,target=.     golangci-lint run --timeout=10m                                                                                                                                                81.9s
------                                                                                                                                                                                                                                       > [lint 3/3] RUN --mount=type=bind,target=.     golangci-lint run --timeout=10m:
81.86 cmd/client/ui.go:5:2: "strings" imported and not used (typecheck)
81.86   "strings"
81.86   ^
81.86 cmd/server/main.go:18:7: undefined: chi (typecheck)
81.86 	r := chi.NewRouter()
81.86 	     ^
------
Dockerfile:37
--------------------36 |     WORKDIR /test37 | >>> RUN --mount=type=bind,target=. \38 | >>>     golangci-lint run --timeout=10m39 |
--------------------
ERROR: failed to solve: process "/bin/sh -c golangci-lint run --timeout=10m" did not complete successfully: exit code: 1
注意:由于 golangci-lint 检测出问题(exit code为1),实际上构建失败了。
➜  buildme git:(main) ✗ echo $?
1
注:官网文档上说必须加上 --target=lint 。
接下来,我们把检测结果export到文件。官网文档提供了大致思路,其实和前面例6的过程是一样的,步骤如下:
- 把检测结果输出到文件。
- 创建一个新的stage,使用
scratch作为base image,复制结果文件。 - 构建时指定
--output选项。
官网文档没有提供具体Dockerfile,而是留给读者作为练习。
要想把检测结果输出到文件,可以通过输出重定向的方式,我测试发现,检测的结果是通过stderr输出的。
注:如果想要详细的输出,可以给 golangci-lint 加上 -v 选项。
另外,有一点需要注意:由于 golangci-lint 检测出问题,实际上构建失败了,随后的指令也不会再运行,所以必须要忽略错误,才能继续构建。
Docker是通过命令的返回值(exit code)来判断是否成功,因此,可以强制让命令返回0。
修改 Dockerfile 文件如下:
# syntax=docker/dockerfile:1
ARG GO_VERSION=1.20
ARG GOLANGCI_LINT_VERSION=v1.52
FROM golang:${GO_VERSION}-alpine AS base
WORKDIR /src
RUN go env -w GOPROXY=https://goproxy.cn
RUN --mount=type=cache,target=/go/pkg/mod/ \--mount=type=bind,source=go.sum,target=go.sum \--mount=type=bind,source=go.mod,target=go.mod \go mod download -xFROM base AS build-client
RUN --mount=type=cache,target=/go/pkg/mod/ \--mount=type=bind,target=. \go build -o /bin/client ./cmd/clientFROM base AS build-server
ARG APP_VERSION="v0.0.0+unknown"
RUN --mount=type=cache,target=/go/pkg/mod/ \--mount=type=bind,target=. \go build -ldflags "-X main.version=$APP_VERSION" -o /bin/server ./cmd/serverFROM scratch AS client
COPY --from=build-client /bin/client /bin/
ENTRYPOINT [ "/bin/client" ]FROM scratch AS server
COPY --from=build-server /bin/server /bin/
ENTRYPOINT [ "/bin/server" ]FROM scratch AS binaries
COPY --from=build-client /bin/client /
COPY --from=build-server /bin/server /FROM golangci/golangci-lint:${GOLANGCI_LINT_VERSION} as lint
WORKDIR /test
RUN --mount=type=bind,target=. \golangci-lint run --timeout=10m > /1.out 2>&1 || trueFROM scratch AS testresult
COPY --from=lint /1.out /
注意:重定向到根目录( /1.out ),不能重定向到当前目录( 1.out ),因为在容器里,当前目录是从宿主机映射而来,是只读的(没有指定source,默认值是 . ,即宿主机的当前目录)。
构建:
docker build --target=testresult --output=. .
构建成功了(虽然检测出了问题)。
查看 1.out 文件:
cmd/client/ui.go:5:2: "strings" imported and not used (typecheck)"strings"^
cmd/server/main.go:18:7: undefined: chi (typecheck)r := chi.NewRouter()
参考
https://docs.docker.com/build/guide/https://goproxy.cnhttps://www.cnblogs.com/wt645631686/p/13405161.htmlhttps://blog.51cto.com/u_16213347/7230157https://stackoverflow.com/questions/76287900/perform-docker-official-guide-still-getting-error-of-stage-build-with-docker-7https://taskfile.dev
