WebApplicationContext接口的类继承关系
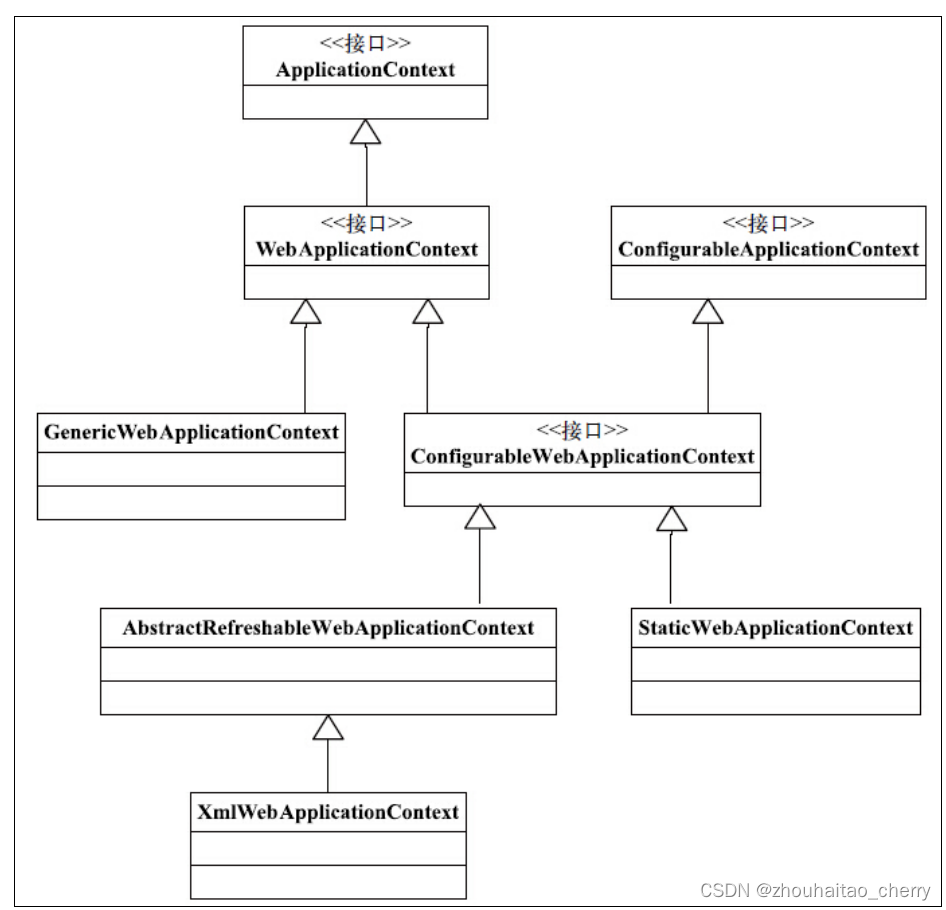
org.springframework.web.context.ContextLoader#initWebApplicationContext 对IOC容器的初始化
SpringMvc如何设计
DispatcherServlet类继承关系

MVC处理流程图如下:
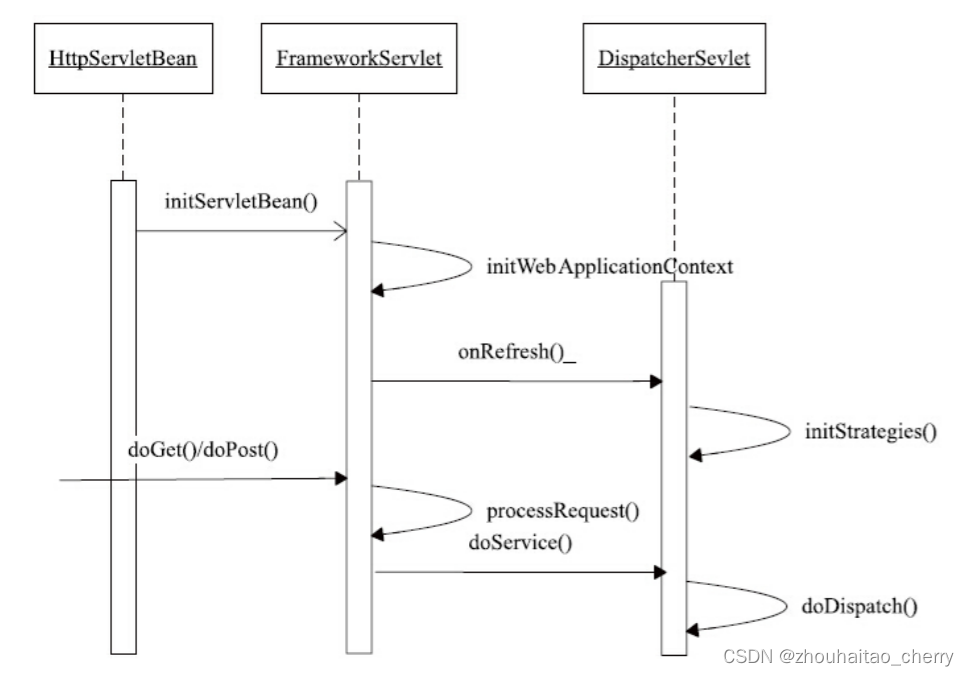
DispatcherServlet的工作大致可以分为两个部分:
-
初始化部分,由initServletBean()启动,通过initWebApplicationContext()方法最终调用DispatcherServlet的initStrategies方法,在这个方法里,DispatcherServlet对MVC模块的其他部分进行了初始化,比如handlerMapping、ViewResolver等;
-
对HTTP请求进行响应,作为一个Servlet,Web容器会调用Servlet的doGet()和doPost()方法,在经过FrameworkServlet的processRequest()简单处理后,会调用DispatcherServlet的doService()方法,在这个方法调用中封装了doDispatch(),这个doDispatch()是Dispatcher实现MVC模式的主要部分,会在下面进行详细的分析。
DispatcherServlet 启动与初始化
- Servlet初始化时org.apache.catalina.core.StandardWrapper#allocate,判断StandardWrapper实例是否存在(instanceInitialized状态标识),不存在则调用org.apache.catalina.core.StandardWrapper#initServlet方法进行初始化,然后调用javax.servlet.GenericServlet#init(javax.servlet.ServletConfig)方法,最终调用org.springframework.web.servlet.HttpServletBean#init方法
- init方法则调用org.springframework.web.servlet.HttpServletBean#init
public final void init() throws ServletException {// Set bean properties from init parameters.PropertyValues pvs = new ServletConfigPropertyValues(getServletConfig(), this.requiredProperties);if (!pvs.isEmpty()) {try {BeanWrapper bw = PropertyAccessorFactory.forBeanPropertyAccess(this);ResourceLoader resourceLoader = new ServletContextResourceLoader(getServletContext());bw.registerCustomEditor(Resource.class, new ResourceEditor(resourceLoader, getEnvironment()));initBeanWrapper(bw);bw.setPropertyValues(pvs, true);}catch (BeansException ex) {if (logger.isErrorEnabled()) {logger.error("Failed to set bean properties on servlet '" + getServletName() + "'", ex);}throw ex;}}// Let subclasses do whatever initialization they like.initServletBean();} - 可以看到最终会调用initServletBean方法,初始化实现是在org.springframework.web.servlet.FrameworkServlet#initServletBean
protected final void initServletBean() throws ServletException {getServletContext().log("Initializing Spring " + getClass().getSimpleName() + " '" + getServletName() + "'");if (logger.isInfoEnabled()) {logger.info("Initializing Servlet '" + getServletName() + "'");}long startTime = System.currentTimeMillis();try {this.webApplicationContext = initWebApplicationContext();initFrameworkServlet();}catch (ServletException | RuntimeException ex) {logger.error("Context initialization failed", ex);throw ex;}if (logger.isDebugEnabled()) {String value = this.enableLoggingRequestDetails ?"shown which may lead to unsafe logging of potentially sensitive data" :"masked to prevent unsafe logging of potentially sensitive data";logger.debug("enableLoggingRequestDetails='" + this.enableLoggingRequestDetails +"': request parameters and headers will be " + value);}if (logger.isInfoEnabled()) {logger.info("Completed initialization in " + (System.currentTimeMillis() - startTime) + " ms");}} - 初始化Web容器是在initWebApplicationContext方法中,主要实现在org.springframework.web.servlet.FrameworkServlet#initWebApplicationContext
protected WebApplicationContext initWebApplicationContext() {WebApplicationContext rootContext =WebApplicationContextUtils.getWebApplicationContext(getServletContext());WebApplicationContext wac = null;if (this.webApplicationContext != null) {// A context instance was injected at construction time -> use itwac = this.webApplicationContext;if (wac instanceof ConfigurableWebApplicationContext) {ConfigurableWebApplicationContext cwac = (ConfigurableWebApplicationContext) wac;if (!cwac.isActive()) {// The context has not yet been refreshed -> provide services such as// setting the parent context, setting the application context id, etcif (cwac.getParent() == null) {// The context instance was injected without an explicit parent -> set// the root application context (if any; may be null) as the parentcwac.setParent(rootContext);}configureAndRefreshWebApplicationContext(cwac);}}}if (wac == null) {// No context instance was injected at construction time -> see if one// has been registered in the servlet context. If one exists, it is assumed// that the parent context (if any) has already been set and that the// user has performed any initialization such as setting the context idwac = findWebApplicationContext();}if (wac == null) {// No context instance is defined for this servlet -> create a local onewac = createWebApplicationContext(rootContext);}if (!this.refreshEventReceived) {// Either the context is not a ConfigurableApplicationContext with refresh// support or the context injected at construction time had already been// refreshed -> trigger initial onRefresh manually here.synchronized (this.onRefreshMonitor) {onRefresh(wac);}}if (this.publishContext) {// Publish the context as a servlet context attribute.String attrName = getServletContextAttributeName();getServletContext().setAttribute(attrName, wac);}return wac;} - 可看到创建Web容器是在createWebApplicationContext方法中,主要实现在org.springframework.web.servlet.FrameworkServlet#createWebApplicationContext(org.springframework.context.ApplicationContext)
protected WebApplicationContext createWebApplicationContext(@Nullable ApplicationContext parent) {Class<?> contextClass = getContextClass();if (!ConfigurableWebApplicationContext.class.isAssignableFrom(contextClass)) {throw new ApplicationContextException("Fatal initialization error in servlet with name '" + getServletName() +"': custom WebApplicationContext class [" + contextClass.getName() +"] is not of type ConfigurableWebApplicationContext");}ConfigurableWebApplicationContext wac =(ConfigurableWebApplicationContext) BeanUtils.instantiateClass(contextClass);wac.setEnvironment(getEnvironment());wac.setParent(parent);String configLocation = getContextConfigLocation();if (configLocation != null) {wac.setConfigLocation(configLocation);}configureAndRefreshWebApplicationContext(wac);return wac;} - 此时就创建成功了Web容器 ConfigurableWebApplicationContext,然后调用配置启动并初始化容器,调用configureAndRefreshWebApplicationContext方法,代码如下:
protected void configureAndRefreshWebApplicationContext(ConfigurableWebApplicationContext wac) {if (ObjectUtils.identityToString(wac).equals(wac.getId())) {// The application context id is still set to its original default value// -> assign a more useful id based on available informationif (this.contextId != null) {wac.setId(this.contextId);}else {// Generate default id...wac.setId(ConfigurableWebApplicationContext.APPLICATION_CONTEXT_ID_PREFIX +ObjectUtils.getDisplayString(getServletContext().getContextPath()) + '/' + getServletName());}}wac.setServletContext(getServletContext());wac.setServletConfig(getServletConfig());wac.setNamespace(getNamespace());wac.addApplicationListener(new SourceFilteringListener(wac, new ContextRefreshListener()));// The wac environment's #initPropertySources will be called in any case when the context// is refreshed; do it eagerly here to ensure servlet property sources are in place for// use in any post-processing or initialization that occurs below prior to #refreshConfigurableEnvironment env = wac.getEnvironment();if (env instanceof ConfigurableWebEnvironment) {((ConfigurableWebEnvironment) env).initPropertySources(getServletContext(), getServletConfig());}postProcessWebApplicationContext(wac);applyInitializers(wac);wac.refresh();} - 可以看到最终调用了org.springframework.context.support.AbstractApplicationContext#refresh方法初始化容器。
可看到创建Web容器时,设置了父容器,DispatcherServlet持有一个以自己的Servlet名称命名的IOC容器。
SpringMvc 路径与HandlerMethod初始化
org.springframework.web.servlet.mvc.method.annotation.RequestMappingHandlerMapping的子类实现了InitializingBean接口,就必须实现afterPropertiesSet方法,主要实现如下:
public void afterPropertiesSet() {this.config = new RequestMappingInfo.BuilderConfiguration();this.config.setTrailingSlashMatch(useTrailingSlashMatch());this.config.setContentNegotiationManager(getContentNegotiationManager());if (getPatternParser() != null) {this.config.setPatternParser(getPatternParser());Assert.isTrue(!this.useSuffixPatternMatch && !this.useRegisteredSuffixPatternMatch,"Suffix pattern matching not supported with PathPatternParser.");}else {this.config.setSuffixPatternMatch(useSuffixPatternMatch());this.config.setRegisteredSuffixPatternMatch(useRegisteredSuffixPatternMatch());this.config.setPathMatcher(getPathMatcher());}super.afterPropertiesSet();}
可看到除了针对config做了一些初始设置操作外,最终调用了父类的afterPropertiesSet()实现,如下:
@Overridepublic void afterPropertiesSet() {initHandlerMethods();}
最终调用org.springframework.web.servlet.handler.AbstractHandlerMethodMapping#initHandlerMethods方法,如下:
protected void initHandlerMethods() {for (String beanName : getCandidateBeanNames()) {if (!beanName.startsWith(SCOPED_TARGET_NAME_PREFIX)) {processCandidateBean(beanName);}}handlerMethodsInitialized(getHandlerMethods());}
可看到关键方法org.springframework.web.servlet.handler.AbstractHandlerMethodMapping#processCandidateBean
protected void processCandidateBean(String beanName) {Class<?> beanType = null;try {beanType = obtainApplicationContext().getType(beanName);}catch (Throwable ex) {// An unresolvable bean type, probably from a lazy bean - let's ignore it.if (logger.isTraceEnabled()) {logger.trace("Could not resolve type for bean '" + beanName + "'", ex);}}if (beanType != null && isHandler(beanType)) {detectHandlerMethods(beanName);}}
此处调用了isHandler方法进行过滤,排除没有Controller或者RequestMapping注解Bean,实现如下:
@Overrideprotected boolean isHandler(Class<?> beanType) {return (AnnotatedElementUtils.hasAnnotation(beanType, Controller.class) ||AnnotatedElementUtils.hasAnnotation(beanType, RequestMapping.class));}
然后调用org.springframework.web.servlet.handler.AbstractHandlerMethodMapping#detectHandlerMethods方法,代码如下:
protected void detectHandlerMethods(Object handler) {Class<?> handlerType = (handler instanceof String ?obtainApplicationContext().getType((String) handler) : handler.getClass());if (handlerType != null) {Class<?> userType = ClassUtils.getUserClass(handlerType);Map<Method, T> methods = MethodIntrospector.selectMethods(userType,(MethodIntrospector.MetadataLookup<T>) method -> {try {return getMappingForMethod(method, userType);}catch (Throwable ex) {throw new IllegalStateException("Invalid mapping on handler class [" +userType.getName() + "]: " + method, ex);}});if (logger.isTraceEnabled()) {logger.trace(formatMappings(userType, methods));}else if (mappingsLogger.isDebugEnabled()) {mappingsLogger.debug(formatMappings(userType, methods));}methods.forEach((method, mapping) -> {Method invocableMethod = AopUtils.selectInvocableMethod(method, userType);registerHandlerMethod(handler, invocableMethod, mapping);});}}
此处关键方法,org.springframework.web.servlet.handler.AbstractHandlerMethodMapping#registerHandlerMethod,实现如下:
protected void registerHandlerMethod(Object handler, Method method, T mapping) {this.mappingRegistry.register(mapping, handler, method);}
进入org.springframework.web.servlet.handler.AbstractHandlerMethodMapping.MappingRegistry#register,进行注册,代码如下:
public void register(T mapping, Object handler, Method method) {this.readWriteLock.writeLock().lock();try {HandlerMethod handlerMethod = createHandlerMethod(handler, method);validateMethodMapping(handlerMethod, mapping);Set<String> directPaths = AbstractHandlerMethodMapping.this.getDirectPaths(mapping);for (String path : directPaths) {this.pathLookup.add(path, mapping);}String name = null;if (getNamingStrategy() != null) {name = getNamingStrategy().getName(handlerMethod, mapping);addMappingName(name, handlerMethod);}CorsConfiguration corsConfig = initCorsConfiguration(handler, method, mapping);if (corsConfig != null) {corsConfig.validateAllowCredentials();this.corsLookup.put(handlerMethod, corsConfig);}this.registry.put(mapping,new MappingRegistration<>(mapping, handlerMethod, directPaths, name, corsConfig != null));}finally {this.readWriteLock.writeLock().unlock();}}
可看到registry将mapping添加成功,根据前面的rg.springframework.web.servlet.handler.AbstractHandlerMethodMapping#initHandlerMethods循环调用,会将所有的Controller里面的路径与MappingRegistration添加至Map<T, MappingRegistration> registry中。效果如下:

至此,Spring完成了所有的Controller的路径注册过程。


