目录
第三章 状态管理库:Pinia
3.1 创建空Vue项目并安装Pinia
3.1.1 创建空Vue项目
3.1.2 安装Pinia以及持久化工具
3.2 使用pinia
3.1.1 使用案例
3.1.2 规范问题
3.1.3 简化:结构赋值
第四章 Vue3的Router路由理解(与vue2类比)
4.1 安装
4.2 路由配置与使用
4.2.1 创建路由组件文件
4.2.2 创建路由配置文件
4.2.3 配置路由信息
4.2.4 使用路由
4.3 query 传参的方法
4.3.1 query参数传递
4.3.2 query参数获取
4.4 params 传参的方法
4.4.1 params参数传递
4.4.2 params参数获取
第五章 项目准备工作
5.1 jsconfig.json配置别名路径
5.2 elementPlus引入
5.3 axios安装并简单封装
5.3.1 axios安装
5.3.2 简单封装
vue3基础+进阶(二、vue3常用组合式api基本使用)-CSDN博客
(由于前段时间比较忙,小编将vue项目实战两个重要模块未及时更新,现在为大家添加上,并添加了项目实战时需要准备的点)
第三章 状态管理库:Pinia
- 什么是Pinia:Pinia是 Vue的专属的最新状态管理库,是Vuex状态管理工具的替代品
- 优点:
- 提供更加简单的API(去掉了mutation )
- 提供符合组合式风格的API(和Vue3新语法统一)
- 去掉了modules的概念,每一个store 都是一个独立的模块
- 搭配TypeScript一起使用提供可靠的类型推断
3.1 创建空Vue项目并安装Pinia
3.1.1 创建空Vue项目
vue3基础+进阶(一、Vue3项目创建并相比vue2熟悉项目结构)_❆VE❆的博客-CSDN博客
3.1.2 安装Pinia以及持久化工具
Pinia官网:Pinia | Pinia
npm i pinia // 使用npm安装pinia不管是vuex还是pinia作为状态管理库,我们都知道它们管理的数据都是非持久化的,怎么才能做到呢持久化呢?
- 常用的方法有:localStorage.setItem(key,value)、localStorage.getItem(key)、localStorage.removeItem()
- 提出一种新的组件库:pinia-plugin-persistedstate,它使 Pinia Store 的持久化更易配置。
pinia-plugin-persistedstate官网:快速开始 | pinia-plugin-persistedstate
npm i pinia-plugin-persistedstate3.2 使用pinia
3.1.1 使用案例
- main.js文件导入下载的pinia相关插件
import { createApp } from 'vue'
import { createPinia } from 'pinia' // 从pinia导入createPinia方法
// 持久化插件 pinia-plugin-persistedstate
import piniaPluginPersistedstate from 'pinia-plugin-persistedstate'import App from './App.vue'const app = createApp(App)
// 将插件添加到pinia实例上,注册持久化插件,使用该插件相当于本地存储,setLocalStore
const pinia = createPinia()
// 当成插件使用
pinia.use(piniaPluginPersistedstate)app.use(pinia)
app.mount('#app')- 创建文件夹stores,实现state、action、getters(这里我们使用组合式api的方法写,统一我 们页面的script的写法)-- 小编用一个项目的store购物车模板跟大家理解state、action、getters的实现
- 分析:
- 根据pinia官网:在pinia中,store 是用 defineStore() 定义,里面有三个参数,第一个参数是store 小仓库的唯一id,第二个参数小编使用的是组合式API的steup函数,该函数定义了一些响应式属性和方法,并且return返回一个带有我们想暴露出去的属性和方法的对象,第三个参数可选,如果配置了pinia-plugin-persistedstate插件,配置{persist: true}将该store小仓库模板持久化。
- state 是 store 的数据 (data),通常 ref() 设置
- actions 同步异步函数,通常是 ()=>{} 函数的形式
- getters 则是计算state数据的,所有使用使用计算属性 computed() 即可实现
// 封装购物车模块
import { defineStore } from "pinia" // pinia里的defineStore函数
import { computed, ref } from "vue" // 获取vue3的组合式api
import { useUserStore } from "./userStore" // 这是小编的另一个仓库暴露的函数
import { insertCartAPI, findNewCartListAPI, delCartAPI } from "@/apis/cart" // api文件export const useCartStore = defineStore('cart', () => { // 暴露函数const userStore = useUserStore() // 另一个仓库的函数数据以及方法赋值const isLogin = computed(() => userStore.userInfo.token) // 通过token判断是否登录// 1、定义state - cartListconst cartList = ref([])// 获取最新购物车列表const updateNewList = async () => {const res = await findNewCartListAPI()cartList.value = res.result}// 2、定义action - addCartconst addCart = async (goods) => { // goods为传的参数:商品对象const {skuId, count} = goods// 用户已登录 + 未登录if (isLogin.value) {// 登录之后加入购物车逻辑  调用购物车接口添加购物车操作// 先加入购物车await insertCartAPI({skuId, count})// 然后获取最新的购物车接口// 最后赋值updateNewList()} else {// 用户未登录 商品加入购物放在本地// 添加购物车操作// 已添加过 - count + goods.count// 没有添加过 - 直接push// 思路:通过匹配传递过来的商品对象中的skuId能不能在cartList中找到,找到了就添加过了const item = cartList.value.find((item) => goods.skuId === item.skuId)if (item) {// 找到了item.count += goods.count} else {// 没有找到cartList.value.push(goods)}}}// 删除购物车const delCart = async (skuId) => {if (isLogin.value) {// 调用接口实现接口购物车中的删除功能await delCartAPI([skuId])// 然后获取最新的购物车接口// 最后赋值updateNewList()} else {// 思路: // 1、找到删除项的下标值, - splice// 2、使用数组的过滤方法 - filterconst idx = cartList.value.findIndex(item => skuId === item.skuId)cartList.value.splice(idx, 1)}}// 清除购物车const clearCart = () => {cartList.value = []}// 复选功能const singleCheck = (skuId, selected) => {// 通过skuId找到要修改的那一项 然后把它的selected修改为传过来的selected值const item = cartList.value.find((item) => item.skuId === skuId)item.selected = selected}// 全选功能const allCheck = (selected) => {// 把cartList中的每一项的selected都设置成当前全选框的状态cartList.value.forEach(item => item.selected = selected) }// 计算属性 getter// 1、总的数量 所有项的count之和const allCount = computed(() => {return cartList.value.reduce((a, c) => a + c.count, 0)})// 2、总价 所有项的count * price之和const allprice = computed(() => {return cartList.value.reduce((a, c) => a + c.count * c.price, 0)})// 3、已选择数量const selectedCount = computed(() => cartList.value.filter(item => item.selected).reduce((a, c) => a + c.count, 0))// 4、已选择商品价格合计const selectePrice = computed(() => cartList.value.filter(item => item.selected).reduce((a, c) => a + c.count * c.price, 0))// 是否全选const isAll = computed(()=>{return cartList.value.every((item) => item.selected)})return { // 返回所有的数据以及方法cartList,addCart,delCart,singleCheck,allCheck,clearCart,updateNewList,allCount,allprice,selectedCount,selectePrice,isAll}
},
{ // store中的数据state持久化persist: true,
})- 定义之后页面中获取store仓库,调用里面的数据、获取里面的方法
-- 导入store的属性和方法,并赋值
<script setup>
import { useCartStore } from "@/stores/cartStore"const cartStore = useCartStore()
</script>
-- 使用store的state属性
// html中直接就能使用store里的cartList值
<li v-for="i in cartStore.cartList" :key="i.id"></li>
-- 使用store的getter方法 --> computed
// html页面中直接使用store里已经通过computed处理好的getter方法
<div class="batch">共 {{ cartStore.allCount }} 件商品,已选择 {{ cartStore.selectedCount }} 件,商品合计:    <span class="red">¥ {{ cartStore.selectePrice.toFixed(2) }} </span>
</div>
-- 使用store的actions方法 --> 函数
<script setup>
import { useCartStore } from "@/stores/cartStore"const cartStore = useCartStore()// 调用cartStore里的action方法allCheck
const allCheck = (selected) => {cartStore.allCheck(selected)
}
</script><template><div class="xtx-cart-page"><el-checkbox :model-value="cartStore.isAll" @change="allCheck"/></div>
</template>
3.1.2 规范问题
- 命名规则:
- 对 `defineStore()` 的返回值进行任意命名,但最好使用 store 的名字,同时以 `use` 开头且以 `Store` 结尾。(比如 `useUserStore`,`useCartStore`,`useProductStore`)
- 页面上引用store值时,赋值把'use'去掉,例如:const cartStore = useCartStore()
- 使用规则:引用时,state与getter的属性,能在html页面直接使用,但是针对于action方法则需要放在script中(原因:规范,同时方便我们与vue类比,便于入门)
3.1.3 简化:结构赋值
注意:如果直接基于store进行解构赋值,响应式数据(state和getter)会丢失响应式特性,所以我们将使用storeToRefs辅助保持响应式。但是actions方法还是需要直接结构赋值
想要玩好vue3,数据一定要保持住响应式,不然在某些操作上就不会实现我们想要的效果
<script setup>
import { storeToRefs } from 'pinia'
import { useCartStore } from "@/stores/cartStore"const cartStore = useCartStore()// 使用它storeToRefs包裹之后解构保持响应式
// 利用storeToRefs解构state与getter
const { count } = storeToRefs(cartStore)// 解构方法
const { increment } = cartStore
</script>
第四章 Vue3的Router路由理解(与vue2类比)
4.1 安装
- 方法一:在使用cli安装vue时手动选择安装router。
- 方法二:使用npm命令安装,以vue3为例,vue3需要4.0以上版本vue-router:
npm install vue-router@44.2 路由配置与使用
4.2.1 创建路由组件文件
- 通常创建 view目录,然后在view目录下创建多个目录,再在目录下创建index.vue文件表示一级路由
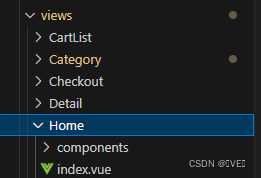
4.2.2 创建路由配置文件
- 新建 router目录,然后在 router目录下通常是新建两个文件:index.js和 routes.js文件
-- index.js:创建路由
-- routes.js:配置路由路径、名字、组件…
1、一个文件如何配置
// 注意小编这里为了写文章就都放到了index.js文件中了
import { createRouter, createWebHashHistory} from "vue-router";const router = createRouter({history: createWebHashHistory(import.meta.env.BASE_URL),routes: [ // routes里的配置通常放到routes.js中{path: "/",name: "Home",component: () => import("@/views/Home/index.vue"),},],
});export default router;
2、两个文件如何配置
-- routes.js配置如下:
const routes = [{path: "/",name: "Home",component: () => import("@/views/Home/index.vue"),},……
];export default routes
-- index.js配置如下:
import {createRouter, createWebHistory} from 'vue-router'
import routes from './routes'const router = createRouter({history: createWebHashHistory(import.meta.env.BASE_URL),routes
})export default router
4.2.3 配置路由信息
- 在 main.js中配置路由
import { createApp } from 'vue'
import App from './App.vue'
import router from './router/index'//注意use要在mount之前
createApp(App).use(router).mount('#app')// --------------即---------------const app = createApp(App)app.use(router)app.mount('#app')
4.2.4 使用路由
- 使用路由的原则:哪里随着路径的变化而变化,路由就放在哪里
- 一级路由通常在app中
-- App.vue中
<template><!-- 一级路由出口组件 --><router-view></router-view>
</template>
4.3 query 传参的方法
4.3.1 query参数传递
- 方法描述代码中展示:
<script setup>
import HeaderCart from './HeaderCart.vue';
import { useCategoryStore } from '@/stores/categoryStore'
import { useRouter } from 'vue-router';const router = useRouter()// 使用pinia中的数据
const categoryStore = useCategoryStore()// -- 编程式导航 (): query参数可以使用path也可以使用name
// 方法: push / replace
const to = () => {router.push({path: '/category', query: {id: '1005000'}})
}</script><ul class="app-header-nav"><li class="home" v-for="item in categoryStore.categoryList" :key="item.id">// 声明式导航:两种方法字之一——符串形式,使用?与&连接<RouterLink active-class = "active" :to="`/category?id=${item.id}`">{{item.name}}</RouterLink></li>
</ul>
<ul class="app-header-nav"><li class="home" v-for="item in categoryStore.categoryList" :key="item.id">// 声明式导航:两种方法之一——对象的形式形式,参数:name、path、query<RouterLink active-class = "active" :to="{path: '/category', query: {'id': item.id}}">{{item.name}}</RouterLink></li>
</ul>
// 编程式导航
<button @click="to">跳转</button>
{path:'category',component: () => import('@/views/Category/index.vue')
}, 
4.3.2 query参数获取
// 封装分类数据业务相关代码
import { getTopCategoryAPI } from "@/apis/category";
import { onMounted, ref } from "vue";
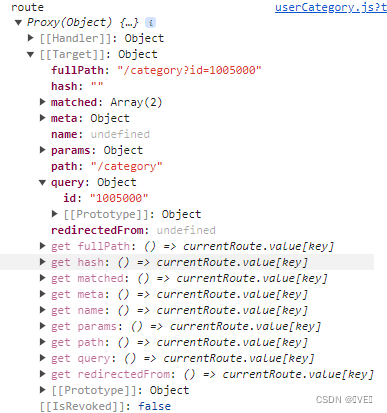
import { onBeforeRouteUpdate, useRoute } from "vue-router";export function useCategory() {const categoryData = ref({});// 利用vue-router中的函数useRoute()/useRouter()获取当前页路由的参数const route = useRoute();console.log('route', route)const getCategory = async (id = route.query.id) => {const res = await getTopCategoryAPI(id);categoryData.value = res.result;};onMounted(() => {getCategory();});// 目标:路由参数变化的时候 可以把分类数据接口重新发送// onBeforeRouteUpdate(() => {//   console.log('路由变化了')//   // 直接这么使用存在的问题:没有使用最新的路由参数请求最新的分类数据//   getCategory()// })// to 到哪个路由 from 从哪个路由来 next 放行onBeforeRouteUpdate((to) => {getCategory(to.params.id);});return {categoryData}
}
4.4 params 传参的方法
4.4.1 params参数传递
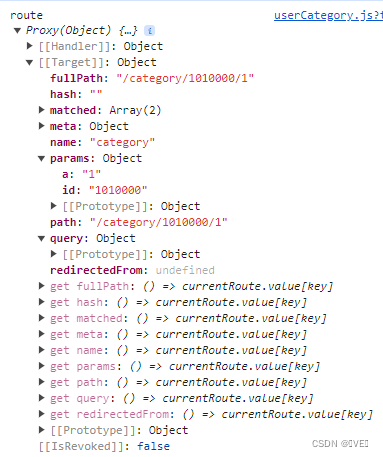
<script setup>import HeaderCart from './HeaderCart.vue';import { useCategoryStore } from '@/stores/categoryStore'import { useRouter } from 'vue-router';const router = useRouter()// 使用pinia中的数据const categoryStore = useCategoryStore()// -- 编程式导航 (): query参数使用name,不要会用path// 方法: push / replaceconst to = () => {router.push({name: 'category', params: {id: '1005000', a: 1}})}</script><ul class="app-header-nav"><li class="home" v-for="item in categoryStore.categoryList" :key="item.id">// 声明式导航: 字符串写法:注意需要与路由配置时的参数对应一致<RouterLink active-class = "active" :to="`/category/${item.id}/${1}`">{{item.name}}</RouterLink></li>
</ul>
<ul><li class="home" v-for="item in categoryStore.categoryList" :key="item.id">// 声明式导航: 对象写法:注意需要与路由配置时的参数对应一致,注意需要使用name,不要使用path<RouterLink active-class = "active" :to="{name: 'category', params: {id: item.id, a: 1}}">{{item.name}}</RouterLink></li>
</ul>
<button @click="to">跳转</button>
{name: 'category',// 路径参数对应一致path:'category/:id/:a',component: Category
},4.4.2 params参数获取
-
与query参数获取一样
VueUse | VueUse
第五章 项目准备工作
5.1 jsconfig.json配置别名路径
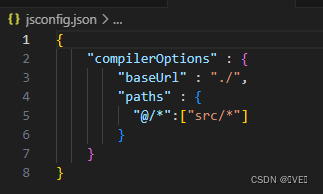
(注意这些配置项不要写错)
{"compilerOptions" : {"baseUrl" : "./","paths" : {"@/*":["src/*"]}}
}
5.2 elementPlus引入
安装 | Element Plus
5.3 axios安装并简单封装
5.3.1 axios安装
npm i axios/yarn add axios5.3.2 简单封装
// axios基础的封装
import axios from 'axios'
import 'element-plus/es/components/message/style/css'
import { ElMessage } from "element-plus" // 引用了element-plus组件
import { useUserStore } from '@/stores/userStore' // pinia仓库
import router from '@/router' // 配置的路由// 创建axios实例
const httpInstance = axios.create({baseURL: '基本路径',timeout: 5000 // 请求超时
})// axios请求拦截器
httpInstance.interceptors.request.use(config => {// 1、从pinia获取token数据const userStore = useUserStore()// 2、按照后端的要求拼接token数据const token = userStore.userInfo.tokenif (token) {config.headers.Authorization = `Bearer ${token}` // 向请求头配置token}return config
}, e => Promise.reject(e))// axios响应式拦截器
httpInstance.interceptors.response.use(res => res.data, e => {const userStore = useUserStore()// 统一错误提示ElMessage({type: 'warning',message: e.response.data.message})// 401 token失效处理---这里返回的是401状态码// 1、清楚本地用户数据// 2、跳转到登录页if (e.response.status === 401) {userStore.clearUserInfo()router.push('/login')}return Promise.reject(e)
})export default httpInstance

