文章目录
- 代理绑定BeginOverlap和EndOverlap
- Hit事件的代理绑定
- 碰撞设置
代理绑定BeginOverlap和EndOverlap
首先,创建自定义ActorC++类 MyCustomActor
添加碰撞组件
#include "Components/BoxComponent.h"public:UPROPERTY(VisibleAnywhere, BlueprintReadOnly, Category = "MyScene")class UBoxComponent *MyBoxComponent;
AMyCustomActor::AMyCustomActor()
{PrimaryActorTick.bCanEverTick = true;// 创建组件MySceneComponent = CreateDefaultSubobject<USceneComponent>(TEXT("CustomScene"));MyMeshComponent = CreateDefaultSubobject<UStaticMeshComponent>(TEXT("CustomStaticMesh"));MyBoxComponent = CreateDefaultSubobject<UBoxComponent>(TEXT("CustomBox"));
}
动态绑定BeginOverlap和EndOverlap
public://声明绑定函数UFUNCTION()void BeginOverlapFunction(UPrimitiveComponent *OverlappedComponent, AActor *OtherActor, UPrimitiveComponent *OtherComp, int32 OtherBodyIndex, bool bFromSweep, const FHitResult &SweepResult);UFUNCTION()void EndOverlapFunction(UPrimitiveComponent *OverlappedComponent, AActor *OtherActor, UPrimitiveComponent *OtherComp, int32 OtherBodyIndex);
// Called when the game starts or when spawned
void AMyCustomActor::BeginPlay()
{Super::BeginPlay();MyBoxComponent->OnComponentBeginOverlap.AddDynamic(this, &AMyCustomActor::BeginOverlapFunction);MyBoxComponent->OnComponentEndOverlap.AddDynamic(this, &AMyCustomActor::EndOverlapFunction);
}void AMyCustomActor::BeginOverlapFunction(UPrimitiveComponent *OverlappedComponent, AActor *OtherActor, UPrimitiveComponent *OtherComp, int32 OtherBodyIndex, bool bFromSweep, const FHitResult &SweepResult)
{GEngine->AddOnScreenDebugMessage(-1, 5.f, FColor::Red, FString::Printf(TEXT("BeginOverlapFunction !!")));
}
void AMyCustomActor::EndOverlapFunction(UPrimitiveComponent *OverlappedComponent, AActor *OtherActor, UPrimitiveComponent *OtherComp, int32 OtherBodyIndex)
{GEngine->AddOnScreenDebugMessage(-1, 5.f, FColor::Red, FString::Printf(TEXT("EndOverlapFunction !!")));
}
编译脚本之后
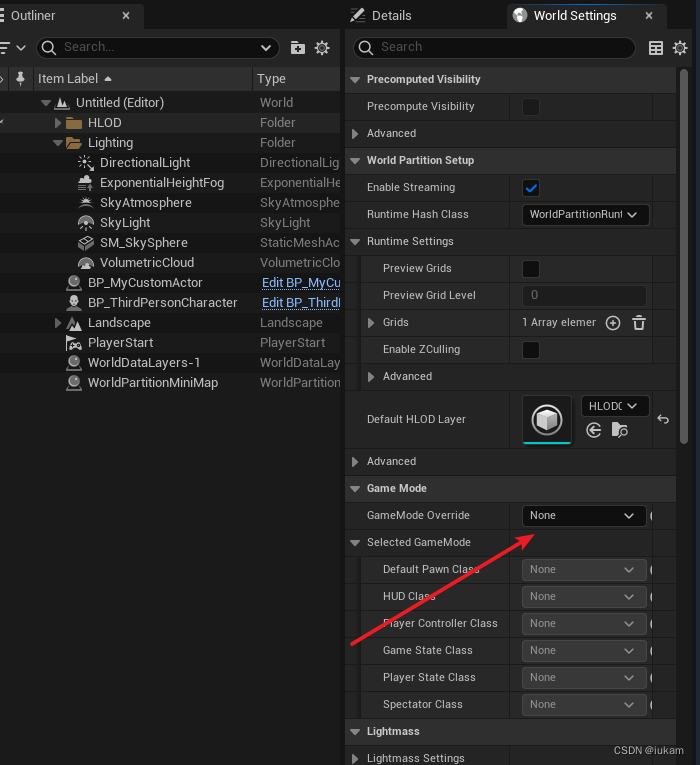
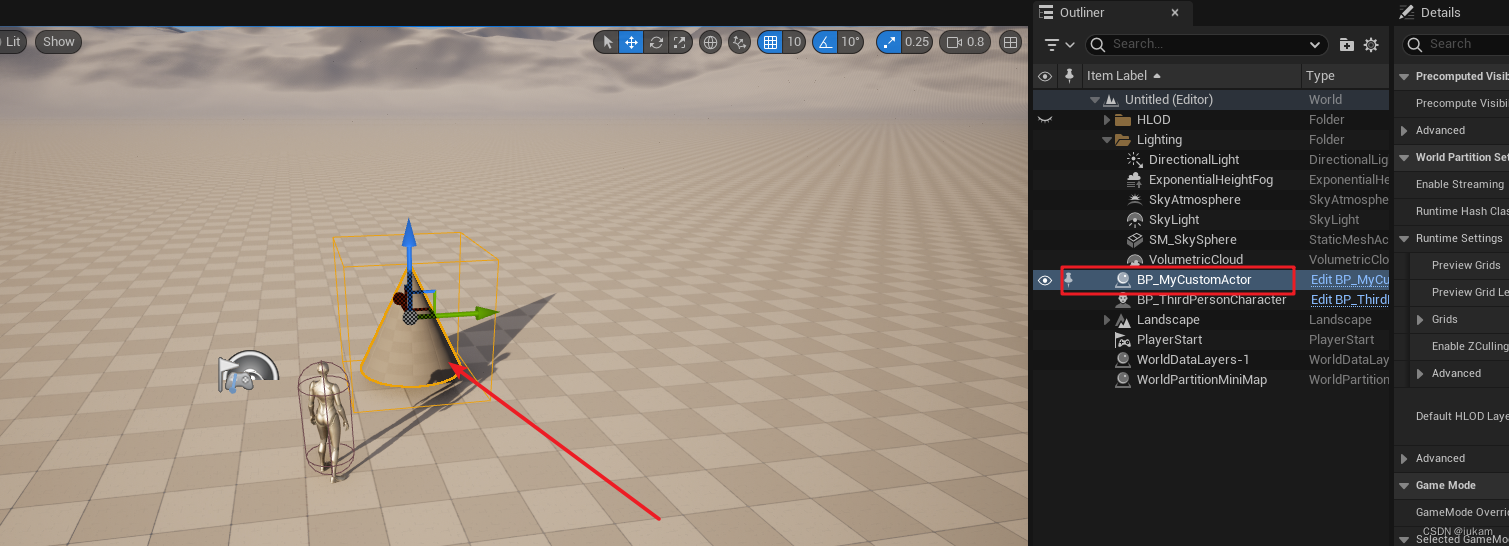
创建刚才脚本的蓝图类 BP_MyCustomActor 并放到场景中
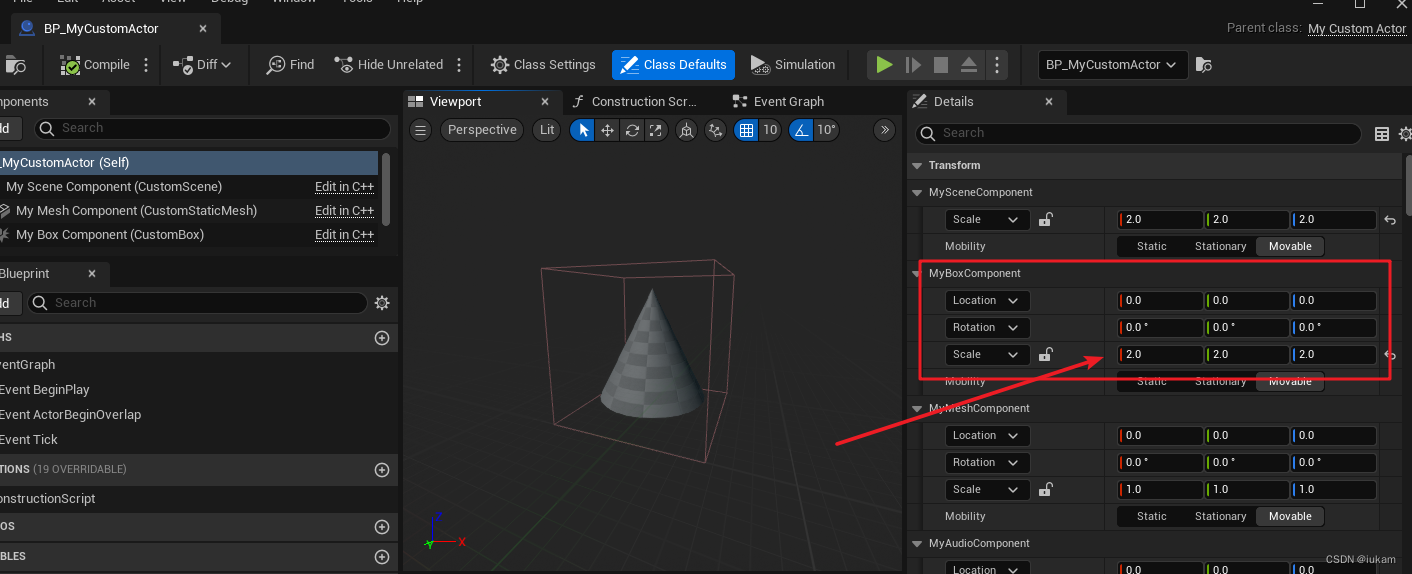
调整碰撞区域大小
然后,添加第三人称人物,并拖拽到场景中
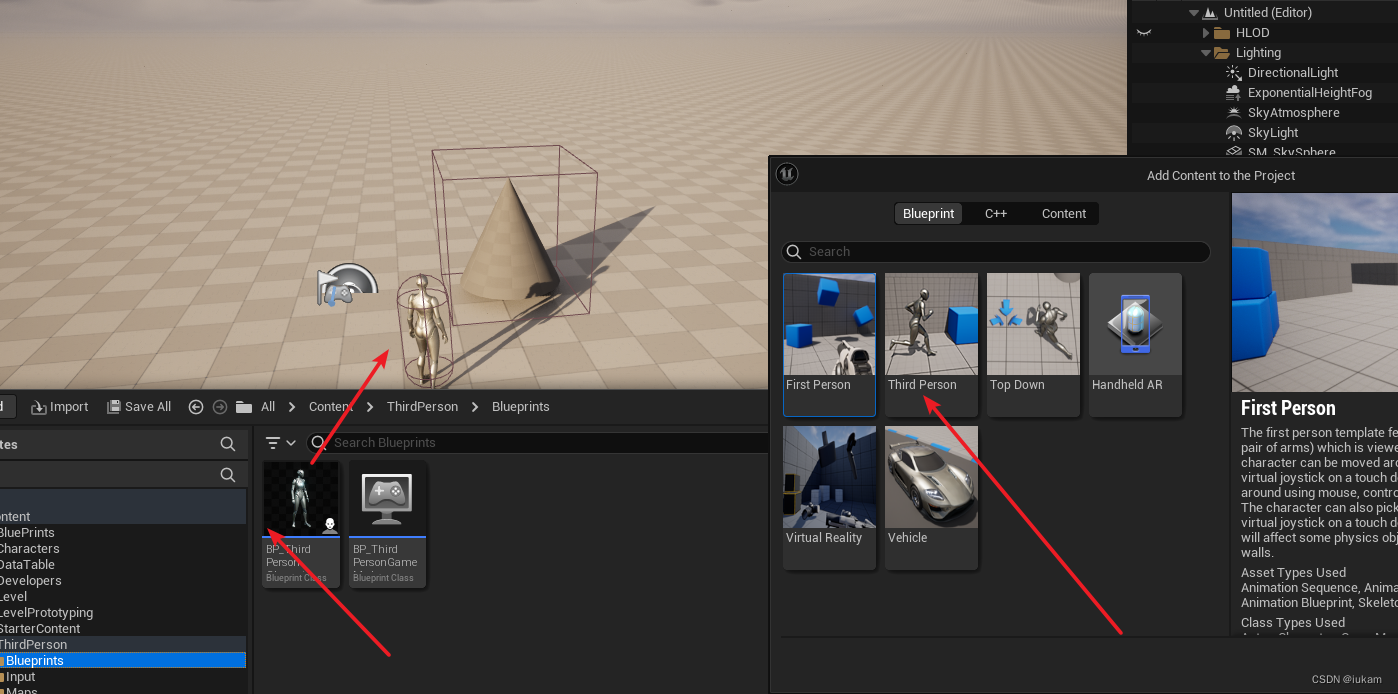
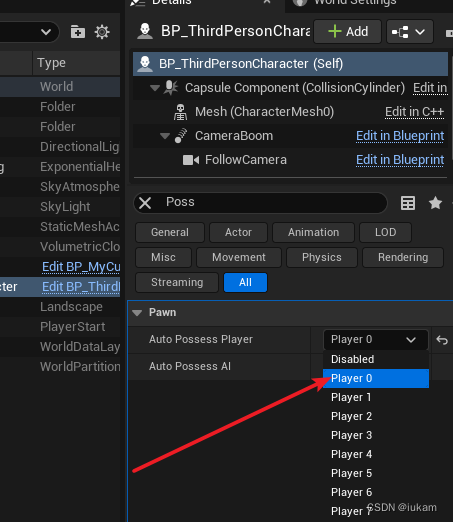
运行之后,碰到和离开都会打印日志

完整的MyCustomActor脚本
MyCustomActor.h
// Fill out your copyright notice in the Description page of Project Settings.#pragma once#include "CoreMinimal.h"
// 引入组件
#include "Components/SceneComponent.h"
#include "Components/StaticMeshComponent.h"
#include "Components/BoxComponent.h"
#include "Components/AudioComponent.h"
#include "Particles/ParticleSystemComponent.h"
#include "GameFramework/Actor.h"
#include "MyCustomActor.generated.h"UCLASS()
class DEMO_API AMyCustomActor : public AActor
{GENERATED_BODY()public:// Sets default values for this actor's propertiesAMyCustomActor();protected:// Called when the game starts or when spawnedvirtual void BeginPlay() override;public:// Called every framevirtual void Tick(float DeltaTime) override;// 自定义组件UPROPERTY(VisibleAnywhere, BlueprintReadOnly, Category = "MyScene")class USceneComponent *MySceneComponent;UPROPERTY(VisibleAnywhere, BlueprintReadOnly, Category = "MyScene")class UStaticMeshComponent *MyMeshComponent;UPROPERTY(VisibleAnywhere, BlueprintReadOnly, Category = "MyScene")class UBoxComponent *MyBoxComponent;UPROPERTY(VisibleAnywhere, BlueprintReadOnly, Category = "MyScene")class UAudioComponent *MyAudioComponent;UPROPERTY(VisibleAnywhere, BlueprintReadOnly, Category = "MyScene")class UParticleSystemComponent *MyParticleSystemComponent;//声明绑定函数UFUNCTION()void BeginOverlapFunction(UPrimitiveComponent *OverlappedComponent, AActor *OtherActor, UPrimitiveComponent *OtherComp, int32 OtherBodyIndex, bool bFromSweep, const FHitResult &SweepResult);UFUNCTION()void EndOverlapFunction(UPrimitiveComponent *OverlappedComponent, AActor *OtherActor, UPrimitiveComponent *OtherComp, int32 OtherBodyIndex);
};
MyCustomActor.cpp
#include "MyCustomActor.h"// Sets default values
AMyCustomActor::AMyCustomActor()
{// Set this actor to call Tick() every frame.  You can turn this off to improve performance if you don't need it.PrimaryActorTick.bCanEverTick = true;// 创建组件MySceneComponent = CreateDefaultSubobject<USceneComponent>(TEXT("CustomScene"));MyMeshComponent = CreateDefaultSubobject<UStaticMeshComponent>(TEXT("CustomStaticMesh"));MyBoxComponent = CreateDefaultSubobject<UBoxComponent>(TEXT("CustomBox"));MyAudioComponent = CreateDefaultSubobject<UAudioComponent>(TEXT("CustomAudio"));MyParticleSystemComponent = CreateDefaultSubobject<UParticleSystemComponent>(TEXT("CustomParticleSystem"));// 把组件添加到根组件RootComponent = MySceneComponent;MyMeshComponent->SetupAttachment(MySceneComponent);MyBoxComponent->SetupAttachment(MySceneComponent);MyAudioComponent->SetupAttachment(MyBoxComponent);MyParticleSystemComponent->SetupAttachment(MySceneComponent);
}// Called when the game starts or when spawned
void AMyCustomActor::BeginPlay()
{Super::BeginPlay();MyBoxComponent->OnComponentBeginOverlap.AddDynamic(this, &AMyCustomActor::BeginOverlapFunction);MyBoxComponent->OnComponentEndOverlap.AddDynamic(this, &AMyCustomActor::EndOverlapFunction);
}// Called every frame
void AMyCustomActor::Tick(float DeltaTime)
{Super::Tick(DeltaTime);
}
void AMyCustomActor::BeginOverlapFunction(UPrimitiveComponent *OverlappedComponent, AActor *OtherActor, UPrimitiveComponent *OtherComp, int32 OtherBodyIndex, bool bFromSweep, const FHitResult &SweepResult)
{GEngine->AddOnScreenDebugMessage(-1, 5.f, FColor::Red, FString::Printf(TEXT("BeginOverlapFunction !!")));
}
void AMyCustomActor::EndOverlapFunction(UPrimitiveComponent *OverlappedComponent, AActor *OtherActor, UPrimitiveComponent *OtherComp, int32 OtherBodyIndex)
{GEngine->AddOnScreenDebugMessage(-1, 5.f, FColor::Red, FString::Printf(TEXT("EndOverlapFunction !!")));
}
Hit事件的代理绑定
以上面同样的方式创建Hit的绑定实现
UFUNCTION()void HitFunction(UPrimitiveComponent *HitComponent, AActor *OtherActor, UPrimitiveComponent *OtherComp, FVector NormalImpulse, const FHitResult &Hit);
void AMyCustomActor::BeginPlay()
{Super::BeginPlay();MyBoxComponent->OnComponentHit.AddDynamic(this, &AMyCustomActor::HitFunction);
}
void AMyCustomActor::HitFunction(UPrimitiveComponent *HitComponent, AActor *OtherActor, UPrimitiveComponent *OtherComp, FVector NormalImpulse, const FHitResult &Hit)
{GEngine->AddOnScreenDebugMessage(-1, 5.f, FColor::Red, FString::Printf(TEXT("HitFunction !!")));
}
不同的是修改碰撞设置
这个是绑定BeginOverlap和EndOverlap
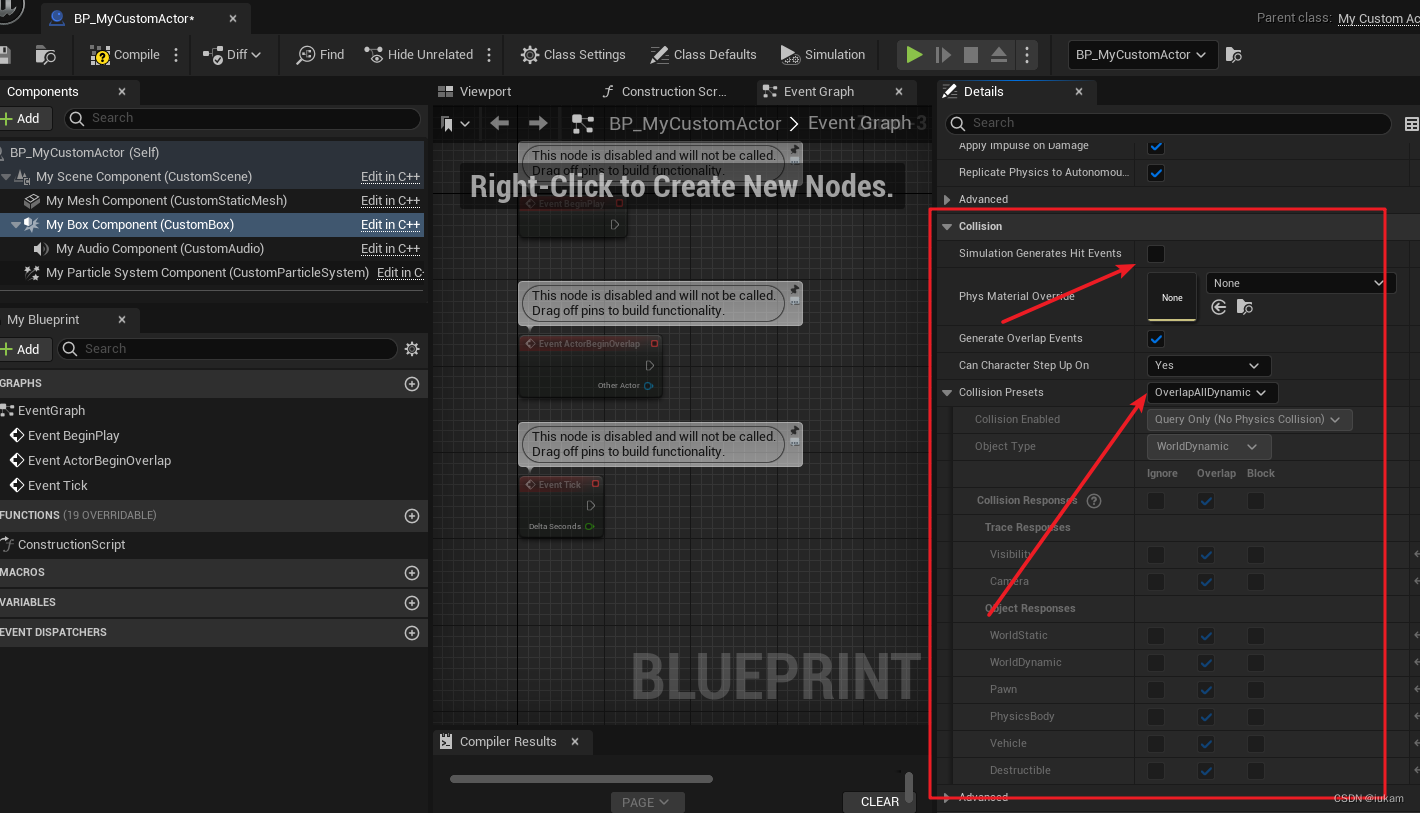
这个是Hit事件的代理绑定
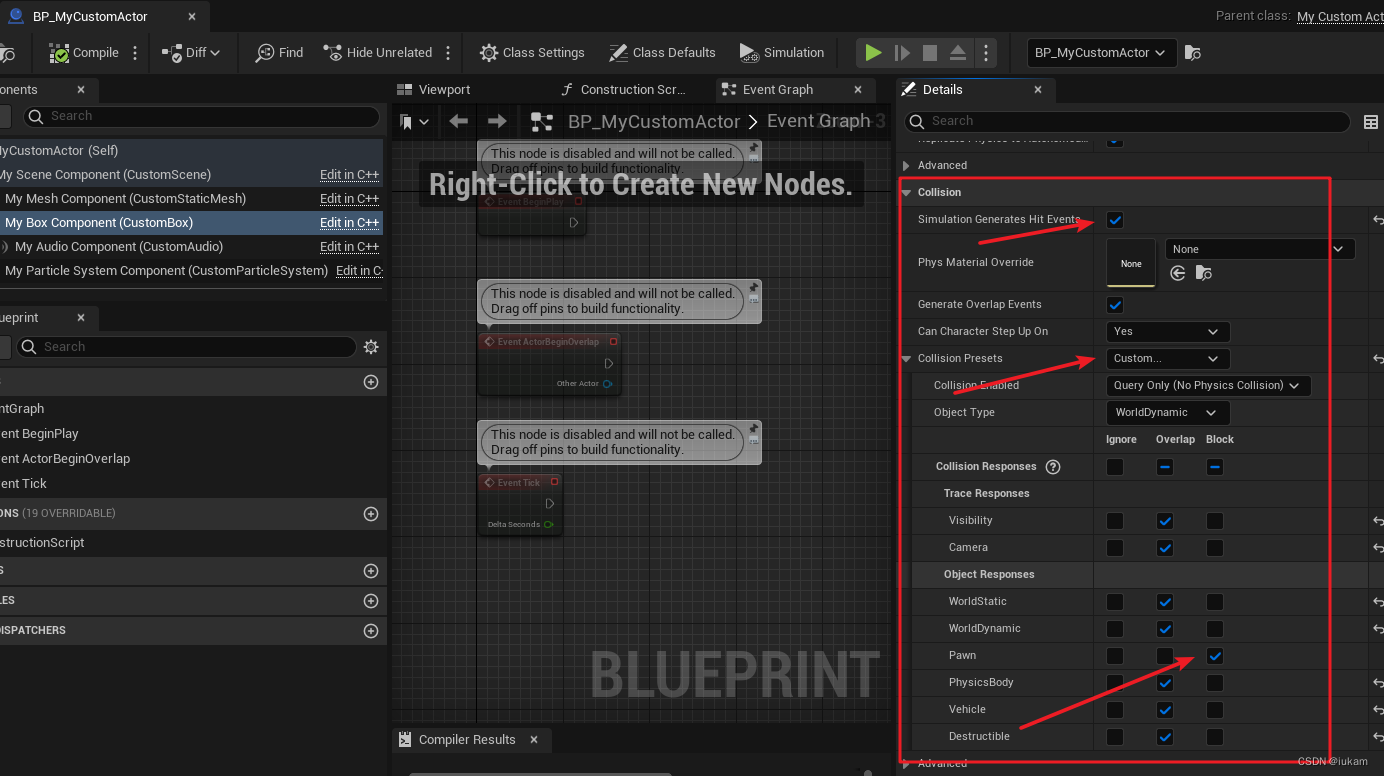
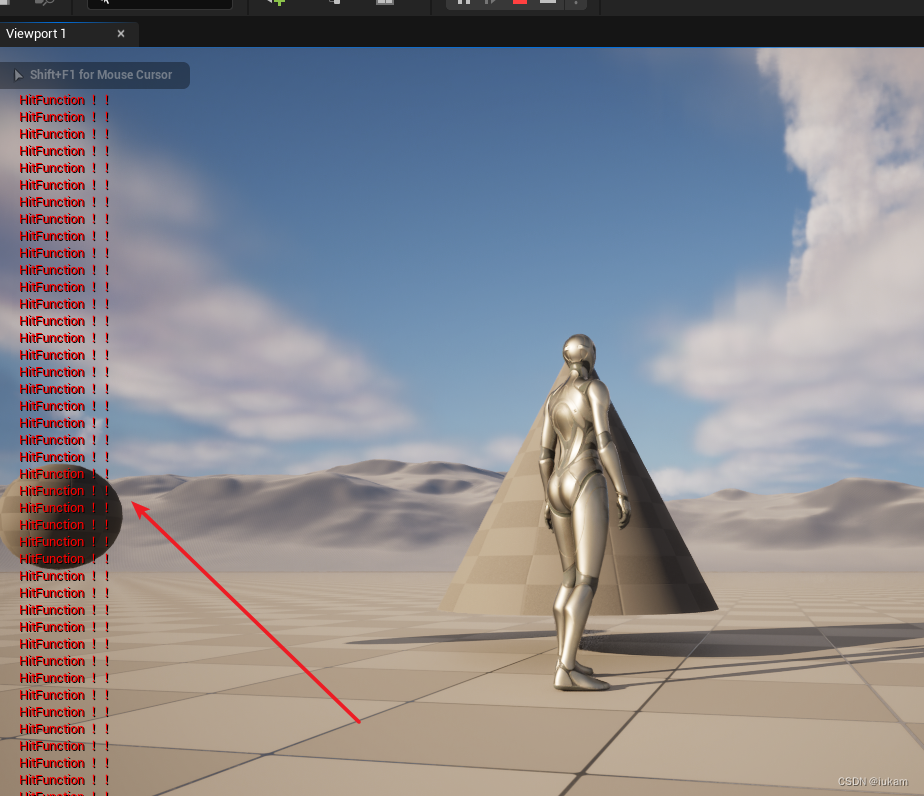
Hit事件的代理绑定之后运行 ,当人物尝试一直前进碰到锥体时会一直触发事件
不像BeginOverlap和EndOverlap只会触发一次
碰撞设置
官网上有相关参考文档
为静态网格体设置碰撞体积
组件和碰撞
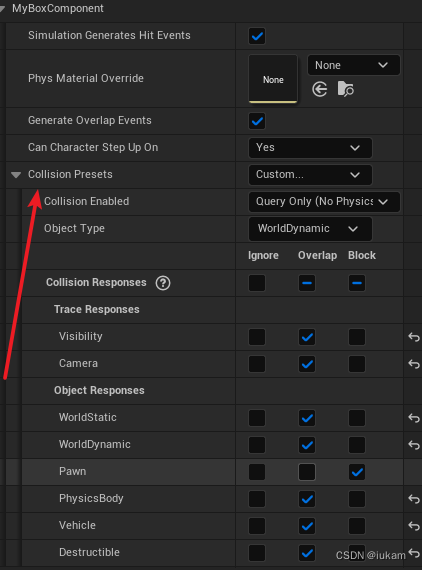
在C++脚本中设置
// Sets default values
AMyCustomActor::AMyCustomActor()
{// Set this actor to call Tick() every frame.  You can turn this off to improve performance if you don't need it.PrimaryActorTick.bCanEverTick = true;// 创建组件MySceneComponent = CreateDefaultSubobject<USceneComponent>(TEXT("CustomScene"));MyMeshComponent = CreateDefaultSubobject<UStaticMeshComponent>(TEXT("CustomStaticMesh"));MyBoxComponent = CreateDefaultSubobject<UBoxComponent>(TEXT("CustomBox"));MyAudioComponent = CreateDefaultSubobject<UAudioComponent>(TEXT("CustomAudio"));MyParticleSystemComponent = CreateDefaultSubobject<UParticleSystemComponent>(TEXT("CustomParticleSystem"));// 把组件添加到根组件RootComponent = MySceneComponent;MyMeshComponent->SetupAttachment(MySceneComponent);MyBoxComponent->SetupAttachment(MySceneComponent);MyAudioComponent->SetupAttachment(MyBoxComponent);MyParticleSystemComponent->SetupAttachment(MySceneComponent);/****************************** 设置碰撞 ****************************************///碰撞设置MyBoxComponent->SetCollisionEnabled(ECollisionEnabled::NoCollision);MyBoxComponent->SetCollisionEnabled(ECollisionEnabled::QueryOnly);MyBoxComponent->SetCollisionEnabled(ECollisionEnabled::PhysicsOnly);MyBoxComponent->SetCollisionEnabled(ECollisionEnabled::QueryAndPhysics);MyBoxComponent->SetCollisionEnabled(ECollisionEnabled::ProbeOnly);MyBoxComponent->SetCollisionEnabled(ECollisionEnabled::QueryAndProbe);//碰撞对象类型MyBoxComponent->SetCollisionObjectType(ECC_WorldStatic);MyBoxComponent->SetCollisionObjectType(ECC_WorldDynamic);MyBoxComponent->SetCollisionObjectType(ECC_Pawn);MyBoxComponent->SetCollisionObjectType(ECC_PhysicsBody);MyBoxComponent->SetCollisionObjectType(ECC_Vehicle);MyBoxComponent->SetCollisionObjectType(ECC_Destructible);//碰撞响应MyBoxComponent->SetCollisionResponseToAllChannels(ECR_Block);//对所有通道进行设置,响应为Block,阻挡MyBoxComponent->SetCollisionResponseToAllChannels(ECR_Overlap);//对所有通道进行设置,响应为Overlap,重叠MyBoxComponent->SetCollisionResponseToAllChannels(ECR_Ignore);//忽略MyBoxComponent->SetCollisionResponseToChannel(ECC_Pawn,ECR_Overlap);//对单个通道进行响应MyBoxComponent->SetCollisionResponseToChannel(ECC_WorldStatic,ECR_Block);//对单个通道进行响应MyBoxComponent->SetCollisionResponseToChannel(ECC_WorldDynamic,ECR_Ignore);//对单个通道进行响应}

