手动注入
- 1.Set方法注入-五种类型的注入
- 1.1 业务对象JavaBean
- 第一步:创建dao包下的UserDao类
- 第二步:属性字段提供set⽅法
- 第三步:配置⽂件的bean标签设置property标签
- 第四步:测试
- 1.2 常用对象String(日期类型)| 基本类型Integer
- 第一步:属性字段提供 set ⽅法
- 第二步:配置⽂件的 bean 标签设置 property 标签
- 第三步:测试
- 1.3 集合类型和属性对象
- 第一步:属性字段提供set⽅法
- 第二步:配置⽂件的bean标签设置property标签
- 第三步:测试
- 2.构造器方法注入-种形式的注入
- 2.1 单个Bean对象作为参数
- 第一步:JavaBean对象
- 第二步:XML配置
- 第三步:测试
- 2.2 多个Bean对象作为参数
- 第一步:JavaBean对象
- 第二步:XML配置
- 第三步:测试
- 2.3 Bean对象和常⽤对象作为参数
- 第一步:加入常用对象String(举例)
- 第二步:XML配置
- 第三步:测试
- 2.4 循环依赖问题
- 问题示例
- 问题解决
- 3.静态工厂注入(了解)
- 第一步:创建工厂类
- 第二步:创建dao实体类
- 第三步:创建TypeService,注入TypeDao
- 第四步:xml配置
- 第五步:测试
- 4.实例化工厂注入(了解)
- 4.1 定义实例化工厂,写非静态方法
- 4.2 修改xml配置
- 注入方式的选择
- p名称空间的使用(了解)
- 第一步:属性字段提供set方法
- 第二步:在配置文件xml引入p名称空间
Spring ⽀持的注⼊⽅式共有四种:set 注⼊、构造器注⼊、静态⼯⼚注⼊、实例化⼯⼚注⼊
注:注入前提均建立在建立好的spring环境内
1.Set方法注入-五种类型的注入
以业务对象JavaBean为主
1.1 业务对象JavaBean
第一步:创建dao包下的UserDao类
package com.svt.dao;public class UserDao {public void test(){System.out.println("UserDao Test...");}
}
第二步:属性字段提供set⽅法
原先写的方式都是手动实例化,比如private UserDao userDao=new UserDao();,这样会耦合过高,所以我们采用了新的形式:注入
package com.svt.service;import com.svt.dao.UserDao;public class UserService {//手动实例化//private UserDao userDao=new UserDao();//业务逻辑对象JavaBean 提供set方法注入//在配置文件中还未告知set方法注入 所以userDao是空的//将这里bean对象实例化的过程交给IOC去做private UserDao userDao;//set方法public void setUserDao(UserDao userDao) {this.userDao = userDao;}public void test(){System.out.println("UserService Test...");userDao.test();}
}
第三步:配置⽂件的bean标签设置property标签
通过property属性实现注入
<?xml version="1.0" encoding="UTF-8"?>
<beans xmlns="http://www.springframework.org/schema/beans"xmlns:xsi="http://www.w3.org/2001/XMLSchema-instance"xsi:schemaLocation="http://www.springframework.org/schema/beanshttps://www.springframework.org/schema/beans/spring-beans.xsd"><!--Set方法注入通过property属性注入--><bean id="userService" class="com.svt.service.UserService"><!--name:bean对象中属性字段的名称ref:指定bean标签的id属性值--><property name="userDao" ref="userDao" /></bean><bean id="userDao" class="com.svt.dao.UserDao"></bean></beans>
如果没有在资源文件夹xml内通过property属性实现注入,那么会出现空指针异常

第四步:测试
在UserService类中写测试方法
public void test(){System.out.println("UserService Test...");//JavaBean对象userDao.test();}
再在测试类中调用
import com.svt.service.UserService;
import org.springframework.context.ApplicationContext;
import org.springframework.context.support.ClassPathXmlApplicationContext;public class Starter01 {public static void main(String[] args) {//获取Spring的上下文环境 BeanFactory也是可以的ApplicationContext ac=new ClassPathXmlApplicationContext("spring.xml");UserService userService= (UserService) ac.getBean("userService");userService.test();}
}
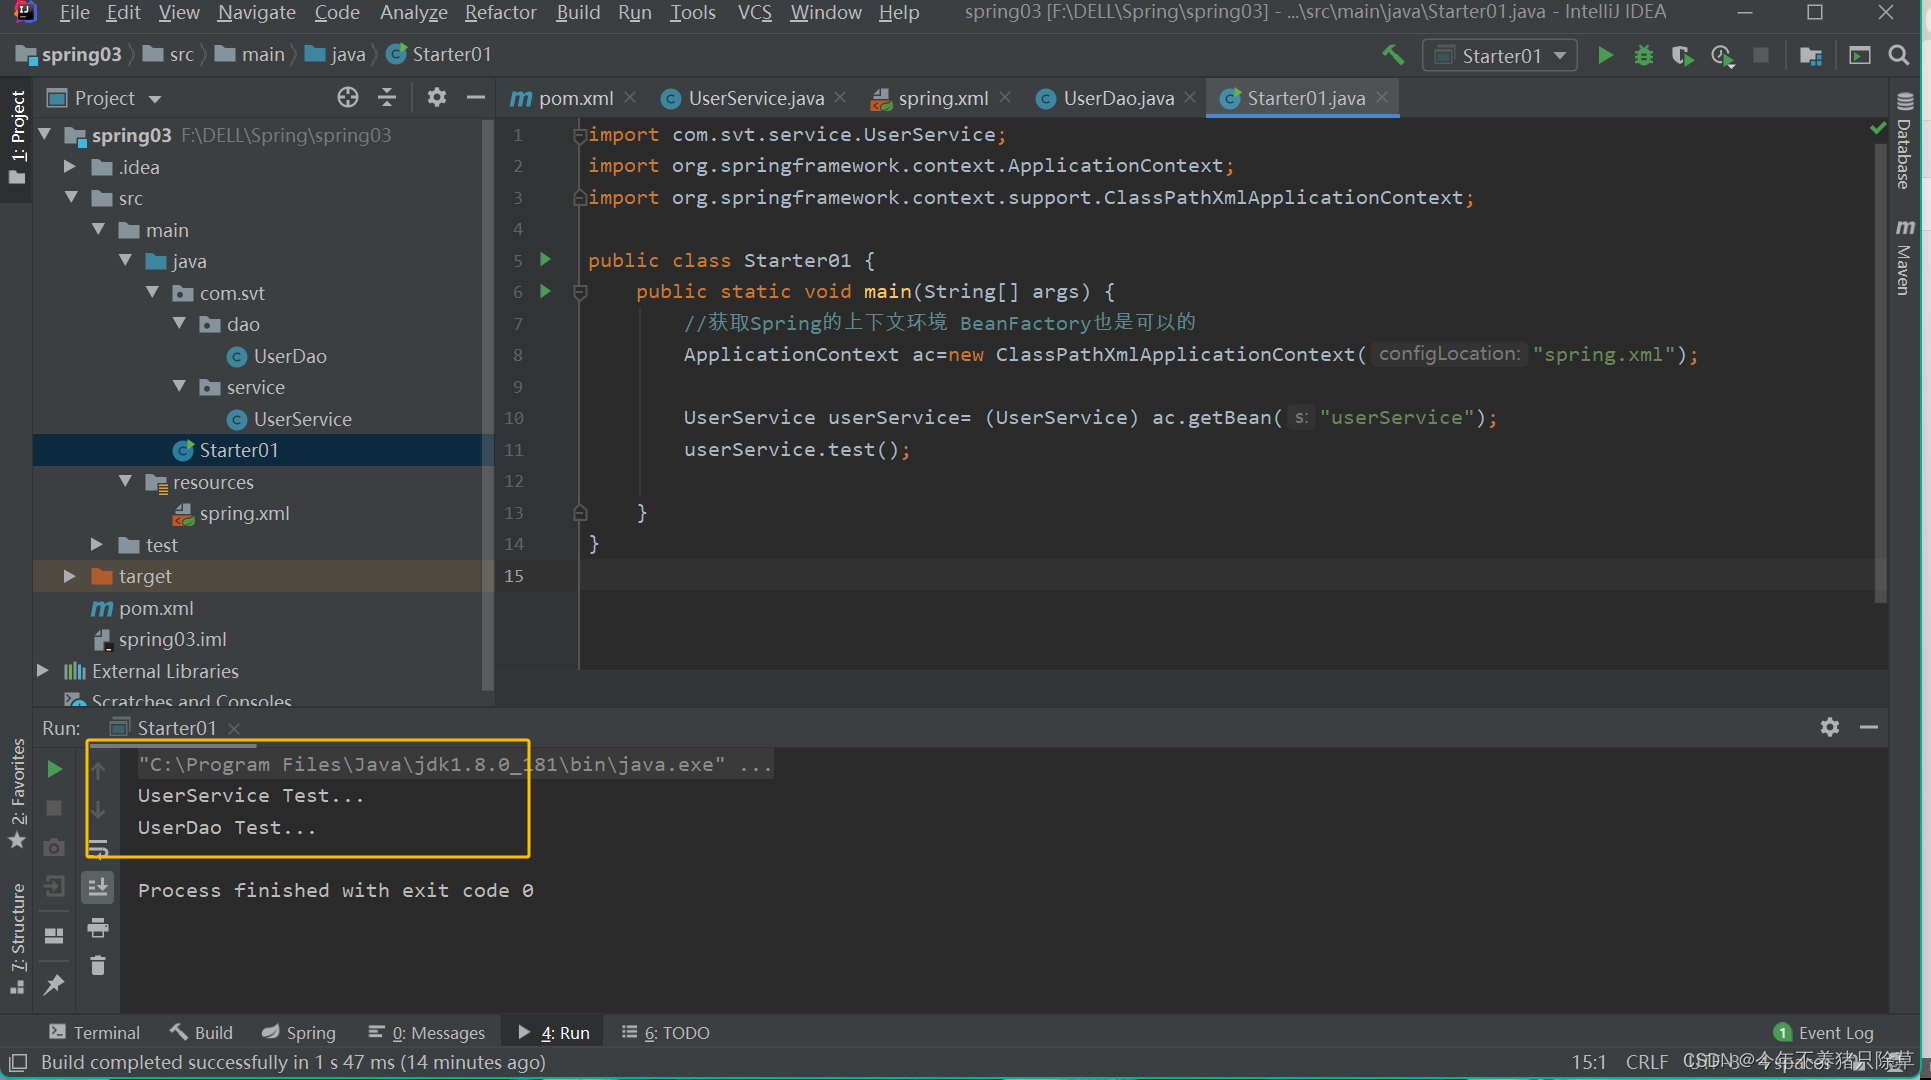
出现测试类中展现的内容则代表注入无误
1.2 常用对象String(日期类型)| 基本类型Integer
第一步:属性字段提供 set ⽅法
//常用对象String(日期类型)private String host;public void setHost(String host) {this.host = host;}//基本类型 Integerprivate Integer port;public void setPort(Integer port) {this.port = port;}
第二步:配置⽂件的 bean 标签设置 property 标签
<!-- value:具体的值(基本类型 常用对象|日期 集合)--><!-- 常用对象 String--><property name="host" value="127.0.0.1"/><!-- 基本类型Integer--><property name="port" value="8080"/>
第三步:测试
在UserService类中写测试方法
public void test(){System.out.println("UserService Test...");//常用对象System.out.println(host);//基本类型System.out.println(port);}
再在测试类中调用
import com.svt.service.UserService;
import org.springframework.context.ApplicationContext;
import org.springframework.context.support.ClassPathXmlApplicationContext;public class Starter01 {public static void main(String[] args) {//获取Spring的上下文环境 BeanFactory也是可以的ApplicationContext ac=new ClassPathXmlApplicationContext("spring.xml");UserService userService= (UserService) ac.getBean("userService");userService.test();}
}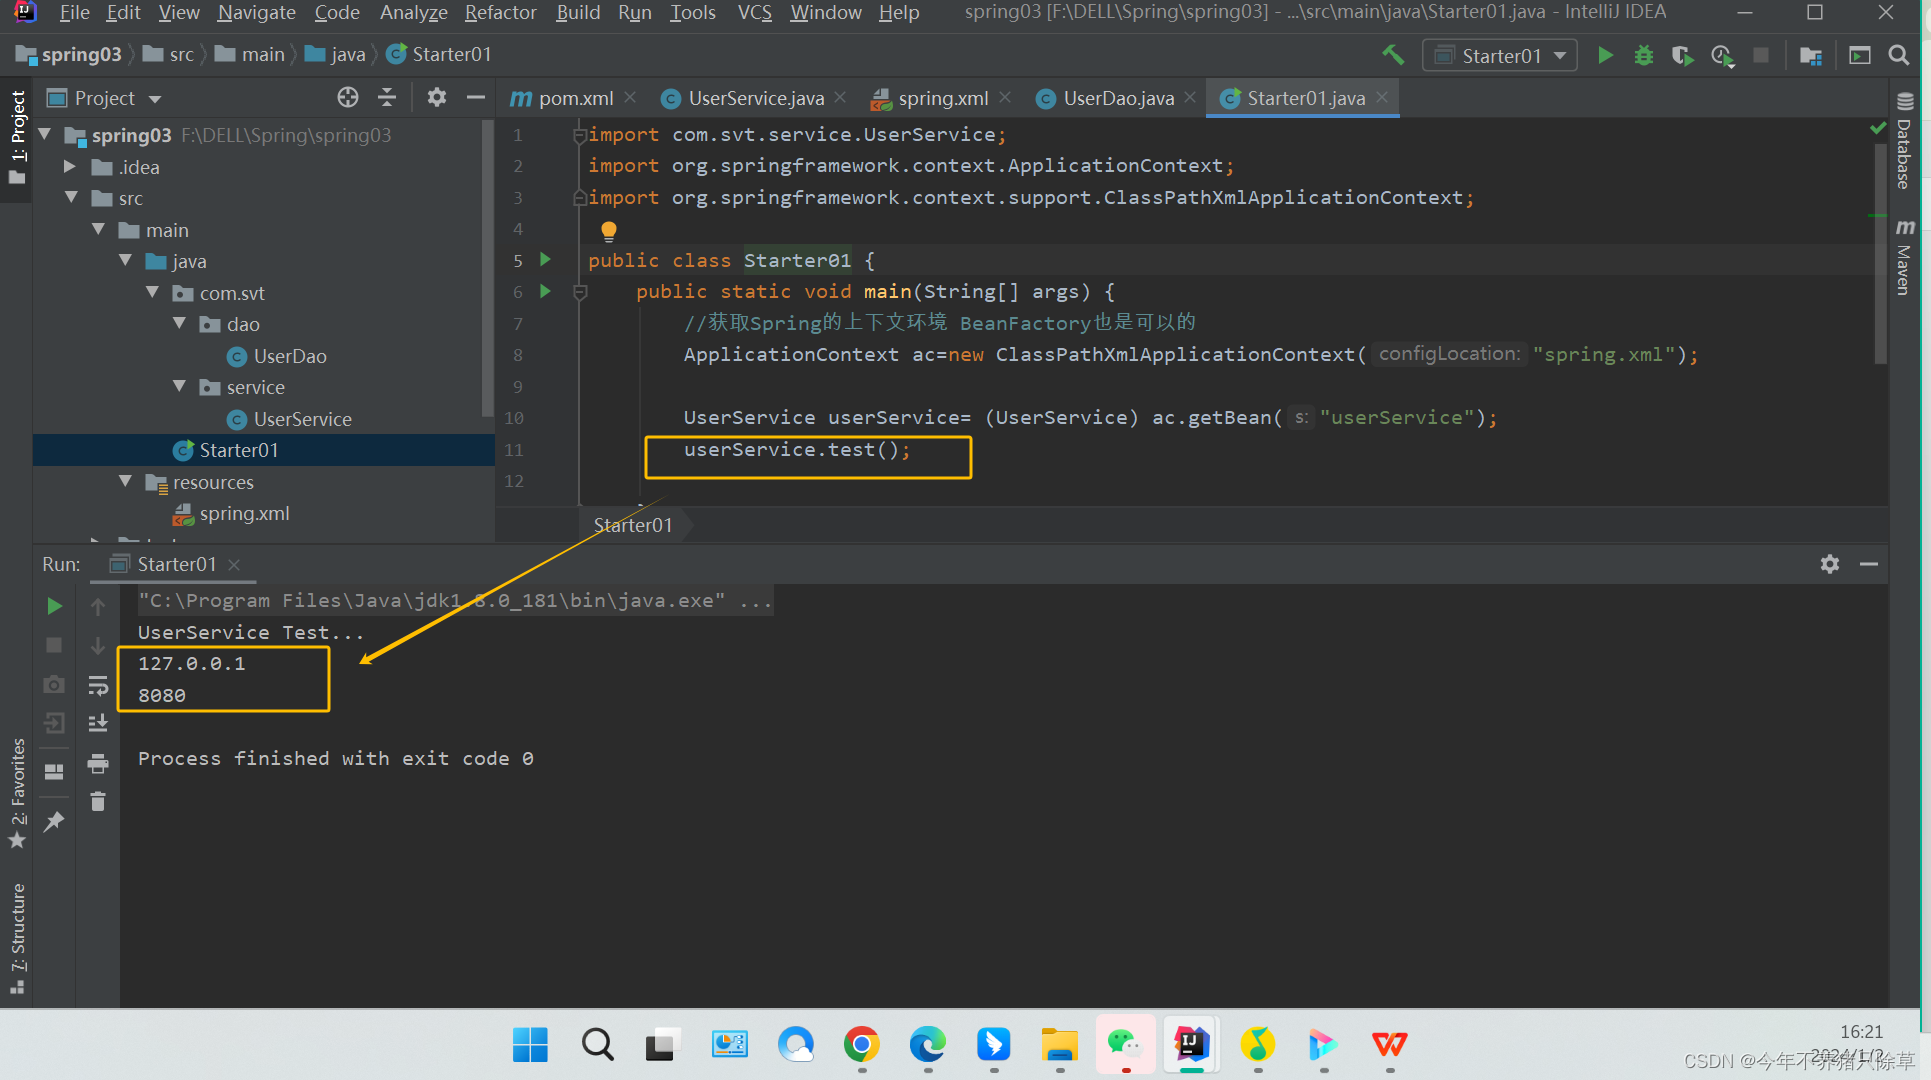
出现测试类中展现的内容则代表注入无误
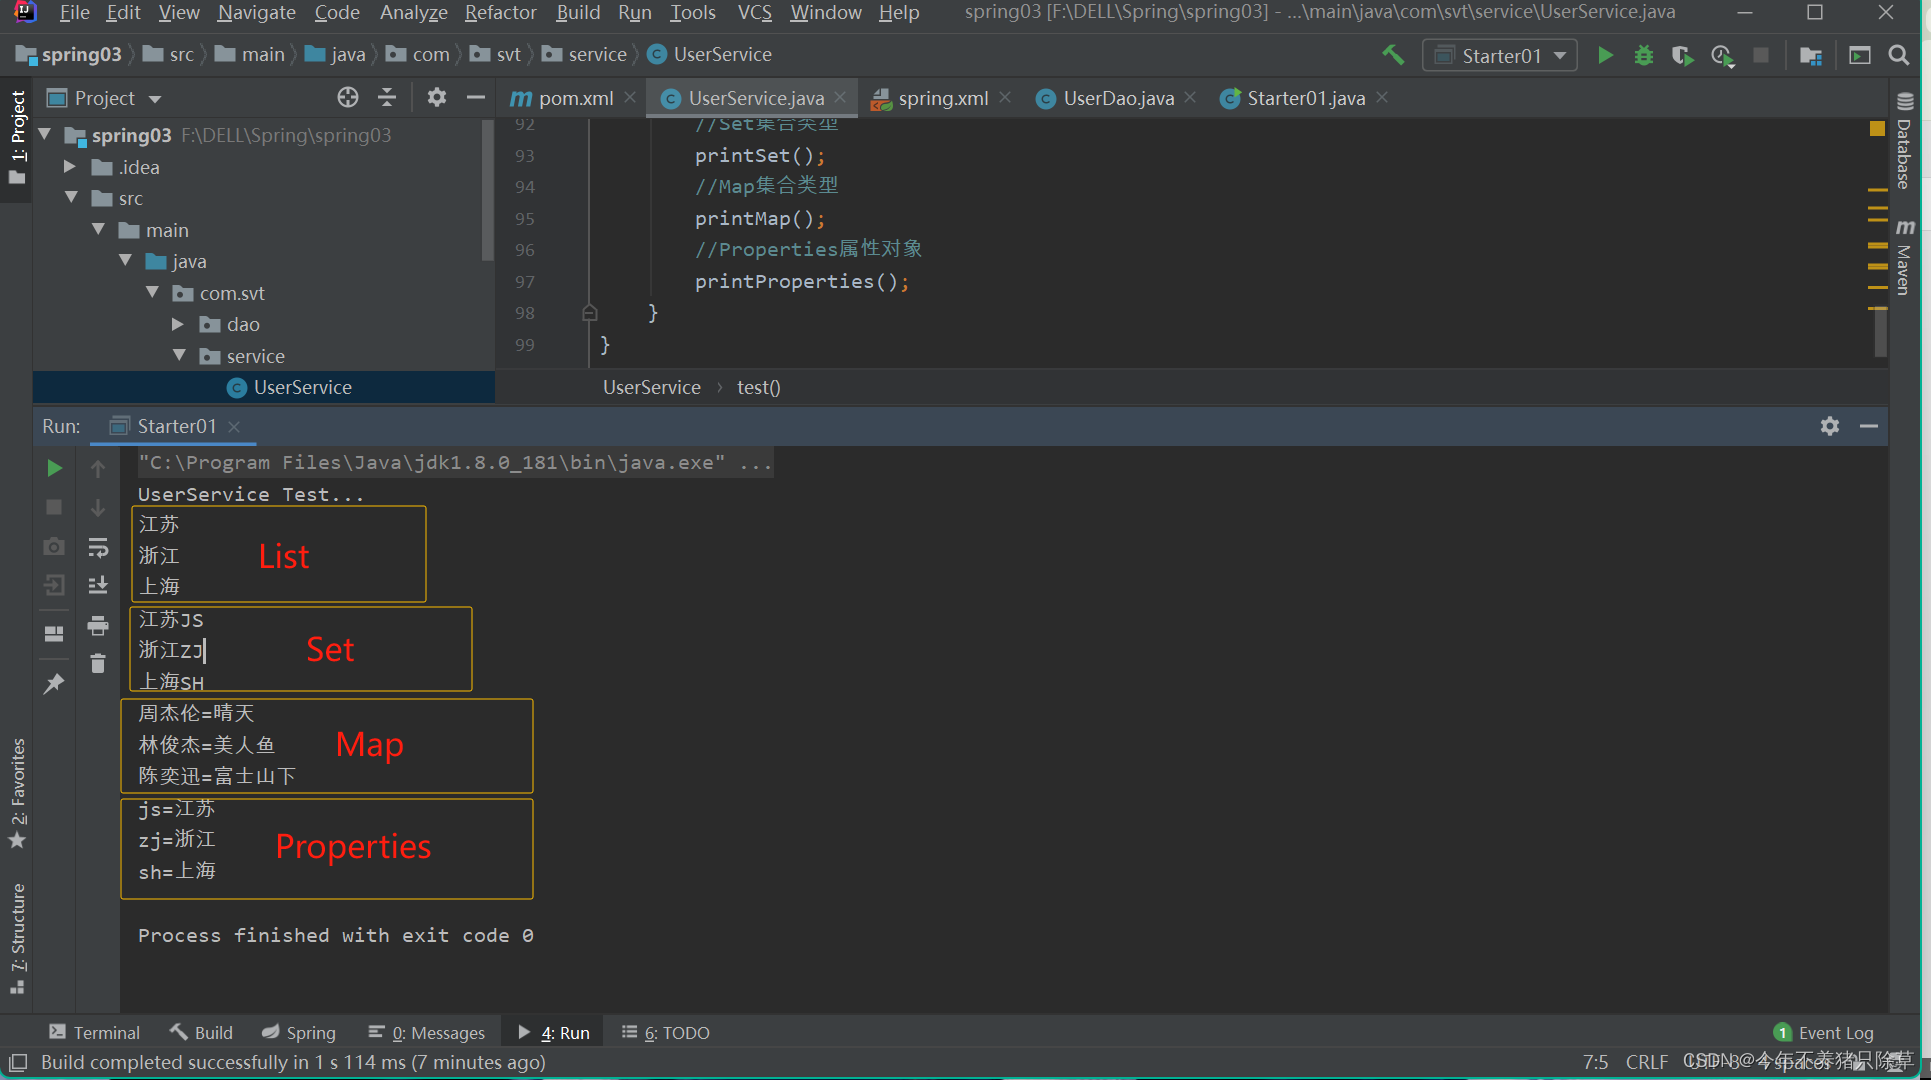
1.3 集合类型和属性对象
第一步:属性字段提供set⽅法
//List集合private List<String> list;public void setList(List<String> list) {this.list = list;}//List输出public void printList(){list.forEach(v-> System.out.println(v));//jdk8提供}//Set集合private Set<String> sets;public void setSets(Set<String> sets) {this.sets = sets;}//Set输出public void printSet(){sets.forEach(v-> System.out.println(v));}//Map集合private Map<String,Object> map;public void setMap(Map<String, Object> map) {this.map = map;}//Map输出public void printMap(){map.forEach((k,v)-> System.out.println(k+"="+v));}//Properties属性对象private Properties properties;public void setProperties(Properties properties) {this.properties = properties;}//Properties输出public void printProperties(){properties.forEach((k,v)-> System.out.println(k+"="+v));}第二步:配置⽂件的bean标签设置property标签
<!-- List集合--><property name="list"><list><value>江苏</value><value>浙江</value><value>上海</value></list></property><!-- Set集合--><property name="sets"><set><value>江苏JS</value><value>浙江ZJ</value><value>上海SH</value></set></property><!-- Map集合--><property name="map"><map><entry><key><value>周杰伦</value></key><value>晴天</value></entry><entry><key><value>林俊杰</value></key><value>美人鱼</value></entry><entry><key><value>陈奕迅</value></key><value>富士山下</value></entry></map></property><!-- Properties属性对象--><property name="properties"><props><prop key="js">江苏</prop><prop key="zj">浙江</prop><prop key="sh">上海</prop></props></property>
第三步:测试
与上面一样
public void test(){System.out.println("UserService Test...");//List集合类型printList();//Set集合类型printSet();//Map集合类型printMap();//Properties属性对象printProperties();}
2.构造器方法注入-种形式的注入
2.1 单个Bean对象作为参数
第一步:JavaBean对象
package com.svt.service;import com.svt.dao.UserDao02;/*** 构造器方法注入*  需要提供带参构造*/
public class UserService02 {private UserDao02 userDao02;/* 构造器注入*/public UserService02(UserDao02 userDao02) {this.userDao02 = userDao02;}public void test(){System.out.println("UserService Test...");}
}
第二步:XML配置
<?xml version="1.0" encoding="UTF-8"?>
<beans xmlns="http://www.springframework.org/schema/beans"xmlns:xsi="http://www.w3.org/2001/XMLSchema-instance"xsi:schemaLocation="http://www.springframework.org/schema/beanshttps://www.springframework.org/schema/beans/spring-beans.xsd"><!--构造器注入设置构造器所需要的参数通过constructor-arg标签设置构造器的参数name:属性名称ref:要注入的bean对象对应的bean标签的id属性值--><bean id="userService02" class="com.svt.service.UserService02"><constructor-arg name="userDao02" ref="userDao02"></constructor-arg></bean><bean id="userDao02" class="com.svt.dao.UserDao02"></bean></beans>
第三步:测试
import com.svt.service.UserService02;
import org.springframework.context.ApplicationContext;
import org.springframework.context.support.ClassPathXmlApplicationContext;public class Starter02 {public static void main(String[] args) {//获取Spring的上下文环境 BeanFactory也是可以的ApplicationContext ac=new ClassPathXmlApplicationContext("spring02.xml");UserService02 userService02= (UserService02) ac.getBean("userService02");userService02.test();}
}

出现测试类中展现的内容则代表注入无误
2.2 多个Bean对象作为参数
第一步:JavaBean对象
package com.svt.service;import com.svt.dao.UserDao;
import com.svt.dao.UserDao02;/*** 构造器方法注入*  需要提供带参构造*/
public class UserService02 {private UserDao02 userDao02;/* 构造器注入*//*public UserService02(UserDao02 userDao02) {this.userDao02 = userDao02;}*/private UserDao userDao;public UserService02(UserDao02 userDao02, UserDao userDao) {this.userDao02 = userDao02;this.userDao = userDao;}public void test(){System.out.println("UserService Test...");userDao02.test();userDao.test();}
}
第二步:XML配置
<?xml version="1.0" encoding="UTF-8"?>
<beans xmlns="http://www.springframework.org/schema/beans"xmlns:xsi="http://www.w3.org/2001/XMLSchema-instance"xsi:schemaLocation="http://www.springframework.org/schema/beanshttps://www.springframework.org/schema/beans/spring-beans.xsd"><!--构造器注入设置构造器所需要的参数通过constructor-arg标签设置构造器的参数name:属性名称ref:要注入的bean对象对应的bean标签的id属性值value:数据具体的值index:参数的位置(从0开始)一般不用 但是可以确定参数是哪个位置的--><bean id="userService02" class="com.svt.service.UserService02"><constructor-arg name="userDao02" ref="userDao02"></constructor-arg><constructor-arg name="userDao" ref="userDao"></constructor-arg></bean><bean id="userDao02" class="com.svt.dao.UserDao02"></bean><bean id="userDao" class="com.svt.dao.UserDao"></bean></beans>
如果在写完JavaBean对象而没有在配置文件中添加bean则会出现以下报错内容,像上面xml文件中一样添加 <constructor-arg name="userDao" ref="userDao"></constructor-arg>即可

第三步:测试
在UserService02中的test测试方法中新增了两行输出语句
public void test(){System.out.println("UserService Test...");userDao02.test();userDao.test();}
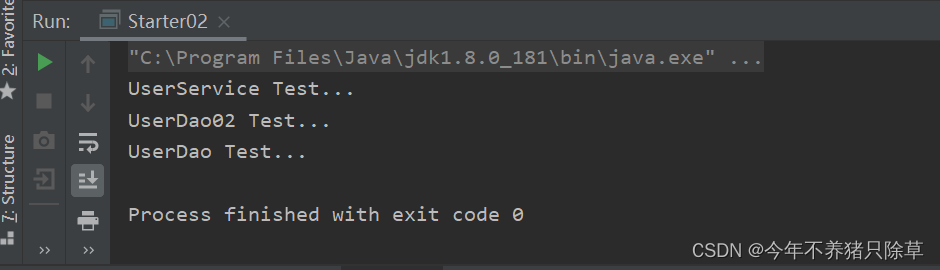
出现测试类中展现的内容则代表注入无误
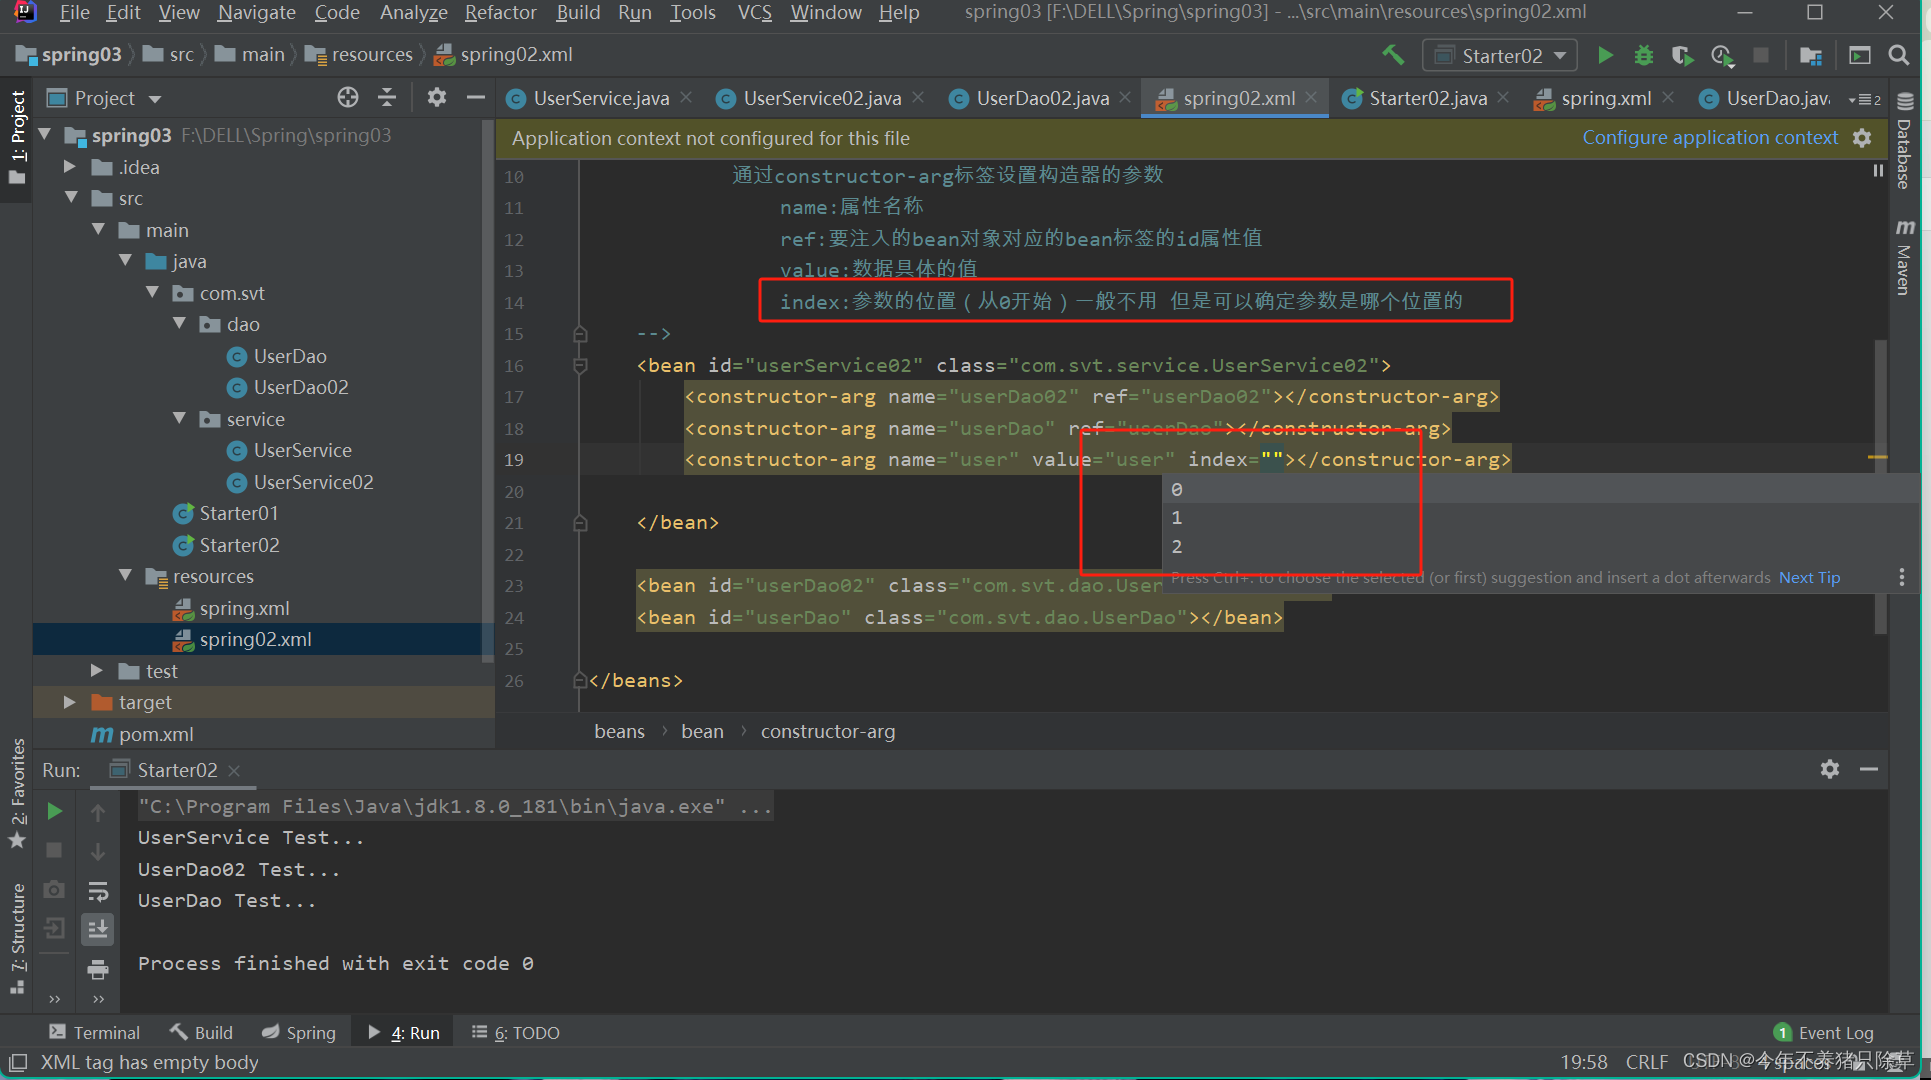
2.3 Bean对象和常⽤对象作为参数
第一步:加入常用对象String(举例)
private UserDao02 userDao02;/* 构造器注入*/private UserDao userDao;private String user;public UserService02(UserDao02 userDao02, UserDao userDao, String user) {this.userDao02 = userDao02;this.userDao = userDao;this.user = user;}
第二步:XML配置
<?xml version="1.0" encoding="UTF-8"?>
<beans xmlns="http://www.springframework.org/schema/beans"xmlns:xsi="http://www.w3.org/2001/XMLSchema-instance"xsi:schemaLocation="http://www.springframework.org/schema/beanshttps://www.springframework.org/schema/beans/spring-beans.xsd"><!--构造器注入设置构造器所需要的参数通过constructor-arg标签设置构造器的参数name:属性名称ref:要注入的bean对象对应的bean标签的id属性值value:数据具体的值index:参数的位置(从0开始)一般不用 但是可以确定参数是哪个位置的--><bean id="userService02" class="com.svt.service.UserService02"><constructor-arg name="userDao02" ref="userDao02"></constructor-arg><constructor-arg name="userDao" ref="userDao"></constructor-arg><constructor-arg name="user" value="user" index=""></constructor-arg></bean><bean id="userDao02" class="com.svt.dao.UserDao02"></bean><bean id="userDao" class="com.svt.dao.UserDao"></bean></beans>
第三步:测试
在UserService02中的test测试方法中新增了一行输出语句
public void test(){System.out.println("UserService Test...");userDao02.test();userDao.test();System.out.println(user);}
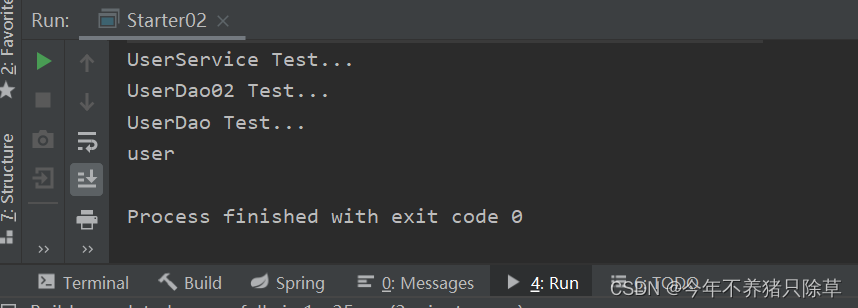
出现测试类中展现的内容则代表注入无误
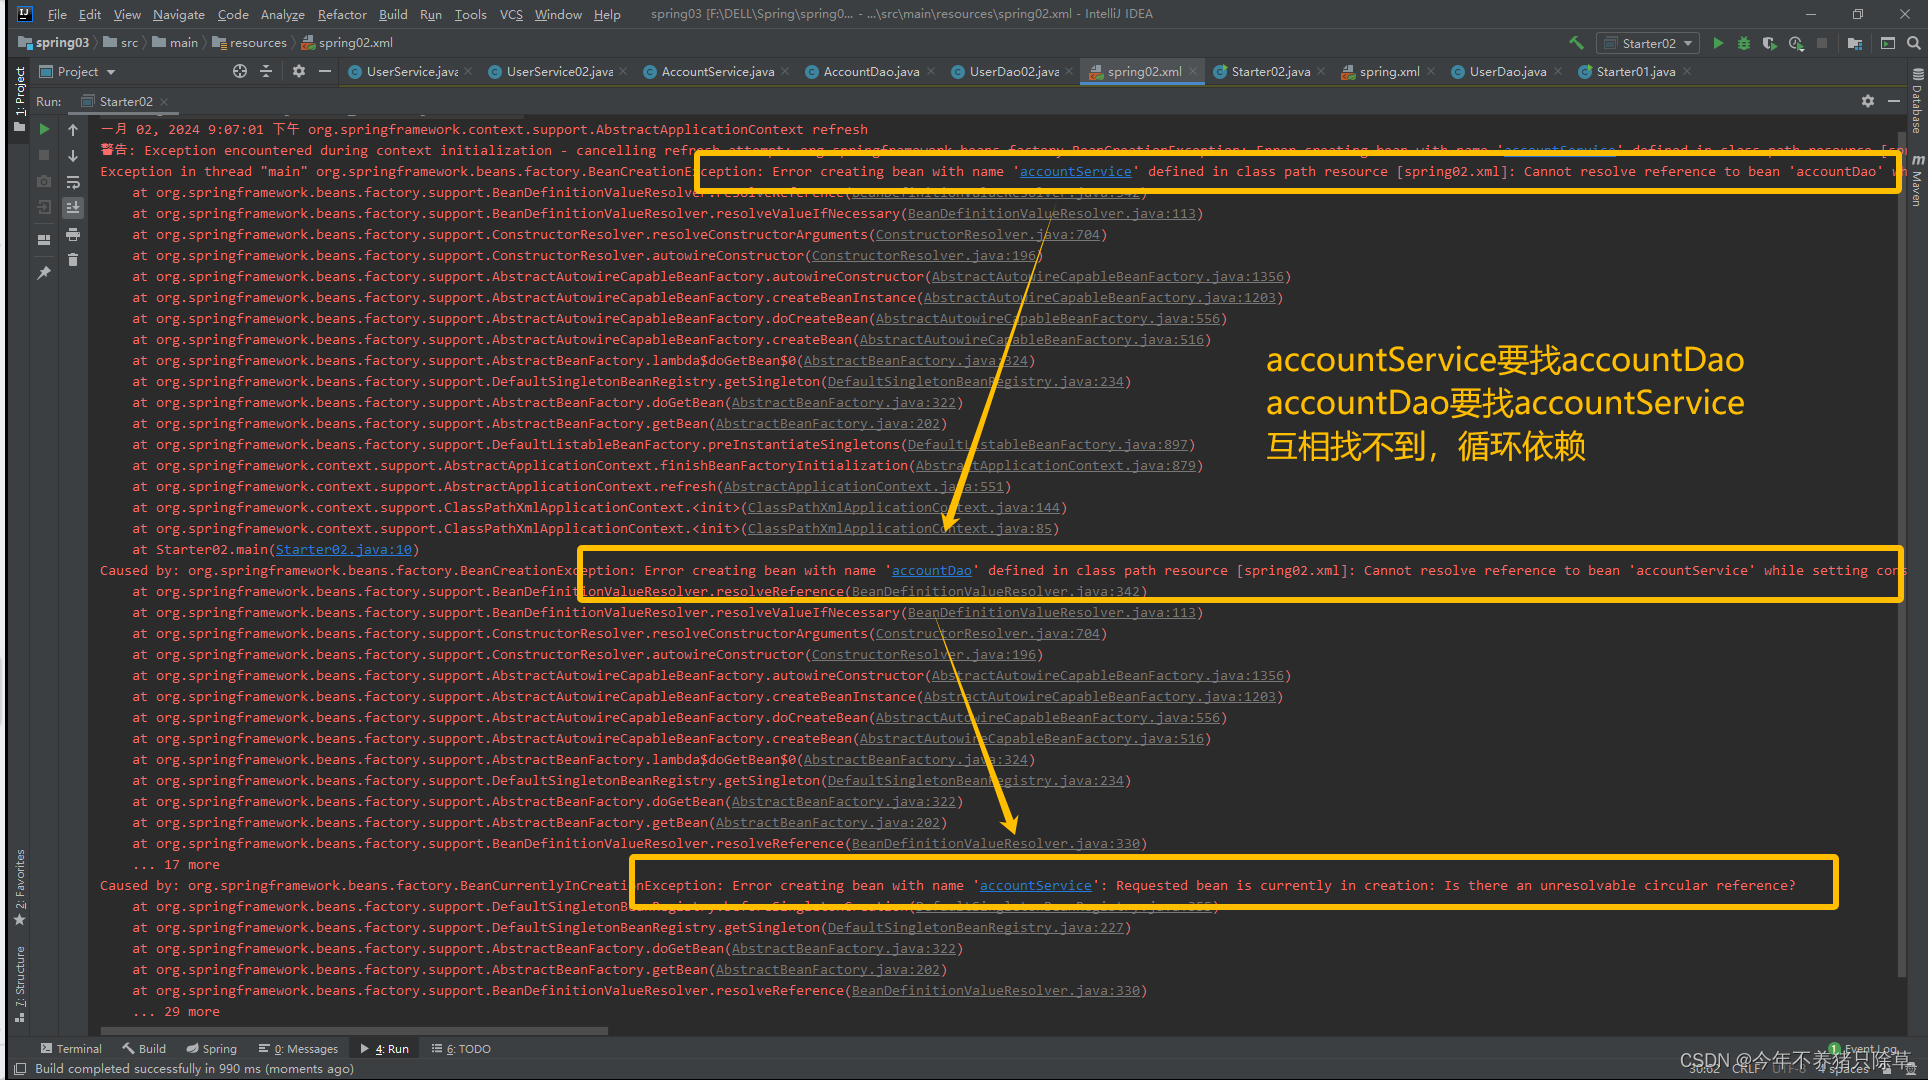
2.4 循环依赖问题
产生原因:Bean 通过构造器注⼊,之间彼此相互依赖对⽅导致 bean ⽆法实例化。比如一个IOC容器要去实例化A,但是A中有B的注入,于是IOC就先去找B实例化,此时B中又有A的注入,IOC又要去找A先进行初始化,这样一套下来IOC不知道是先找A还是B就会出现循环依赖的问题。
问题示例
- 代码示例
public class AccountService {private AccountDao accountDao;public AccountService(AccountDao accountDao) {this.accountDao = accountDao;}public void test(){System.out.println("AccountService Test...");accountDao.test();}
}public class AccountDao {private AccountService accountService;public AccountDao(AccountService accountService) {this.accountService = accountService;}public void test(){System.out.println("AccountDao Test...");}
}- xml配置示例
<?xml version="1.0" encoding="UTF-8"?>
<beans xmlns="http://www.springframework.org/schema/beans"xmlns:xsi="http://www.w3.org/2001/XMLSchema-instance"xsi:schemaLocation="http://www.springframework.org/schema/beanshttps://www.springframework.org/schema/beans/spring-beans.xsd">
<!--    循环依赖问题--><bean id="acountService" class="com.svt.service.AccountService"><constructor-arg name="accountDao" ref="accountDao"></constructor-arg></bean><bean id="accountDao" class="com.svt.dao.AccountDao"><constructor-arg name="accountService" ref="acountService"></constructor-arg></bean>
</beans>
此时AccountDao 注入了AccountService ,而AccountService 也注入了AccountDao ,这就造成了循环依赖
问题解决
如果出现循环依赖 需要通过set注入解决,下面就依据上面的循环注入代码进行解决
- 解决代码示例
public class AccountDao {private AccountService accountService;public void setAccountService(AccountService accountService) {this.accountService = accountService;}public void test(){System.out.println("AccountDao Test...");}
}public class AccountService {private AccountDao accountDao;public void setAccountDao(AccountDao accountDao) {this.accountDao = accountDao;}public void test(){System.out.println("AccountService Test...");accountDao.test();}
}- 解决xml配置示例
<?xml version="1.0" encoding="UTF-8"?>
<beans xmlns="http://www.springframework.org/schema/beans"xmlns:xsi="http://www.w3.org/2001/XMLSchema-instance"xsi:schemaLocation="http://www.springframework.org/schema/beanshttps://www.springframework.org/schema/beans/spring-beans.xsd"><!--    如果出现循环依赖 需要通过set注入解决--><bean id="accountService" class="com.svt.service.AccountService"><property name="accountDao" ref="accountDao"></property></bean><bean id="accountDao" class="com.svt.dao.AccountDao"><property name="accountService" ref="accountService"></property></bean><!--构造器必须等待构造器参数中的实例化实例化好后才会实例化本身set方法注入:先实例化对象,再找被注入的set进去,就不会造成循环依赖-->
</beans>
原因
- 构造器注入:必须等待构造器参数中的实例化实例化好后才会实例化本身
- set方法注入:先实例化对象,再找被注入的set进去,就不会造成循环依赖

3.静态工厂注入(了解)
第一步:创建工厂类
new factory->new StaticFactory
package com.svt.factory;import com.svt.dao.TypeDao;//静态工厂
public class StaticFactory {//定义静态方法public static TypeDao createTypeDao(){return new TypeDao();}
}
第二步:创建dao实体类
package com.svt.dao;public class TypeDao {public void test(){System.out.println("TypeDao Test...");}
}
第三步:创建TypeService,注入TypeDao
package com.svt.service;import com.svt.dao.TypeDao;public class TypeService {//注入TypeDaoprivate TypeDao typeDao;public void setTypeDao(TypeDao typeDao) {this.typeDao = typeDao;}public void test(){System.out.println("TypeService Test...");typeDao.test();}
}
第四步:xml配置
<?xml version="1.0" encoding="UTF-8"?>
<beans xmlns="http://www.springframework.org/schema/beans"xmlns:xsi="http://www.w3.org/2001/XMLSchema-instance"xsi:schemaLocation="http://www.springframework.org/schema/beanshttps://www.springframework.org/schema/beans/spring-beans.xsd"><!--    静态工厂--><!--    定义bean对象--><bean id="typeService" class="com.svt.service.TypeService"><property name="typeDao" ref="typeDao"></property></bean>
<!--    静态工厂注入:通过静态构造实例化需要被注入的bean对象--><bean id="typeDao" class="com.svt.factory.StaticFactory" factory-method="createTypeDao"></bean>
</beans>
第五步:测试
import com.svt.service.TypeService;
import org.springframework.context.ApplicationContext;
import org.springframework.context.support.ClassPathXmlApplicationContext;public class Starter02 {public static void main(String[] args) {//获取Spring的上下文环境 BeanFactory也是可以的ApplicationContext ac=new ClassPathXmlApplicationContext("spring02.xml");TypeService typeService= (TypeService) ac.getBean("typeService");typeService.test();}
}

出现测试类中展现的内容则代表注入无误
4.实例化工厂注入(了解)
实例化工厂注入与静态工厂注入大致一样,有以下几点不同
4.1 定义实例化工厂,写非静态方法
静态工厂里写的是静态方法,实例化工厂里写的非静态方法
package com.svt.factory;import com.svt.dao.TypeDao;//定义实例化工厂
public class InstanceFactory {public TypeDao createTypeDao(){return new TypeDao();}
}
4.2 修改xml配置
<?xml version="1.0" encoding="UTF-8"?>
<beans xmlns="http://www.springframework.org/schema/beans"xmlns:xsi="http://www.w3.org/2001/XMLSchema-instance"xsi:schemaLocation="http://www.springframework.org/schema/beanshttps://www.springframework.org/schema/beans/spring-beans.xsd"><!--    定义bean对象--><bean id="typeService" class="com.svt.service.TypeService"><property name="typeDao" ref="typeDao"></property></bean><!--    实例化工厂注入:通过实例化工厂需要被注入的bean对象--><bean id="instanceFactory" class="com.svt.factory.InstanceFactory"></bean><bean id="typeDao" factory-bean="instanceFactory" factory-method="createTypeDao"></bean>
</beans>
其余与静态工厂一致,测试类实现结果也与静态工厂一致
静态工厂注入与实例化工厂注入本质上还是set注入,只是本来bean对象是通过构造器去实例化的,现在更换了以下,想要静态工厂注入就把实例化的方式变成静态工厂,实例化工厂同理,两者用的不多,理解即可
注入方式的选择
开发项⽬中set⽅式注⼊⾸选
使⽤构造注⼊可以在构建对象的同时⼀并完成依赖关系的建⽴,对象⼀建⽴则所有的⼀切也就准备好
了,但如果要建⽴的对象关系很多,使⽤构造器注⼊会在构建函数上留下⼀⻓串的参数,且不易记忆,这时使⽤Set注⼊会是个不错的选择。
使⽤Set注⼊可以有明确的名称,可以了解注⼊的对象会是什么,像setXXX()这样的名称会⽐记忆Constructor上某个参数的位置代表某个对象更好。
p名称空间的使用(了解)
spring2.5以后,为了简化setter方法属性注入,引用p名称空间的概念,可以将子元素,简化为元素属性配置。
第一步:属性字段提供set方法
package com.svt.service;import com.svt.dao.UserDao;import java.util.List;
import java.util.Map;
import java.util.Properties;
import java.util.Set;/*** Set方法注入* 1.属性字段提供set方法* 2.在配置文件中通过property属性指定属性字段*/
public class UserService03 {//手动实例化//private UserDao userDao=new UserDao();//业务逻辑对象JavaBean 提供set方法注入//在配置文件中还未告知set方法注入 所以userDao是空的//将这里bean对象实例化的过程交给IOC去做private UserDao userDao;//set方法public void setUserDao(UserDao userDao) {this.userDao = userDao;}//常用对象String(日期类型)private String host;public void setHost(String host) {this.host = host;}public void test(){System.out.println("UserService Test...");//JavaBean对象userDao.test();}
}
第二步:在配置文件xml引入p名称空间
xmlns:p="http://www.springframework.org/schema/p"
<?xml version="1.0" encoding="UTF-8"?>
<beans xmlns="http://www.springframework.org/schema/beans"xmlns:xsi="http://www.w3.org/2001/XMLSchema-instance"xmlns:p="http://www.springframework.org/schema/p"xsi:schemaLocation="http://www.springframework.org/schema/beanshttps://www.springframework.org/schema/beans/spring-beans.xsd">
<!--    p名称空间:简化set属性的注入--><bean id="userDao" class="com.svt.dao.UserDao"></bean><bean id="userService03" class="com.svt.service.UserService03"p:host="127.0.0.1"p:userDao-ref="userDao"></bean><!--p:属性名:="xxx 引入常量值p:属性名-ref;="xxx" 引入其他Bean对象的id属性值-->
</beans>