mmdetection训练自己的数据集
这里写目录标题
- mmdetection训练自己的数据集
- 一: 环境搭建
- 二:数据集格式转换(yolo转coco格式)
- yolo数据集格式
- coco数据集格式
- yolo转coco数据集格式
- yolo转coco数据集格式的代码
- 三: 训练
- dataset数据文件配置
- configs
- 1.在configs/faster_rcnn/faster-rcnn_r101_fpn_1x_coco.py我们发现,索引的是'./faster-rcnn_r50_fpn_1x_coco.py'
- 2.找到'./faster-rcnn_r50_fpn_1x_coco.py',发现索引是下面代码
- 3.修改
- 4.训练
- 五: 还在继续研究的内容
一: 环境搭建
- 有很多的环境搭建过程,这里就不介绍,我自己也搭建环境了,一会就搭建好了。
二:数据集格式转换(yolo转coco格式)
yolo数据集格式
- 因为我平时训练目标检测数据集用的YOLO系列,所以数据集格式标签也是txt,在最近接触的mmdetection训练目标检测数据集是需要用到coco格式,所以在这里需要转换数据集的格式。
- 先来看看yolo数据集标签的格式,图片和标签一一对应的。有多少张图片就有多少张txt文件标签。
├── linhuo(这个是数据集名称)
│ ├── images
│ │ ├── train
│ │ │ ├── 1.jpg
│ │ │ ├── 2.jpg
│ │ │ ├── …
│ │ ├── val
│ │ │ ├── 2000.jpg
│ │ │ ├── 2001.jpg
│ │ │ ├── …
│ │ ├── test
│ │ │ ├── 3000.jpg
│ │ │ ├── 30001.jpg
│ │ │ ├── …
│ ├── labels
│ │ ├── train
│ │ │ ├── 1.xml
│ │ │ ├── 2.xml
│ │ │ ├── …
│ │ ├── val
│ │ │ ├── 2000.xml
│ │ │ ├── 2001.xml
│ │ │ ├── …
│ │ ├── test
│ │ │ ├── 3000.xml
│ │ │ ├── 3001.xml
│ │ │ ├── …
coco数据集格式
- coco数据集格式如下:
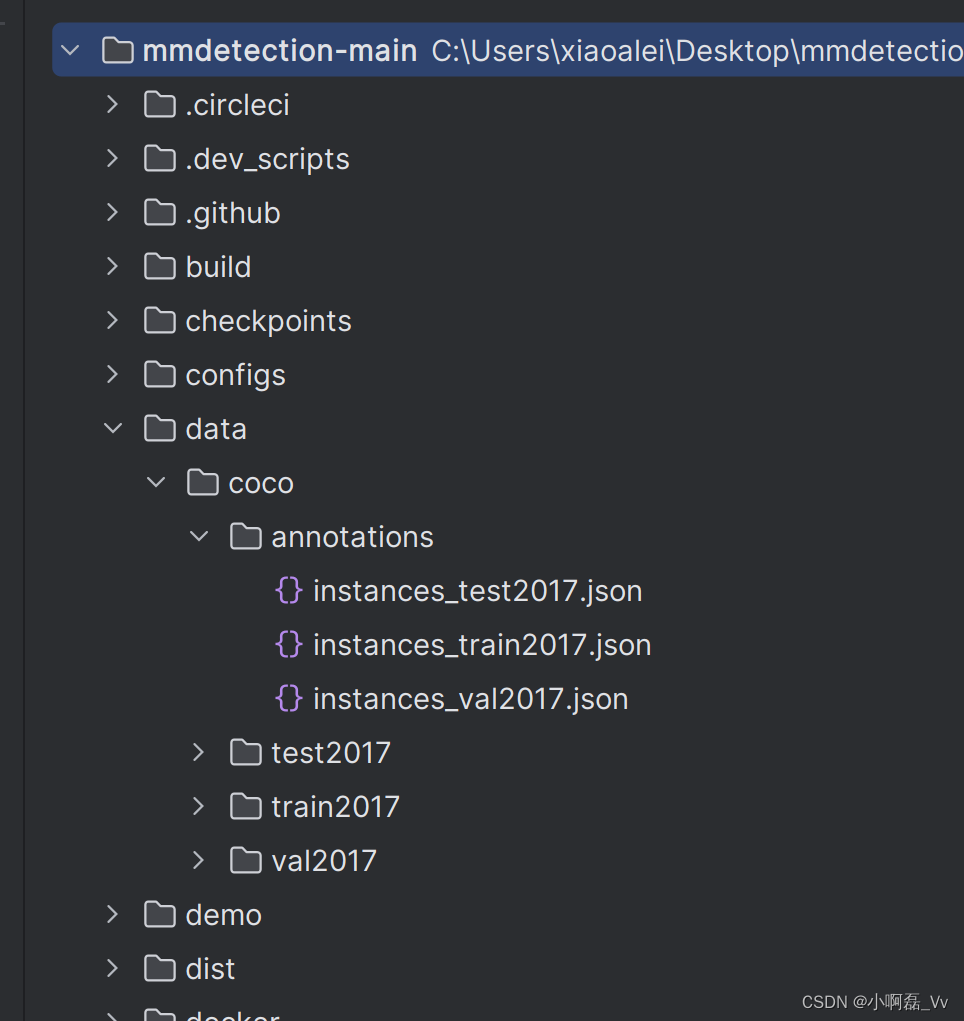
├── data
│ ├── coco
│ │ ├── annotations
│ │ │ ├── instances_train2017.json
│ │ │ ├── instances_val2017.json
│ │ ├── train2017
│ │ ├── val2017
│ │ ├── test2017
yolo转coco数据集格式
- 我们需要对yolo的数据集的训练集(train)、验证集(val)、测试集(test)标签分别进行转换生成coco数据集的标签格式(图片相对是不变的)instances_train2017.json、 instances_val2017.json(这里不需要对应的test的标签)
- 在回顾说明一下需要转换的,和保持相对不变的
- 保持相对不变的:
- linhuo/images/train的图片直接复制到train2017
- linhuo/images/val的图片直接复制到val2017
- linhuo/images/test的图片直接复制到test2017
- 需要改变的是:
- linhuo/labels/train的所有标签需要转换成 instances_train2017.json(coco格式)
- linhuo/labels/vla的所有标签需要转换成instances_val2017.json(coco格式)
yolo转coco数据集格式的代码
"""
yolo标签:
yolo数据集的标注文件是.txt文件,在label文件夹中每一个.txt文件对应数据集中的一张图片
其中每个.txt文件中的每一行代表图片中的一个目标。
coco标签:
而coco数据集的标注文件是.json文件,全部的数据标注文件由三个.json文件组成:train.json val.json test.json,
其中每个.json文件中包含全部的数据集图片中的所有目标(注意是所有目标不是数据集中的所有张图片)
准备工作:
1. 在根目录下创建coco文件格式对应的文件夹
dataset_coco:annotationsimageslabelsclasses.txt(每一行是自定义数据集中的一个类别)YOLO 格式的数据集转化为 COCO 格式的数据集
--root_dir 输入根路径
--save_path 保存文件的名字(没有random_split时使用)
--random_split 有则会随机划分数据集,然后再分别保存为3个文件。
--split_by_file 按照 ./train.txt ./val.txt ./test.txt 来对数据集进行划分运行方式:python yolo2coco.py --root_dir ./dataset_coco --random_split
datasetcoco/images: 数据集所有图片
datasetcoco/labels: 数据集yolo标签的txt文件
classes.txt(每一行是自定义数据集中的一个类别)
"""import os
import cv2
import json
from tqdm import tqdm
from sklearn.model_selection import train_test_split
import argparseparser = argparse.ArgumentParser()
parser.add_argument('--root_dir', default='./data', type=str,help="root path of images and labels, include ./images and ./labels and classes.txt")
parser.add_argument('--save_path', type=str, default='./train.json',help="if not split the dataset, give a path to a json file")
parser.add_argument('--random_split', action='store_true', help="random split the dataset, default ratio is 8:1:1")
parser.add_argument('--split_by_file', action='store_true',help="define how to split the dataset, include ./train.txt ./val.txt ./test.txt ")arg = parser.parse_args()def train_test_val_split_random(img_paths, ratio_train=0.8, ratio_test=0.1, ratio_val=0.1):# 这里可以修改数据集划分的比例。assert int(ratio_train + ratio_test + ratio_val) == 1train_img, middle_img = train_test_split(img_paths, test_size=1 - ratio_train, random_state=233)ratio = ratio_val / (1 - ratio_train)val_img, test_img = train_test_split(middle_img, test_size=ratio, random_state=233)print("NUMS of train:val:test = {}:{}:{}".format(len(train_img), len(val_img), len(test_img)))return train_img, val_img, test_imgdef train_test_val_split_by_files(img_paths, root_dir):# 根据文件 train.txt, val.txt, test.txt(里面写的都是对应集合的图片名字) 来定义训练集、验证集和测试集phases = ['train', 'val', 'test']img_split = []for p in phases:define_path = os.path.join(root_dir, f'{p}.txt')print(f'Read {p} dataset definition from {define_path}')assert os.path.exists(define_path)with open(define_path, 'r') as f:img_paths = f.readlines()# img_paths = [os.path.split(img_path.strip())[1] for img_path in img_paths]  # NOTE 取消这句备注可以读取绝对地址。img_split.append(img_paths)return img_split[0], img_split[1], img_split[2]def yolo2coco(arg):root_path = arg.root_dirprint("Loading data from ", root_path)assert os.path.exists(root_path)originLabelsDir = os.path.join(root_path, 'labels')originImagesDir = os.path.join(root_path, 'images')with open(os.path.join(root_path, 'classes.txt')) as f:classes = f.read().strip().split()# images dir nameindexes = os.listdir(originImagesDir)if arg.random_split or arg.split_by_file:# 用于保存所有数据的图片信息和标注信息train_dataset = {'categories': [], 'annotations': [], 'images': []}val_dataset = {'categories': [], 'annotations': [], 'images': []}test_dataset = {'categories': [], 'annotations': [], 'images': []}# 建立类别标签和数字id的对应关系, 类别id从0开始。for i, cls in enumerate(classes, 0):train_dataset['categories'].append({'id': i, 'name': cls, 'supercategory': 'mark'})val_dataset['categories'].append({'id': i, 'name': cls, 'supercategory': 'mark'})test_dataset['categories'].append({'id': i, 'name': cls, 'supercategory': 'mark'})if arg.random_split:print("spliting mode: random split")train_img, val_img, test_img = train_test_val_split_random(indexes, 0.8, 0.1, 0.1)elif arg.split_by_file:print("spliting mode: split by files")train_img, val_img, test_img = train_test_val_split_by_files(indexes, root_path)else:dataset = {'categories': [], 'annotations': [], 'images': []}for i, cls in enumerate(classes, 0):dataset['categories'].append({'id': i, 'name': cls, 'supercategory': 'mark'})# 标注的idann_id_cnt = 0for k, index in enumerate(tqdm(indexes)):# 支持 png jpg 格式的图片。txtFile = index.replace('images', 'txt').replace('.jpg', '.txt').replace('.png', '.txt')# 读取图像的宽和高im = cv2.imread(os.path.join(root_path, 'images/') + index)height, width, _ = im.shapeif arg.random_split or arg.split_by_file:# 切换dataset的引用对象,从而划分数据集if index in train_img:dataset = train_datasetelif index in val_img:dataset = val_datasetelif index in test_img:dataset = test_dataset# 添加图像的信息dataset['images'].append({'file_name': index,'id': k,'width': width,'height': height})if not os.path.exists(os.path.join(originLabelsDir, txtFile)):# 如没标签,跳过,只保留图片信息。continuewith open(os.path.join(originLabelsDir, txtFile), 'r') as fr:labelList = fr.readlines()for label in labelList:label = label.strip().split()x = float(label[1])y = float(label[2])w = float(label[3])h = float(label[4])# convert x,y,w,h to x1,y1,x2,y2H, W, _ = im.shapex1 = (x - w / 2) * Wy1 = (y - h / 2) * Hx2 = (x + w / 2) * Wy2 = (y + h / 2) * H# 标签序号从0开始计算, coco2017数据集标号混乱,不管它了。cls_id = int(label[0])width = max(0, x2 - x1)height = max(0, y2 - y1)dataset['annotations'].append({'area': width * height,'bbox': [x1, y1, width, height],'category_id': cls_id,'id': ann_id_cnt,'image_id': k,'iscrowd': 0,# mask, 矩形是从左上角点按顺时针的四个顶点'segmentation': [[x1, y1, x2, y1, x2, y2, x1, y2]]})ann_id_cnt += 1# 保存结果folder = os.path.join(root_path, 'annotations')if not os.path.exists(folder):os.makedirs(folder)if arg.random_split or arg.split_by_file:for phase in ['train', 'val', 'test']:json_name = os.path.join(root_path, 'annotations/{}.json'.format(phase))with open(json_name, 'w') as f:if phase == 'train':json.dump(train_dataset, f)elif phase == 'val':json.dump(val_dataset, f)elif phase == 'test':json.dump(test_dataset, f)print('Save annotation to {}'.format(json_name))else:json_name = os.path.join(root_path, 'annotations/{}'.format(arg.save_path))with open(json_name, 'w') as f:json.dump(dataset, f)print('Save annotation to {}'.format(json_name))if __name__ == "__main__":yolo2coco(arg)
三: 训练
以configs/faster_rcnn/faster-rcnn_r101_fpn_1x_coco.py为例
- mmdetection-mian创建文件夹data,在将上面转换后的格式进行简单整理如下,放到mmdetection-mian文件下
dataset数据文件配置
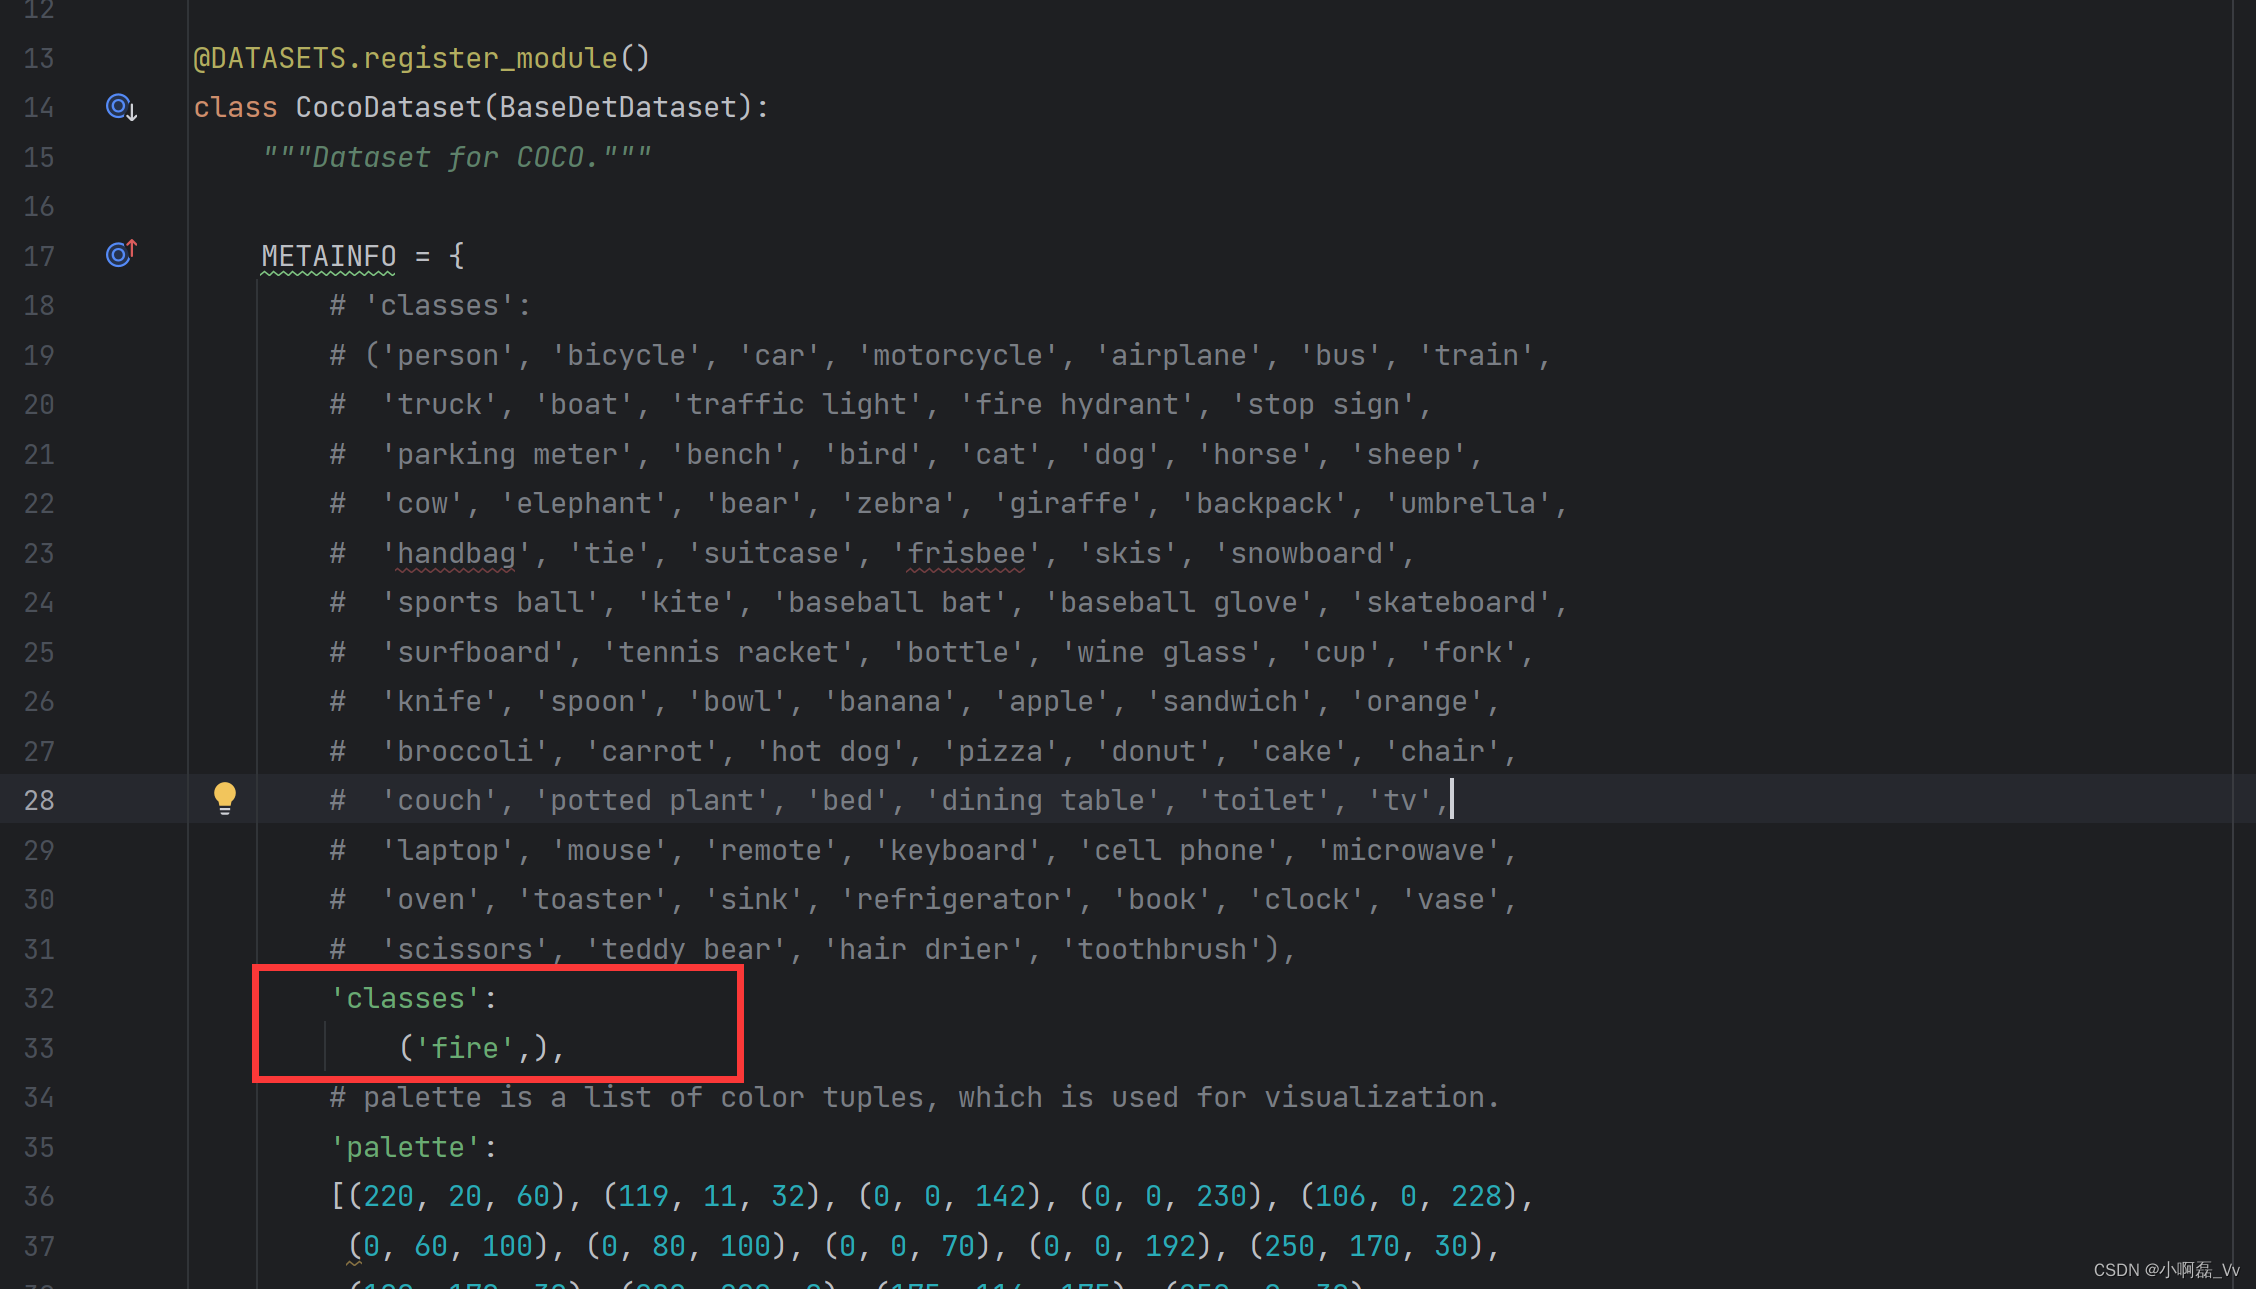
在路径下面路径中,修改数据集种类为自己数据集的种类。
mmdet/datasets/coco.py
configs
1.在configs/faster_rcnn/faster-rcnn_r101_fpn_1x_coco.py我们发现,索引的是’./faster-rcnn_r50_fpn_1x_coco.py’

2.找到’./faster-rcnn_r50_fpn_1x_coco.py’,发现索引是下面代码

3.修改
_base_ = ['../_base_/models/faster-rcnn_r50_fpn.py',#指向的是model dict,修改其中的num_classes类别为自己的类别。'../_base_/datasets/coco_detection.py',# 修改train_dataloader的ann_file为自己数据集json路径,我这里ann_file='annotations/instances_val2017.json',val_dataloader,val_evaluator也要修改ann_file'../_base_/schedules/schedule_1x.py', # 优化器,超参数,自己实际情况来'../_base_/default_runtime.py'# 可以不修改
]
4.训练
- 若改动框架源代码后,一定要注意重新编译后再使用。类似这里修改了几个源代码文件后再使用train命令之前,先要编译,执行下面命令。
pip install -v -e . # or "python setup.py develop"
- 训练语句
python tools/train.py configs/faster_rcnn/faster-rcnn_r101_fpn_1x_coco.py --work-dir work_dirs_2
