一.安装
1.下载安装依赖
npm install vue-router@nextnpm install @types/vue-router
2.router目录创建
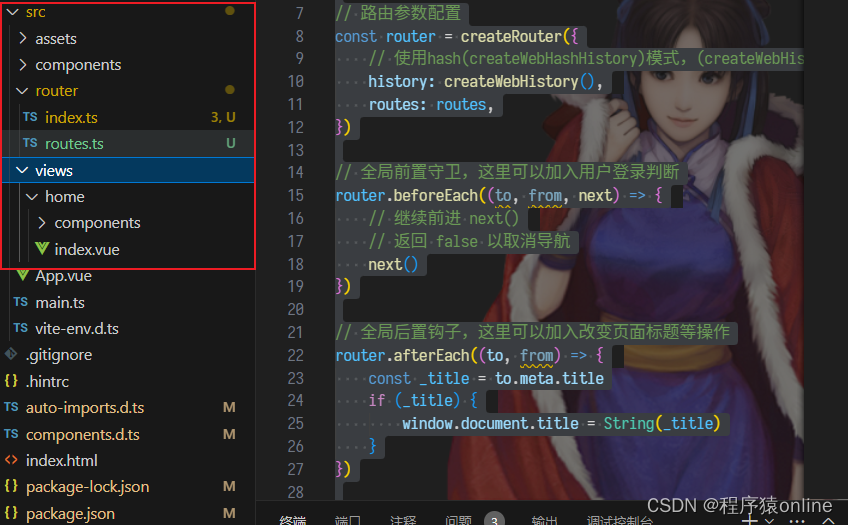
在src 目录下 创建 /src/router文件夹
包含两个文件 route.ts
import { RouteRecordRaw } from 'vue-router'const routes: Array<RouteRecordRaw> = [{path: '/',name: 'index',component: () => import('@/views/home/index.vue'),meta: {title: '首页'},}
]
export default routes
以及 index.ts
// 导入router所需的方法
import { createRouter, createWebHashHistory } from 'vue-router'// 导入路由页面的配置
import routes from './routes'// 路由参数配置
const router = createRouter({// 使用hash(createWebHashHistory)模式,(createWebHistory是HTML5历史模式,支持SEO)history: createWebHashHistory(),routes: routes,
})// 全局前置守卫,这里可以加入用户登录判断
router.beforeEach((to, from, next) => {// 继续前进 next()// 返回 false 以取消导航next()
})// 全局后置钩子,这里可以加入改变页面标题等操作
router.afterEach((to, from) => {const _title = to.meta.titleif (_title) {window.document.title = String(_title)}
})// 导出默认值
export default router
效果如下

3.main.ts修改引入
都有注释的,从搭建到现在整个main.ts的内容
import { createApp } from 'vue'
import '@/assets/style/style.css'
import App from './App.vue'// 以下是 完整引入 element plus 时使用
// import ElementPlus from 'element-plus'
// import 'element-plus/dist/index.css'// 引入图标库,如果您正在使用CDN引入,请删除下面一行。
import * as ElementPlusIconsVue from '@element-plus/icons-vue'// 导入新建的路由文件
import router from "./router/index"const app = createApp(App)
app.use(router)// 以下是 完整引入 element plus 时使用
// app.use(ElementPlus)for (const [key, component] of Object.entries(ElementPlusIconsVue)) {app.component(key, component)
}
app.mount('#app')
4.测试使用
记得之前在App.vue 引用Home是直接引用的组件形式吗,回去修改成路由入口形式
App.vue
<template><router-view></router-view><!-- <Home></Home> -->
</template><script setup lang="ts">
// import Home from '@/views/home/index.vue'
</script><style ></style>


