1. 如何自定义摄像机输入
当你调用摄像机的attachControl方法之后,摄像机都会自动为您处理输入。可以使detachControl方法撤消该控件。大多数Babylon.js专家使用两步流程来激活和连接相机:
//First, set the scene's activeCamera... to be YOUR camera.
scene.activeCamera = myCamera;
// Then attach the activeCamera to the canvas.
//Parameters: canvas, noPreventDefault
scene.activeCamera.attachControl(canvas, true);
一个简单的写法类似这样:
myCamera.attachControl(canvas);默认情况下,noPreventDefault设置为false(上述代码后面这个布尔类型参数),这意味着在所有canvas上的鼠标单击和触摸事件中都会自动调用preventDefault函数。(不太明白preventDefault的可以百度js事件处理)
Babylon.js v2.4开始引入了一种不同的方法来管理摄像机输入,即提供一种面向输入的、可组合的方式。现在,您可以使用输入管理器,每种输入都可以被视为一个插件,所有的相机都可以使用它,并通过输入类型(鼠标、键盘、游戏板、其他设备的)来的区分。
使用输入管理器,您可以添加、删除、启用或禁用摄像机可用的任何输入。您还可以轻松地实现自定义输入机制或覆盖现有的输入机制。
输入管理器可通过camera的inputs属性使用。例如:
const camera = new BABYLON.FreeCamera("sceneCamera", new BABYLON.Vector3(0, 1, -15), scene);
const inputManager = camera.inputs;
2. 配置输入
大多数输入都提供了自定义灵敏度的设置,并使其适应您自己的场景。
每种输入都提供了管理器上可用的简称。目标是在使用输入时提供友好的语法。
const camera = new BABYLON.FreeCamera("sceneCamera", new BABYLON.Vector3(0, 1, -15), scene);
camera.inputs.add(new BABYLON.FreeCameraGamepadInput());
camera.inputs.attached.gamepad.gamepadAngularSensibility = 250;
3. 添加已存在的输入
ArcRotateCamera和FreeCamera的输入管理器暴露了用于添加内置输入的函数。
const camera = new BABYLON.FreeCamera("sceneCamera", new BABYLON.Vector3(0, 1, -15), scene);
camera.inputs.addGamepad();
如果您愿意,您也可以添加定制化输入的实例(将在第6节介绍如何实现定制化输入)。
const camera = new BABYLON.FreeCamera("sceneCamera", new BABYLON.Vector3(0, 1, -15), scene);
camera.inputs.add(new BABYLON.FreeCameraGamepadInput());
4. 启用和禁用输入
当您在相机上调用attachControl函数时,将会激活输入管理器的所有输入。同样的,您可以通过调用相机上的detachControl函数来关闭所有输入。
如果您想暂时禁用输入,可以直接在某个输入上调用detachControl函数, 下面以鼠标输入举例:
const camera = new BABYLON.FreeCamera("sceneCamera", new BABYLON.Vector3(0, 1, -15), scene);
camera.inputs.attached.mouse.detachControl();
camera.inputs.addGamepad();
然后,当您想再次打开,调用attachInput函数即可。
camera.inputs.attachInput(camera.inputs.attached.mouse);
5. 删除输入
有时你想要一个非常特定的输入机制。在这种情况下,最好的方法可能是清除所有输入,只在场景中添加您可能需要的输入。
const camera = new BABYLON.FreeCamera("sceneCamera", new BABYLON.Vector3(0, 1, -15), scene);
camera.inputs.clear();
camera.inputs.addMouse();
您还可以从输入管理器中删除单个输入。您可以按实例或按类型名称删除它们。
const camera = new BABYLON.FreeCamera("sceneCamera", new BABYLON.Vector3(0, 1, -15), scene);
// remove by instance
camera.inputs.remove(camera.inputs.attached.mouse);
// remove by type
camera.inputs.removeByType("FreeCameraKeyboardMoveInput");
6. 自定义输入
要实现自定义输入则需要创建为一个函数对象,这个函数对象需要具备以下几个方法并编写实现代码。方法名称和用途如下:(完成之后,按照第2节的方式配置即可生效)
// This function must return the class name of the camera, it could be used for serializing your scene
getClassName();// This function must return the simple name that will be injected in the input manager as short hand
// for example "mouse" will turn into camera.inputs.attached.mouse
getSimpleName();//T his function must activate your input event.  Even if your input does not need a DOM element
// element and noPreventDefault must be present and used as parameter names.
// Return void.
attachControl(noPreventDefault);// Detach control must deactivate your input and release all pointers, closures or event listeners
// element must be present as a parameter name.
// Return void.
detachControl();// This optional function will get called for each rendered frame, if you want to synchronize your
// input to rendering, no need to use requestAnimationFrame. It's a good place for applying
// calculations if you have to.
// Return void.
checkInputs();
7. HammerJS输入
如果ArcRotateCamera的内置的触摸控件对您来说不够强大的话,您可以使用著名的触摸手势库HammerJS当作相机输入。Github地址:https://hammerjs.github.io/
我们有一个如何使用HammerJS来模拟类似Google Earth控件的示例。为此,我们使用BabylonJS的ArcRotateCamera。摄影机锁定在Y轴上,水平平移沿X轴移动摄影机,垂直平移沿Z轴移动摄影机。平行移动时会考虑摄影机的alpha角度。通过捏可以更改相机的半径,以便放大和缩小。您可以通过两个手指旋转手势来更改相机的alpha角度,这样基本上就可以围绕相机目标旋转。
示例应用程序:https://demos.babylonjs.xyz/hammerjs-example/#/
GitHub仓库:https://github.com/RolandCsibrei/babylonjs-hammerjs-arc-rotate-camera
该示例的文件位于utils/ArcRotateCameraHammerJsInput.ts,它实现ICameraInput<ArcRotateCamera>接口。有多个输入参数,代码很简单且能够自解释。请参考源代码,并设置适合灵敏度参数和其他入参。
首先,您需要安装HammerJS,请参https://hammerjs.github.io/getting-started/并导入。
import "hammerjs";要使用新的输入,请在代码中创建相机后将其添加到camera.input中。为了避免多个输入之间的冲突,请从camera.input中删除ArcRotateCameraPointersInput。创建输入后,可以设置其参数。
默认的配置适用于普通触摸屏显示器,因此可能需要根据实际情况进行修改。(请参阅https://github.com/RolandCsibrei/babylonjs-hammerjs-arc-rotate-camera/blob/680cf12155924a818faac5ff9d7f0a0271bb632b/src/utils/ArcRotateCameraHammerJsInput.ts#L21)
// remove mouse input
camera.inputs.removeByType("ArcRotateCameraPointersInput");// add hammer js input
const hammerJsInput = new ArcRotateCameraHammerJsInput();
// now you can set the parameters you like
// let's double the zoomSensitivity (default is 1)
hammerJsInput.zoomSensitivity = 2;
// add the input to the camera
camera.inputs.add(hammerJsInput);
请随意使用这个Input类作为您自己的基于HammerJS的输入的入门。
使用JavaScript实现自定义输入
以下代码用于使用键盘向左、向右、向前和向后移动摄影机以及在其当前位置进行旋转。
首先,删除默认的键盘输入。
camera.inputs.removeByType("FreeCameraKeyboardMoveInput");
接下来创建新的输入函数FreeCameraKeyboardRotateInput:
const FreeCameraKeyboardRotateInput = function () {this._keys = [];this.keysLeft = [37];this.keysRight = [39];this.sensibility = 0.01;
};
添加获取类名称的方法:
FreeCameraKeyboardRotateInput.prototype.getClassName = function () {return "FreeCameraKeyboardRotateInput";
};
FreeCameraKeyboardRotateInput.prototype.getSimpleName = function () {return "keyboardRotate";
};
添加attach和detach方法:
FreeCameraKeyboardRotateInput.prototype.attachControl = function (noPreventDefault) {const _this = this;const engine = this.camera.getEngine();const element = engine.getInputElement();if (!this._onKeyDown) {element.tabIndex = 1;this._onKeyDown = function (evt) {if (_this.keysLeft.indexOf(evt.keyCode) !== -1 || _this.keysRight.indexOf(evt.keyCode) !== -1) {const index = _this._keys.indexOf(evt.keyCode);if (index === -1) {_this._keys.push(evt.keyCode);}if (!noPreventDefault) {evt.preventDefault();}}};this._onKeyUp = function (evt) {if (_this.keysLeft.indexOf(evt.keyCode) !== -1 || _this.keysRight.indexOf(evt.keyCode) !== -1) {const index = _this._keys.indexOf(evt.keyCode);if (index >= 0) {_this._keys.splice(index, 1);}if (!noPreventDefault) {evt.preventDefault();}}};element.addEventListener("keydown", this._onKeyDown, false);element.addEventListener("keyup", this._onKeyUp, false);BABYLON.Tools.RegisterTopRootEvents(canvas, [{ name: "blur", handler: this._onLostFocus }]);}
};FreeCameraKeyboardRotateInput.prototype.detachControl = function () {const engine = this.camera.getEngine();const element = engine.getInputElement();if (this._onKeyDown) {element.removeEventListener("keydown", this._onKeyDown);element.removeEventListener("keyup", this._onKeyUp);BABYLON.Tools.UnregisterTopRootEvents(canvas, [{ name: "blur", handler: this._onLostFocus }]);this._keys = [];this._onKeyDown = null;this._onKeyUp = null;}
};
添加检查输入的方法(可选)
FreeCameraKeyboardRotateInput.prototype.checkInputs = function () {if (this._onKeyDown) {const camera = this.camera;// Keyboardfor (let index = 0; index < this._keys.length; index++) {const keyCode = this._keys[index];if (this.keysLeft.indexOf(keyCode) !== -1) {camera.cameraRotation.y += this.sensibility;} else if (this.keysRight.indexOf(keyCode) !== -1) {camera.cameraRotation.y -= this.sensibility;}}}
};
最后,把新的输入配置给相机
camera.inputs.add(new FreeCameraKeyboardRotateInput());完整示例:
使用TypeScript实现自定义输入
使用TypeScript,您通过实现接口ICameraInput来完成这个类:
interface ICameraInput<TCamera extends BABYLON.Camera> {// the input manager will fill the parent cameracamera: TCamera;//this function must return the class name of the camera, it could be used for serializing your scenegetClassName(): string;//this function must return the simple name that will be injected in the input manager as short hand//for example "mouse" will turn into camera.inputs.attached.mousegetSimpleName(): string;//this function must activate your input, event if your input does not need a DOM elementattachControl: (noPreventDefault?: boolean) => void;//detach control must deactivate your input and release all pointers, closures or event listenersdetachControl: () => void;//this optional function will get called for each rendered frame, if you want to synchronize your input to rendering,//no need to use requestAnimationFrame. It's a good place for applying calculations if you have tocheckInputs?: () => void;
}
相机实现第一人称行走案例
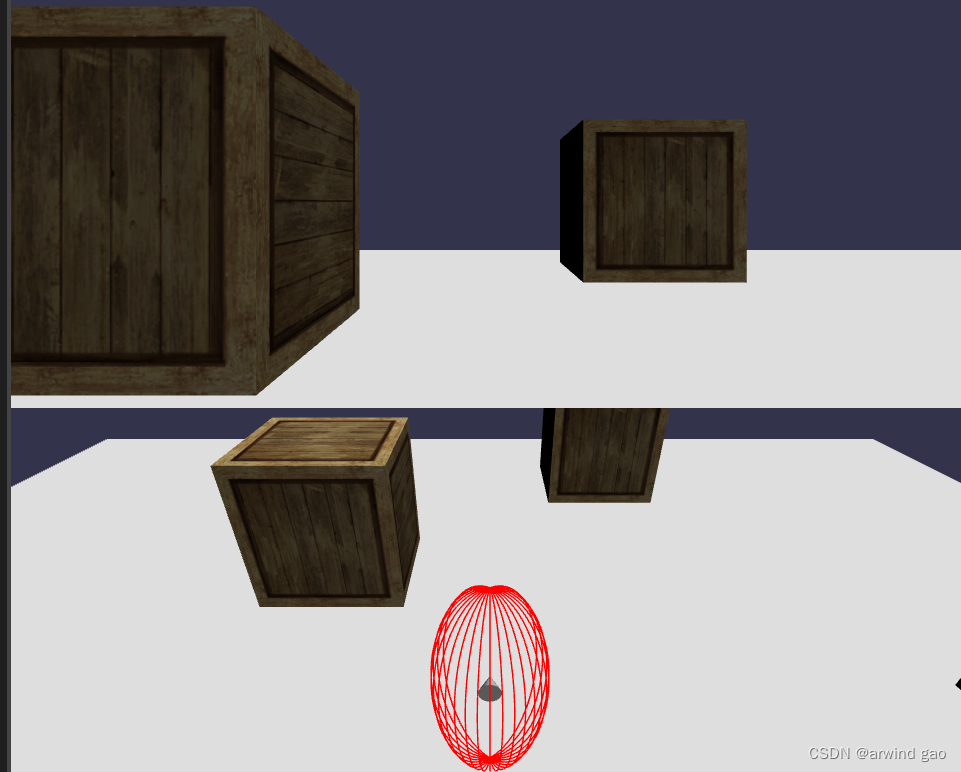
以下的示例使用通用相机的并自定义键盘、鼠标输入。使用键盘的上下左右箭头可以在场景中向前和向后行走,并旋转以向左和向右看。使用鼠标,您可以四处查看,也可以上下查看。
在本例中,有两个视角,上面的视角为供第一人称。下面的一个为第三视角,可表示相机和周围碰撞。
请记住在使用箭头键之前单击场景。
案例地址
使用BaseCameraPointersInput
除了以上第6节所述的创建自定义输入的方法外,您还可以扩展一些已实现的基类,从而更容易的实现。其中一个类是BaseCameraPointersInput:
对于Javascript(ES6+)或Typescript,您应该能够扩展BaseCameraPointersInput类的功能。从那里,您只需要覆盖一些函数。
// You need to extend the BaseCameraPointersInput to get the required functionality
class YourCustomInputClass extends BABYLON.BaseCameraPointersInput {// This is the constructor.  Unless you have something specific that you need// to do when you create your object, you don't need to implement this. You// must call the super() function though, if you do.// constructor() { super(); }// This is exactly the same the function in the previous section and will still need to be// implemented.getClassName() {};// This function is the exact same thing as the previous section.  However, it has already// been implemented with a value of "pointers" and is technically optional.// getSimpleName() {};// This function is already implemented.  If you are planning to use this class, it is // recommened to not override it.// attachControl(noPreventDefault) {};// Same thing with detachControl// detachControl() {};// This optional function will get called for each rendered frame, if you want to synchronize your// input to rendering, no need to use requestAnimationFrame. It's a good place for applying// calculations if you have to.// Return void.checkInputs() {};// This function will fire during a POINTERMOVE event where there is either an active mouse // button down or only one active touch.  "point" will contain the coordinates, pointerId,// and pointer type.  The offsets are just the changes in position from the previous point.// This will NOT fire if multiple touches are active.  This method is required.onTouch(point, offsetX, offsetY) {};// This function will only fire during a POINTERMOVE event where more than one touch is active.// This function will only support the first two active touches and all others will be ignored.// Points A and B are said touches.  Both previous and current pinch distances and positions are// available to support basic gesture logic, as needed.  As a warning, the previous movement may// be null at the beginning of a multi-touch movement.onMultiTouch(pointA,pointB,previousPinchSquaredDistance,pinchSquaredDistance,previousMultiTouchPanPosition,multiTouchPanPosition) {};// This function will only fire during a POINTERDOUBLETAP event.  The "type" parameter// is just the pointer type (mouse, touch, etc.).  This is optional.onDoubleTap(type) {};// This function will fire when a contextmenu event occurs (right-click menu).// "evt" is the triggering event.  This is optional.onContextMenu(evt) {};// This function will fire when a POINTERDOWN event occurs.// "evt" is the triggering event.  This is optional.onButtonDown(evt) {};// This function will fire when a POINTERUP event occurs (right-click menu).// "evt" is the triggering event.  This is optional.onButtonUp(evt) {};// This function will fire when the window loses focus (eg. blur event)// This is optional.onLostFocus() {};
}
这看起来可能有很多代码,但最核心的是onTouch,表示处理单击事件(Pointer)的地方,onMultiTouch是处理至少有两个触摸源的事件的地方。
如果你发现自己在问,“使用这个与从头开始创建自己的相比有什么好处”,这里有一些好处。BaseCameraPointersInput类将自动处理各种输入和基于事件的事情,如preventDefault、pointer捕获和pointer锁定。最重要的是,事件处理由您负责。虽然走这条路的灵活性较小,但它可能更容易使用。
以下是两个版本的示例:
Javascript和 Typescript