文章目录
- 一、ConfigMap配置中心理论知识
- 1、ConfigMap配置中心简介
- 2、ConfigMap局限性
- 二、创建ConfigMap的四种方式
- 1、第一种:通过命令行创建ConfigMap
- 2、第二种:通过指定文件创建ConfigMap
- 3、第三种:通过指定目录创建ConfigMap
- 4、第四种:通过YAML资源清单创建ConfigMap
- 三、使用ConfigMap的三种方式
- 1、第一种:使用环境变量引入-configMapKeyRef方式
- 2、第二种:使用环境变量引入-envfrom方式
- 3、第三种:使用volume卷挂载
- 四、拓展知识
一、ConfigMap配置中心理论知识
1、ConfigMap配置中心简介
官方中文参考文档:
ConfigMap是API对象,用于存放明文(非机密性)数据保存到键值对中,可以使用环境变量、命令行参数或者存储卷方式应用到Pod中,ConfigMap相当于Pod中程序的配置文件,通过修改ConfigMap内容来修改程序的配置。
2、ConfigMap局限性
ConfigMap在设计上不是用来存储大量数据的,所以在ConfigMap中保存的数据不能超过1MiB。
二、创建ConfigMap的四种方式
1、第一种:通过命令行创建ConfigMap
创建 名为 mysql.conf 的 configmap
kubectl create configmap mysql.conf --from-literal=datadir=/var/lib/mysql --from-literal=socket=/var/lib/mysql/mysql.sock
查看 configmap详细信息:
kubectl describe cm mysql.conf
![[外链图片转存失败,源站可能有防盗链机制,建议将图片保存下来直接上传(img-4sgFWDuK-1688205066564)(D:\MD归档文档\IMG\image-20230627212430774.png)]](https://img-blog.csdnimg.cn/c37dd208403942bb9c8545451098b311.png)
2、第二种:通过指定文件创建ConfigMap
首先创建nginx.conf文件,针对nginx.conf文件创建configmap
vim nginx.confuser  nginx;
worker_processes  auto;
error_log  /var/log/nginx/error.log notice;
pid        /var/run/nginx.pid;events {worker_connections  1024;
}http {include       /etc/nginx/mime.types;default_type  application/octet-stream;log_format  main  '$remote_addr - $remote_user [$time_local] "$request" ''$status $body_bytes_sent "$http_referer" ''"$http_user_agent" "$http_x_forwarded_for"';access_log  /var/log/nginx/access.log  main;sendfile        on;keepalive_timeout  65;include /etc/nginx/conf.d/*.conf;
}
创建 名为 nginx.conf 的 configmap,使用--from-file 参数指定文件位置
kubectl create configmap nginx.conf --from-file=www=./nginx.conf
查看详细信息:定义key=www,value=./nginx.conf 中的内容
kubectl describe cm nginx.conf
![[外链图片转存失败,源站可能有防盗链机制,建议将图片保存下来直接上传(img-gsuEAdWO-1688205066566)(D:\MD归档文档\IMG\image-20230627213525723.png)]](https://img-blog.csdnimg.cn/022b257832a342a2980784663551c42f.png)
3、第三种:通过指定目录创建ConfigMap
首先创建config目录,目录中创建nginx、mysql配置文件,使用--from-file参数指定config目录。
mkdir config && cd configvim nginx.confuser  nginx;
worker_processes  auto;
error_log  /var/log/nginx/error.log notice;
pid        /var/run/nginx.pid;events {worker_connections  1024;
}http {include       /etc/nginx/mime.types;default_type  application/octet-stream;log_format  main  '$remote_addr - $remote_user [$time_local] "$request" ''$status $body_bytes_sent "$http_referer" ''"$http_user_agent" "$http_x_forwarded_for"';access_log  /var/log/nginx/access.log  main;sendfile        on;keepalive_timeout  65;include /etc/nginx/conf.d/*.conf;
}vim my.cnf[mysqld]
datadir=/var/lib/mysql
socket=/var/lib/mysql/mysql.sock
symbolic-links=0[mysqld_safe]
log-error=/var/log/mariadb/mariadb.log
pid-file=/var/run/mariadb/mariadb.pid
!includedir /etc/my.cnf.d
指定 config 目录创建 configmap
kubectl create cm config --from-file=./config
查看详细信息:key会以目录中文件名进行命名
kubectl describe cm config
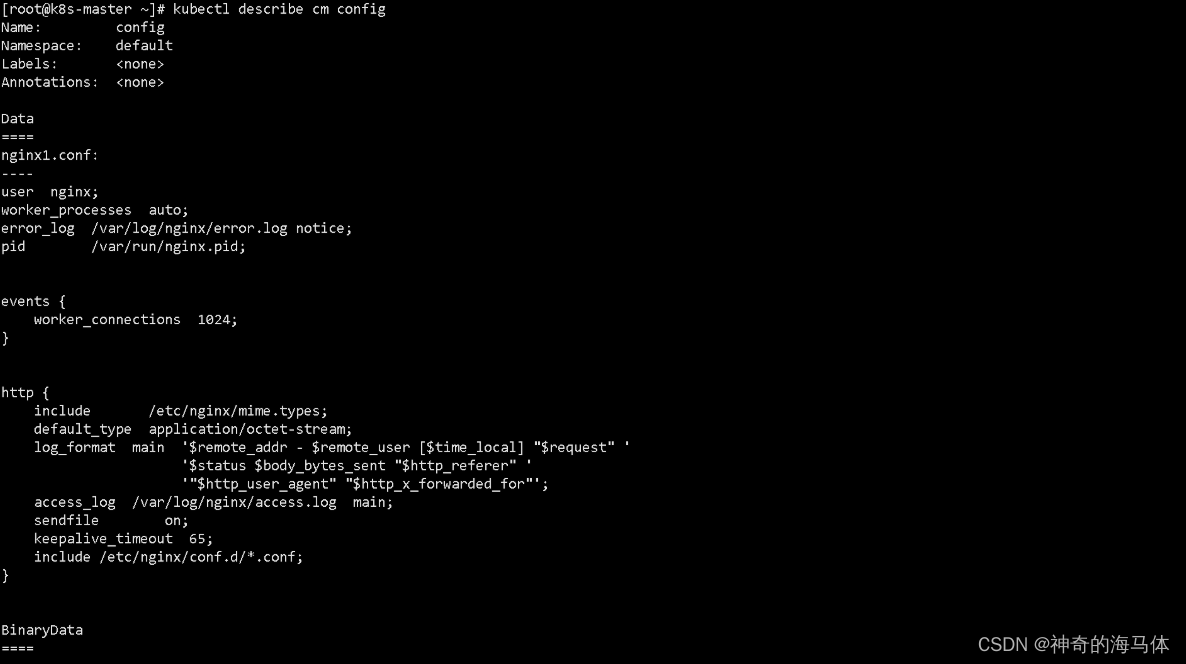
4、第四种:通过YAML资源清单创建ConfigMap
创建 db-config configmap,定义master.cnf ,slave.cnf Key
cat db-config.yaml
---
apiVersion: v1
kind: ConfigMap
metadata:name: db-configlabels:app: db
data:master.cnf: |[mysqld]datadir=/var/lib/mysqlsocket=/var/lib/mysql/mysql.socksymbolic-links=0server-id=1slave.cnf: |[mysqld]datadir=/var/lib/mysqlsocket=/var/lib/mysql/mysql.socksymbolic-links=0server-id=2
执行YAML文件:
kubectl apply -f db-config.yaml
查看db-config configmap详细信息:
kubectl describe cm db-config
![[外链图片转存失败,源站可能有防盗链机制,建议将图片保存下来直接上传(img-CnNLBp2k-1688205066566)(D:\MD归档文档\IMG\image-20230629113041746.png)]](https://img-blog.csdnimg.cn/85546dc46e1c4d3eab65433ba34ac8a6.png)
三、使用ConfigMap的三种方式
上面是通过key/value方式定义配置文件信息,下面来学习一下,如何引用配置文件。
1、第一种:使用环境变量引入-configMapKeyRef方式
创建名为nginx-config 的configmap:
cat nginx-config.yaml
---
apiVersion: v1
kind: ConfigMap
metadata:name: nginx-configlabels:app: nginxenv: uat
data:nginx.conf: |user nginx;worker_processes auto;error_log /var/log/nginx/nginx-error.log notice;pid /var/run/nginx.pid;events {worker_connections 1024;}http {include /etc/nginx/mime.types;default_type application/octet-stream;log_format main '$remote_addr - $remote_user [$time_local] "$request" ''$status $body_bytes_sent "$http_referer" ''"$http_user_agent" "$http_x_forwarded_for"';access_log /var/log/nginx/access.log main;sendfile on;keepalive_timeout 65;include /etc/nginx/conf.d/*.conf;}创建deployment资源,容器中引用nginx-config configmap的nginx.conf Key
cat web-nginx.yaml ---
apiVersion: apps/v1
kind: Deployment
metadata:name: web-nginxlabels:app: nginxenv: uat
spec:replicas: 1selector:          # 关联标签matchLabels:app: nginxenv: uatstrategy:rollingUpdate:   # 更新策略maxSurge: 2maxUnavailable: 0template:metadata:labels:app: nginxenv: uatspec:containers:- name: nginximage: nginximagePullPolicy: IfNotPresentenv:- name: nginxConfig    # 定义环境变量名称valueFrom:configMapKeyRef:name: nginx-config # 指定configmap名称key: nginx.conf    # 指定configmap中Key
执行YAML文件:
kubectl apply -f nginx-config.yaml
kubectl apply -f  web-nginx.yaml
查看创建出来的资源信息:
kubectl get pods -l app=nginx
kubectl get configmap nginx-config
进入 被创建Pod中容器,查看变量信息:
kubectl exec -it web-nginx-84989c5546-6clp4  -- /bin/bash
printenv
![[外链图片转存失败,源站可能有防盗链机制,建议将图片保存下来直接上传(img-938y5FRL-1688205066567)(D:\MD归档文档\IMG\image-20230701161133785.png)]](https://img-blog.csdnimg.cn/51e15acd44c042f2a763bc1c79e997b0.png)
我们可以在创建Pod资源时使用command,来引用变量,进行启动操作,比如下面启动MongoDB操作。
command: ["/bin/mongod", "--bind_ip=$(变量名)"]
2、第二种:使用环境变量引入-envfrom方式
创建名为mysql-config 的configmap,其中定义了两个KEY
cat mysql-config.yamlapiVersion: v1
kind: ConfigMap
metadata:name: mysql-config
data:master.cnf: |[mysqld]datadir=/var/lib/mysqlsocket=/var/lib/mysql/mysql.socksymbolic-links=0server-id=1slave.cnf: |[mysqld]datadir=/var/lib/mysqlsocket=/var/lib/mysql/mysql.socksymbolic-links=0server-id=2
创建Deployment,通过envfrom方式指定configmap,这种方式会引用configmap中所有的KEY为系统变量,由于只是演示envFrom方式特性,所有我这边使用 busybox 镜像演示,YAML资源清单如下:
cat envfrom_demo.yaml ---
apiVersion: apps/v1
kind: Deployment
metadata:name: envfrom-demonamespace: default
spec:replicas: 1selector:matchLabels:name: envfrom-demotemplate:metadata:labels:name: envfrom-demospec:containers:- name: envfrom-demoimage: busybox:1.28.0imagePullPolicy: IfNotPresentcommand: ["/bin/sh", "-c", "sleep 360000"]envFrom:- configMapRef:name: mysql-config    # 指定configmap名称
执行YAML文件:
kubectl apply -f mysql-config.yaml
kubectl apply -f envfrom_demo.yaml
查看创建出来的资源信息:
kubectl get pods -l name=envfrom-demo
kubectl get configmap mysql-config
进入容器查看变量信息:
kubectl exec -it envfrom-demo-6cf79bf4bc-4xvcc -- /bin/sh
printenv
![[外链图片转存失败,源站可能有防盗链机制,建议将图片保存下来直接上传(img-0oPQ7qXB-1688205066567)(D:\MD归档文档\IMG\image-20230701165551344.png)]](https://img-blog.csdnimg.cn/0d7a2fbeae67460bb5775089bb635b69.png)
3、第三种:使用volume卷挂载
前两种都是使用环境变量方式引用配置的不会经常使用,最常用的还是使用卷挂载方式!
创建名为web的configmap:
cat web-config.yaml
---
apiVersion: v1
kind: ConfigMap
metadata:name: web
data:nginx_8080.conf: |server {listen 8080;location / {root   /usr/share/nginx/html;index  index.html index.htm;}}
使用nginx镜像,创建Deployment,并使用挂载configmap
cat web.yaml ---
apiVersion: apps/v1
kind: Deployment
metadata:name: web-nginx
spec:replicas: 1selector:      matchLabels:app: webtemplate:metadata:labels:app: webspec:volumes:- name: web-configconfigMap:           # 定义卷,使用名为web的configmapname: webcontainers:- name: nginximage: nginximagePullPolicy: IfNotPresentvolumeMounts:- name: web-config  # 挂载卷mountPath: /etc/nginx/conf.d
执行YAML资源清单:
kubectl apply -f web-config.yaml
kubectl apply -f web.yaml
我将配置文件端口改为8080了,我们请求Nginx的8080端口,作为验证:
kubectl get pods -o wide
curl 10.244.235.251:8080
![[外链图片转存失败,源站可能有防盗链机制,建议将图片保存下来直接上传(img-ww7wQP5p-1688205066567)(D:\MD归档文档\IMG\image-20230701174553603.png)]](https://img-blog.csdnimg.cn/3a0604a0d5f447b9a11dad37502df094.png)
OK,上面可以成功通过8080端口访问到nginx,需要注意的是这种卷挂载方式,是针对目录的,打个比方,比如你挂载了 /etc/nginx 下面,那么容器 /etc/nginx目录之前的数据会被,挂载的数据代替。
四、拓展知识
1、编辑ConfigMap
kubectl edit cm web
编辑并保存后,对于卷挂载方式,支持热加载(大约等10s)生效,会更新到容器配置中,但对于变量方式并不支持,需要重新删除创建,更改的数据才会生效。
2、删除ConfigMap
kubectl delete cm web
3、configMapKeyRef和envfrom方式引入变量区别?
- configMapKeyRef是一种将ConfigMap中的数据作为环境变量注入到容器中的方式。它允许你在Pod的定义中引用ConfigMap中的特定键值对,并将其作为环境变量传递给容器。这种方式适用于将ConfigMap中的配置数据直接暴露给容器内的应用程序。
- envFrom是一种将整个ConfigMap的数据作为环境变量注入到容器中的方式。它允许你在Pod的定义中引用一个或多个ConfigMap,并将它们的所有键值对作为环境变量传递给容器。这种方式适用于将多个相关的配置数据一次性注入到容器内。