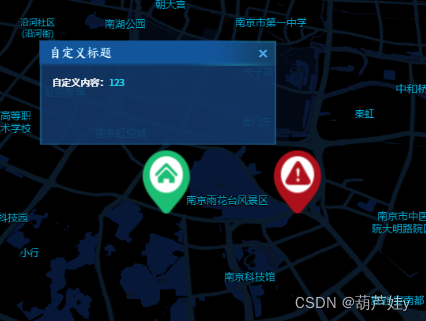
效果图
一、安装 vue-amap 插件
npm install vue-amap --save
二、vue页面
<template>
<div><ul style='display:flex;'><liv-for="(item, index) in checkList":key="index"@click="onClick(item)":class="item.checked ? 'active' : ''"><span class="name">{{ item.label }}</span></li></ul>
<div ref='map' id='map' style='width:500px;height:500px'></div></div>
</template>
<script>
import AMapLoader from '@amap/amap-jsapi-loader';//引入
import point1 from '@/assets/images/point1.png'
import point2 from '@/assets/images/point2.png'
import point3 from '@/assets/images/point3.png'
export default {data() {return {checkList: [{ label: '类型1', checked: false, value: 1 },{ label: '类型2', checked: false, value: 2 },{ label: '类型3', checked: false, value: 3 },],_map:null}},mounted(){this.initMap()
},methods: {initMap(){AMapLoader.load({key: "你的key", // 申请好的Web端开发者Key,首次调用 load 时必填version: "1.4.15", // 指定要加载的 JSAPI 的版本,缺省时默认为 1.4.15plugins: ["AMap.Scale", "AMap.ToolBar", "AMap.ControlBar", 'AMap.Geocoder', 'AMap.Marker',  'Map3D','AMap.Geolocation', 'AMap.InfoWindow'], // 需要使用的的插件列表,如比例尺'AMap.Scale'等}).then((AMap) => {// 获取到作为地图容器的DOM元素,创建地图实例this._map = new AMap.Map(this.$refs['map'], { //设置地图容器idresizeEnable: true,viewMode: "3D", // 使用3D视图zoomEnable: true, // 地图是否可缩放,默认值为truedragEnable: true, // 地图是否可通过鼠标拖拽平移,默认为truedoubleClickZoom: true, // 地图是否可通过双击鼠标放大地图,默认为truezoom: 12, //初始化地图级别center: [118.77,32.03], // 初始化中心点坐标pitch: 50, //倾斜视角})this._map.setMapStyle("amap://styles/darkblue");}).catch(e => {console.log(e)})},// 关闭弹框closeDialog() {if (this._infoWindow) {this._infoWindow.close(this._map)}},onClick(item) {item.checked = !item.checkedif (this._infoWindow) {this._infoWindow.close(this._map)}if (item.value ==1) {if (item.checked) {const data = [{icon: point1,position: [118.79,32.00],content: ` <div class="map-info-dlg"><div class="map-info-head"><div class="tit"><span>自定义标题</span></div></div><div class="map-info-content"><div class="content-wxy"><div class='row'>自定义内容:<span class='row-value'>123</span></div></div></div></div>`,},]this.setMarkers(data,1)} else {this.removeMarkers(1)}}if (item.value == 2) {if (item.checked) {const data = [{icon: point2,position: [118.77,32.00],content: ` <div class="map-info-dlg"><div class="map-info-head"><div class="tit"><span>自定义标题</span></div></div><div class="map-info-content"><div class="content-wxy"><div class='row'>自定义内容:<span class='row-value'>123</span></div></div></div></div>`,},]this.setMarkers(data,2)} else {this.removeMarkers(2)}}},setMarkers(data,type){for (let i = 0; i < data.length; i++) {const img = new AMap.Icon({size: new AMap.Size(60, 80),image: data[i].icon,imageSize: new AMap.Size(60, 80),})const icon = { ...data[i], icon: img }this._marker = new AMap.Marker({position: icon.position,icon: icon.icon,//   offset: new AMap.Pixel(-12, -36),extData: { content: icon.content,type },})this._markers.setMap( this._map)if (this._markers) {this._markers.push(this._marker)} else {this._markers = []this._markers.push(this._marker)}this._marker.on('click', (e) => {this.closeDialog()const marker = e.targetconst content = marker.getExtData().contentthis._map.panTo(marker.getPosition())this.showInfoWindow(content, marker.getPosition())})}this._map.setFitView(this._markers, true)//可视化区域显示所有点},removeMarkers(type){if (this._markers) {for (let i = 0; i < this._markers.length; i++) {const content = this._markers[i].getExtData().contentif(content.type == type){this._map.remove(this._markers[i])}}if (this._infoWindow) {this._infoWindow.close( this._map)}}},showInfoWindow(content, position) {console.log('position: ', position);this._infoWindow = new AMap.InfoWindow({content: content,position: position,offset: new AMap.Pixel(10, -30),autoMove: true,zIndex:400})this._infoWindow.open(this._map)},// toggleMarkers(type, visible) {//   if (this._markers) {//    for (let i = 0; i < this._markers.length; i++) {//      const marker = this._markers[i]//      const icon = marker.getIcon()//       if (icon.indexOf(type) !== -1) {//       marker.setVisible(visible)//     }//     }//   }//  },},
}
</script>
<style scoped lang="scss">li {width: 177px;height: 40px;cursor: pointer;.name {color:#000;}}.active {.name {color:red !important;}}
</style>
<style lang="scss">
.amap-info-contentContainer,
.amap-info-content {overflow: hidden;padding: 0;margin: 0;background: transparent;
}
.amap-info-sharp {border-top: 8px solid #2c4e79 !important;display: none;
}
.map-info-dlg {background: url('../../../assets/images/yjzh/common/tc-bg.png') no-repeat;background-size: 100% 100%;.map-info-head {width: 300px;display: flex;align-items: center;justify-content: space-between;height: 32px;background: url('../../../assets/images/yjzh/common/tc-title.png') no-repeat;background-size: 100% 100%;margin: 6px 0 0 0px;.tit {font-size: 16px;width: 100%;margin-left: 12px;background-image: -webkit-linear-gradient(bottom, #fff, #98deff);-webkit-background-clip: text;-webkit-text-fill-color: transparent;font-family: Alimama;}.c-img {width: 20px;height: 20px;margin: 0 12px 4px 0;cursor: pointer;}}.map-info-content {width: 300px;padding-left:  16px;.content-wxy,.content-bns {color: #fff;font-size: 12px;word-break: break-all;line-height: 26px;height: 100px;overflow-y: auto;padding:8px 12px 10px 0;.row {font-size: 12px;.row-value {color: #1fe2f3;word-break: break-all;}}&::-webkit-scrollbar {width: 8px;border-radius: 10px;background: #1fe2f3;}&::-webkit-scrollbar-track {border-radius: 10px;background-color: #091b32;border: 1px solid #091b32;}&::-webkit-scrollbar-thumb {border-radius: 10px;background-color: #1fe2f3;}}.content-bns {height: 160px;}}
}
.amap-info-close {top: 14px;right: 10px !important;font-size: 18px;color: #4ba9ef;
}
.amap-layers,.amap-overlays{z-index: 5;
}
</style>