文章目录
- 前言
- 技术积累
- 为什么要在redis集群前面加个predixy代理?
- 这样做的好处有哪些?
- 常用代理配置
- 网络存储
- 实战构建predixy镜像并部署
- 下载predixy源码编译构建镜像
- 创建K8S配置文件predixy-configmap并执行
- 网络储存PV与PVC
- 部署predixy-deployment
- 测试代理效果
- 写在最后
前言
部署在K8S中的redis可以在集群内通过服务名访问,这个我们前面博文K8S Helm部署Redis Cluster & Redisinsight 已经介绍过了。但是还是有很多的问题,比如不能在K8S集群外访问,并且在切换库的时候会发生异常,而且只能安装特定的客户端来访问数据库。所以,今天就直接引入Redis集群代理Predixy来管理,让我们把集群当做单机一样。
技术积累
为什么要在redis集群前面加个predixy代理?
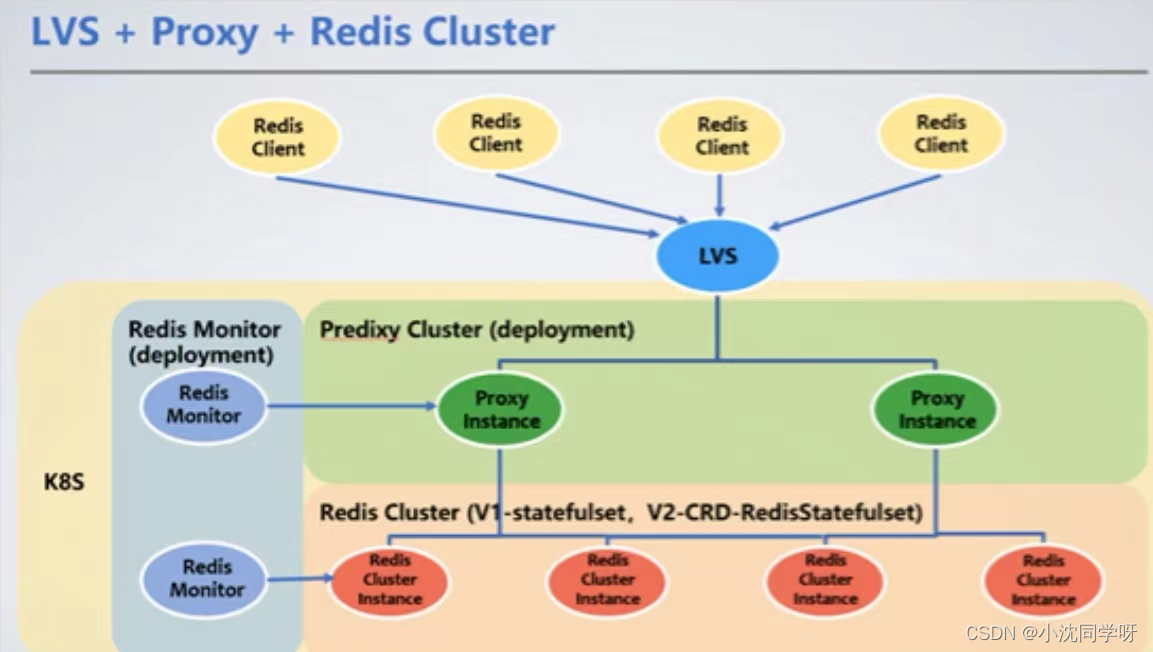
如上图所视,在redis集群之上还存在一个predixy集群。在predixy集群之上可以加个nginx,负载最终端的请求,对于客户端来说,看起来只是连接了一个单机版的redis,实际上连接的是一个集群。
这样做的好处有哪些?
Redis pod重启可导致IP变化
POD重新安装后,NODE IP会变化,此时终端无感知
Redis处理连接负载高
集群扩缩容无感知
数据安全风险
常用代理配置
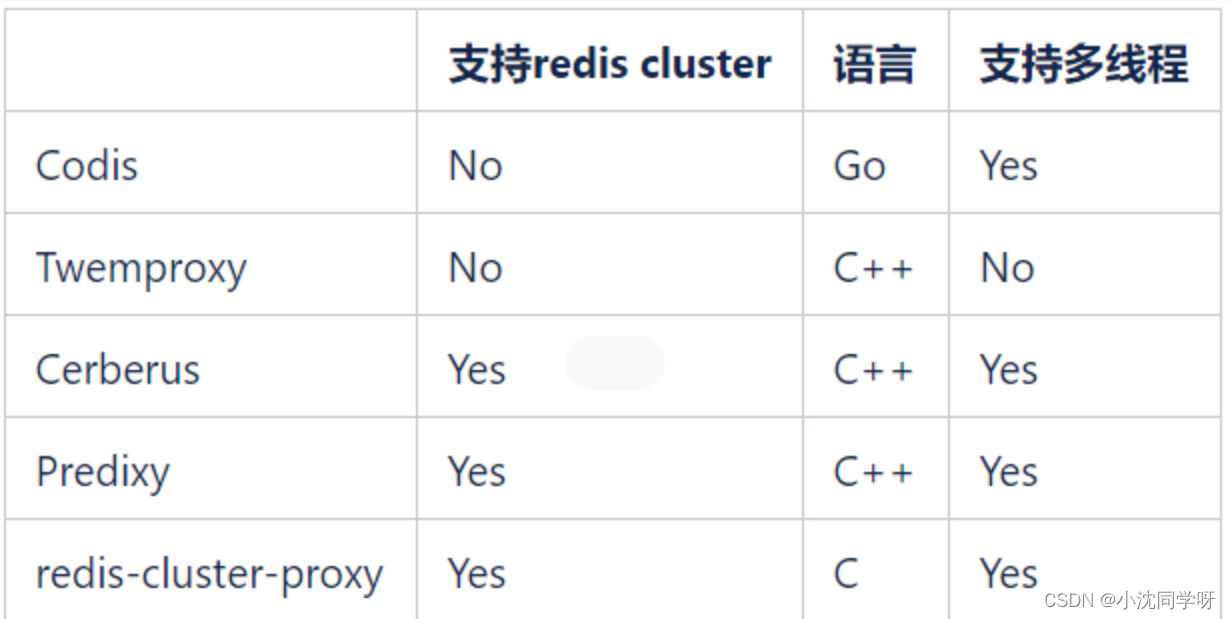
我们希望能够继续使用Redis Cluster来管理Redis集群,所以Codis和Twemproxy不再考虑。redis-cluster-proxy是Redis官方在6.0版本推出的支持Redis Cluster协议的Proxy,但是目前还没有稳定版,暂时也无法大规模应用。
网络存储
PersistentVolume(PV)是集群中由管理员配置的一段网络存储。 它是集群中的资源,就像节点是集群资源一样。 PV是容量插件,如Volumes,但其生命周期独立于使用PV的任何单个pod。 此API对象捕获存储实现的详细信息,包括NFS,iSCSI或特定于云提供程序的存储系统。
PersistentVolumeClaim(PVC)是由用户进行存储的请求。 它类似于pod。 Pod消耗节点资源,PVC消耗PV资源。Pod可以请求特定级别的资源(CPU和内存)。声明可以请求特定的大小和访问模式(例如,可以一次读/写或多次只读)。
PV是运维人员来创建的,开发操作PVC,可是大规模集群中可能会有很多PV,如果这些PV都需要运维手动来处理这也是一件很繁琐的事情,所以就有了动态供给概念,也就是Dynamic Provisioning。而我们上面的创建的PV都是静态供给方式,也就是Static Provisioning。而动态供给的关键就是StorageClass,它的作用就是创建PV模板。
创建StorageClass里面需要定义PV属性比如存储类型、大小等;另外创建这种PV需要用到存储插件。最终效果是,用户提交PVC,里面指定存储类型,如果符合我们定义的StorageClass,则会为其自动创建PV并进行绑定。
实战构建predixy镜像并部署
下载predixy源码编译构建镜像
载predixy源码
mkdir -p /k8s/predixy
cd /k8s/predixy
wget https://codeload.github.com/joyieldInc/predixy/zip/refs/heads/master
unzip master
mv predixy-master predixy-1.0.5
编译源码
cd predixy-1.0.5
make
准备Dockerfile
[root@master predixy]# pwd
/k8s/predixy
[root@master predixy]# vim predixy-dockerfile.yaml
FROM centos:7
RUN yum install -y epel-release net-tools
RUN yum install -y redis
RUN yum install -y libstdc++-static gcc gcc-c++ make
RUN mkdir /opt/predixy-1.0.5
RUN mkdir /etc/predixy
COPY ./predixy-1.0.5/src/predixy  /usr/local/bin/
COPY ./predixy-1.0.5/conf/*  /etc/predixy/
ENTRYPOINT ["/usr/local/bin/predixy","/etc/predixy/predixy.conf"]
然后就可以使用该镜像
[root@master predixy]# docker build . -t prodixy:v1.0.5 -f predixy-dockerfile.yaml
创建K8S配置文件predixy-configmap并执行
vim predixy-configmap.yaml
apiVersion: v1
kind: ConfigMap
metadata:name: predixy-confignamespace: redis-cluster  #namespace按自已的修改
data:predixy.conf: |################################### GENERAL ###################################### Predixy configuration file example## Specify a name for this predixy service## redis command INFO can get thisName Predixy-DefaultNS## Specify listen address, support IPV4, IPV6, Unix socket## Examples:# Bind 127.0.0.1:7617# Bind 0.0.0.0:7617# Bind /tmp/predixy## Default is 0.0.0.0:7617Bind 0.0.0.0:7617## Worker threadsWorkerThreads 4## Memory limit, 0 means unlimited## Examples:# MaxMemory 100M# MaxMemory 1G# MaxMemory 0## MaxMemory can change online by CONFIG SET MaxMemory xxx## Default is 0# MaxMemory 0## Close the connection after a client is idle for N seconds (0 to disable)## ClientTimeout can change online by CONFIG SET ClientTimeout N## Default is 0 为0时表示禁止该功能,不主动断开客户端连接ClientTimeout 0## IO buffer size## Default is 4096# BufSize 4096################################### LOG ########################################## Log file path## Unspecify will log to stdout## Default is UnspecifiedLog /data/predixy.log## LogRotate support## 1d rotate log every day## nh rotate log every n hours   1 <= n <= 24## nm rotate log every n minutes 1 <= n <= 1440## nG rotate log evenry nG bytes## nM rotate log evenry nM bytes## time rotate and size rotate can combine eg 1h 2G, means 1h or 2G roate a time## Examples:# LogRotate 1d 2G# LogRotate 1dLogRotate 1d## Default is disable LogRotate## In multi-threads, worker thread log need lock,## AllowMissLog can reduce lock time for improve performance## AllowMissLog can change online by CONFIG SET AllowMissLog true|false## Default is true# AllowMissLog false## LogLevelSample, output a log every N## all level sample can change online by CONFIG SET LogXXXSample NLogVerbSample 0LogDebugSample 0LogInfoSample 100LogNoticeSample 1LogWarnSample 1LogErrorSample 1################################### AUTHORITY ################################### Include auth.confAuthority {Auth "123456pw" {    # predixy 代理密码,业务后端认证需要配置的密码Mode admin   # 权限}}################################### SERVERS #####################################Include cluster.conf# Include sentinel.conf# Include try.conf################################################################################这个clusterserverpool也可以放到cluster.conf文件中,看自已的需求ClusterServerPool {Password 123456    # redis cluste 集群密码MasterReadPriority 60StaticSlaveReadPriority 50DynamicSlaveReadPriority 60RefreshInterval 1ServerTimeout 1ServerFailureLimit 10ServerRetryTimeout 1KeepAlive 120Servers {#这个很重要,就是redis-server的集群IP地址,一定要要能取到,可以按我上面的curl方法,能取就行+ redis-cluster.redis-cluster.svc.cluster.local:6379  }}################################### DATACENTER ################################### LocalDC specify current machine dc# LocalDC bj## see dc.conf# Include dc.conf################################### COMMAND ###################################### Custom command define, see command.conf#Include command.conf################################### LATENCY ###################################### Latency monitor define, see latency.conf#Include latency.confMode write}Auth "#a complex password#" {Mode admin}
}
#执行
kubectl apply -f predixy-configmap.yaml
网络储存PV与PVC
#创建pvc,没有安装nfs-storage的自行查看之前的博文安装
vim predixy-pvc-nfs.yaml
apiVersion: v1
kind: PersistentVolumeClaim
metadata:name: predixy-pvc-nfsnamespace: redis-cluster
spec:accessModes:- ReadWriteManyresources:requests:storage: 5GistorageClassName: nfs-storage
#执行
kubectl apply -f predixy-pvc-nfs.yaml
#查看状态
#  nfs创建了pvc会自动创建pv
[root@master nfs]# kubectl get pvc -A|grep  predixy-pvc-nfs
redis-cluster   predixy-pvc-nfs                           Bound    pvc-8524dbd5-fe88-49c5-9417-b1df0815f595   5Gi        RWX            nfs-storage    5m12s[root@master nfs]# kubectl get pv -A | grep predixy
pvc-8524dbd5-fe88-49c5-9417-b1df0815f595   5Gi        RWX            Delete           Bound         redis-cluster/predixy-pvc-nfs                     nfs-storage             18m
部署predixy-deployment
注:predixy是无状态服务
vim predixy-deployment.yaml
---
apiVersion: apps/v1
kind: Deployment ## 升级、回滚
metadata:annotations:deployment.kubernetes.io/revision: '1'name: predixynamespace: redis-cluster
spec:progressDeadlineSeconds: 600replicas: 2revisionHistoryLimit: 5selector:matchLabels:app: predixystrategy:rollingUpdate:maxSurge: 25%maxUnavailable: 25%type: RollingUpdatetemplate:metadata:labels:app: predixyspec:containers:- command:- predixy- /etc/predixy/predixy.confimage: registry.cn-hangzhou.aliyuncs.com/senfel/predixy:v1.0.5name: predixyterminationMessagePath: /dev/termination-logterminationMessagePolicy: Fileresources:requests:cpu: 100mmemory: 30Milimits:cpu: 100mmemory: 30MivolumeMounts:- mountPath: /etc/predixy/name: predixy-config-dirreadOnly: true- mountPath: /data/name: predixy-data-dirimagePullSecrets:- name: registry.cn-hangzhou.aliyuncs.comdnsPolicy: ClusterFirstrestartPolicy: AlwaysschedulerName: default-schedulerterminationGracePeriodSeconds: 30volumes:- configMap:defaultMode: 420name: predixy-config ## ConfigMapname: predixy-config-dir- name: predixy-data-dirpersistentVolumeClaim:claimName: predixy-pvc-nfs ## 存储---
apiVersion: autoscaling/v2
kind: HorizontalPodAutoscaler ## 自动扩容
metadata:name: predixynamespace: redis-cluster
spec:scaleTargetRef:apiVersion: apps/v1kind: Deploymentname: predixyminReplicas: 1maxReplicas: 3metrics:- type: Resourceresource:name: cputarget:type: UtilizationaverageUtilization: 50- type: Resourceresource:name: memorytarget:type: AverageValueaverageValue: 80Mi---
apiVersion: v1
kind: Service ## 服务
metadata:name: predixynamespace: redis-cluster
spec:externalTrafficPolicy: Clusterports:- name: predixy-portnodePort: 30617port: 7617protocol: TCPtargetPort: 7617sessionAffinity: Nonetype: NodePortselector:app: predixy
#执行
kubectl apply -f predixy-deployment.yaml
#查看状态
[root@master nfs]# kubectl get pod -A|grep predixy
redis-cluster predixy-ff95dcbc5-k9zjs 1/1 Running 0 15m
redis-cluster predixy-ff95dcbc5-nllx8 1/1 Running 0 15m
#删除
kubectl delete -f predixy-deployment.yaml
测试代理效果
K8S集群外部直接使用客户端调用
C:\Users\dev>redis-cli -h 10.10.22.91 -p 30617
10.10.22.91:30617> auth 123456pw
OK
10.10.22.91:30617> get name
“senfel”
10.10.22.91:30617> set name senfel1
OK
10.10.22.91:30617> get name
“senfel1”
10.10.22.91:30617> set age
(error) ERR wrong number of arguments for ‘set’ command
10.10.22.91:30617> set age 10
OK
10.10.22.91:30617> get age
“10”
10.10.22.91:30617>
写在最后
K8S部署Redis集群代理Predixy还是比较简单,只需要编译Predixy源码并构建镜像然后部署在K8S集群即可。最后的效果也是比较nice,直接可以负载均衡到任意的redis节点,让redis集群管理和K8S外部环境任意访问都轻而易举。
