1 案例1:部署Python网站项目
1.1 问题
配置Nginx使其可以将动态访问转交给uWSGI:
1.2 方案
安装Python工具及依赖
安装uWSGI并编写配置文件
1.3 步骤
实现此案例需要按照如下步骤进行。
步骤一:
首先$教学资料目录/python拷贝到虚拟机
1)安装python依赖软件
[root@proxy python]# yum -y install gcc make python3 python3-devel2)安装项目依赖
[root@proxy python]# pip3 install pytz-2022.6-py2.py3-none-any.whl[root@proxy python]# pip3 install Django-1.11.8-py2.py3-none-any.whl[root@proxy python]# pip3 install django-bootstrap3-11.0.0.tar.gz3)测试项目
[root@proxy python]# tar -xf python-project-demo.tar.gz[root@proxy python]# cd python-project-demo/[root@proxy python-project-demo]# python3 manage.py runserver 0.0.0.0:8000之后可在浏览器访问192.168.99.5:8000,测试完毕后按ctrl + c
注意:测试时如果无法连接外网,可能需要将python-project-demo/learning_logs/templates/base.html文件中的特效注释
<!-- {% bootstrap_css %}{% bootstrap_javascript %}-->步骤二:
1)安装uWSGI
[root@proxy python-project-demo]# cd ..[root@proxy python]# pip3 install uWSGI-2.0.21.tar.gz[root@proxy python]# vim myproject.ini[uwsgi]socket=127.0.0.1:8000 #与web服务(nginx)通信的接口chdir=/root/python/python-project-demo #项目的工作目录wsgi-file=learning_log/wsgi.py #指定项目中的wsgi.py配置文件daemonize=/var/log/uwsgi.log #指定日志文件位置#processes=4 #指定启动进程的数目#master=true #开启主进程管理模式2)运行uWSGI
[root@proxy python]# uwsgi --ini myproject.ini #读取myproject.ini运行uWSGI3)修改nginx配置文件,添加uWSGI转发
[root@proxy python]# vim /usr/local/nginx/conf/nginx.conf...location / {uwsgi_pass 127.0.0.1:8000; #动态页面交给uWSGIinclude uwsgi_params; #调用uWSGI配置文件root html;index index.html index.htm;}...[root@proxy python]# /usr/local/nginx/sbin/nginx测试
使用浏览器访问192.168.99.5
2 案例2:配置Nginx实现用IP测试灰度发布
2.1 问题
本案例要求不同IP的客户访问相同代理时,可以看到不同集群主机的内容
2.2 方案
创建不同集群,准备多台集群主机,通过$remote_addr变量识别不同客户机
2.3 步骤
实现此案例需要按照如下步骤进行。
步骤一:
1)使用proxy主机在nginx配置中创建集群
[root@proxy nginx]# vim /usr/local/nginx/conf/nginx.confhttp { ...upstream s8001 { #测试集群1server 192.168.99.100:8001;}upstream s8002 { #测试集群2server 192.168.99.200:8002;}upstream default { #正常业务集群server 192.168.99.100:80;server 192.168.99.200:80;}server {listen 80;server_name localhost;...set $group "default"; #定义变量$group,默认值defaultif ($remote_addr ~ "192.168.99.1"){ #如果客户机ip是99.1就访问集群1set $group s8001;}if ($remote_addr ~ "192.168.99.2"){ #如果客户机ip是99.2就访问集群1set $group s8002;}location / {proxy_pass http://$group; #调用集群root html;index index.html index.htm;}...}[root@proxy nginx]# sbin/nginx -s reload为web1新建nginx虚拟主机
[root@web1 nginx]# vim /usr/local/nginx/conf/nginx.confhttp { ...server {listen 8001;server_name localhost;root html8001;index index.html;}...}[root@proxy nginx]# sbin/nginx -s reload[root@web1 nginx]# mkdir html8001[root@web1 nginx]# echo web1-8001 > html8001/index.html为web2新建nginx虚拟主机
[root@web2 nginx]# vim /usr/local/nginx/conf/nginx.confhttp {...server {listen 8002;server_name localhost;root html8002;index index.html;}...}[root@proxy nginx]# sbin/nginx -s reload[root@web2 nginx]# mkdir html8002[root@web2 nginx]# echo web1-8002 > html8002/index.html2)测试
192.168.99.1访问192.168.99.5
192.168.99.2访问192.168.99.5
其他ip访问192.168.99.5
3 案例3:通过不同用户ID测试灰度发布
3.1 问题
不同ID的客户访问相同代理时,可以看到不同集群主机的内容
3.2 方案
使用php页面,定义不同匹配语句
3.3 步骤
实现此案例需要按照如下步骤进行。
步骤一:
1)使用proxy主机,要先还原nginx,并配置可以解析动态网页
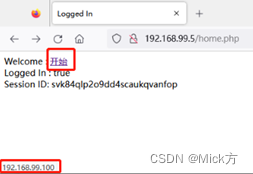
[root@proxy nginx]# vim html/home.php #修改php页面,将原有Welcome那行修改成以下状态Welcome : <?phpif(preg_match("/^abc/",$_SESSION['login_user'])) { #preg_match匹配正则,如果登录账号是以abc开头,就连接99.100,否则连接99.200echo "<a href='http://192.168.99.100'>开始</a>";}else{echo "<a href='http://192.168.99.200'>开始</a>";}?>2)测试
浏览器访问192.168.99.5/index.php分别输入不同名称的账户,可以看到"开始"连接的是不同的地址,效果如图-1所示。
4 案例4:配置网站限流限速
4.1 问题
本案例要求配置nginx限流限速,效果如下:
- 使用Nginx配置全局限速100k
- 配置虚拟主机www.b.com限速200k,该网站根目录下的file_a目录中的所有数据限速300k,file_b目录中的所有数据不限速
4.2 方案
使用limit_rate指令限制速度
4.3 步骤
实现此案例需要按照如下步骤进行。
步骤一:
1)定义limit_rate限制
[root@web1 nginx]# vim /usr/local/nginx/conf/nginx.confhttp {... limit_rate 100k; #全局限速server {limit_rate 200k; #虚拟主机限速listen 80;server_name www.b.com;root html;index index.html;location /file_a {limit_rate 300k; #file_a目录限速300k}location /file_b {limit_rate 0k; #file_b目录不限速}}2)创建测试目录
[root@web1 nginx]# mkdir html/file_a[root@web1 nginx]# mkdir html/file_b3)创建测试文件
[root@web1 nginx]# dd if=/dev/zero of=html/test.img bs=100M count=1[root@web1 nginx]# dd if=/dev/zero of=html/file_a/test.img bs=100M count=1[root@web1 nginx]# dd if=/dev/zero of=html/file_b/test.img bs=100M count=1下载测试
wget www.a.com/test.imgwget www.b.com/test.imgwget www.b.com/file_a/test.imgwget www.b.com/file_b/test.img连接限制(非必须配置)
修改用户访问连接限制,使一个客户同时打开多个连接也无法突破限制
首先安装ngx_http_limit_conn_module模块
http {limit_conn_zone $binary_remote_addr zone=addr:10m; server {location /app {limit_rate 30k; limit_conn addr 1 ; }5 防盗链
valid_referers指令可以检测被访问资源从哪个地址来
1)修改配置,添加防盗链测试语句
[root@web1 nginx]# vim /usr/local/nginx/conf/nginx.confserver {... valid_referers none 192.168.99.100; #如果请求中的referer 头字段包含者地址是99.100或者没有referer 头字段则有效,if ($invalid_referer){ #如果上述测试无效则条件成立return 403; #返回错误提示}...}2)web1编写测试页面
[root@web1 nginx]# cat html/index.htmlweb1测试页面 --<a href="http://192.168.99.100/nr.html">内容</a>[root@web1 nginx]# cat html/nr.htmlweb1内容页面3)web2编写测试页面
root@web2 nginx]# cat html/index.html
web2
测试页面  --
<a href="http://192.168.99.100/nr.html">内容</a>
4)测试,从192.168.99.100主页点内容可以访问,但从99.200点不可以