介绍
ChatGPT已经改变了我们与AI的互动方式。人们现在将这些大型语言模型(LLMs)作为主要的个人助手来进行写作、头脑风暴甚至咨询。然而,这些LLMs的问题在于,它们的表现只能和它们接受的训练数据一样好。
例如,如果一家公司想要向ChatGPT查询一份内部文件,ChatGPT可能无法理解它。此外,它的知识可能不是最新的,而且容易产生幻觉。
为了解决这个问题,我们可以在我们的数据上对这些LLMs进行微调,使它们能够从中回答问题。然而,这种方法可能非常昂贵。要使它们与新信息保持更新,需要不断的重新训练。
此外,幻觉的问题仍然存在,而且很难验证他们答案的来源。
更好的方法是利用强大的LLMs,可以访问我们的数据,而无需进行微调。我们如何实现这个目标呢?多亏了一种最近出现的方法,叫做检索增强生成(RAG),我们可以检索与用户查询相关的文档,并将它们作为额外的上下文输入到LLM中以生成答案。(更多细节将在接下来的部分中讨论。)

来源:原始论文
动机
互联网上有大量关于如何构建RAG管道的教程,问题在于,大多数都依赖于在线服务和云工具,特别是在生成部分,许多教程都主张使用OpenAI LLM API,不幸的是,这些API并不总是免费的,而且在处理敏感数据时可能不被认为是可信的。
这就是为什么我试图完全离线且完全免费地构建一个端到端的RAG api,这对于不想将其敏感数据发送到云服务或在线黑盒LLM Api的公司来说可能非常有用。
项目概述
我们将创建一个API端点,用户可以在此处提问。该端点将通过一系列研究论文来寻找答案。然后,它将使用一个大型语言模型(LLM)来处理答案,并以简单易懂的格式返回。
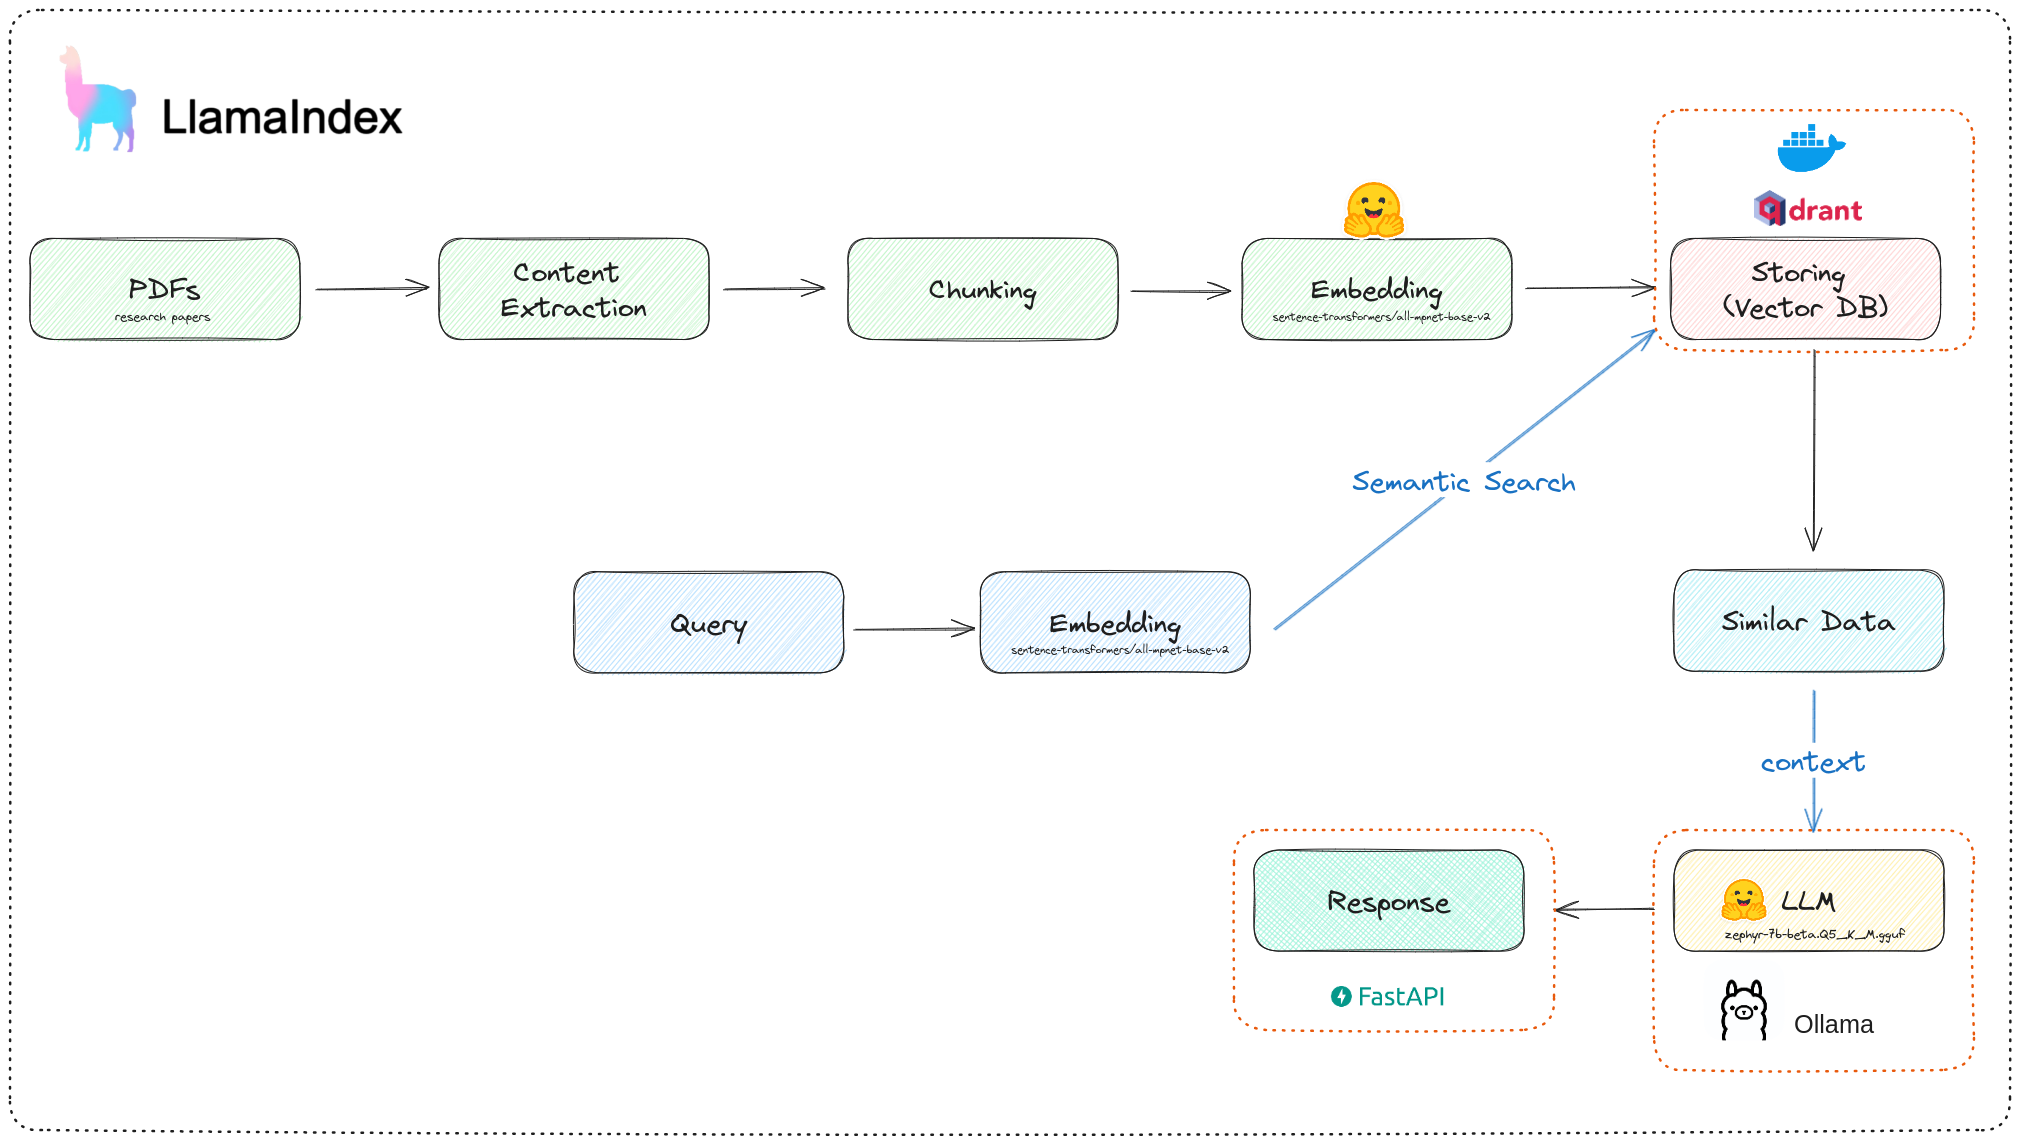
本地RAG管道架构
该项目包括4个主要部分:
- 使用Llamaindex构建RAG管道
- 使用Docker设置本地Qdrant实例
- 从hugging face下载一个量化的LLM并使用Ollama将其作为服务器运行
- 连接所有组件并使用FastApi暴露API端点
好的,让我们开始构建项目。
构建项目
我们将遵循RAG流程的常规流程,这与标准的ETL流程有些相似。

该项目的代码可以在此Github仓库中找到。别忘了
正在加载
首先,我们需要获取一些数据,在我们的情况下,是研究论文。让我们创建一个Python脚本,使用一些关键词快速从arxiv.org下载论文。幸运的是,arxiv api已经有了一个Python封装器。
以下函数负责将研究论文下载到一个文件夹中。
Llamaindex支持各种数据加载器,在我们的情况下,我们的数据将是一个文件夹中的一堆PDF,这意味着我们可以使用 SimpleDirectoryReader
2. 索引/存储
索引涉及以一种有利于存储、查询和馈送到LLM的方式来构造和表示我们的数据。Llamaindex提供了几种完成此任务的方法。
分块
首先,我们需要使用指定的 chunk_size 对我们的数据进行分块。这是必要的,因为文档经常会过长,这可能会引入噪声并超过我们LLM的上下文长度。
嵌入
接下来,我们将使用预训练的模型来嵌入这些块。你可以在我之前的文章中了解更多关于它们的信息。
对于嵌入,有许多可用的强大的预训练模型。对于这个项目,我们将使用sentence-transformers/all-mpnet-base-v2

在Hugging Face上的sentence-transformers/all-mpnet-base-v2
存储
为了存储我们的数据,我们将使用本地的 Qdrant docker 实例,可以通过以下方式轻松设置:
docker run -p 6333:6333 qdrant/qdrant然而,由于我们需要在停止实例后,数据仍然保留在磁盘上,我们必须添加一个卷。
docker run -p 6333:6333 -v ~/qdrant_storage:/qdrant/storage:z qdrant/qdrant
qdrant_storage是我们在HOME目录中创建的一个文件夹的名称,qdrant数据库实例的数据将会被保存在这里。
然后我们可以从http://localhost:6333/dashboard 访问我们的数据库用户界面
以下函数负责加载、分块、嵌入和存储我们的数据。
def ingest(self, embedder, llm):print("Indexing data...")# Loadingdocuments = SimpleDirectoryReader(self.config["data_path"]).load_data()client = qdrant_client.QdrantClient(url=self.config["qdrant_url"])qdrant_vector_store = QdrantVectorStore(client=client, collection_name=self.config["collection_name"])storage_context = StorageContext.from_defaults(vector_store=qdrant_vector_store)service_context = ServiceContext.from_defaults(llm=llm, embed_model=embedder, chunk_size=self.config["chunk_size"])# Chunking + Embedding + Storingindex = VectorStoreIndex.from_documents(documents, storage_context=storage_context, service_context=service_context)print(f"Data indexed successfully to Qdrant. Collection: {self.config['collection_name']}")return index
Data类的完整代码可以在这里找到:data.py
我们可以看到我们的收藏现在已经创建好了

Qdrant仪表板用户界面
3. 查询
现在我们已经成功地将我们的数据(研究论文)加载到我们的向量存储(Qdrant)中,我们可以开始查询它以获取相关数据,以供我们的LLM使用。
让我们开始编写一个函数,用于设置我们的Qdrant索引,它将作为我们的查询引擎。
查询引擎
def qdrant_index(self):client = qdrant_client.QdrantClient(url=self.config["qdrant_url"])qdrant_vector_store = QdrantVectorStore(client=client, collection_name=self.config['collection_name'])service_context = ServiceContext.from_defaults(llm=self.llm, embed_model=self.load_embedder(), chunk_size=self.config["chunk_size"])index = VectorStoreIndex.from_vector_store(vector_store=qdrant_vector_store, service_context=service_context)return index来自:rag.py的代码
LLM
目标是使用本地LLM,这可能有点挑战性,因为强大的LLMs可能会占用大量资源并且昂贵。但是,得益于模型量化和Ollama,这个过程可以变得非常简单。
请参阅我之前的文章,以了解更多关于使用Ollama设置本地LLM的信息:使用Ollama在本地使用Hugging Face的自定义LLMs
在从Hugging Face下载 zephyr-7b-beta.Q5_K_M.gguf 后,我们需要为Ollama创建一个模型文件。
FROM models/zephyr-models/zephyr-7b-beta.Q5_K_M.gguf
PARAMETER num_ctx 3900
PARAMETER temperature 0.7
PARAMETER top_k 50
PARAMETER top_p 0.95
PARAMETER stop "<|system|>"
PARAMETER stop "<|user|>"
PARAMETER stop "<|assistant|>"
PARAMETER stop "</s>"
TEMPLATE """
<|system|>\n system
{{ .System }}</s>
<|user|>\n user
{{ .Prompt }}</s>
<|assistant|>\n
"""SYSTEM """
As a personal assistant for researchers, your task is to analyze the provided research papers and extract pertinent information on using the provided keywords. Summarize key findings, methodologies, and any notable insights. This assistant plays a crucial role in facilitating researchers' understanding of the current state of knowledge on the provided keywords.
Your Motive:
Give the learner "aha" moment on every Topic he needs to understand. You can do this with the art of explaining things.
Focus on Conciseness and Clarity: Ensure that the output is concise yet comprehensive. Focus on clarity and readability to provide researchers with easily digestible insights.
IMPORTANT:
If the user query cannot be answered using the provided context, do not improvise, you should only answer using the provided context from the research papers.
If the user asks something that does not exist within the provided context, Answer ONLY with: 'Sorry, the provided query is not clear enough for me to answer from the provided research papers'.
"""
接下来,我们使用Modelfile创建我们的模型。
ollama create research_assistant -f Modelfile然后,我们启动模型服务器:
ollama run research_assistant默认情况下,Ollama运行在 http://localhost:11434 上
最后,我们使用FastAPI创建一个API端点。这个端点将接收一个查询,搜索文档,并返回一个响应。
使用FastAPI的一个优点是它与Pydantic的兼容性,这对于构建我们的代码和API响应非常有帮助。
让我们首先定义两个模型:一个用于查询,一个用于响应:
class Query(BaseModel):query: strsimilarity_top_k: Optional[int] = Field(default=1, ge=1, le=5)class Response(BaseModel):search_result: str source: str在启动llm,qdrant索引和我们的FastAPI应用程序之后:
llm = Ollama(model=config["llm_name"], url=config["llm_url"])
rag = RAG(config_file=config, llm=llm)
index = rag.qdrant_index()app = FastAPI()
我们将创建一个路由,它接收一个 Query 并返回一个 Response ,如我们的pydantic类中所定义的。
a = "You can only answer based on the provided context. If a response cannot be formed strictly using the context, politely say you don’t have knowledge about that topic"@app.post("/api/search", response_model=Response, status_code=200)
def search(query: Query):query_engine = index.as_query_engine(similarity_top_k=query.similarity_top_k, output=Response, response_mode="tree_summarize", verbose=True)response = query_engine.query(query.query + a)response_object = Response(search_result=str(response).strip(), source=[response.metadata[k]["file_path"] for k in response.metadata.keys()][0])return response_object
来自:app.py的代码
关于在整个项目中使用的配置文件:
data_path: "data/"
llm_url: "http://localhost:11434"
llm_name: "research_assistant"
embedding_model: "sentence-transformers/all-mpnet-base-v2"
qdrant_url: "http://localhost:6333"
collection_name: "researchpapers"
chunk_size: 1024
现在,让我们尝试使用以下请求来测试API:
{"query": "How can robots imitate human actions?","similarity_top_k": 3
}
为了测试目的,我们将直接使用FastAPI自带的文档用户界面
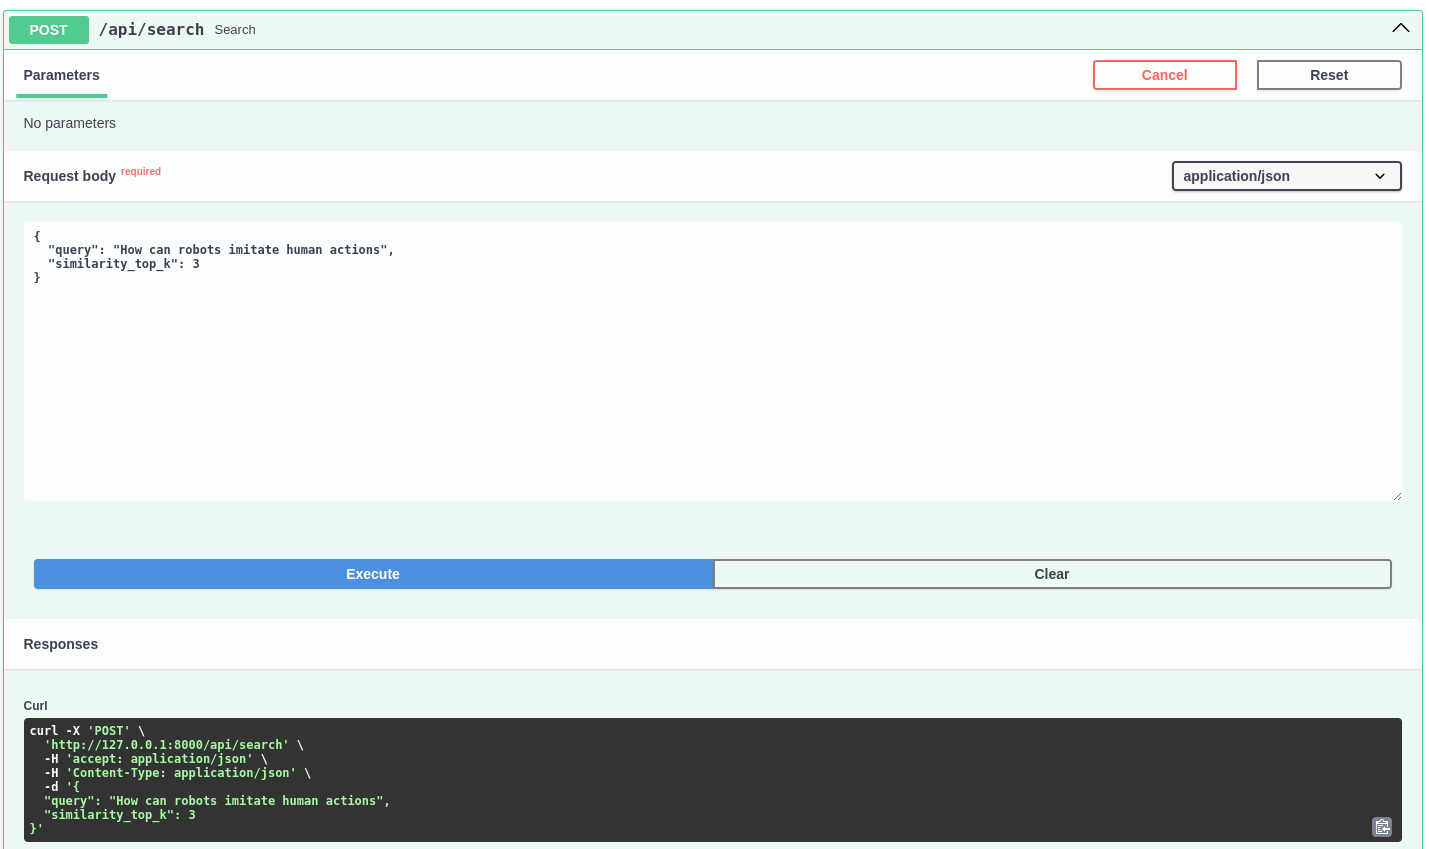
API 请求
响应

API 响应
太好了!API能够从我们的文档中检索到相关的上下文,返回一个结构良好的答案,并引用了来源。
结论
总的来说,该项目的目标是使用LlamaIndex、Qdrant、Ollama和FastAPI创建一个本地的RAG API。这种方法提供了对数据的隐私保护和控制,对于处理敏感信息的组织来说尤其有价值。
不要忘记访问项目的Github仓库


