小游戏和GUI编程(1) | 基于 SFML 的自由落体小球
文章目录
- 小游戏和GUI编程(1) | 基于 SFML 的自由落体小球
- 1. 目的
- 2. SFML 适合做图形显示的理由
- 3. 使用 SFML - 构建阶段
- 4. 使用 SFML - C++ 代码
- 4.0 代码布局
- 4.1 创建窗口
- 4.2 循环显示窗口, 并处理关闭事件
- 4.3 使用能够执行绘制的窗口
- 4.4 绘制静态小球
- 5. 自由落体公式和代码实现
- 5.1 匀速下落
- 5.2 带反弹的小球
- 5.3 考虑重力的反弹
- 5.4 最终代码
- 6. 总结
- 7. References
1. 目的
通过一些简单的例子(2D小游戏的基础代码片段), 来学习 SFML 的使用。
2. SFML 适合做图形显示的理由
使用 SFML 做图形显示的库。 相比于其他用的过库:
- EasyX: 不开源, 不能跨平台使用, API 风格陈旧, 不是 C++ API
- OpenCV 的 highgui 模块: highgui 不是 OpenCV 的最强项, 功能有限
- SDL2: 完全用 C 写的, 不利于让我保持 C++ 语法的熟悉度
- Qt: 有 GPL License 导致的潜在法律问题, 弃用
- Dear imgui: 比较 geek, 默认的字体风格我受不了, “代码即文档” 也难度较大
- SFML: 开源, 跨平台, 现代的 C++, License 友好, 文档直白, 功能齐全
3. 使用 SFML - 构建阶段
目前是 2024 年 2 月 9 日, 使用最新版 SFML 2.6.1。 我是 mac-mini 环境, 安装了 CMake 3.28, C++编译器是苹果自带的 AppleClang 15.0.0。
首先安装 SFML:
brew intall sfml
然后在 CMakeLists.txt 里, 为可执行程序链接 sfml 的库。 SFML 的 cmake 里,要求指明每一个 component:
cmake_minimum_required(VERSION 3.20)
project(free-falling-ball)
set(CMAKE_CXX_STANDARD 11)add_executable(free-falling-ballfree-falling-ball.cpp
)find_package(SFML COMPONENTS graphics window system)
target_link_libraries(free-falling-ball PRIVATE sfml-graphics sfml-window sfml-system)
简单起见, free-falling-ball.cpp 里先写一个 hello world, 用于完成构建:
#include <stdio.h>
int main()
{printf("hello SFML\n");return 0;
}
执行编译和运行:
cmake -S . -B build
cmake --build build
4. 使用 SFML - C++ 代码
官方给出了创建和管理窗口的文档: Opening and managing a SFML window
4.0 代码布局
在达到最终效果前, 每一步实现一个基础功能, 放在一个 demox_xxx() 的函数中, 在 main 函数里调用它, 后续的每一小节就不列出 main() 了:
int main()
{demo1_show_window();return 0;
}
4.1 创建窗口
创建窗口的最简代码如下, 运行的话是一闪而过,但确实是创建了窗口的:
#include <SFML/Window.hpp>
int demo1_show_window()
{sf::Window window(sf::VideoMode(800, 600), "My Window");return 0;
}
sf::Window 类
SFML 库中的窗口, 是定义在 sf::Window 类中, 通过包含 SFML/Window.hpp 来引入。 实际上是在 SFML/Window/Window.hpp 中给出类的声明:
class SFML_WINDOW_API Window : public WindowBase, GlResource
{
public:...
}
而 SFML/Window.hpp 里则是类似于 OpenCV 的 opencv2/opencv.hpp, 只包含了各个模块的头文件:
#include <SFML/System.hpp>
#include <SFML/Window/Clipboard.hpp>
#include <SFML/Window/Context.hpp>
#include <SFML/Window/ContextSettings.hpp>
#include <SFML/Window/Cursor.hpp>
#include <SFML/Window/Event.hpp>
#include <SFML/Window/Joystick.hpp>
#include <SFML/Window/Keyboard.hpp>
#include <SFML/Window/Mouse.hpp>
#include <SFML/Window/Sensor.hpp>
#include <SFML/Window/Touch.hpp>
#include <SFML/Window/VideoMode.hpp>
#include <SFML/Window/Window.hpp>
#include <SFML/Window/WindowHandle.hpp>
#include <SFML/Window/WindowStyle.hpp>
sf::VideoMode类
sf::VideoMode 类定义在 SFML/Window/VideoMode.hpp 文件中, 构造函数如下, bpp参数默认值是 32, 前两个参数指定了窗口的宽度和高度:
namespace sf
{
class SFML_WINDOW_API VideoMode
{
public:
VideoMode(unsigned int modeWidth, unsigned int modeHeight, unsigned int modeBitsPerPixel = 32);
...
}
重构后的代码
让变量尽可能有意义, 避免硬编码:
int demo1_show_window_refactored()
{constexpr int win_width = 600;constexpr int win_height = 600;const std::string title = "Free falling ball";sf::Window window(sf::VideoMode(win_width, win_height), title);return 0;
}
4.2 循环显示窗口, 并处理关闭事件
如下代码创建的窗口, 能够持续显示, 并且带有最小化、最大化、关闭按钮, 能用鼠标点击关闭按钮后关闭窗口:
int demo2_show_window_with_loop()
{constexpr int win_width = 600;constexpr int win_height = 600;const std::string title = "Free falling ball";sf::Window window(sf::VideoMode(win_width, win_height), title);// run the program as long as the window is openwhile (window.isOpen()){// check all the window's evetnts that were triggered since the last iteration of the loopsf::Event event;while (window.pollEvent(event)){if (event.type == sf::Event::Closed){window.close();}}}return 0;
}
首先, 增加了一个外层循环 while(window.isOpen()), 用来确保只要窗口没有被关闭, 就持续的刷新显示。 绝大多数的 SFML 窗口程序都有这个循环, 也叫做 “main loop” 或 “game loop”.
内存循环, 是处理所有的窗口事件, 意思是说如果有多个事件, 比如同时做了鼠标和键盘的操作, 都会被处理。
window.pollEvent() 函数返回 bool 类型, 如果现在还有没被处理过的事件, 它返回 true, 如果所有事件都处理完了, 它返回 false。
这里我们只处理了 sf::Event::Closed 事件, SFML/Window/Event.hpp 里定义了 EventType 枚举类型: Closed 的注释写的很清晰, 是窗口关闭的请求。
/// \brief Enumeration of the different types of events///enum EventType{Closed, //!< The window requested to be closed (no data)Resized, //!< The window was resized (data in event.size)LostFocus, //!< The window lost the focus (no data)GainedFocus, //!< The window gained the focus (no data)TextEntered, //!< A character was entered (data in event.text)KeyPressed, //!< A key was pressed (data in event.key)KeyReleased, //!< A key was released (data in event.key)MouseWheelMoved, //!< The mouse wheel was scrolled (data in event.mouseWheel) (deprecated)MouseWheelScrolled, //!< The mouse wheel was scrolled (data in event.mouseWheelScroll)MouseButtonPressed, //!< A mouse button was pressed (data in event.mouseButton)MouseButtonReleased, //!< A mouse button was released (data in event.mouseButton)MouseMoved, //!< The mouse cursor moved (data in event.mouseMove)MouseEntered, //!< The mouse cursor entered the area of the window (no data)MouseLeft, //!< The mouse cursor left the area of the window (no data)JoystickButtonPressed, //!< A joystick button was pressed (data in event.joystickButton)JoystickButtonReleased, //!< A joystick button was released (data in event.joystickButton)JoystickMoved, //!< The joystick moved along an axis (data in event.joystickMove)JoystickConnected, //!< A joystick was connected (data in event.joystickConnect)JoystickDisconnected, //!< A joystick was disconnected (data in event.joystickConnect)TouchBegan, //!< A touch event began (data in event.touch)TouchMoved, //!< A touch moved (data in event.touch)TouchEnded, //!< A touch event ended (data in event.touch)SensorChanged, //!< A sensor value changed (data in event.sensor)Count //!< Keep last -- the total number of event types};
4.3 使用能够执行绘制的窗口
SFML-Windows 的文档中, 并不包含绘制的内容。 可以用 OpenGL 和 sf::Window 交互, 也可以用 SFML 封装好的 SFML-graphics 模块的 API 来实现绘制, 我们选择后者, 文档在 Drawing 2D stuff.
替换 sf::Window 为 sf::RenderWindow
int demo3_use_render_window()
{constexpr int win_width = 600;constexpr int win_height = 600;const std::string title = "Free falling ball";sf::RenderWindow window(sf::VideoMode(win_width, win_height), title);// run the program as long as the window is openwhile (window.isOpen()){// check all the window's evetnts that were triggered since the last iteration of the loopsf::Event event;while (window.pollEvent(event)){if (event.type == sf::Event::Closed){window.close();}}}return 0;
}
sf::RenderWindow类
是 sf::Window 的子类, 定义在 SFML/Graphics/RenderWindow.hpp 中, 能够用于方便的绘制 2D 内容。
namespace sf
{

/// \brief Window that can serve as a target for 2D drawing
///

class SFML_GRAPHICS_API RenderWindow : public Window, public RenderTarget
{
public:.../// \brief Construct a new window////// This constructor creates the window with the size and pixel/// depth defined in \a mode. An optional style can be passed to/// customize the look and behavior of the window (borders,/// title bar, resizable, closable, ...).////// The fourth parameter is an optional structure specifying/// advanced OpenGL context settings such as antialiasing,/// depth-buffer bits, etc. You shouldn't care about these/// parameters for a regular usage of the graphics module.////// \param mode     Video mode to use (defines the width, height and depth of the rendering area of the window)/// \param title    Title of the window/// \param style    %Window style, a bitwise OR combination of sf::Style enumerators/// \param settings Additional settings for the underlying OpenGL context///RenderWindow(VideoMode mode, const String& title, Uint32 style = Style::Default, const ContextSettings& settings = ContextSettings());...
};
sf::RenderWindow 增加了和 2D 绘制相关的功能, 这是由它的另一个父类 sf::RenderTarget 带来的, 定义在 SFML/Graphics/RenderTarget.hpp:
class SFML_GRAPHICS_API RenderTarget : NonCopyable
{
public:void clear(const Color& color = Color(0, 0, 0, 255)); // 清理 target 上的内容。 通常是每一帧调用一次。void setView(const View& view); // 设置 view。 view 就像是一个 2D 相机, 控制了2D场景中被显示的部分, 以及这部分如何被显示。const View& getView() const; // 获取当前使用的 viewIntRect getViewport(const View& view) const; // 获取 viewport, 也就是一个矩形区域...void draw(const Drawable& drawable, const RenderStates& states = RenderStates::Default); // 绘制函数void draw(const Vertex* vertices, std::size_t vertexCount,PrimitiveType type, const RenderStates& states = RenderStates::Default); // 除了 Drawable 对象,也可以根据 Vertext 绘制void draw(const VertexBuffer& vertexBuffer, const RenderStates& states = RenderStates::Default); // 或在 VertexBuffer 上绘制// 也提供了使用 OpenGL 进行绘制的相关函数void pushGLStates();void popGLStates();void resetGLStates();...
sf::RenderWindow的最常用 api: clear() 和 draw()
在原有的事件判断处理的后面, 增加两个函数调用:
window.clear(...): 清理屏幕window.display(): 显示内容
典型用法:
int demo3_use_render_window_with_clear_and_display()
{constexpr int win_width = 600;constexpr int win_height = 600;const std::string title = "Free falling ball";sf::RenderWindow window(sf::VideoMode(win_width, win_height), title);// run the program as long as the window is openwhile (window.isOpen()){// check all the window's evetnts that were triggered since the last iteration of the loopsf::Event event;while (window.pollEvent(event)){if (event.type == sf::Event::Closed){window.close();}}// clear the window with black colorwindow.clear(sf::Color::Cyan);// draw everything here...// window.draw(...);// end the current frame: display rendered objects (the hidden buffer)window.display();}return 0;
}
通常来说这两个api都是要调用的。 clear() 是清除之前一帧绘制的内容, display() 则是显示从上次 display() 调用到这次 display() 调用之前, 所有被“渲染”的“物体”。 由于绘制和渲染是两个分离的过程, 绘制是绘制在内部维护的一个 buffer 上, 而 display() 只是负责显示。 换言之, 如果在 display 之前有执行绘制, 但没有调用 display(), 就会导致看不到绘制效果。
例如上述代码中如果改为:
// run the program as long as the window is openwhile (window.isOpen()){// check all the window's evetnts that were triggered since the last iteration of the loopsf::Event event;while (window.pollEvent(event)){if (event.type == sf::Event::Closed){window.close();}}// clear the window with black colorwindow.clear(sf::Color::Cyan); // 这里是把窗口绘制为靛蓝色// draw everything here...// window.draw(...);// end the current frame: display rendered objects (the hidden buffer)// window.display(); 关闭这句, 导致窗口是默认的黑色}
会导致看不到靛蓝色的窗口。
4.4 绘制静态小球
在 4.3 代码基础上, 在 window.clear() 和 window.display() 两个函数调用之间, 增加绘制的代码。
最常用的三种绘制:
window.draw(sprite)window.draw(circle)window.draw(text)
CircleShape类
sf::CircleShape 类定义了圆形, 能用于我们要绘制的静态小球。 sf::CircleShape 继承自 Shape 类, 而 Shape 则继承自 Drawable。 以下是各个类的定义中的继承关系, 以及关键函数:
class SFML_GRAPHICS_API CircleShape : public Shape
{
public:...
};class SFML_GRAPHICS_API CircleShape : public Shape
{
public:...
};class SFML_GRAPHICS_API Shape : public Drawable, public Transformable
{
public:...void setFillColor(const Color& color); // 设置颜色, 能用于绘制小球并和背景区分开来
};class SFML_GRAPHICS_API Transformable
{
public:...void setPosition(float x, float y); // 设置物体的位置
};
sf::RenderWindow::draw()函数
sf::RenderWindow 类提供的 draw() 函数中, 先前提到的 drawable 作为第一个参数的函数, 是本小节使用的关键 API:
class SFML_GRAPHICS_API RenderTarget : NonCopyable
{
public:/// \brief Draw a drawable object to the render target////// \param drawable Object to draw/// \param states   Render states to use for drawing///void draw(const Drawable& drawable, const RenderStates& states = RenderStates::Default);
因此, 构造 sf::CircleShape 对象, 设置它的位置、 颜色, 传入 RenderWindow::draw() 函数, 就执行了渲染。 再执行 window.display() 就执行了在窗口上的绘制。

int demo4_draw_static_ball()
{constexpr int win_width = 600;constexpr int win_height = 600;const std::string title = "Free falling ball";sf::RenderWindow window(sf::VideoMode(win_width, win_height), title);// run the program as long as the window is openwhile (window.isOpen()){// check all the window's evetnts that were triggered since the last iteration of the loopsf::Event event;while (window.pollEvent(event)){if (event.type == sf::Event::Closed){window.close();}}// clear the window with black colorwindow.clear(sf::Color::Cyan);sf::CircleShape circle(100);circle.setFillColor(sf::Color::White);circle.setPosition(200, 200);window.draw(circle);// end the current frame: display rendered objects (the hidden buffer)window.display();}return 0;
}
5. 自由落体公式和代码实现
5.1 匀速下落
用数学公式描述运动的过程, 然后在坐标系下绘制出来, 这和在窗口里渲染运动物体在数学层面是一致的。 首先考虑匀速下落的小球, 如果超出了图像边界就从新从图像顶部往下降落:
x = window_width / 2 y = ( y + 10 ) % window_height x = \text{window\_width}/2 \\ y = (y + 10) \% \text{window\_height} x=window_width/2y=(y+10)%window_height
由于默认帧率过高, 按目前设定的每一帧 y 增加 10,需要设置帧率为 25 FPS, 才能看的比较舒服:
window.setFramerateLimit(25);
匀速下落的完整代码:
int demo5_falling_ball_with_avg_speed()
{constexpr int win_width = 600;constexpr int win_height = 600;const std::string title = "Free falling ball";sf::RenderWindow window(sf::VideoMode(win_width, win_height), title);window.setFramerateLimit(25);constexpr int ball_radius = 50;int y = 0;// run the program as long as the window is openwhile (window.isOpen()){// check all the window's evetnts that were triggered since the last iteration of the loopsf::Event event;while (window.pollEvent(event)){if (event.type == sf::Event::Closed){window.close();}}// clear the window with black colorwindow.clear(sf::Color::Cyan);sf::CircleShape circle(ball_radius);circle.setFillColor(sf::Color::White);y = (y + 10) % win_height;circle.setPosition(win_width/2 - ball_radius, y);window.draw(circle);// end the current frame: display rendered objects (the hidden buffer)window.display();}return 0;
}
5.2 带反弹的小球
当小球触底, 让它反弹; 当小球触顶, 也反弹。 总之, 是上下匀速运动, 碰到边界就反向运动:
y = y + direction ∗ 10 direction = { 1 , − 1 } y = y + \text{direction} * 10 \\ \text{direction} = \{1, -1\} y=y+direction∗10direction={1,−1}
int demo6_falling_ball_with_rebound()
{constexpr int win_width = 600;constexpr int win_height = 600;const std::string title = "Free falling ball";sf::RenderWindow window(sf::VideoMode(win_width, win_height), title);window.setFramerateLimit(25);constexpr int ball_radius = 50;int direction = 1;int y = 0;// run the program as long as the window is openwhile (window.isOpen()){// check all the window's evetnts that were triggered since the last iteration of the loopsf::Event event;while (window.pollEvent(event)){if (event.type == sf::Event::Closed){window.close();}}// clear the window with black colorwindow.clear(sf::Color::Cyan);sf::CircleShape circle(ball_radius);circle.setFillColor(sf::Color::White);y = y + direction * 10;if (y > win_height - ball_radius || y < 0){direction = -direction;}circle.setPosition(win_width/2 - ball_radius, y);window.draw(circle);// end the current frame: display rendered objects (the hidden buffer)window.display();}return 0;
}
5.3 考虑重力的反弹
重力方向是垂直向下的。 触底后小球速度应当反向并且数值变小, 而向上的方向上不会触顶。
v y = v y + g y = y + v y vy = vy + g \\ y = y + vy \\ vy=vy+gy=y+vy
若 y 到达底边, 考虑速度的方向的变为相反方向, 数值见小:
v y = − 0.95 ∗ v y vy = -0.95 * vy vy=−0.95∗vy
注意此时 y 值仍然是在边界的地方, 会导致下一帧仍然判断为 “y 到达边界”, 进而让速度再次数值减小, 但是 y 的位置仍然在边界的地方或边界之外。 因此, 这里需要额外的处理: 一旦y 到达边界,就修改 y 为小于边界的值, 使得下一帧不会更新 vy。
vy = vy + g;y = y + vy;if (y >= win_height - ball_radius){vy = -0.95 * vy;}if (y > win_height - ball_radius){y = win_height - ball_radius;}
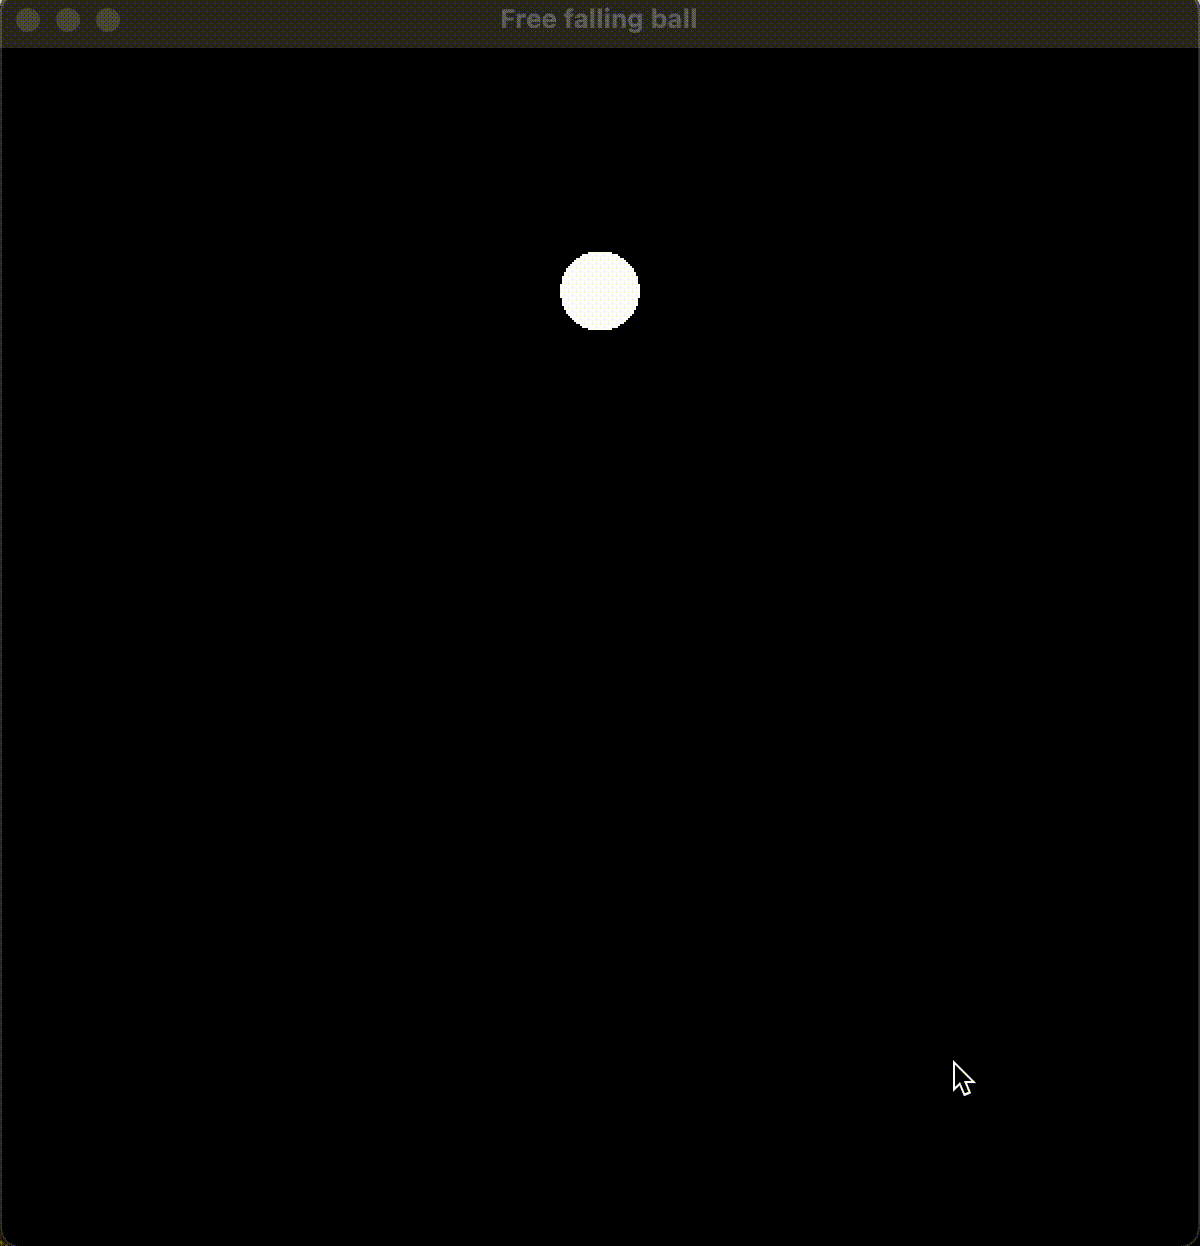
5.4 最终代码
#include <SFML/Graphics.hpp>int main()
{constexpr int win_width = 600;constexpr int win_height = 600;const std::string title = "Free falling ball";sf::RenderWindow window(sf::VideoMode(win_width, win_height), title);window.setFramerateLimit(25);constexpr int ball_radius = 50;int direction = 1;constexpr int g = 10;float vy = 0;float y = 0;// run the program as long as the window is openwhile (window.isOpen()){// check all the window's evetnts that were triggered since the last iteration of the loopsf::Event event;while (window.pollEvent(event)){if (event.type == sf::Event::Closed){window.close();}}// clear the window with black colorwindow.clear(sf::Color::Cyan);sf::CircleShape circle(ball_radius);circle.setFillColor(sf::Color::White);vy = vy + g;y = y + vy;if (y >= win_height - ball_radius){vy = -0.95 * vy;}if (y > win_height - ball_radius){y = win_height - ball_radius;}circle.setPosition(win_width/2 - ball_radius, y);window.draw(circle);// end the current frame: display rendered objects (the hidden buffer)window.display();}return 0;
}
运行效果:
6. 总结
使用 SFML 而不是其他的图形库, 理由是:
- 依赖库是开源的, license 友好
- 跨平台(windows,linux,macos)
- modern C++, 而不是 C 或 legacy C++
- 主流的 C++ 构建: 基于 CMake, 而不是直接创建 Makefile 或 VS Solution
通过查看 SFML 的 window, renderwindow 的文档, 初步了解了一些类的继承关系, 窗口的基本绘制流程, 并绘制了静态和匀速运动的小球。
通过物理公式的推导和使用, 考虑了符合重力的反弹, 并规避了重复判断小球出界导致的小球没有反弹的问题, 最终得到了基于 SFML 的自由落体小球的渲染和绘制。
7. References
- SFML Doc - Window
- SFML Doc - graphics
- 《C和C++游戏趣味编程》 Chapter2