目录
一、编译原理概述
二、编译过程分析
三、编译动静态库
四、执行过程分析
一、编译原理概述
make: 一个GCC工具程序,它会读 makefile 脚本来确定程序中的哪个部分需要编译和连接,然后发布必要的命令。它读出的脚本(叫做 makefile 或 Makefile)定义了文件关系和依赖关系。
# 查看GCC默认头文件搜索路径echo | gcc -v -x c -E -#include <stdio.h>int main()
{printf("hello, world\n");return 0;
}hello 程序的生命周期是从一个源程序(或者说源文件)开始的,即程序员通过编辑器创建并保存的文本文件,文件名是 hello.c。源程序实际上就是一个由值 0 和 1组成的位(又称为比特)序列,8 个位被组织成一组,称为字节。每个字节表示程序中的某些文本字符。
大部分计算机使用 ASCII 标准来表示文本字符:
- 用一个唯一的单字节大小的整数值息来表示每个字符
- hello.c 程序是以字节序列的方式储存在文件中的
hello.c 的表示方法说明了一个基本思想:系统中所有的信息——包括磁盘文件、内存中的程序、内存中存放的用户数据以及网络上传送的数据,都是由一串比特表示的。

二、编译过程分析
hello 程序的生命周期从一个高级 C 语言程序开始。
为了在系统上运行 hello.c 程序,每条 C 语句都必须被其他程序转化为一系列的低级机器语言指令。
然后这些指令按照一种称为可执行目标程序的格式打好包,并以二进制磁盘文件的形式存放起来。
GCC 编译器读取源程序文件 hello.c,并把它翻译成一个可执行目标文件 hello。这个翻译过程可分为四个阶段完成,如下图所示:

执行这四个阶段的程序(预处理器、编译器、汇编器和链接器)一起构成了编译系统(compilation system)。

# 预处理 Preprocessing
# -E 选项告诉编译器只进行预处理操作
# -o 选项把预处理的结果输出到指定文件(base) [root@localhost 01_test]# vim hello.c
(base) [root@localhost 01_test]# cat hello.c
#include <stdio.h>int main()
{printf("hello, world\n");return 0;
}
(base) [root@localhost 01_test]# gcc -E hello.c -o hello.i
(base) [root@localhost 01_test]# ls
hello.c hello.i
(base) [root@localhost 01_test]## 生成汇编语言 Generating Assembly Language
# -S 选项告诉编译器,进行预处理和编译成汇编语言操作(base) [root@localhost 01_test]# gcc -S hello.i -o hello.s
(base) [root@localhost 01_test]# ls
hello.c hello.i hello.s
(base) [root@localhost 01_test]# cat hello.s.file "hello.c".section .rodata
.LC0:.string "hello, world".text.globl main.type main, @function
main:
.LFB0:.cfi_startprocpushq %rbp.cfi_def_cfa_offset 16.cfi_offset 6, -16movq %rsp, %rbp.cfi_def_cfa_register 6movl $.LC0, %edicall putsmovl $0, %eaxpopq %rbp.cfi_def_cfa 7, 8ret.cfi_endproc
.LFE0:.size main, .-main.ident "GCC: (GNU) 4.8.5 20150623 (Red Hat 4.8.5-44)".section .note.GNU-stack,"",@progbits
(base) [root@localhost 01_test]# # 源程序编译为目标程序 Source File to Object File
# -c 选项告诉编译器,将源代码或汇编代码翻译成二进制机器代码(base) [root@localhost 01_test]# ls
hello.c hello.i hello.s
(base) [root@localhost 01_test]# gcc -c hello.s -o hello.o
(base) [root@localhost 01_test]# ls
hello.c hello.i hello.o hello.s
(base) [root@localhost 01_test]# cat hello.o
ELF>�@@
UH����]�hello, worldGCC: (GNU) 4.8.5 20150623 (Red Hat 4.8.5-44)zRx
P A�C
�� hello.cmainputs�������� .symtab.strtab.shstrtab.rela.text.data.bss.rodata.comment.note.GNU-stack.rela.eh_frame @�0
90b.B�W�R@
��0a(base) [root@localhost 01_test]#
# 可执行文件生成 Executable
# -o 选项告诉编译器生成可执行文件(base) [root@localhost 01_test]# ls
hello.c  hello.i  hello.o  hello.s
(base) [root@localhost 01_test]# gcc hello.o -o hello
(base) [root@localhost 01_test]# ls
hello  hello.c  hello.i  hello.o  hello.s
(base) [root@localhost 01_test]# ./hello
hello, world
(base) [root@localhost 01_test]#
# 我们也可以直接将源代码生成可执行文件
# 可以单个源文件生成可执行文件,也可以多个源文件生成可执行文件(base) [root@localhost 01_test]# gcc hello.c -o hello
(base) [root@localhost 01_test]# ls
hello hello.c
(base) [root@localhost 01_test]# ./hello
hello, world
(base) [root@localhost 01_test]#源文件.c文件 -> 预编译成.i文件 -> 编译成汇编语言.s -> 汇编成.o文件 -> 链接成可执行文件。
三、编译动静态库
# 创建一个静态库 Create a Static Lib# 编译成 .o 文件
gcc -c [.c] -o [自定义文件名]
gcc -c [.c] [.c] ...# 编静态库
ar -r [lib自定义库名.a] [.o] [.o] ...# 链接成可执行文件
gcc [.c] [.a] -o [自定义输出文件名]
gcc [.c] -o [自定义输出文件名] -l[库名] -L[库所在路径](base) [root@localhost 02_test]# vim add.c
(base) [root@localhost 02_test]# vim minus.c
(base) [root@localhost 02_test]# cat add.c
int add(int a, int b) {return a + b;
}
(base) [root@localhost 02_test]# cat minus.c
int minus(int a, int b) {return a - b;
}
(base) [root@localhost 02_test]# vim main.c
(base) [root@localhost 02_test]# cat main.c
#include <stdio.h>int add(int a, int b);
int minus(int a, int b);int main() {int a = 10;int b = 5;printf("a + b = %d\n", add(a, b));printf("a - b = %d\n", minus(a, b));return 0;
}
(base) [root@localhost 02_test]# gcc -c add.c -o add.o
(base) [root@localhost 02_test]# gcc -c minus.c -o minus.o
(base) [root@localhost 02_test]# ar -r mymathlib.a add.o minus.o
ar: 正在创建 mymathlib.a
(base) [root@localhost 02_test]# gcc main.c mymathlib.a -o math.exe
(base) [root@localhost 02_test]# ./math.exe
a + b = 15
a - b = 5
(base) [root@localhost 02_test]#
# 创建一个动态库 Create a Shared Lib# 编译成二进制 .o 文件
gcc -c -fpic [.c/.cpp][.c/.cpp]... # 编动态库
gcc -shared [.o][.o]... -o [lib自定义库名.so]# 链接库到可执行文件
gcc [.c/.cpp] -o [自定义可执行文件名] -l[库名] -L[库路径]# 告诉编译器动态库的位置
# 1. 安装,不建议往系统库添加头文件
# 2. 添加环境变量,重启后无效
# 3. 配置 /etc/ld.so.conf.d 文件,永久有效
# 4. 建立软链接,永久有效(base) [root@localhost 02_test]# gcc -c -fpic add.c minus.c
(base) [root@localhost 02_test]# ls
add.c add.o main.c minus.c minus.o
(base) [root@localhost 02_test]# gcc -shared add.o minus.o -o libmymathlib.so
(base) [root@localhost 02_test]# ls
add.c add.o libmymathlib.so main.c minus.c minus.o
(base) [root@localhost 02_test]# gcc main.c -o math -lmymathlib -L.
(base) [root@localhost 02_test]# ls
add.c add.o libmymathlib.so main.c math minus.c minus.o
(base) [root@localhost 02_test]# ./math
./math: error while loading shared libraries: libmymathlib.so: cannot open shared object file: No such file or directory
(base) [root@localhost 02_test]# pwd
/root/gitee/Test/Make_Learn/02_test
(base) [root@localhost 02_test]# rm math
rm:是否删除普通文件 "math"?y
(base) [root@localhost 02_test]# gcc main.c -o math -lmymathlib -L/root/gitee/Test/Make_Learn/02_test
(base) [root@localhost 02_test]# ./math
./math: error while loading shared libraries: libmymathlib.so: cannot open shared object file: No such file or directory
(base) [root@localhost 02_test]# ln -s ./libmymathlib.so /lib64/libmymathlib.so
(base) [root@localhost 02_test]# ./math
./math: error while loading shared libraries: libmymathlib.so: cannot open shared object file: Error 40
(base) [root@localhost 02_test]# pwd
/root/gitee/Test/Make_Learn/02_test
(base) [root@localhost 02_test]# ls /lib64/libmymathlib.so
ls: 无法访问/lib64/libmymathlib.so: 符号连接的层数过多
(base) [root@localhost 02_test]# rm -rf /lib64/libmymathlib.so
(base) [root@localhost 02_test]# ln -s /root/gitee/Test/Make_Learn/02_test/libmymathlib.so /lib64/libmymathlib.so
(base) [root@localhost 02_test]# ./math
a + b = 15
a - b = 5
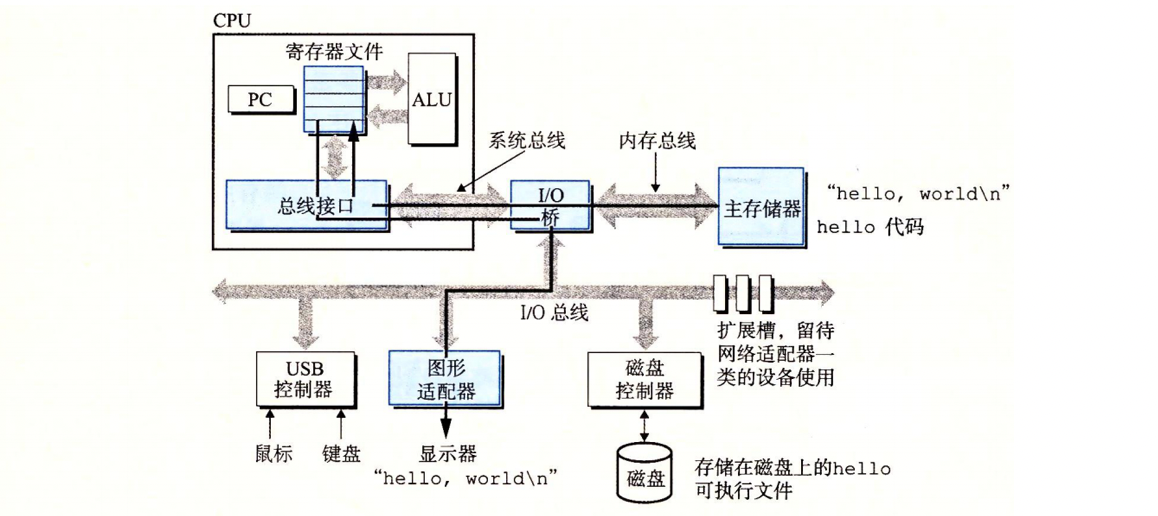
(base) [root@localhost 02_test]#四、执行过程分析

第一步:
- shell 等待我们输入一个命令
- 当我们在键盘上输入字符串"./hello"(注意这里是编译好的可执行目标文件)后
- shell 程序将字符逐一读入寄存器
- 再把它存放到内存中

第二步:
- 当我们在键盘上敲回车键时,shell 程序就知道我们已经结束了命令的输人
- 然后 shell 执行一系列指令来加载可执行的 hello 文件
- 这些指令将 hello 目标文件中的代码和数据从磁盘复制到主存
- 数据包括最终会被输出的字符串"hello,world\n"

第三步:
- 一旦目标文件 hello 中的代码和数据被加载到主存
- 处理器就开始执行 hello 程序的 main 程序中的机器语言指令
- 这些指令将 "hello,world\n" 字符串中的字节从主存复制到寄存器文件
- 再从寄存器文件中复制到显示设备,最终显示在屏幕上