# include "main.h" # include "adc.h" # include "tim.h" # include "gpio.h" # include "led.h" # include "key.h" # include "myadc.h" # include "stdbool.h" # include "stdio.h" int8_t upled = 0x01 ;
int8_t uplednum = 1 ;
int8_t lowled = 0x02 ;
int8_t lowlednum = 2 ;
float upval = 2.4 ;
float lowval = 1.2 ;
float val;
uint32_t led1time = 0 ;
uint32_t led2time = 0 ;
uint8_t led1enable = 0 ;
uint8_t led2enable = 0 ;
uint8_t view = 0 ;
uint8_t lcdtext[ 30 ] ;
uint8_t status[ 30 ] ;
extern struct Key key[ 4 ] ;
void SystemClock_Config ( void ) ;
void led_process ( void ) ;
void lcd_process ( void ) ;
void adc_process ( void ) ;
void key_process ( void ) ;
void lcdclear ( void )
{ LCD_Clear ( Black) ; LCD_SetBackColor ( Black) ; LCD_SetTextColor ( White) ;
}
int main ( void )
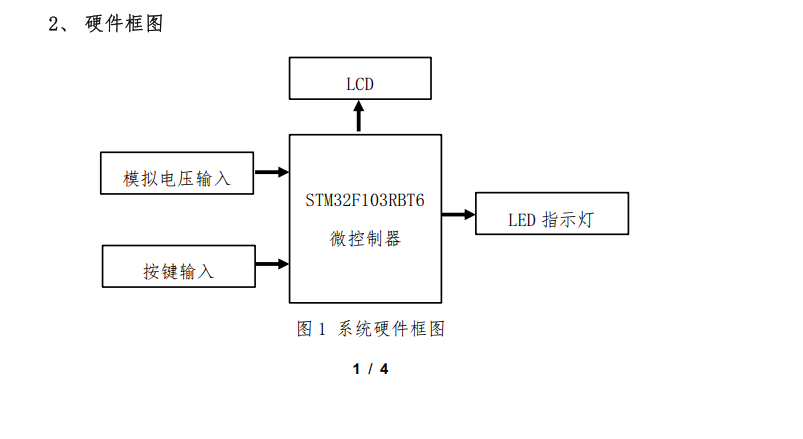
{ HAL_Init ( ) ; SystemClock_Config ( ) ; MX_GPIO_Init ( ) ; MX_ADC2_Init ( ) ; MX_TIM2_Init ( ) ; HAL_TIM_Base_Start_IT ( & htim2) ; LCD_Init ( ) ; lcdclear ( ) ; led_display ( 0x00 ) ; while ( 1 ) { key_process ( ) ; adc_process ( ) ; lcd_process ( ) ; led_process ( ) ; }
}
void SystemClock_Config ( void )
{ RCC_OscInitTypeDef RCC_OscInitStruct = { 0 } ; RCC_ClkInitTypeDef RCC_ClkInitStruct = { 0 } ; RCC_PeriphCLKInitTypeDef PeriphClkInit = { 0 } ; HAL_PWREx_ControlVoltageScaling ( PWR_REGULATOR_VOLTAGE_SCALE1) ; RCC_OscInitStruct. OscillatorType = RCC_OSCILLATORTYPE_HSI; RCC_OscInitStruct. HSIState = RCC_HSI_ON; RCC_OscInitStruct. HSICalibrationValue = RCC_HSICALIBRATION_DEFAULT; RCC_OscInitStruct. PLL. PLLState = RCC_PLL_ON; RCC_OscInitStruct. PLL. PLLSource = RCC_PLLSOURCE_HSI; RCC_OscInitStruct. PLL. PLLM = RCC_PLLM_DIV2; RCC_OscInitStruct. PLL. PLLN = 20 ; RCC_OscInitStruct. PLL. PLLP = RCC_PLLP_DIV2; RCC_OscInitStruct. PLL. PLLQ = RCC_PLLQ_DIV2; RCC_OscInitStruct. PLL. PLLR = RCC_PLLR_DIV2; if ( HAL_RCC_OscConfig ( & RCC_OscInitStruct) != HAL_OK) { Error_Handler ( ) ; } RCC_ClkInitStruct. ClockType = RCC_CLOCKTYPE_HCLK| RCC_CLOCKTYPE_SYSCLK| RCC_CLOCKTYPE_PCLK1| RCC_CLOCKTYPE_PCLK2; RCC_ClkInitStruct. SYSCLKSource = RCC_SYSCLKSOURCE_PLLCLK; RCC_ClkInitStruct. AHBCLKDivider = RCC_SYSCLK_DIV1; RCC_ClkInitStruct. APB1CLKDivider = RCC_HCLK_DIV1; RCC_ClkInitStruct. APB2CLKDivider = RCC_HCLK_DIV1; if ( HAL_RCC_ClockConfig ( & RCC_ClkInitStruct, FLASH_LATENCY_2) != HAL_OK) { Error_Handler ( ) ; } PeriphClkInit. PeriphClockSelection = RCC_PERIPHCLK_ADC12; PeriphClkInit. Adc12ClockSelection = RCC_ADC12CLKSOURCE_SYSCLK; if ( HAL_RCCEx_PeriphCLKConfig ( & PeriphClkInit) != HAL_OK) { Error_Handler ( ) ; }
}
void led_process ( void )
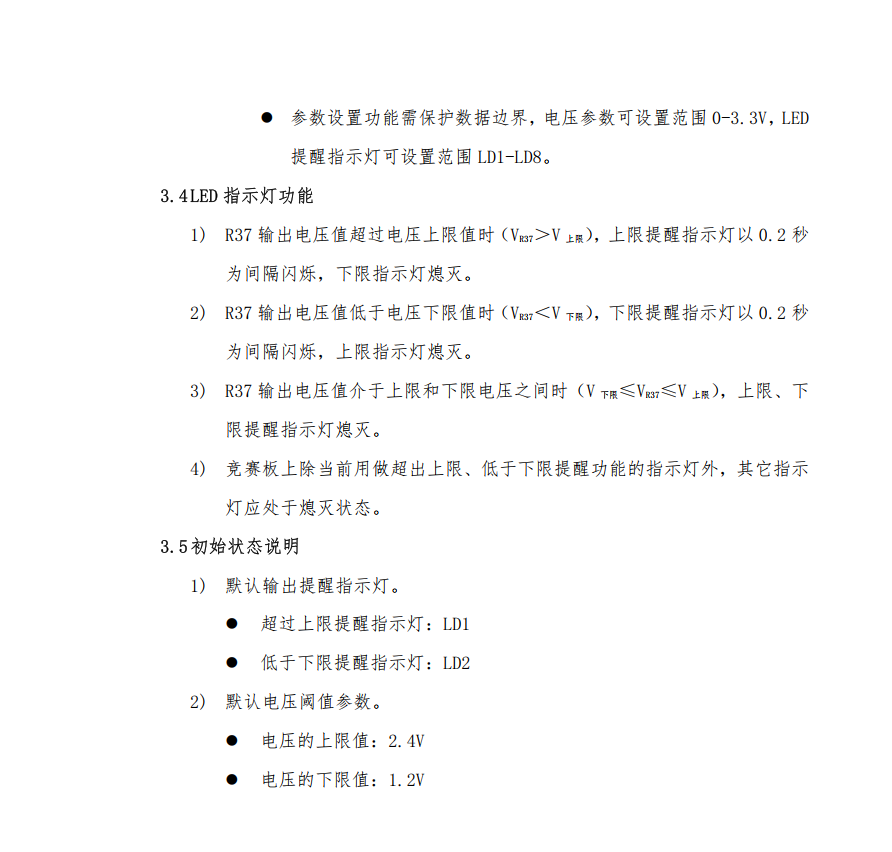
{ static bool led1flag = false; static bool led2flag = false; uint32_t currentTick = HAL_GetTick ( ) ; if ( led1enable && ( currentTick - led1time >= 200 ) ) { led1time = currentTick; led1flag = ! led1flag; if ( led1flag) { led_display ( upled) ; } else { led_display ( 0x00 ) ; } } if ( led2enable && ( currentTick - led2time >= 200 ) ) { led2time = currentTick; led2flag = ! led2flag; if ( led2flag) { led_display ( lowled) ; } else { led_display ( 0x00 ) ; } }
} void lcd_process ( void )
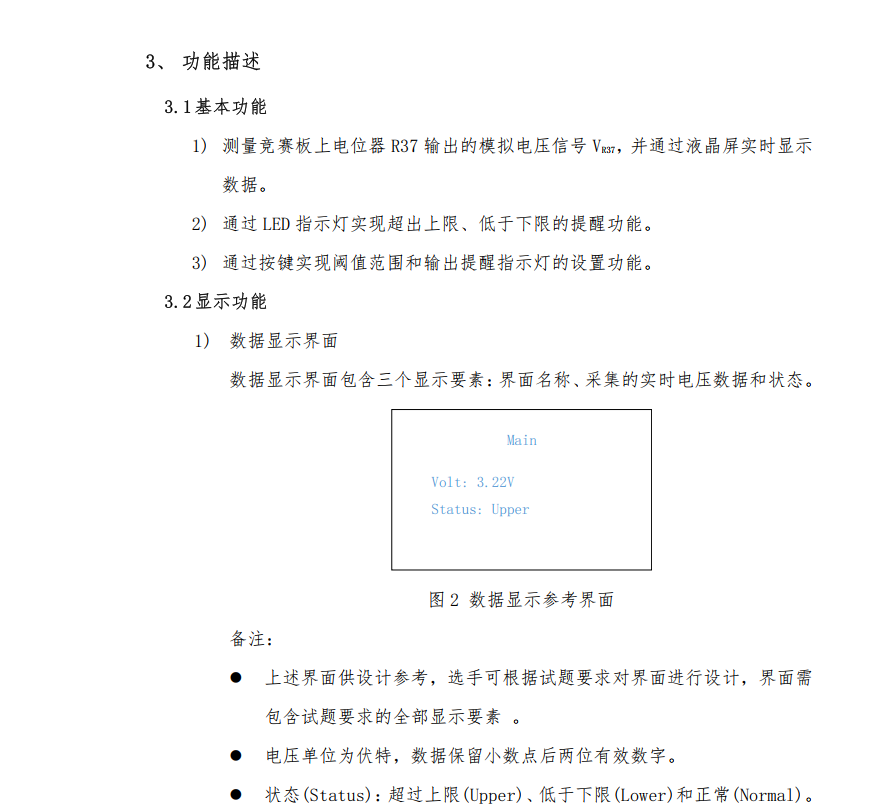
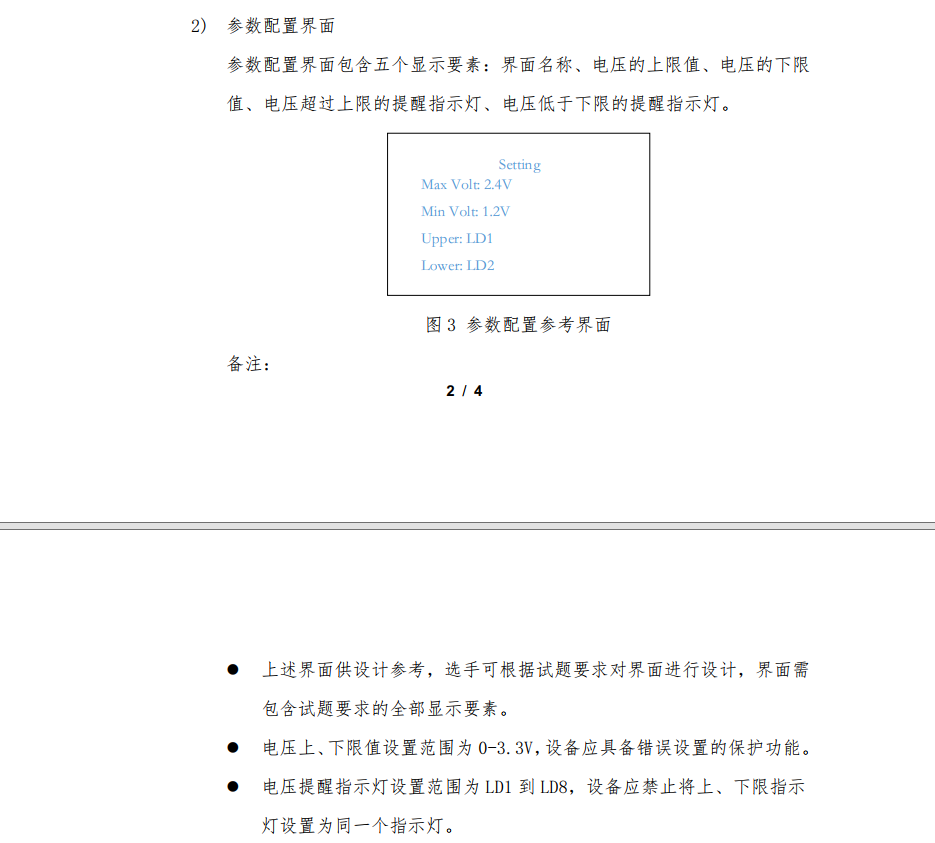
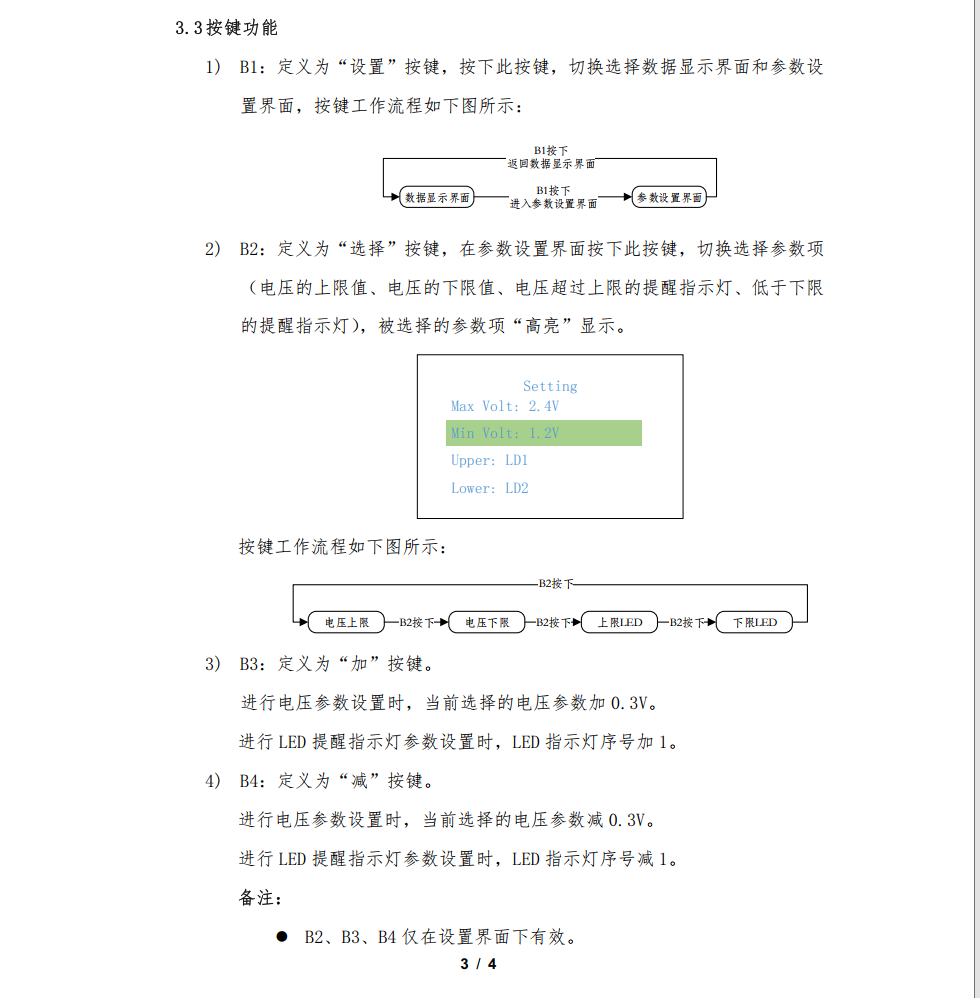
{ switch ( view) { case 0 : { sprintf ( ( char * ) lcdtext, " Main" ) ; LCD_DisplayStringLine ( Line1, lcdtext) ; sprintf ( ( char * ) lcdtext, " Volt:%.2f" , val) ; LCD_DisplayStringLine ( Line4, lcdtext) ; sprintf ( ( char * ) lcdtext, " Status:%s" , status) ; LCD_DisplayStringLine ( Line6, lcdtext) ; } break ; case 1 : { sprintf ( ( char * ) lcdtext, " Setting" ) ; LCD_DisplayStringLine ( Line1, lcdtext) ; sprintf ( ( char * ) lcdtext, " Max Volt:%.2f" , upval) ; LCD_DisplayStringLine ( Line3, lcdtext) ; sprintf ( ( char * ) lcdtext, " Min Volt:%.2f" , lowval) ; LCD_DisplayStringLine ( Line5, lcdtext) ; sprintf ( ( char * ) lcdtext, " Upper:LD%d" , uplednum) ; LCD_DisplayStringLine ( Line7, lcdtext) ; sprintf ( ( char * ) lcdtext, " Lower:LD%d" , lowlednum) ; LCD_DisplayStringLine ( Line9, lcdtext) ; } break ; case 2 : { sprintf ( ( char * ) lcdtext, " Setting" ) ; LCD_DisplayStringLine ( Line1, lcdtext) ; sprintf ( ( char * ) lcdtext, " Max Volt:%.2f" , upval) ; LCD_SetBackColor ( Green) ; LCD_DisplayStringLine ( Line3, lcdtext) ; LCD_SetBackColor ( Black) ; sprintf ( ( char * ) lcdtext, " Min Volt:%.2f" , lowval) ; LCD_DisplayStringLine ( Line5, lcdtext) ; sprintf ( ( char * ) lcdtext, " UpperLD:%d" , uplednum) ; LCD_DisplayStringLine ( Line7, lcdtext) ; sprintf ( ( char * ) lcdtext, " Lower:LD%d" , lowlednum) ; LCD_DisplayStringLine ( Line9, lcdtext) ; } break ; case 3 : { sprintf ( ( char * ) lcdtext, " Setting" ) ; LCD_DisplayStringLine ( Line1, lcdtext) ; sprintf ( ( char * ) lcdtext, " Max Volt:%.2f" , upval) ; LCD_DisplayStringLine ( Line3, lcdtext) ; sprintf ( ( char * ) lcdtext, " Min Volt:%.2f" , lowval) ; LCD_SetBackColor ( Green) ; LCD_DisplayStringLine ( Line5, lcdtext) ; LCD_SetBackColor ( Black) ; sprintf ( ( char * ) lcdtext, " Upper:LD%d" , uplednum) ; LCD_DisplayStringLine ( Line7, lcdtext) ; sprintf ( ( char * ) lcdtext, " Lower:LD%d" , lowlednum) ; LCD_DisplayStringLine ( Line9, lcdtext) ; } break ; case 4 : { sprintf ( ( char * ) lcdtext, " Setting" ) ; LCD_DisplayStringLine ( Line1, lcdtext) ; sprintf ( ( char * ) lcdtext, " Max Volt:%.2f" , upval) ; LCD_DisplayStringLine ( Line3, lcdtext) ; sprintf ( ( char * ) lcdtext, " Min Volt:%.2f" , lowval) ; LCD_DisplayStringLine ( Line5, lcdtext) ; sprintf ( ( char * ) lcdtext, " Upper:LD%d" , uplednum) ; LCD_SetBackColor ( Green) ; LCD_DisplayStringLine ( Line7, lcdtext) ; LCD_SetBackColor ( Black) ; sprintf ( ( char * ) lcdtext, " Lower:LD%d" , lowlednum) ; LCD_DisplayStringLine ( Line9, lcdtext) ; } break ; case 5 : { sprintf ( ( char * ) lcdtext, " Setting" ) ; LCD_DisplayStringLine ( Line1, lcdtext) ; sprintf ( ( char * ) lcdtext, " Max Volt:%.2f" , upval) ; LCD_DisplayStringLine ( Line3, lcdtext) ; sprintf ( ( char * ) lcdtext, " Min Volt:%.2f" , lowval) ; LCD_DisplayStringLine ( Line5, lcdtext) ; sprintf ( ( char * ) lcdtext, " Upper:LD%d" , uplednum) ; LCD_DisplayStringLine ( Line7, lcdtext) ; sprintf ( ( char * ) lcdtext, " Lower:LD%d" , lowlednum) ; LCD_SetBackColor ( Green) ; LCD_DisplayStringLine ( Line9, lcdtext) ; LCD_SetBackColor ( Black) ; } break ; }
}
void adc_process ( void )
{ val = getADcVal ( & hadc2) ; if ( val> upval) { led1enable = 1 ; led2enable = 0 ; sprintf ( ( char * ) status, "Upper " ) ; } else if ( val<= upval&& val>= lowval) { led1enable = 0 ; led2enable = 0 ; led_display ( 0x00 ) ; sprintf ( ( char * ) status, "Normal " ) ; } else { led1enable = 0 ; led2enable = 1 ; sprintf ( ( char * ) status, "Lower " ) ; }
}
void key_process ( void )
{ if ( key[ 0 ] . key_single_flag) { lcdclear ( ) ; key[ 0 ] . key_single_flag = 0 ; if ( view== 0 ) { view = 1 ; } else if ( view== 1 || view== 2 || view== 3 || view== 4 || view== 5 ) { view = 0 ; } } if ( key[ 1 ] . key_single_flag) { lcdclear ( ) ; key[ 1 ] . key_single_flag = 0 ; if ( view== 1 ) { view = 2 ; } else if ( view>= 2 && view<= 5 ) { view++ ; if ( view> 5 ) view = 2 ; } } if ( key[ 2 ] . key_single_flag) { key[ 2 ] . key_single_flag = 0 ; if ( view == 4 ) { uplednum = ( uplednum % 8 ) + 1 ; upled = 0x01 << ( uplednum - 1 ) ; } else if ( view == 5 ) { lowlednum = ( lowlednum % 8 ) + 1 ; lowled = 0x01 << ( lowlednum - 1 ) ; } } if ( key[ 3 ] . key_single_flag) { key[ 3 ] . key_single_flag = 0 ; if ( view == 4 ) { uplednum = ( uplednum == 1 ) ? 8 : uplednum - 1 ; upled = 0x01 << ( uplednum - 1 ) ; } else if ( view == 5 ) { lowlednum = ( lowlednum == 1 ) ? 8 : lowlednum - 1 ; lowled = 0x01 << ( lowlednum - 1 ) ; } } }
void Error_Handler ( void )
{
} # ifdef USE_FULL_ASSERT void assert_failed ( uint8_t * file, uint32_t line)
{
}
# endif # include "key.h" struct Key key[ 4 ] = { 0 , 0 , 0 , 0 } ;
void HAL_TIM_PeriodElapsedCallback ( TIM_HandleTypeDef * htim)
{ if ( htim-> Instance== TIM2) { key[ 0 ] . key_gpio = HAL_GPIO_ReadPin ( GPIOB, GPIO_PIN_0) ; key[ 1 ] . key_gpio = HAL_GPIO_ReadPin ( GPIOB, GPIO_PIN_1) ; key[ 2 ] . key_gpio = HAL_GPIO_ReadPin ( GPIOB, GPIO_PIN_2) ; key[ 3 ] . key_gpio = HAL_GPIO_ReadPin ( GPIOA, GPIO_PIN_0) ; for ( int i = 0 ; i< 4 ; i++ ) { switch ( key[ i] . key_status) { case 0 : { if ( key[ i] . key_gpio== 0 ) { key[ i] . key_status = 1 ; } } break ; case 1 : { if ( key[ i] . key_gpio== 0 ) { key[ i] . key_single_flag = 1 ; key[ i] . key_status = 2 ; } else { key[ i] . key_status = 0 ; } } break ; case 2 : { if ( key[ i] . key_gpio== 1 ) { key[ i] . key_status = 0 ; } } break ; } } }
} # include "led.h" void led_display ( uint8_t led)
{ HAL_GPIO_WritePin ( GPIOC, GPIO_PIN_All, GPIO_PIN_SET) ; HAL_GPIO_WritePin ( GPIOD, GPIO_PIN_2, GPIO_PIN_SET) ; HAL_GPIO_WritePin ( GPIOD, GPIO_PIN_2, GPIO_PIN_RESET) ; HAL_GPIO_WritePin ( GPIOC, led<< 8 , GPIO_PIN_RESET) ; HAL_GPIO_WritePin ( GPIOD, GPIO_PIN_2, GPIO_PIN_SET) ; HAL_GPIO_WritePin ( GPIOD, GPIO_PIN_2, GPIO_PIN_RESET) ;
} # include "myadc.h" float getADcVal ( ADC_HandleTypeDef * hadc)
{ float val; HAL_ADC_Start ( hadc) ; val = HAL_ADC_GetValue ( hadc) ; return val* 3.3f / 4096 ; } 