本文主要是详解解释了SAM的论文部分以及代码实现~
论文:2023.04.05_Segment Anything
论文地址:2304.02643.pdf (arxiv.org)
代码地址:facebookresearch/segment-anything: The repository provides code for running inference with the SegmentAnything Model (SAM), links for downloading the trained model checkpoints, and example notebooks that show how to use the model. (github.com)
1.论文详解
SAM 包括三个主要组件:图像编码器、提示编码器和掩蔽解码器。
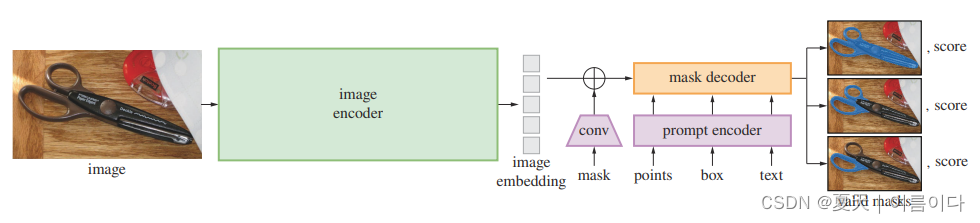
图像编码器由基于 MAE 预训练的 ViT 构成,而掩蔽解码器如图所示
图像编码器(Image encoder)
基于ViT模型对于图像编码作为输入,利用MAE(Masked AutoEncoder)预训练的ViT模型,对每张图片只处理一次。输入(c,h,w)的图像,对图像进行缩放,按照长边缩放成1024,短边不够就填充(pad),得到(c,1024,1024)的图像,经过image encoder,得到对图像16倍下采样的feature,大小为(256,64,64)。
提示编码器(Prompt encoder )
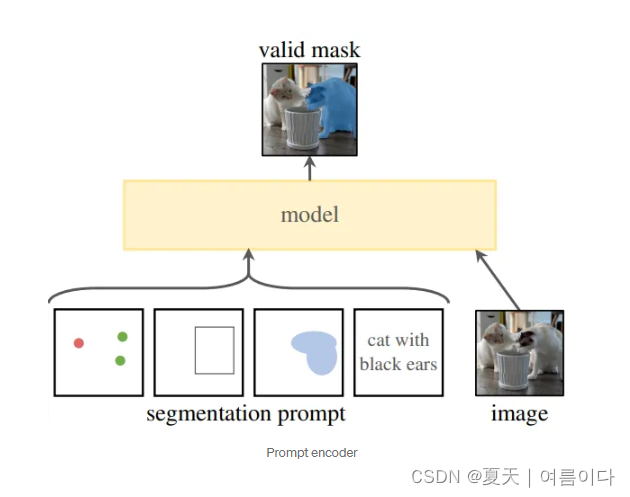
俩种提示:
稀疏sparse
- 点points:使用position encodings。点映射到256维的向量,代表点位置的 positional encoding,加2个代表该点是前景/背景的可学习的embedding
- boxes:使用position encodings,俩点确定一个box,用一个embedding对表示:1) 可学习的embedding代表左上角,2) 可学习的embedding代表右下角
- text:使用CLIP作为encoder
密集dense(mask):使用卷积作为encoder,mask 和image embedding通过element-wise相乘 (逐元素相乘,可以理解成mask的feature对image的feature进行加权)。在内部会缩小4倍,通过2个2×2,步幅为2的卷积实现,输出的通道为4和16.然后1×1卷积将这些通道映射到256个通道,每一次都通过层归一化进行增强,然后将蒙版按元素添加到图像嵌入中。在未提示掩码提示的情况下,将每个图像嵌入位置添加一个表示无掩码的学习嵌入。
掩码解码(Mask decoder)
掩码解码器有效地将图像嵌入、提示嵌入和输出令牌映射到掩码。它使用改进的 Transformer 解码器,后跟动态掩模预测头。输出token作为掩码,运行俩个块后,对图像编码和MLPt图输出到动态线性分类(dynamic linear classifier),用来计算掩码区域在每张图像的位置.
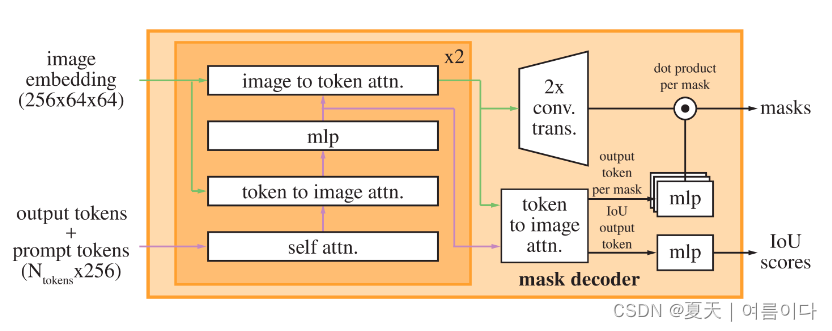
每个解码器层执行 4 个步骤(从上图可以看出):
1)对 output tokens + prompt tokens 进行 self-attention;
2)将 1)得到的 tokens 作为 query token 与 image embedding 做 cross-attention;
3)使用 MLP 更新 2)得到的 tokens;
4)将 image embedding 作为 query token 与 3)得到的 tokens 做 cross-attention。
最后一步使用提示信息更新图像嵌入。在交叉注意力期间,图像嵌入被视为一组 64×64×256 维向量。
推理时,sam模型是被封装在SamPredictor类中,将sam的forward预测的流程分别拆解到SamPredictor类的不同方法中、分不同阶段进行。
sam中forward函数对Image encoder、Prompt encoder和Mask decoder三个操作是连续的。
2.项目实现
docker 容器(Ubuntu20.04)+python3.8+pytorch1.14等等
2.1.SAM实现
2.1.0.环境设置
git clone https://github.com/facebookresearch/segment-anything
cd segment-anything; pip install -e .pip install  pycocotools matplotlib onnxruntime onnx# docker容器内的情况下务必安装
pip install opencv-python-headless
pip install opencv-contrib-python pip install opencv-python==4.8.0.74# b的大小:358M
wget https://dl.fbaipublicfiles.com/segment_anything/sam_vit_b_01ec64.pth# l的大小:1.2G
wget https://dl.fbaipublicfiles.com/segment_anything/sam_vit_l_0b3195.pth# 默认为h,h的大小:2.4G
wget https://dl.fbaipublicfiles.com/segment_anything/sam_vit_h_4b8939.pth
2.1.1.分割方法实例
输入提示点分割
可以直接用官网给的,segment-anything/notebooks/predictor_example.ipynb文件。
可以用谷歌的,也也用自己的GPU。
import sys
sys.path.append("..")
from segment_anything import sam_model_registry, SamPredictor# 这里指定sam预训练模型的权重地址及类型
sam_checkpoint = "sam_vit_h_4b8939.pth"
model_type = "vit_h"# 指定cuda还是cpu
device = "cuda"sam = sam_model_registry[model_type](checkpoint=sam_checkpoint)
sam.to(device=device)#用SamPredictor进行预测。该模型返回掩码、这些掩码的质量预测和低分辨率的掩码对数,可传递给下一次迭代预测。
predictor = SamPredictor(sam)predictor.set_image(image)
输入点为提示,进行图像分割的情况
# 输入提示点的坐标[x,y]
input_point = np.array([[400,425]])
# 定义标签:[0]: 背景   [1]:前景
input_label = np.array([1])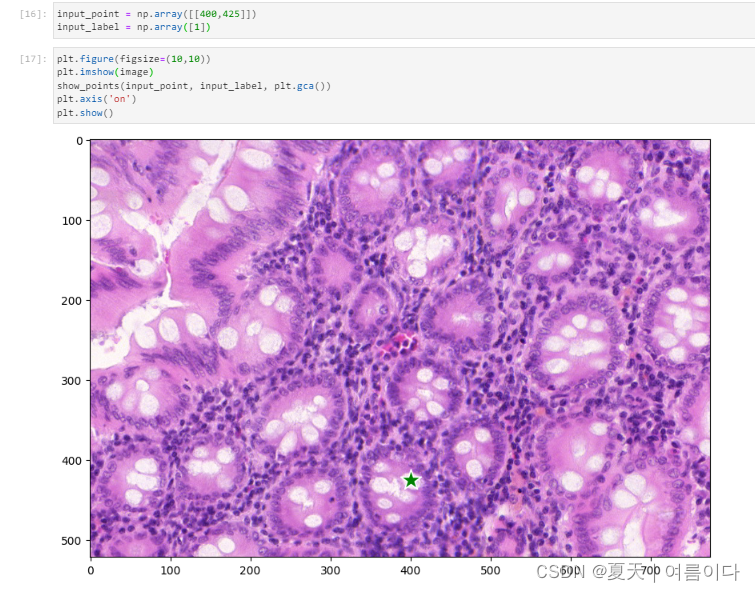
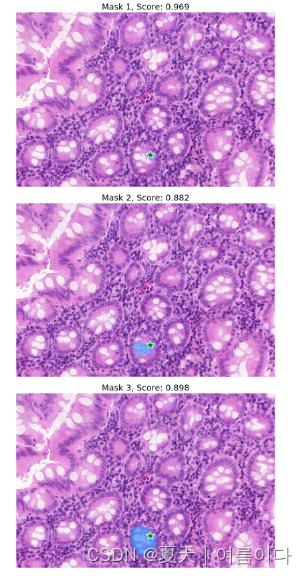
masks, scores, logits = predictor.predict(point_coords=input_point,point_labels=input_label,multimask_output=True,
)
用`SamPredictor`进行预测。该模型返回掩码、这些掩码的质量预测和低分辨率的掩码对数,可传递给下一次迭代预测。
默认输出3个掩码可视化,使用multimask_output=True会生成3个mask,multimask_output=False的话只输出一个mask
全局分割
jupter lab的代码写到一起
# 导入相关库和优化可视化效果import numpy as np
import torch
import matplotlib.pyplot as plt
import cv2def show_anns(anns):if len(anns) == 0:returnsorted_anns = sorted(anns, key=(lambda x: x['area']), reverse=True)ax = plt.gca()ax.set_autoscale_on(False)polygons = []color = []for ann in sorted_anns:m = ann['segmentation']img = np.ones((m.shape[0], m.shape[1], 3))color_mask = np.random.random((1, 3)).tolist()[0]for i in range(3):img[:,:,i] = color_mask[i]ax.imshow(np.dstack((img, m*0.35)))image = cv2.imread('test.jpg')
# 还原原图像色彩
image = cv2.cvtColor(image, cv2.COLOR_BGR2RGB)
plt.figure(figsize=(10,10))
plt.imshow(image)
plt.axis('on')
plt.show()import sys
from segment_anything import sam_model_registry, SamAutomaticMaskGenerator, SamPredictor# 加载模型
sam_checkpoint = '/lvdongrui/segment_anything/sam_vit_h_4b8939.pth'
model_type = "vit_h"device = "cuda"sam = sam_model_registry[model_type](checkpoint=sam_checkpoint)
sam.to(device=device)# 调用全局分割模型
mask_generator = SamAutomaticMaskGenerator(sam)#预测并输出可视化结果
masks = mask_generator.generate(image)
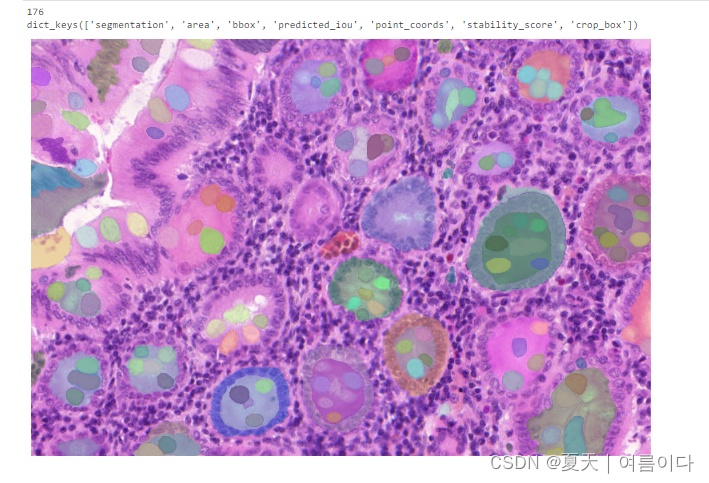
print(len(masks)) # 产生的掩码数量
print(masks[0].keys()) # 第1个掩码内的相关属性plt.figure(figsize=(10,10))
plt.imshow(image)
show_anns(masks)
plt.axis('off')
plt.show() # 如果想要调节相关参数的话
# 配置相关参数
mask_generator_2 = SamAutomaticMaskGenerator(model=sam,points_per_side=32,pred_iou_thresh=0.86, # IOU阈值stability_score_thresh=0.92, # 稳定性得分阈值crop_n_layers=1, crop_n_points_downscale_factor=2,min_mask_region_area=100, # Requires open-cv to run post-processing
)masks2 = mask_generator_2.generate(image)
print(len(masks2)) # 产生的掩码数量
print(masks2[0].keys())plt.figure(figsize=(10,10))
plt.imshow(image)
show_anns(masks2)
plt.axis('off')
plt.show()
结果
2.1.2.基于SAM微调自己的数据集
训练代码:train.py
# 导入了一些库
import warnings
warnings.filterwarnings(action='ignore')
import numpy as np
from tqdm import tqdm
import cv2
from datetime import datetime
import json
import os
import matplotlib.pyplot as plt
import argparseimport torch
from torch import nn, optim
import torch.nn.functional as F
from torch.nn.functional import threshold, normalize
from torchvision import datasets, transforms
from torch.utils.data import DataLoaderfrom segment_anything import SamAutomaticMaskGenerator, sam_model_registry
from segment_anything.utils.transforms import ResizeLongestSide
from dataloader_sam import CustomDataset# 设置了一些配置参数
beta = [0.9, 0.999]
milestone = [60000, 86666]
gamma = 0.1
use_cuda = torch.cuda.is_available()
device = torch.device("cuda" if use_cuda else "cpu")def parse_opt():parser = argparse.ArgumentParser()parser.add_argument('--batch_size', type=int, default=4, help = 'batch size')parser.add_argument('--warmup_steps', type = int, default = 250, help = ' ')parser.add_argument('--global_step', type = int, default = 0, help = ' ')parser.add_argument('--epochs', type = int, default = 10, help = 'train epcoh')parser.add_argument('--lr', type = float, default = 1e-5, help = 'learning_rate')parser.add_argument('--weight_decay', type = float, default = 0.1, help = 'weight_decay')parser.add_argument('--num_workers', type = int, default = 0, help = 'num_workers')parser.add_argument('--model_path', type = str, default = './models/', help = 'model path directory')parser.add_argument('--data_dir', type = str, default = './data_list_sam/pr_data_list.csv', help = 'data directory')parser.add_argument('--pretrained', type = str, default = False, help = 'pre trained model select')parser.add_argument('--device_id', type = int, default = 0, help = 'Cuda device Id')return parser.parse_known_args()[0]# 数据加载
def build_dataloader(data_dir, batch_size, num_workers):dataloaders = {key: DataLoader(CustomDataset(data_dir, key),batch_size = batch_size,shuffle = True if key != 'test' else False,num_workers = num_workers,pin_memory = True) for key in ['train', 'valid', 'test']}return dataloaders# 损失函数
def focal_loss(pred, target, gamma=2.0, alpha=0.25, reduction='mean'):#pred = F.sigmoid(pred)pt = torch.where(target == 1, pred, 1-pred)ce_loss = F.binary_cross_entropy(pred, target, reduction="none")focal_term = (1 - pt).pow(gamma)loss = alpha * focal_term * ce_lossreturn loss.mean()def dice_loss(pred, target, smooth=1.0):pred_flat = pred.reshape(-1)target_flat = target.reshape(-1)intersection = (pred_flat * target_flat).sum()return 1 - ((2. * intersection + smooth) /(pred_flat.sum() + target_flat.sum() + smooth))def compute_loss(pred_mask, true_mask, pred_iou, true_iou):pred_mask = F.sigmoid(pred_mask).squeeze(1).to(dtype = torch.float64)fl = focal_loss(pred_mask, true_mask)dl = dice_loss(pred_mask, true_mask)mask_loss = 20 * fl + dliou_loss = F.mse_loss(pred_iou, true_iou)total_loss = mask_loss + iou_lossreturn total_lossdef mean_iou(preds, labels, eps=1e-6):preds = normalize(threshold(preds, 0.0, 0)).squeeze(1)pred_cls = (preds == 1).float()label_cls = (labels == 1).float()intersection = (pred_cls * label_cls).sum(1).sum(1)union = (1 - (1 - pred_cls) * (1 - label_cls)).sum(1).sum(1)intersection = intersection + (union == 0)union = union + (union == 0)ious = intersection / unionreturn iousdef main(opt):use_cuda = torch.cuda.is_available()device = torch.device(f"cuda:{opt.device_id}" if use_cuda else "cpu")torch.manual_seed(234)if device == f'cuda:{opt.device_id}':torch.cuda.manual_seed_all(234)#  脚本使用预先构建的架构(sam_model_registry['vit_b'])定义了一个神经网络模型,并设置了优化器(AdamW)和学习率调度。print(device,'is available')print("Loading model...")epoch_add = 0lr = opt.lrsam = sam_model_registry['vit_b'](checkpoint='./checkpoint/sam_vit_b_01ec64.pth')if opt.pretrained:sam.load_state_dict(torch.load('./models/' + opt.pretrained))sam = sam.to(device=device)else: sam = sam.to(device=device)sam_decoder = sam.mask_decoder.to(device=device)sam_decoder = sam.mask_decoderoptimizer = optim.AdamW(sam.mask_decoder.parameters(),lr = lr, betas = beta, weight_decay = opt.weight_decay)criterion = nn.CrossEntropyLoss()scheduler = optim.lr_scheduler.MultiStepLR(optimizer, milestones=milestone, gamma=gamma)# 脚本在各个检查点保存训练模型的状态字典,如果模型在验证集上取得最佳平均IOU,则单独保存最佳模型。if len(os.listdir(opt.model_path)) == 0:save_path = os.path.join(opt.model_path, f"model_{opt.epochs}_{opt.batch_size}_0")os.makedirs(save_path)else:save_path = os.path.join(opt.model_path, f"model_{opt.epochs}_{opt.batch_size}_" + str(len(os.listdir(opt.model_path))))os.makedirs(save_path)print('Training Start')best_loss = 999999999best_mIOU = 0tr_pl_loss_list = []tr_pl_mi_list = []val_pl_loss_list = []val_pl_mi_list = []dataloaders = build_dataloader(opt.data_dir, opt.batch_size, opt.num_workers)for epoch in range(opt.epochs):train_loss_list = []train_miou_list = []sam.train()iterations = tqdm(dataloaders['train'])# 循环进行模型的多轮训练for train_data in iterations:# 将训练数据移到指定设备,这里是GPUtrain_input = train_data['image'].to(device)train_target_mask = train_data['mask'].to(device, dtype = torch.float64)# 对优化器的梯度进行归零optimizer.zero_grad()with torch.no_grad():# 使用 sam 模型的 image_encoder 提取图像特征,并使用 prompt_encoder 提取稀疏和密集的嵌入。在本代码中进行提示输入,所以都是None.train_encode_feature = sam.image_encoder(train_input)train_sparse_embeddings, train_dense_embeddings = sam.prompt_encoder(points = None, boxes = None, masks = None)#  通过 mask_decoder 解码器生成训练集的预测掩码和IOUtrain_mask, train_IOU = sam.mask_decoder(image_embeddings = train_encode_feature,image_pe = sam.prompt_encoder.get_dense_pe(),sparse_prompt_embeddings = train_sparse_embeddings,dense_prompt_embeddings = train_dense_embeddings,multimask_output = False)# 计算预测IOU和真实IOU之间的差异,并将其添加到列表中。然后计算训练损失(总损失包括mask损失和IOU损失),进行反向传播和优化器更新。train_true_iou = mean_iou(train_mask, train_target_mask, eps=1e-6)train_miou_list = train_miou_list + train_true_iou.tolist()train_loss_one = compute_loss(train_mask, train_target_mask, train_IOU, train_true_iou)train_loss_one.backward()optimizer.step()train_loss_list.append(train_loss_one.item())     # 学习率调整if epoch_add == 0:if opt.global_step < opt.warmup_steps:    lr_scale = opt.global_step / opt.warmup_stepsfor param_group in optimizer.param_groups:param_group['lr'] = 8e-4 * lr_scaleopt.global_step += 1pbar_desc = "Model train loss --- "pbar_desc += f"Total loss: {np.mean(train_loss_list):.5f}"pbar_desc += f", total mIOU: {np.mean(train_miou_list):.5f}"iterations.set_description(pbar_desc)train_loss = np.mean(train_loss_list)train_miou = np.mean(train_miou_list)torch.cuda.empty_cache()tr_pl_loss_list.append(train_loss)tr_pl_mi_list.append(train_miou)sam.eval()scheduler.step()with torch.no_grad():valid_loss_list = []valid_miou_list = []valid_true_iou = 0valid_loss = 0valid_miou = 0iterations = tqdm(dataloaders['valid'])for valid_data in iterations:   valid_input = valid_data['image'].to(device)valid_target_mask = valid_data['mask'].to(device, dtype = torch.float64)valid_encode_feature = sam.image_encoder(valid_input)valid_sparse_embeddings, valid_dense_embeddings = sam.prompt_encoder(points = None, boxes = None, masks = None)valid_mask, valid_IOU = sam.mask_decoder(image_embeddings = valid_encode_feature,image_pe = sam.prompt_encoder.get_dense_pe(),sparse_prompt_embeddings = valid_sparse_embeddings,dense_prompt_embeddings = valid_dense_embeddings,multimask_output = False)valid_true_iou = mean_iou(valid_mask, valid_target_mask, eps=1e-6)valid_miou_list = valid_miou_list + valid_true_iou.tolist()valid_loss_one = compute_loss(valid_mask, valid_target_mask, valid_IOU, valid_true_iou)valid_loss_list.append(valid_loss_one.item())pbar_desc = "Model valid loss --- "pbar_desc += f"Total loss: {np.mean(valid_loss_list):.5f}"pbar_desc += f", total mIOU: {np.mean(valid_miou_list):.5f}"iterations.set_description(pbar_desc)valid_loss = np.mean(valid_loss_list)valid_miou = np.mean(valid_miou_list)val_pl_loss_list.append(valid_loss)val_pl_mi_list.append(valid_miou)       model_path = opt.model_path + 'sam.pth'sam = sam.cpu()torch.save(sam.state_dict(), model_path)sam = sam.to(device)if best_mIOU < valid_miou:best_loss = valid_lossbest_mIOU = valid_mioumodel_path = save_path + '/sam_best.pth'sam = sam.cpu()torch.save(sam.state_dict(), model_path)sam = sam.to(device)f = open(os.path.join(save_path, 'best.txt'), 'w')f.write(f"Experimental Day: {datetime.now()}")f.write("\n")f.write(f"mIoU: {str(best_mIOU)}")f.write("\n")f.write(f"epochs:{opt.epochs}")f.write("\n")f.write(f"batch_size:{opt.batch_size}")f.write("\n")f.write(f"learning_rate:{opt.lr}")f.write("\n")f.write(f"Data_set : {opt.data_dir}")f.close()print("epoch : {:3d}, train loss : {:3.4f}, valid loss : {:3.4f}, valid mIOU : {:3.4f}\( best vaild loss : {:3.4f}, best valid mIOU : {:3.4f} )".format(epoch + 1 + epoch_add,train_loss,valid_loss,valid_miou,best_loss,best_mIOU))lr = optimizer.param_groups[0]["lr"]if (epoch + 1) % 5 == 0 or (epoch + 1) in [1, 2, 3, 4, 5]:model_path = save_path + "/"+ "sam_" + str(epoch + 1 + epoch_add) + '_' + str(round(lr, 10)) + '.pth'sam = sam.cpu()torch.save(sam.state_dict(), model_path)sam = sam.to(device)# (2, 2) 形式的图使用matplotlib可视化训练进展,生成用于训练和验证平均IOU、训练和验证损失的图表。plt_dict = {"Train_mIoU" : tr_pl_mi_list,"Val_mIoU" : val_pl_mi_list,"Train_Loss" : tr_pl_loss_list,"Val_Loss" : val_pl_loss_list}plt.figure(figsize=(15,15))for i, (key, item) in enumerate(plt_dict.items()):plt.subplot(2, 2, i+1)plt.plot(range(opt.epochs), item, label=f"{key}")plt.title(f"{key}", fontsize = 20)plt.xlabel('Epochs', fontsize = 15)plt.ylabel(f'{key.split("_")[-1]}', fontsize = 15)plt.grid(True)plt.savefig(save_path + f'/sam_{opt.epochs}_{opt.batch_size}_{opt.lr}_result.png')if __name__ == '__main__':opt = parse_opt()main(opt)
2.2.YOLO+SAM
2.2.0.环境设置及Demo
pip install ultralytics
#pip install git+https://github.com/facebookresearch/segment-anything.git
#wget https://dl.fbaipublicfiles.com/segment_anything/sam_vit_l_0b3195.pthgit clone https://github.com/poojatambe/Segmentation_models_on_custom_data
cd Segmentation_models_on_custom_data# 下载yolov8的检测权重
wget https://github.com/ultralytics/assets/releases/download/v8.1.0/yolov8x-oiv7.pt# 根据自己路径修改
python SAM_yolov8.py --img './test.png' --weights './yolov8-oiv7.pt' --model_type 'vit_l' --checkpoints './sam_vit_l_0b3195.pth'
如果出现错误,请参考【PS3】
3.2.1.微调自己的数据集
敬请期待。。。
3.相关知识点进阶
输入提示点实例
#输入1个点
input_point = np.array([[495,518]])
input_label = np.ones(input_point.shape[0])
input_box = None
#输入三个提示点
input_point = np.array([[221,482],[498,633],[750,379]])
input_label = np.ones(input_point.shape[0])
input_box = None输入提示框box实例
#输入一个box
input_box = np.array([[4,13,1007,1023]])
input_point, input_label = None, None
#输入多个box
input_box = torch.tensor([[45,260,515,470], [310,228,424,296]],device=predictor.device)
transformed_box = predictor.transform.apply_boxes_torch(input_box, image.shape[:2])
input_point, input_label = None, None
使用box的计算
IoU(Intersection over Union): 交并比,衡量bounding box与ground truth的重叠程度。比值越大重叠度越高,完全重合为1。如果还没有bbox回归,则bbox就是候选框/锚框。
通常表示边界框的位置有两种方式:
- (x1,y1,x2,y2):其中(x1,y1)是矩形框左上角的坐标,(x2,y2)是矩形框右下角的坐标。
- (x,y,w,h):其中(x,y)是矩形框中心点的坐标,w是矩形框的宽度,h是矩形框的高度。
在SAM中使用xywh 格式的掩模边界框
【PS1】IndexError: boolean index did not match indexed array along dimension 0; dimension is 2 but corresponding boolean dimension is 1
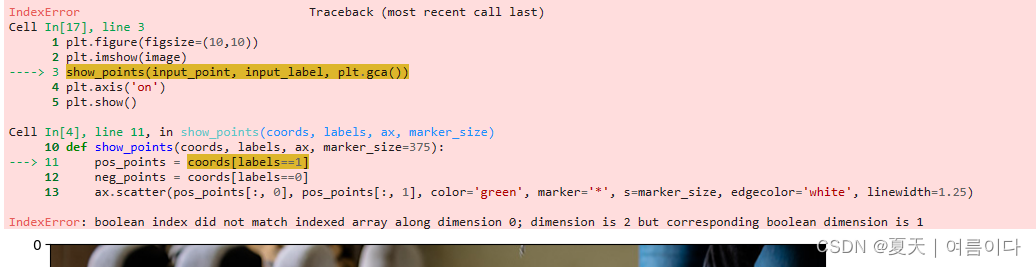
错误原因:数组输入错误,少了一对中括号
将自定义的input_point = np.array([200,400])
改为input_point = np.array([[200,400]])
【PS2】RuntimeError:CUDNN_BACKEND_TENSOR_DESCRIPTOR: Check and Set the CUDNN_ATTR_TENSOR_STRIDES Correctly cudnn_status: CUDNN_STATUS_BAD_PARAM
【PS3】RuntimeError: Expected all tensors to be on the same device, but found at least two devices, cuda:0 and cpu! (when checking argument for argument mat2 in method wrapper_mm)
这是由于代码所写的某一位置的Tensor设备指代不清楚,tensors一会在cpu计算,一会在GPU计算。容易导致该错误产生的原因:
当多GPU并行训练时(我的是俩块):
这时候你的model里面传入的不只是Cuda:0,还有Cuda:1, Cuda:2等等,这个时候,你的网络模型model里面的forward函数里面就及其容易报错,因为里面存在的一些定维度的Tensor,比如权重、偏差的device容易跑偏。
当单GPU正常使用Cuda:0:
这时候按理来说,只要device代码指代正常,按理来说不会出现设备问题,如果出现了,就是tensor的格式没有传入cuda而是保留在cpu。碰巧我某天训练时候就出现了,思路跟上面一样,最容易出现错误的地方是网络模型中固定维度的tensor如权重和偏差等tensor,或者是forward函数里面的输出.
解决
指定GPU
device = torch.device('cuda' if torch.cuda.is_available() else 'cpu')更多可参考RuntimeError: Expected all tensors to be on the same device, but found at least two devices-CSDN博客
Q&A
【Q&A1】怎么计算mask的shape?
在图像分割中,模型在训练过程中计算mask的形状(shape)取决于任务的要求。分割模型通常输出一个与输入图像相同空间分辨率的mask,该mask用于标识图像中的不同区域或对象。这个mask的形状通常与输入图像的宽度和高度相匹配。
参考文献
【1】SAM : Segment Anything - Best Simple Tutorial to master it (inside-machinelearning.com)
【2】SAM + YOLO8图像检测与分割简明教程 - 知乎 (zhihu.com)
【3】Segment Anything Model (SAM): Explained | by Utkarsh Doshi | Dec, 2023 | Medium
【4】SAM: A Image Segmentation Foundation Model – Towards AI
【5】SAM(segment anything model)分割一切 Demo测试及API调用_sam模型运行实例-CSDN博客
【6】Segment Anything(SAM)的demo的简单使用_segment anything demo-CSDN博客

![[office] Excel CHITEST 函数 使用实例教程 #媒体#知识分享#其他](https://img-blog.csdnimg.cn/img_convert/72480a7f0328615b4d14d99752204d89.png)