先来复习一下之前写的两个例程:
1. 绘制网格线
import pygletwindow = pyglet.window.Window(800, 600)
color = (255, 255, 255, 255)  # 白色
lines = []for y in range(0, window.height, 40):lines.append(pyglet.shapes.Line(0, y, window.width, y, color=color))
for x in range(0, window.width, 40):lines.append(pyglet.shapes.Line(x, 0, x, window.height, color=color))@window.event
def on_draw():window.clear()for line in lines:line.draw()pyglet.app.run()
2. 模拟按钮
import pygletwindow = pyglet.window.Window(800, 600)GRAY = (220, 220, 220, 255)
BLACK = (0, 0, 0, 255)
RED = (255, 0, 0, 255)pattern = pyglet.image.SolidColorImagePattern(color=GRAY)
image = pattern.create_image(100,50)
button1 = pyglet.sprite.Sprite(image, 280, 200)
button2 = pyglet.sprite.Sprite(image, 280+150, 200)
labelb1 = pyglet.text.Label('按钮1', font_size=16, x=305, y=216, color=BLACK)
labelb2 = pyglet.text.Label('按钮2', font_size=16, x=455, y=216, color=BLACK)
message = pyglet.text.Label('', font_size=16, x=20, y=16)
widgets = [message]
widgets.extend([button1, button2, labelb1, labelb2])@window.event
def on_draw():window.clear()for widget in widgets:widget.draw()@window.event
def on_mouse_press(x, y, button, modifier):X, Y, W, H = button1.x, button1.y, button1.width, button1.heightif x in range(X,X+W+1) and y in range(Y,Y+H+1):message.text = '你点击了按钮1'elif x in range(X+150,X+W+151) and y in range(Y,Y+H+1):message.text = '你点击了按钮2'@window.event
def on_mouse_motion(x, y, dx, dy):X, Y, W, H = button1.x, button1.y, button1.width, button1.heightif x in range(X,X+W+1) and y in range(Y,Y+H+1):labelb1.color = REDelif x in range(X+150,X+W+151) and y in range(Y,Y+H+1):labelb2.color = REDelse:labelb1.color = BLACKlabelb2.color = BLACKpyglet.app.run()
以上两个例程,都使用了控件列表,然后在on_draw事件中遍历,基本上实现了“批处理”画图的功能。但是,实现上pyglet库本身就带有这种批处理功能,这就是各个控件都带有的batch参数。看一个pyglet自带的实例:
import pyglet
from pyglet import shapeswindow = pyglet.window.Window(960, 540)
batch = pyglet.graphics.Batch()circle = shapes.Circle(700, 150, 100, color=(50, 225, 30), batch=batch)
square = shapes.Rectangle(200, 200, 200, 200, color=(55, 55, 255), batch=batch)
rectangle = shapes.Rectangle(250, 300, 400, 200, color=(255, 22, 20), batch=batch)
rectangle.opacity = 128
rectangle.rotation = 33
line = shapes.Line(100, 100, 100, 200, width=19, batch=batch)
line2 = shapes.Line(150, 150, 444, 111, width=4, color=(200, 20, 20), batch=batch)
star = shapes.Star(800, 400, 60, 40, num_spikes=20, color=(255, 255, 0), batch=batch)@window.event
def on_draw():window.clear()batch.draw()pyglet.app.run()
是不是更简单,使用了pyglet.graphics.Batch()对象,把需要一起画的控件都装进Batch()里,然后再一起画出来。与以下代码的效果是一样的,但省掉了widgets元组和遍历过程,还是原生的批处理参数batch更简单。
import pyglet
from pyglet import shapeswindow = pyglet.window.Window(960, 540)circle = shapes.Circle(700, 150, 100, color=(50, 225, 30))
square = shapes.Rectangle(200, 200, 200, 200, color=(55, 55, 255))
rectangle = shapes.Rectangle(250, 300, 400, 200, color=(255, 22, 20))
rectangle.opacity = 128
rectangle.rotation = 33
line = shapes.Line(100, 100, 100, 200, width=19)
line2 = shapes.Line(150, 150, 444, 111, width=4, color=(200, 20, 20))
star = shapes.Star(800, 400, 60, 40, num_spikes=20, color=(255, 255, 0))
widgets = circle, square, rectangle, line, line2, star@window.event
def on_draw():window.clear()for batch in widgets:batch.draw()pyglet.app.run()
接下来说说group分组参数,先看一个实例:
import pygletwindow = pyglet.window.Window(800, 500 , caption='Batch&Group')
batch = pyglet.graphics.Batch()  # 创建一个Batch对象
group = [pyglet.graphics.Group(i) for i in range(4)]   # 创建一组Group对象circle1 = pyglet.shapes.Circle(x=250, y=250, radius=80, color=(255, 0, 0, 255), batch=batch, group=group[0])
rectangle1 = pyglet.shapes.Rectangle(x=150, y=200, width=200, height=100, color=(0, 0, 255, 255), batch=batch, group=group[1])circle2 = pyglet.shapes.Circle(x=550, y=250, radius=80, color=(255, 0, 0, 255), batch=batch, group=group[3])
rectangle2 = pyglet.shapes.Rectangle(x=450, y=200, width=200, height=100, color=(0, 0, 255, 255), batch=batch, group=group[2])@window.event
def on_draw():window.clear()batch.draw()  # 在窗口上绘制batch中的所有图形对象pyglet.app.run()
运行效果:
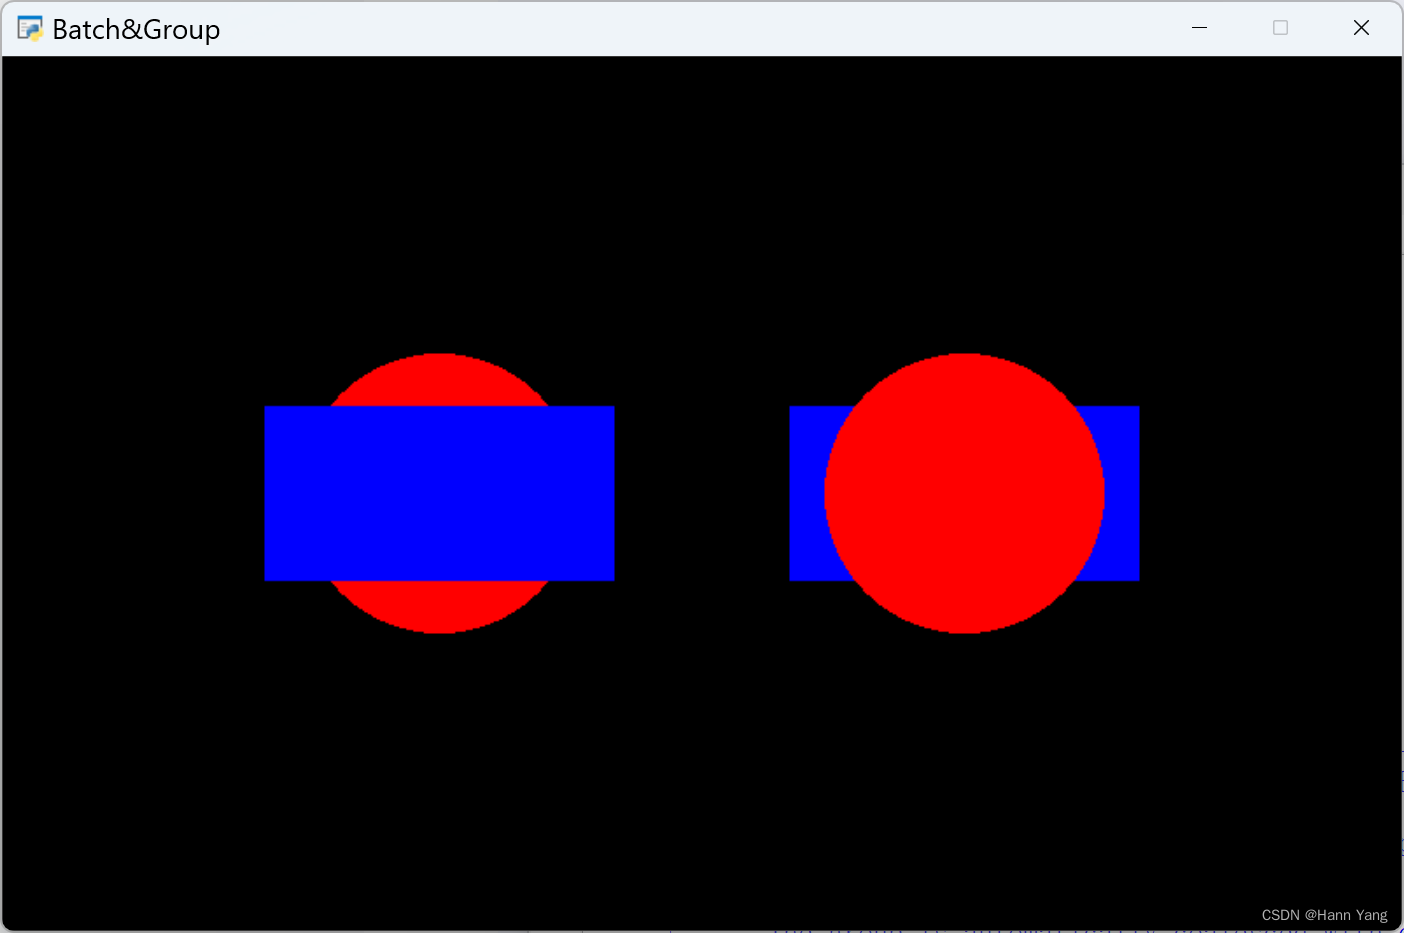
group参数主要用于控制控件的显示顺序,与pyglet.graphics.Group(order=i)配合使用,这里order数值越大越在上层,越小则越在下层。当然group除了排序的功能,还有包括同组绑定纹理、着色器或设置任何其他参数的功能,这些功能以后再安排学习。
到此已基本了解pyglet控件参数batch和group的用法,再来看一下graphics.Batch和graphics.Group的自带说明:
class Batch
Help on class Batch in module pyglet.graphics:
class Batch(builtins.object)
Manage a collection of drawables for batched rendering.Many drawable pyglet objects accept an optional `Batch` argument in their
constructors. By giving a `Batch` to multiple objects, you can tell pyglet
that you expect to draw all of these objects at once, so it can optimise its
use of OpenGL. Hence, drawing a `Batch` is often much faster than drawing
each contained drawable separately.The following example creates a batch, adds two sprites to the batch, and
then draws the entire batch::batch = pyglet.graphics.Batch()
car = pyglet.sprite.Sprite(car_image, batch=batch)
boat = pyglet.sprite.Sprite(boat_image, batch=batch)def on_draw():
batch.draw()While any drawables can be added to a `Batch`, only those with the same
draw mode, shader program, and group can be optimised together.Internally, a `Batch` manages a set of VertexDomains along with
information about how the domains are to be drawn. To implement batching on
a custom drawable, get your vertex domains from the given batch instead of
setting them up yourself.Methods defined here:
__init__(self)
Create a graphics batch.draw(self)
Draw the batch.draw_subset(self, vertex_lists)
Draw only some vertex lists in the batch.The use of this method is highly discouraged, as it is quite
inefficient. Usually an application can be redesigned so that batches
can always be drawn in their entirety, using `draw`.The given vertex lists must belong to this batch; behaviour is
undefined if this condition is not met.:Parameters:
`vertex_lists` : sequence of `VertexList` or `IndexedVertexList`
Vertex lists to draw.get_domain(self, indexed, mode, group, program, attributes)
Get, or create, the vertex domain corresponding to the given arguments.invalidate(self)
Force the batch to update the draw list.This method can be used to force the batch to re-compute the draw list
when the ordering of groups has changed... versionadded:: 1.2
migrate(self, vertex_list, mode, group, batch)
Migrate a vertex list to another batch and/or group.`vertex_list` and `mode` together identify the vertex list to migrate.
`group` and `batch` are new owners of the vertex list after migration.The results are undefined if `mode` is not correct or if `vertex_list`
does not belong to this batch (they are not checked and will not
necessarily throw an exception immediately).`batch` can remain unchanged if only a group change is desired.
:Parameters:
`vertex_list` : `~pyglet.graphics.vertexdomain.VertexList`
A vertex list currently belonging to this batch.
`mode` : int
The current GL drawing mode of the vertex list.
`group` : `~pyglet.graphics.Group`
The new group to migrate to.
`batch` : `~pyglet.graphics.Batch`
The batch to migrate to (or the current batch).----------------------------------------------------------------------
Data descriptors defined here:__dict__
dictionary for instance variables (if defined)__weakref__
list of weak references to the object (if defined)
class Group
Help on class Group in module pyglet.graphics:
class Group(builtins.object)
Group(order=0, parent=None)Group of common OpenGL state.
`Group` provides extra control over how drawables are handled within a
`Batch`. When a batch draws a drawable, it ensures its group's state is set;
this can include binding textures, shaders, or setting any other parameters.
It also sorts the groups before drawing.In the following example, the background sprite is guaranteed to be drawn
before the car and the boat::batch = pyglet.graphics.Batch()
background = pyglet.graphics.Group(order=0)
foreground = pyglet.graphics.Group(order=1)background = pyglet.sprite.Sprite(background_image, batch=batch, group=background)
car = pyglet.sprite.Sprite(car_image, batch=batch, group=foreground)
boat = pyglet.sprite.Sprite(boat_image, batch=batch, group=foreground)def on_draw():
batch.draw():Parameters:
`order` : int
Set the order to render above or below other Groups.
Lower orders are drawn first.
`parent` : `~pyglet.graphics.Group`
Group to contain this Group; its state will be set before this
Group's state.:Variables:
`visible` : bool
Determines whether this Group is visible in any of the Batches
it is assigned to. If ``False``, objects in this Group will not
be rendered.
`batches` : list
Read Only. A list of which Batches this Group is a part of.Methods defined here:
__eq__(self, other)
Return self==value.__hash__(self)
Return hash(self).__init__(self, order=0, parent=None)
Initialize self. See help(type(self)) for accurate signature.__lt__(self, other)
Return self<value.__repr__(self)
Return repr(self).set_state(self)
Apply the OpenGL state change.The default implementation does nothing.
set_state_recursive(self)
Set this group and its ancestry.Call this method if you are using a group in isolation: the
parent groups will be called in top-down order, with this class's
`set` being called last.unset_state(self)
Repeal the OpenGL state change.The default implementation does nothing.
unset_state_recursive(self)
Unset this group and its ancestry.The inverse of `set_state_recursive`.
----------------------------------------------------------------------
Readonly properties defined here:batches
order
----------------------------------------------------------------------
Data descriptors defined here:__dict__
dictionary for instance variables (if defined)__weakref__
list of weak references to the object (if defined)visible
最后,使用Batch()修改一下之前两个例程:
import pygletwindow = pyglet.window.Window(800, 600, caption='绘制网络线')
color = (255, 255, 255, 255)
lines = pyglet.graphics.Batch()for y in range(0, window.height, 40):exec(f'y{y//40} = pyglet.shapes.Line(0, y, window.width, y, color=color, batch=lines)')
for x in range(0, window.width, 40):exec(f'x{x//40} = pyglet.shapes.Line(x, 0, x, window.height, color=color, batch=lines)')@window.event
def on_draw():window.clear()lines.draw()pyglet.app.run()
import pygletwindow = pyglet.window.Window(800, 600, caption='按钮模拟')GRAY = (220, 220, 220, 255)
BLACK = (0, 0, 0, 255)
RED = (255, 0, 0, 255)batch = pyglet.graphics.Batch()
pattern = pyglet.image.SolidColorImagePattern(color=GRAY)
image = pattern.create_image(100,50)
button1 = pyglet.sprite.Sprite(image, 280, 200, batch = batch)
button2 = pyglet.sprite.Sprite(image, 280+150, 200, batch = batch)
labelb1 = pyglet.text.Label('按钮1', font_size=16, x=305, y=216, color=BLACK, batch = batch)
labelb2 = pyglet.text.Label('按钮2', font_size=16, x=455, y=216, color=BLACK, batch = batch)
message = pyglet.text.Label('', font_size=16, x=20, y=16, batch = batch)@window.event
def on_draw():window.clear()batch.draw()@window.event
def on_mouse_press(x, y, button, modifier):X, Y, W, H = button1.x, button1.y, button1.width, button1.heightif x in range(X,X+W+1) and y in range(Y,Y+H+1):message.text = '你点击了按钮1'elif x in range(X+150,X+W+151) and y in range(Y,Y+H+1):message.text = '你点击了按钮2'@window.event
def on_mouse_motion(x, y, dx, dy):X, Y, W, H = button1.x, button1.y, button1.width, button1.heightif x in range(X,X+W+1) and y in range(Y,Y+H+1):labelb1.color = REDelif x in range(X+150,X+W+151) and y in range(Y,Y+H+1):labelb2.color = REDelse:labelb1.color = BLACKlabelb2.color = BLACKpyglet.app.run()
完。