文章目录
- 前言
- 一、关键函数
- 二、完整代码
- 效果
前言
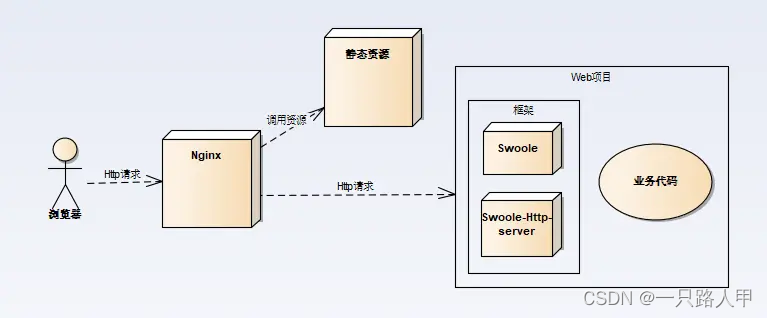
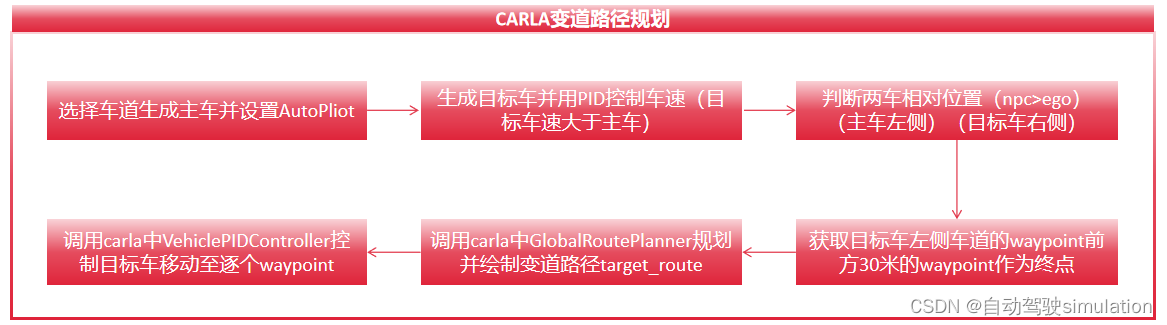
本文介绍一种在carla中比较简单的变道路径规划方法,主要核心是调用carla的GlobalRoutePlanner模块和PID控制模块实现变道,大体的框架如下图所示。
一、关键函数
1、get_spawn_point(),该函数根据指定road和lane获得waypoint(这里之所以这么用是为了选择一条比较长的直路)。具体用法可以参考上篇文章:Carla自动驾驶仿真八:两种查找CARLA地图坐标点的方法
def get_spawn_point(self,target_road_id,target_lane_id):#每隔5m生成1个waypointwaypoints = self.map.generate_waypoints(5.0)# 遍历路点for waypoint in waypoints:if waypoint.road_id == target_road_id:lane_id = waypoint.lane_id# 检查是否已经找到了特定车道ID的路点if lane_id == target_lane_id:location = waypoint.transform.locationlocation.z = 1ego_spawn_point = carla.Transform(location, waypoint.transform.rotation)breakreturn ego_spawn_point
2、should_cut_in(),用于主车和目标车的相对距离判断,当目标车超越自车一定距离时,开始给cut_in_flag置Ture,并在下一步骤规划变道路径和执行变道操作。
def should_cut_in(self,npc_vehicle, ego_vehicle, dis_to_cut=5):location1 = npc_vehicle.get_transform().locationlocation2 = ego_vehicle.get_transform().locationrel_x = location1.x - location2.xrel_y = location1.y - location2.ydistance = math.sqrt(rel_x * rel_x + rel_y * rel_y)print("relative dis",distance)#rel_x 大于等于0,说明目标车在前方if rel_x >= 0:distance = distanceelse:distance = -distanceif distance >= dis_to_cut:print("The conditions for changing lanes are met.")cut_in_flag = Trueelse:cut_in_flag = Falsereturn cut_in_flag
3、cal_target_route(),函数中调用了Carla的GlobalRoutePlanner模块,能根据起点和终点自动生成车辆行驶的路径(重点),我这里的变道起点是两车相对距离达到(阈值)时目标车的当前位置,而终点就是左侧车道前方target_dis米。将起点和终点代入到route = grp.trace_route(current_location, target_location)就能获取到规划路径route。
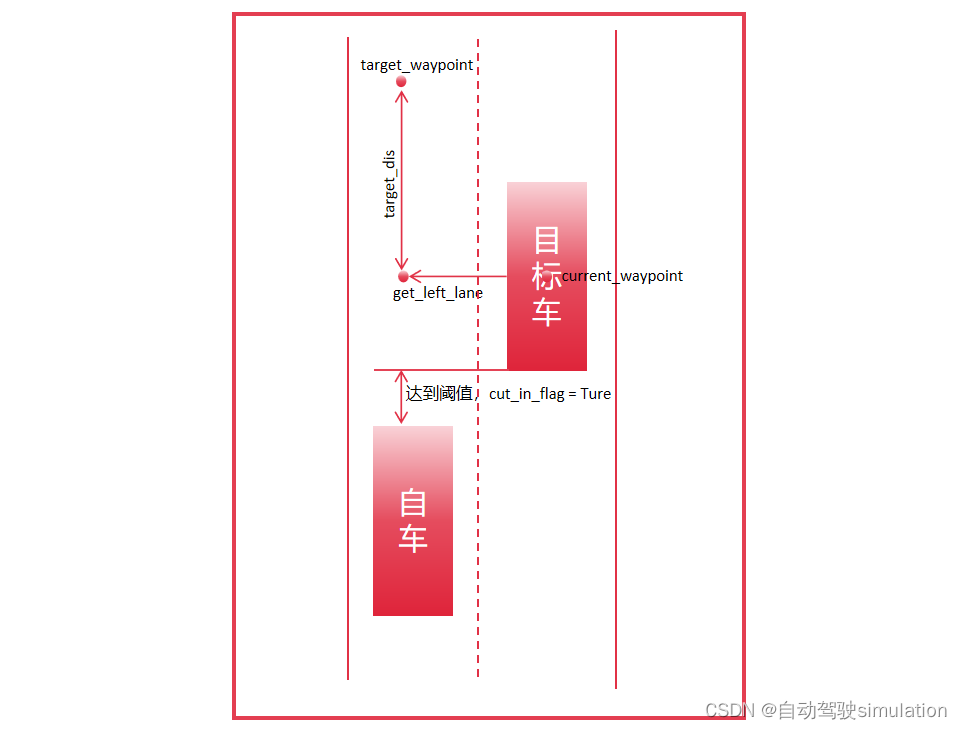
def cal_target_route(self,vehicle=None,lanechange="left",target_dis=20):#实例化道路规划模块grp = GlobalRoutePlanner(self.map, 2)#获取npc车辆当前所在的waypointcurrent_location = vehicle.get_transform().locationcurrent_waypoint = self.map.get_waypoint(current_location)#选择变道方向if "left" in lanechange:target_org_waypoint = current_waypoint.get_left_lane()elif "right" in lanechange:target_org_waypoint = current_waypoint.get_right_lane()#获取终点的位置target_location = target_org_waypoint.next(target_dis)[0].transform.location#根据起点和重点生成规划路径route = grp.trace_route(current_location, target_location)return route
4、speed_con_by_pid(),通过PID控制车辆的达到目标速度,pid是通过实例化Carla的PIDLongitudinalController实现。由于pid.run_step()只返回油门的控制,需要增加刹车的逻辑。
control_signal = pid.run_step(target_speed=target_speed, debug=False)throttle = max(min(control_signal, 1.0), 0.0) # 确保油门值在0到1之间brake = 0.0 # 根据需要设置刹车值if control_signal < 0:throttle = 0.0brake = abs(control_signal) # 假设控制器输出的负值可以用来刹车vehilce.apply_control(carla.VehicleControl(throttle=throttle, brake=brake))
5、PID = VehiclePIDController()是carla的pid横纵向控制模块,通过设置目标速度和目标终点来实现轨迹控制control = PID.run_step(target_speed, target_waypoint),PID参数我随便调了一组,有兴趣的可以深入调一下。
二、完整代码
import carla
import time
import math
import sys#修改成自己的carla路径
sys.path.append(r'D:\CARLA_0.9.14\WindowsNoEditor\PythonAPI\carla')
from agents.navigation.global_route_planner import GlobalRoutePlanner
from agents.navigation.controller import VehiclePIDController,PIDLongitudinalController
from agents.tools.misc import draw_waypoints, distance_vehicle, vector, is_within_distance, get_speedclass CarlaWorld:def __init__(self):self.client = carla.Client('localhost', 2000)self.world = self.client.load_world('Town06')# self.world = self.client.get_world()self.map = self.world.get_map()# 开启同步模式settings = self.world.get_settings()settings.synchronous_mode = Truesettings.fixed_delta_seconds = 0.05def spawm_ego_by_point(self,ego_spawn_point):vehicle_bp = self.world.get_blueprint_library().filter('vehicle.tesla.*')[0]ego_vehicle = self.world.try_spawn_actor(vehicle_bp,ego_spawn_point)return ego_vehicledef spawn_npc_by_offset(self,ego_spawn_point,offset):vehicle_bp = self.world.get_blueprint_library().filter('vehicle.tesla.*')[0]# 计算新的生成点rotation = ego_spawn_point.rotationlocation = ego_spawn_point.locationlocation.x += offset.xlocation.y += offset.ylocation.z += offset.znpc_transform = carla.Transform(location, rotation)npc_vehicle = self.world.spawn_actor(vehicle_bp, npc_transform)return npc_vehicledef get_spawn_point(self,target_road_id,target_lane_id):#每隔5m生成1个waypointwaypoints = self.map.generate_waypoints(5.0)# 遍历路点for waypoint in waypoints:if waypoint.road_id == target_road_id:lane_id = waypoint.lane_id# 检查是否已经找到了特定车道ID的路点if lane_id == target_lane_id:location = waypoint.transform.locationlocation.z = 1ego_spawn_point = carla.Transform(location, waypoint.transform.rotation)breakreturn ego_spawn_pointdef cal_target_route(self,vehicle=None,lanechange="left",target_dis=20):#实例化道路规划模块grp = GlobalRoutePlanner(self.map, 2)#获取npc车辆当前所在的waypointcurrent_location = vehicle.get_transform().locationcurrent_waypoint = self.map.get_waypoint(current_location)#选择变道方向if "left" in lanechange:target_org_waypoint = current_waypoint.get_left_lane()elif "right" in lanechange:target_org_waypoint = current_waypoint.get_right_lane()#获取终点的位置target_location = target_org_waypoint.next(target_dis)[0].transform.location#根据起点和重点生成规划路径route = grp.trace_route(current_location, target_location)return routedef draw_target_line(self,waypoints):# 获取世界和调试助手debug = self.world.debug# 设置绘制参数life_time = 60.0  # 点和线将持续显示的时间(秒)color = carla.Color(255, 0, 0)thickness = 0.3  # 线的厚度for i in range(len(waypoints) - 1):debug.draw_line(waypoints[i][0].transform.location + carla.Location(z=0.5),waypoints[i + 1][0].transform.location + carla.Location(z=0.5),thickness=thickness,color=color,life_time=life_time)def draw_current_point(self,current_point):self.world.debug.draw_point(current_point,size=0.1, color=carla.Color(b=255), life_time=60)def speed_con_by_pid(self,vehilce=None,pid=None,target_speed=30):control_signal = pid.run_step(target_speed=target_speed, debug=False)throttle = max(min(control_signal, 1.0), 0.0)  # 确保油门值在0到1之间brake = 0.0  # 根据需要设置刹车值if control_signal < 0:throttle = 0.0brake = abs(control_signal)  # 假设控制器输出的负值可以用来刹车vehilce.apply_control(carla.VehicleControl(throttle=throttle, brake=brake))def set_spectator(self,vehicle):self.world.get_spectator().set_transform(carla.Transform(vehicle.get_transform().location +carla.Location(z=50), carla.Rotation(pitch=-90)))def should_cut_in(self,npc_vehicle, ego_vehicle, dis_to_cut=5):location1 = npc_vehicle.get_transform().locationlocation2 = ego_vehicle.get_transform().locationrel_x = location1.x - location2.xrel_y = location1.y - location2.ydistance = math.sqrt(rel_x * rel_x + rel_y * rel_y)print("relative dis",distance)if rel_x >= 0:distance = distanceelse:distance = -distanceif distance >= dis_to_cut:print("The conditions for changing lanes are met.")cut_in_flag = Trueelse:cut_in_flag = Falsereturn cut_in_flagif __name__ == '__main__':try:CARLA = CarlaWorld()#根据road_id和lane_id选择出生点start_point = CARLA.get_spawn_point(target_road_id=40, target_lane_id=-5)#生成自车ego_vehicle = CARLA.spawm_ego_by_point(start_point)#设置初始的观察者视角CARLA.set_spectator(ego_vehicle)#相对ego生成目标车relative_ego = carla.Location(x=-10, y=3.75, z=0)npc_vehicle = CARLA.spawn_npc_by_offset(start_point, relative_ego)# 设置ego自动巡航ego_vehicle.set_autopilot(True)#设置目标车初始速度的纵向控制PIDinitspd_pid = PIDLongitudinalController(npc_vehicle, K_P=1.0, K_I=0.1, K_D=0.05)#设置目标车的cut_in的横纵向控制PIDargs_lateral_dict = {'K_P': 0.8, 'K_D': 0.8, 'K_I': 0.70, 'dt': 1.0 / 10.0}args_long_dict = {'K_P': 1, 'K_D': 0.0, 'K_I': 0.75, 'dt': 1.0 / 10.0}PID = VehiclePIDController(npc_vehicle, args_lateral_dict, args_long_dict)waypoints = Nonewaypoint_index = 0need_cal_route = Truecut_in_flag = Falsearrive_target_point = Falsetarget_distance_threshold = 2.0  # 切换waypoint的距离start_sim_time = time.time()while not arrive_target_point:CARLA.world.tick()# 更新观察者的视野CARLA.set_spectator(ego_vehicle)#计算目标车的初始速度ego_speed = (ego_vehicle.get_velocity().x  * 3.6) #km/htarget_speed = ego_speed + 8 #目标车的目标速度#是否满足cut_in条件if cut_in_flag:if need_cal_route:#生成车侧车道前方30m的waypointwaypoints = CARLA.cal_target_route(npc_vehicle,lanechange= "left",target_dis=30)CARLA.draw_target_line(waypoints)need_cal_route = False# 如果已经计算了路线if waypoints is not None and waypoint_index < len(waypoints):# 获取当前目标路点target_waypoint = waypoints[waypoint_index][0]# 获取车辆当前位置transform = npc_vehicle.get_transform()#绘制当前运行的点CARLA.draw_current_point(transform.location)# 计算车辆与当前目标路点的距离distance_to_waypoint = distance_vehicle(target_waypoint, transform)# 如果车辆距离当前路点的距离小于阈值,则更新到下一个路点if distance_to_waypoint < target_distance_threshold:waypoint_index += 1  # 移动到下一个路点if waypoint_index >= len(waypoints):arrive_target_point = Trueprint("npc_vehicle had arrive target point.")break  # 如果没有更多的路点,退出循环else:# 计算控制命令control = PID.run_step(target_speed, target_waypoint)# 应用控制命令npc_vehicle.apply_control(control)else:#设置NPC的初始速度CARLA.speed_con_by_pid(npc_vehicle,initspd_pid,target_speed)#判断是否可以cut incut_in_flag = CARLA.should_cut_in(npc_vehicle,ego_vehicle,dis_to_cut=8)# 判断是否达到模拟时长if time.time() - start_sim_time > 60:print("Simulation ended due to time limit.")break#到达目的地停车npc_vehicle.apply_control(carla.VehicleControl(throttle=0, steer=0, brake=-0.5))print("Control the target car to brake.")time.sleep(10)except Exception as e:print(f"An error occurred: {e}")finally:# 清理资源print("Cleaning up the simulation...")if ego_vehicle is not None:ego_vehicle.destroy()if npc_vehicle is not None:npc_vehicle.destroy()settings = CARLA.world.get_settings()settings.synchronous_mode = False  # 禁用同步模式settings.fixed_delta_seconds = None
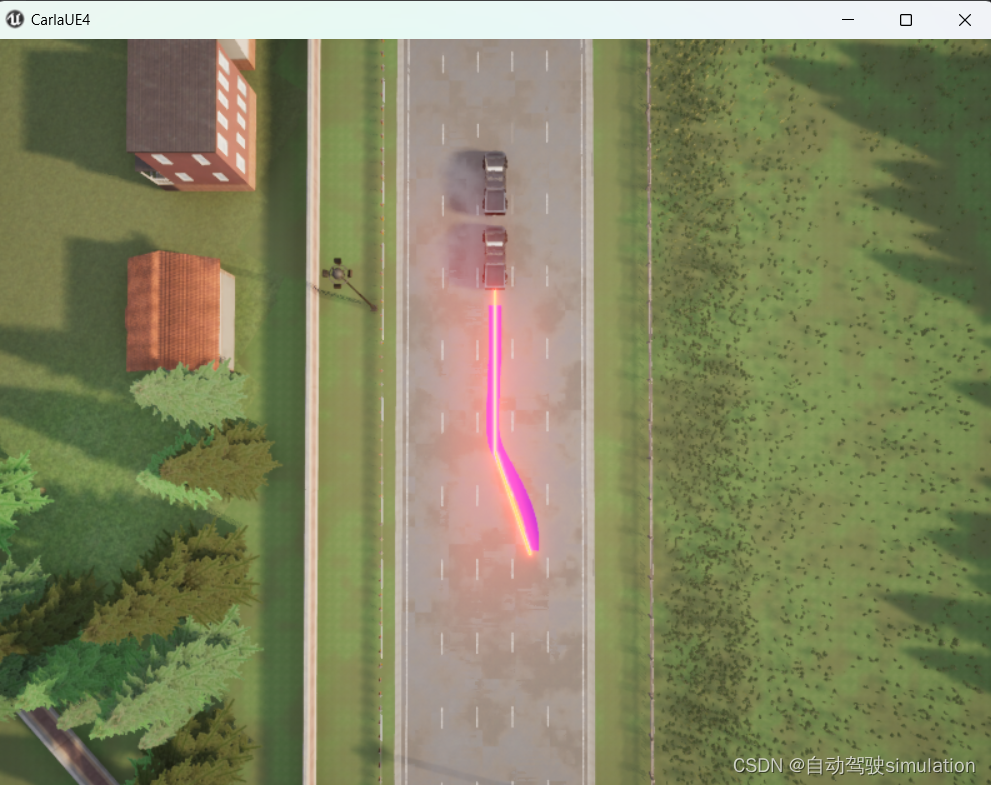
效果
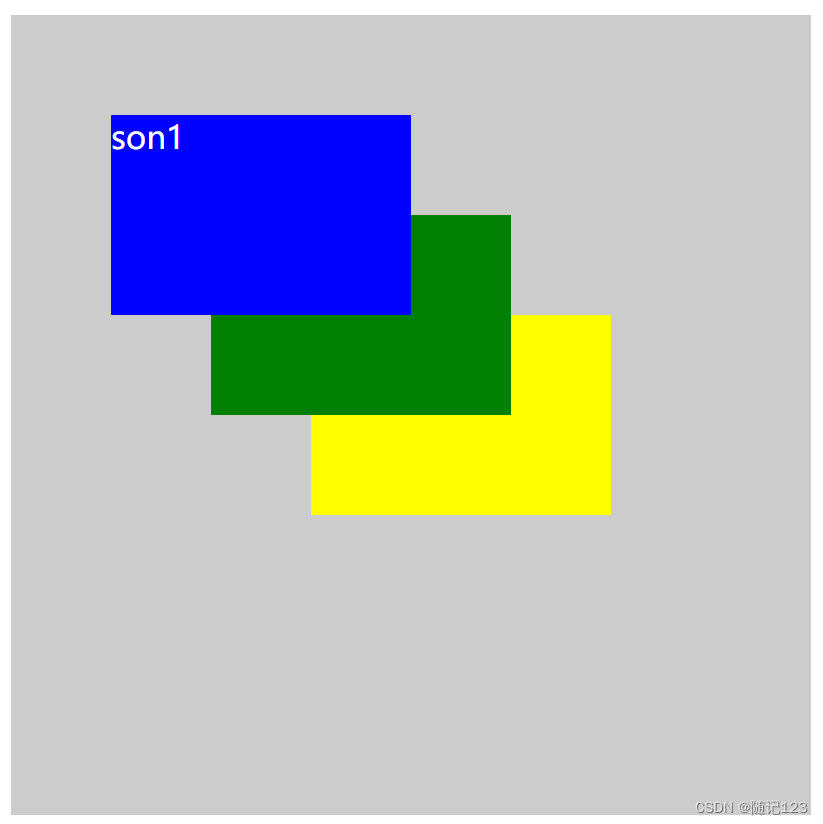
下述是变道规划简单的实现,轨迹跟踪效果比较一般,PID没有仔细调,紫色是车辆运行的点迹。

公众号:自动驾驶simulation