基于 Vue3打造前台+中台通用提效解决方案
1、项目架构
本项目使用vite + vue3来实现前中台解决方案
2、为什么使用vite ?
因为,之前的项目一直都是使用webpack作为构建工具;vite出来这么久了,也没有用过;所以想在当前项目下进行使用;
2.1、为什么vite比webpack块?
webpack
假设我们的项目中有A、B两个页面。
其中A页面是项目首页,里面的代码一切正常。
B页面是一个需要经这跳转才会进入的页面,里面存在一些错误。比如︰我导入一个不存在的文件a.js 然后打印a
当我们去构建这个项目时,明明我们从来都没有进入过B页面,但是此时
webpack依然会给我们抛出一个对应的错误 `Can't resolve './a.js' in xxX`
webpack在开发时构建时,默认会去抓取并构建你的整个应用,然后才能提供服务,这就导致你的项目中,存在的任何一个错误(哪怕这个错误是在用户从来都没有进入过的页面中出现的),它依然会影响到你的整个项目构建。
也正是因为这个原因,当你的项目越大时,构建的时间就会越长,你的项目启动速度也就会越慢。
vite
同样的`Can't resolve './a.js' in xx` 错误,在我们没有进入到B页面的时候,它是不会出现的,只有当我们进入了B页面,才会突然出现这样的一个错误;
而之所以会这样的原因就是因为: vite 不会在一开始就构建你的整个项目,而是会将应用中的模块区分为依赖和源码(项目代码)两部分,对于源码部分,它会根据路由来拆分代码模块,只会去构建一开始就必须要构建的内容。
同时 vite以原生 ESM 的方式为浏览器提供源码,让浏览器接管了打包的部分工作。
因为这样的一个机制,无论你的项目有多大,它只会构建一开始必须要构建的内容,这就让 vite在构建时的速度大大提升了。
这也是vite为什么会快的一个核心原因。
2.2、vite这么快会有什么问题吗?
如果大家对ESM的构建机制有了解的话,那么应该可以发现一个问题。
那就是**vite既然以原生ESM的方式为浏览器提供源码,让浏览器接管了打包的部分工作**,那么假如我们的项目中存在 cormmonJS的内容怎么办?是不是就意味着无法解析呢?
是的!
在 vite 的早期版本中,确实存在这个问题,这个问题导致的最核心的麻烦就是很多的依赖无法使用。
比如axios 因为 axios 中使用了很多的 commonJS规范,这就让 vite 无法解析对应的内容(对应的 ieeue),从而会抛出一个错误,关于这个问题曾经也在vite的issues中进行过激烈的讨论。
2.3、上面这个问题,官方是如何解决的呢?
因为这个问题非常的严重,所以针对于这个问题, vite在后期提供了依赖预构建的功能,其中一个非常重要的目的就是为了解决
CommonJS和UMD兼容性问题。目前 vite 会先将CommonJS或 UMD发布的依赖项转换为ESM之后,再重新进行编译。这也可以理解为速度对业务的一个妥协。
3、初始化项目
-
1、全局安装
vite版本2.8.5$ npm install -g vite@2.8.5 -
2、使用
vite创建项目$ npm init vite@latest # npx: installed 6 in 2.285s # √ Project name: ... front # √ Select a framework: » vue # √ Select a variant: » vue -
3、运行项目
$ npm run dev

可以看到,项目已经启动,但是没有 network地址;我们需要手动配置下
package.json
"scripts": {"dev": "vite --host", // dev后面 加上 --host"build": "vite build","preview": "vite preview"},
4、tailwindcss工具
在正式的项目开发之前,我们还需要了解另外一个工具 tailwindcss .
大家只看它的名字可能会想,这不就是一个处理css的库吗?值得我们专门拿出来一章的内容去学习?
那么我的回答可能是:“是的,这是有价值的。“
tailwindcss是一个非常富有争议的库,喜欢它的人和讨厌它的人都非常多。
但是我们去查看taliwindcss下载量可以发现,它的月下载量已经达到了惊人的977万!要知道 vite也只有200多万而已。
4.1、传统的企业级开发css痛点
在前端技术巨变的现在,一直流传着一句话:每隔六个月,你要学习的前端技术就增加了一倍。
或许这句话本身只是个戏言,但是也在一定程度中反映了前端技术是变化非常快的。就像我们在上一章中提到的 vite ,在不到两年的时间里经历了三个大版本的变化。
但是大家仔细的想一下,这样的一个变化好像只适用于js 端, html、css 好像已经有很多年没有发生过大的变化
难道是因为html、css 已经足够成熟,不需要再进行改变了吗?应该也不是的,比如针对于css而言,我们在进行企业开发时,就会遇到很多问题,比如:
-
1.有时我们需要统一设计方案,比如项目中的红色我们需要使用同样的色值,标题的文字大小我们期望在整个项目中进行统一的划分。这样的一套变量如果通过 css 来实现,那么就不得不维护一个庞大的变量组,这其实是一个非常大的心智负担。
-
2.html结构是一个非常复杂的结构化内容,为了给这些结构指定对应的样式,那么通常我们都是通过cLssName
来去指定。这就必
须要求我们为这套复杂的结构指定各种各样包含语义化的className。比如:container、container-box
container-box-title、container-box-5ub-title,container-box-sub-title-left-imag大量的"无意义“命名本身就会增加很多额外的负担。 -
3.因为 html和 css 是分离的,所以我们通常情况下在开发时,不得不在整个代码文件中,来回的上下翻滚,或者进行分屏操作。无
论是哪一种其实都不能给我们带来一个很好地开发体验。
4.针对于一些”复杂”的功能,比如响应式(媒体查询)、主题定制。如果我们想要通过传统的 html + css 的形式来进行实现,无
疑是非常复杂的。除了上面提到的这些之外,还有很多其他的问题,感兴趣的同学可以看一下这篇文章的介绍CSS Utility Classes and “Separation of Concerns”
总而言之,传统的 html + css 的模式存在着很多的问题,那么有什么好的方案可以解决呢?tailwindcss就是一个很好地方向。
4.2、安装tailwindcss
1、安装依赖
$ npm install -D tailwindcss@3.0.23 postcss@8.4.8 autoprefixer@10.4.2
2、创建配置文件
$ npx tailwindcss init -p
# 执行当前命令生配置文件
/** @type {import('tailwindcss').Config} */
module.exports = {content: ["./index.html","./src/**/*.{vue,js,ts,jsx,tsx}",], // 表示tailwindcss的作用范围 [src下所有目录下的所有vue/js文件, 当前index.html文件]theme: {extend: {},},plugins: [],
}
3、导入tailwindcss的基础指令组件
创建src/styles/index,scss文件
// 导入`tailwindcss`的基础指令组件
@tailwind base;
@tailwind components;
@tailwind utilities;
4、在项目的入口文件、main.js中引入src/styles/index,scss
import { createApp } from 'vue'
import './style.css'
+ import './styles/index.scss'
保存之后,运行后,会报没有sass依赖包的错误,所以我们需要手动安装一下

$ yarn add sass
重启即可
如果postcss报错的话,可以将package.json中 “type”: "module"删除掉
5、安装vscode插件
工欲善其事必先利其器,想要有一个比较爽快的开发体验,那么一些好的开发辅助插件是必不可少的。
我们今天就以VSCode为例,来介绍一些咱们这次项目中需要使用到的一些辅助插件来帮助大家进行项目的开发。
5.1、Prettier 和 Code formatter 格式代码
相信对于很多同学而言代码格式问题,是一个一直让大家头疼的问题,混乱的代码格式非常不利于我们的日常开发工作,如果你的项目被ESLint管理,那么还会得到很多的错误,导致项目无法运行。那么我们有没有什么办法来让我们的代码格式变得更加漂亮呢?
答案是有的,它就是 prettier。
prettier是一个让代码变得更加漂亮的工具,我们可以利用它来处理我们代码的格式化问题。
想要使用prettier,那么我们可以按照以下步骤进行:
- 1、在vscode中插件库中安装 prettier

-
2、在项目的根目录下创建
.prettierrc文件{"semi": false,"singleQuote": true,"trailingComma": "none" } -
3、在
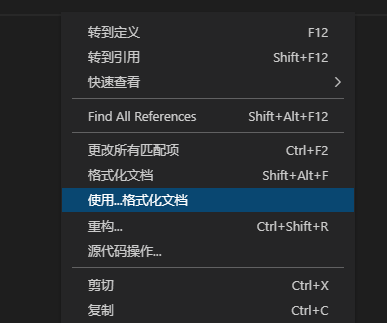
.vue和.js结尾的文件中,点击右键,选择“使用…格式化文档”,选择“配置默认格式化程序”,选择“Prettier”


-
4、在vsode的设置页面,搜索“save”,找到“Format On Save” 勾选上;等到保存时会自动格式化代码

5.2、配置tailwindcss插件
这个插件可以帮助我们在写代码时,进行tailwindcss的css类名提示

5.3、安装Volar插件
这个插件代替了Vuter功能,比Vuter更加贴合Vue3

6、项目结构分析
咱们的项目分为移动端和PC端两种显示结果,但是这两种显示结果通过同一套代码进行实现,也就是所谓的响应式构建方案。那么我们在分析的时候就需要分别分析(PS:此处我们只分析大的路由方案,目的是让大家对基本的项目结构有一个初步的认识,以方便我们的项目结构处理,后续具体的细节构建方案不在这次分析行为之内):
-
1.移动端结构
-
2.PC端结构
然后把这两种的分析方案,合并到一起,组成一个最终的架构方案。
6.1、移动端结构分析
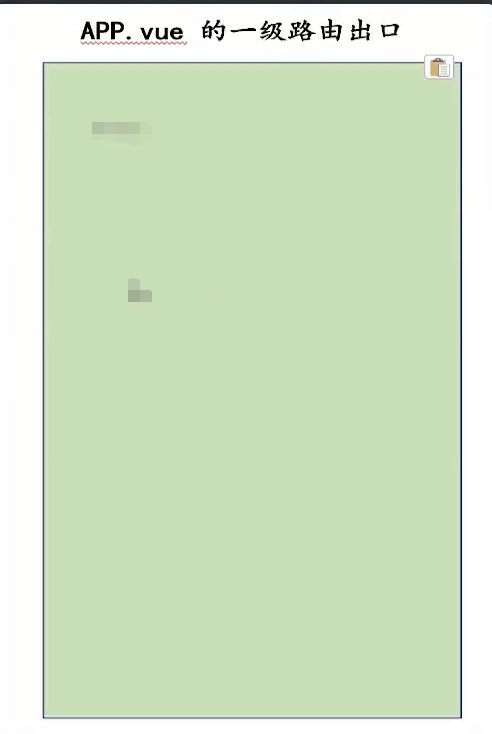
移动端的结构相对比较简单,当我们去进行路由跳转时,它是以整个页面进行的整体路由切换。
那么由此可知,移动端不存在嵌套路由的概念,只需要在 APP.vue 中保留一个路由出口即可。
6.2、PC端接否分析
pc端相对于移动端、多了一个固定头部的部分,所以处理起来更加复杂一点
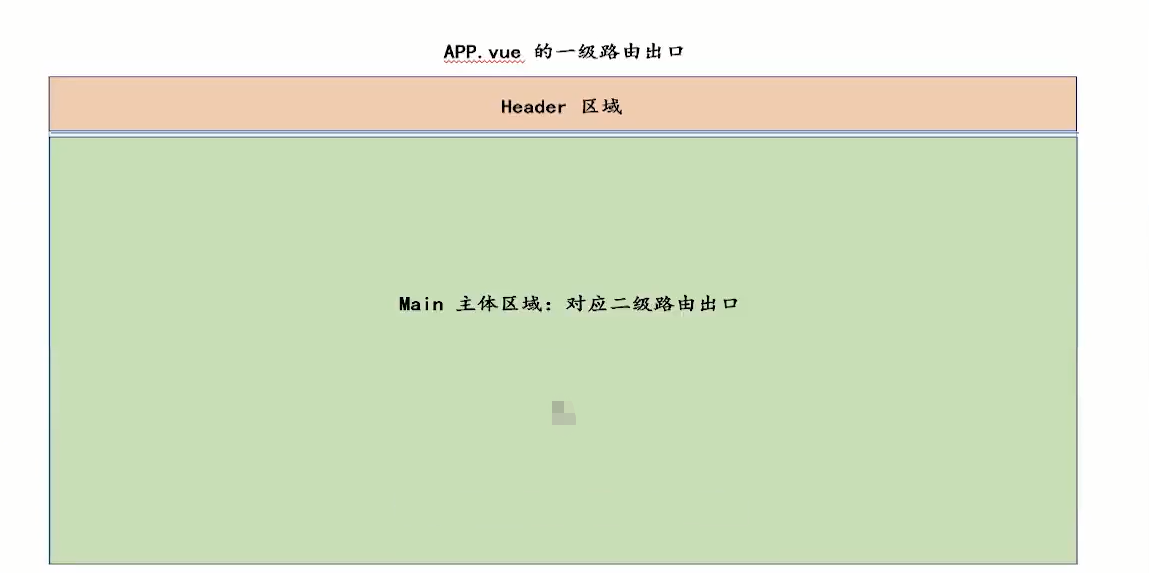
我们需要通过两个路由出口进行表示:
-
App.vue:一级路由出口,用作整页路由切换 -
Main.vue:二级路由出口,用作局部路由切换
那么由此我们可知,移动端和PC端两者的路由结构是不同的,所以这就要求我们需要根据当前用户所在设备的不同,构建不同的路由表
7、项目结构
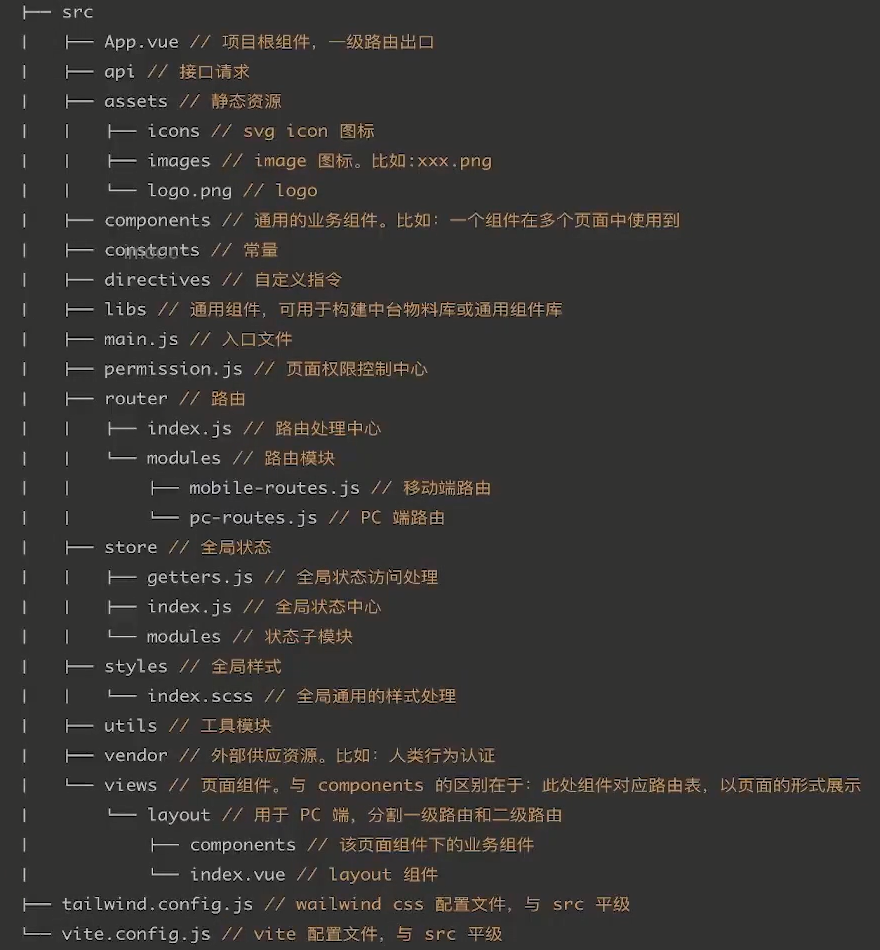
项目的整体结构如下图所示
首先,我们项目中使用了vuex和vue-router;那么接下来我们先来安装他们吧
$ yarn add vuex@4.0.2 vue-router@4.0.14
8、企业级vite配置方案-让vite得心应手
8.1、前言
在前面的章节中我们通过 vite构建了项目,但是初始的vite配置还比较粗糙,不足以支撑企业级的项目开发。
所以说在本章中,我们就需要来配置vite 。
但是配置vite 不能想当然的进行处理,而是需要依据业务来进行配置。
所以在本章中,我们会:
-
1.先明确项目的业务处理方赛
-
2.依据业务需要,来配置对应的vite内容
那么明确好了本章的内容之后,就让我们一起进入业务与vite结合的世界中去吧!
8.2、明确移动瑞和PC端的构建顺序
在上一章中(项目架构基本结构处理分析)中,我们明确了项目包含移动端路由表和PC端路由表两部分,所以我们在开发的时候就需要分别来去处理移动端和pc端对应的内容。
由于tailwindcss是遵循移动端优先的,所以我们在构建项目时,遵循它的规则,移动端优先
8.3、首先我们封装isMoboleTerminal判断是否是移动端方法
我们规定、屏幕宽度大于或等于1280像素的为pc端,小于1280像素的为移动端
import { computed } from 'vue'
import { PC_DEVICE_WIDTH } from '../constants'/*** 是否是移动端设备; 判断依据: 屏幕宽度小于 PC_DEVICE_WIDTH* @returns*/
export const isMoboleTerminal = computed(() => {console.log(document.documentElement.clientWidth, PC_DEVICE_WIDTH)return document.documentElement.clientWidth < PC_DEVICE_WIDTH
})
上面封装的方法有缺陷,就是:当页面尺寸发生变化时,isMoboleTerminal的值并不会发生响应式改变;这是因为computed重新执行的条件是,内部的响应式数据发生变化computed才会执行;而此时内部没有响应式数据,所以并不会重新执行;所以我们可以监听屏幕的尺寸变化,并设置响应式宽度
这里我们不使用上面的方法,而是使用第三方插件:VueUse 这个插件就像react hook一样,提供响应式数据
-
1、首先安装
vueuse$ npm i @vueuse/core -
2、重构
isMoboleTerminalimport { computed } from 'vue' import { PC_DEVICE_WIDTH } from '../constants' import { useWindowSize } from '@vueuse/core' const { width } = useWindowSize() /*** 是否是移动端设备; 判断依据: 屏幕宽度小于 PC_DEVICE_WIDTH* @returns*/ export const isMoboleTerminal = computed(() => {return width.value < PC_DEVICE_WIDTH })
8.4、配置路由、判断当前是移动端还是pc端加载对应的路由
import { createRouter, createWebHistory } from 'vue-router'
import { isMoboleTerminal } from '../utils/flexible'
import mobileRoutes from './modules/mobile-routes'
import pcRoutes from './modules/pc-routes'const router = createRouter({history: createWebHistory(),routes: isMoboleTerminal.value ? mobileRoutes : pcRoutes
})export default router
9、vite中的一些配置
9.1、使用@符号代理src路径
vite官方给出来了,解决方案:resolve.alias
vite.config.js
export default defineConfig({resolve: {alias: {'@': path.resolve(__dirname, './src'),'@@': path.resolve(__dirname, './src/components')}}
})
9.2、配置开发环境下跨域代理
vite官方给出来了,解决方案:server.proxy
vite.config.js
export default defineConfig({server: {proxy: {'/prod-api': {target: ' http://localhost:3000',changeOrigin: true}}}
})
10、动态设置rem并修修改tailmindcss默认配置
因为我们做的页面需要在不同设备下使用、要想在不同设备下适用;这里移动端我们采用的是flex+rem布局的方式:
首先我们先实现下rem布局
/*** 首次加载成功时设置html跟标签的fontSize属性值;最大基准值为40px*/
export const useREM = () => {const MAX_FONT_SIZE = 40// 当文档被解析成功时调用window.addEventListener('DOMContentLoaded', () => {const html = document.querySelector('html')// 设置屏幕基准值的标准为 屏幕的宽度 / 10const fontSize = window.innerWidth / 10html.style.fontSize = Math.min(fontSize, MAX_FONT_SIZE) + 'px'})
}
在mian.js中引入并调用useREM
import { useREM } from '@/utils/flexible'useREM()
测试发现:字体非常大,不符合我们的预期;如下图所示

解决办法: tailwindcss提供了配置文件,我们可以在配置文件中自定义一些样式
我们在tailwind.config.js中进行theme.extend配置
module.exports = {content: ['./index.html', './src/**/*.{vue,js,ts,jsx,tsx}'],theme: {extend: {fontSize: {xs: ['0.25rem', { lineHeight: '0.35rem' }],sm: ['0.35rem', { lineHeight: '0.45rem' }],base: ['0.45rem', { lineHeight: '0.55rem' }],lg: ['0.55rem', { lineHeight: '0.65rem' }],xl: ['0.65rem', { lineHeight: '0.75rem' }]},boxShadow: {'l-white': '-10px 0 10px white' // 自定义类名样式 使用时 shadow-l-white}}},plugins: []
}

配置完成生效
11、在vite中封装通用的svg
我们之前在webpack中封装了通用的svg图标、但是在vite中没有进行分装;所以在本项目中我们对svg图标进行通用封装
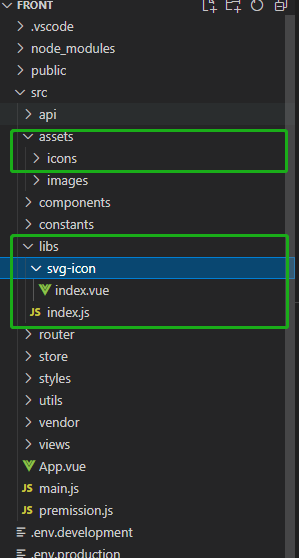
我们先看一下文件目录
-
1、封装
svg-icon通用组件libs/svg-icon/index.vue<template><svg aria-hidden="true"><use :xlink:href="symbolId" :fill="color" :class="fillClass" /></svg> </template><script setup> import { computed } from 'vue'const props = defineProps({// 图标名称name: {type: String,required: true},// 颜色color: {type: String},// 类名fillClass: {type: String} })// 生成图标唯一id #icon-xxx const symbolId = computed(() => `#icon-${props.name}`) </script> -
2、导出注册组件对象
libs/index.jsimport SvgIcon from './svg-icon/index.vue'// 导出对象、这个对象有install方法,这样既可以通过app.use(options)来使用 export default {install(app) {app.component('svg-icon', SvgIcon)} } -
3、在
mian.js中注册组件对象import libs from '@/libs' createApp(App).use(router).use(libs).mount('#app') -
4、安装
vite-plugin-svg-icons插件,并配置vite$ yarn add vite-plugin-svg-icons -Dvite.config.js
import { defineConfig } from 'vite' import vue from '@vitejs/plugin-vue' import path from 'path' import { createSvgIconsPlugin } from 'vite-plugin-svg-icons'// https://vitejs.dev/config/ export default defineConfig({plugins: [vue(),// svg配置createSvgIconsPlugin({// 指定需要缓存的图标文件夹iconDirs: [path.resolve(process.cwd(), 'src/assets/icons')],// 指定symbolId格式symbolId: 'icon-[name]'})], }) -
5、在
main.js中注册import 'virtual:svg-icons-register'import libs from '@/libs' import 'virtual:svg-icons-register' // 为固定格式createApp(App).use(router).use(libs).mount('#app') -
6、在组件中使用svg
<svg-iconname="hamburger"class="px-1 w-4 h-4 fixed top-0 right-[-2px] z-20 shadow-l-white bg-white"/>

12、实现移动端navigation头部效果
需要实现的效果如下:

实现思路:
- 1、滑块绝对定位动态改变滑块的
left和width值, 来改变滑块的位置 - 2、left值计算公式: 滚动x距离 + 点击元素距离屏幕左边的距离
- 3、width值计算公式: 点击元素的宽度
实现细节:
-
对于获取
v-for生成的子元素的实例,需要使用回调函数获取<ul ref="ulEle"><li v-for="item in data" :ref="getEleFn"></li> </ul><script setup>import { ref } from 'vue'// 获取普通元素的实例,可以使用ref(null)获取const ulEle = ref(null)//对于获取`v-for`生成的子元素的实例,需要使用回调函数获取const getEleFn = (el) => {console.log(el)} </script> -
在初始化时,我们需要在li元素渲染完成之后触发一下重新设置一下滑块绝对定位动态改变滑块的
left和width值;我们可以监听渲染list的响应式数据是否改变,并且在改变后通过nextTick触发设置选中第一个元素// 监听data初次数据渲染之后,将slider条设置到第一项 watch(() => props.data,() => {nextTick(() => {curretIndex.value = 0})} )
完整实例
<template><ulclass="relative z-10 text-xs bg-white flex overflow-auto p-1 text-zinc-600"ref="ulEle"><liclass="absolute top-1 h-[22.5px] bg-zinc-900 rounded-lg duration-200 z-10":style="sliderStyle"></li><liv-for="(category, index) in data":key="category.id"class="shrink-0 px-1.5 py-0.5 last:mr-6 z-10":class="{ 'text-zinc-50': index === curretIndex }"@click="handleSelectCategory(index)":ref="storeLiEle">{{ category.name }}</li></ul><svg-iconname="hamburger"class="px-1 w-4 h-4 fixed top-0 right-[-2px] z-20 shadow-l-white bg-white"/>
</template><script setup>
import { ref, watch, nextTick } from 'vue'
import { useScroll } from '@vueuse/core'
const props = defineProps({data: {type: Array,required: true}
})// 默认选中索引
const curretIndex = ref(-1)
const sliderStyle = ref({left: '10px',width: '0px'
})
//  ul dom元素
const ulEle = ref(null)
// li dom元素容器
const liEles = ref(new Set())// ulScrollLeft 向左滚动的距离
const { x: ulScrollLeft } = useScroll(ulEle)// 选中索引
const handleSelectCategory = (index) => {curretIndex.value = index
}
// 获取v-for遍历的子元素dom节点时,需要使用回调函数获取; 注意: 每次页面更新之后storeLiEle,都会重新执行一遍,这样会导致liEles中存储的都是重复的元素
// 所以可以使用Set来存储数据,避免存入重复的数据, 也可以在obBeforeUpdate前设置liEles.value的值为初始化值
const storeLiEle = (el) => {liEles.value.add(el)
}watch(curretIndex, (newIndex, oldIndex) => {// 获取点击元素的距离左边屏幕的距离和元素的宽度const liEle = Array.from(liEles.value)[newIndex]if (!liEle) return falseconst { left, width } = liEle.getBoundingClientRect()sliderStyle.value = {left: `${left + ulScrollLeft.value}px`,width: `${width}px`}
})// 监听data初次数据渲染之后,将slider条设置到第一项
watch(() => props.data,() => {nextTick(() => {curretIndex.value = 0})}
)
</script>
12.1、现在增加一个新功能:点击之后将点击项展示在屏幕的正中央,并且加上过渡**
实现思路
-
1、在list菜单列表的数据发生改变后,获取每一项如果想要展示在中间需要滚动的距离
菜单展示中间需要向左滚动的距离l = 每一项距离屏幕左边的距离 - 1/2屏幕的宽度 + 1/2自身的宽度 -
2、在点击时获取【被点击项向左滚动的距离l】,使得ul平滑滚动到指定位置(本案例使用自定义封装的平滑滚动函数)
export const scrollTransition = () => {let timer = nullreturn function exec ({el = document.body, position = 0, direction = 'v', time = 150} = options) {clearInterval(timer)// 每步的时间 msconst TIME_EVERY_STEP = 5 // 最大滚动距离const maxScrollSize = el.scrollWidth - el.offsetWidth// 限定position的有效滚动范围position = Math.max(Math.min(position, maxScrollSize), 0)// 可以分为多少步let steps = Math.ceil(time / TIME_EVERY_STEP)const stepSize = (position - el.scrollLeft) / steps // 每步的长度timer = setInterval(() => {// console.log(el.scrollLeft , position)if (el.scrollLeft !== Number.parseInt(position) && position >= 0) {if (stepSize >= 0) {let scrollX = el.scrollLeft + stepSize >= position ? position : el.scrollLeft + stepSizeel.scrollLeft = scrollX} else {let scrollX = el.scrollLeft + stepSize <= position ? position : el.scrollLeft + stepSizeel.scrollLeft = scrollX}} else {clearInterval(timer)}}, TIME_EVERY_STEP)} } -
3、我们来处理下滑块的位置,因为滑块的位置是根据被选中项的
getBoundingClientRect的属性值决定的;所以我们只要保证,在滑块获取getBoundingClientRect属性是在页面渲染之后即可;所以我们可以使用nextTick保证在页面dom元素发生变化后改变滑块的值watch(curretIndex, (newIndex, oldIndex) => {// 保证渲染之后再进行计算元素的位置, 在这里加上nextTicknextTick(() => {// 获取点击元素的距离左边屏幕的距离和元素的宽度const liEle = Array.from(liEles.value)[newIndex]if (!liEle) return falseconst { left, width } = liEle.getBoundingClientRect()sliderStyle.value = {left: `${left + ulScrollLeft.value}px`,width: `${width}px`}}) })
实现代码
<template><ulclass="relative z-10 text-sm bg-white flex overflow-auto p-1 text-zinc-600"ref="ulEle"><liclass="absolute top-1 h-[22.5px] bg-zinc-900 rounded-lg duration-200 z-10":style="sliderStyle"></li><liv-for="(category, index) in data":key="category.id"class="shrink-0 px-1.5 py-0.5 last:mr-6 z-10":class="{ 'text-zinc-50': index === curretIndex }"@click="handleSelectCategory(index)":ref="storeLiEle">{{ category.name }}</li></ul><svg-iconname="hamburger"class="px-1 w-4 h-4 fixed top-0 right-[-2px] z-20 shadow-l-white bg-white"@click="visible = true"/><popup v-model="visible" class="aaa" style="color: red"><Menu :categorys="data" @handleSelectCategory="handleSelectCategory" /></popup>
</template><script setup>
import { ref, watch, nextTick } from 'vue'
import { useScroll } from '@vueuse/core'
import Menu from '@/views/main/components/menu/index.vue'
import { scrollTransition } from '@/utils'
const run = scrollTransition()
const props = defineProps({data: {type: Array,required: true}
})// 默认选中索引
const curretIndex = ref(-1)
const sliderStyle = ref({left: '10px',width: '0px',bottom: 0,
})
//  ul dom元素
const ulEle = ref(null)
// li dom元素容器
const liEles = ref(new Set())
// 每一项在屏幕中央时,需要向左滚动的距离
const scrollRaces = ref([])// ulScrollLeft 向左滚动的距离
const { x: ulScrollLeft } = useScroll(ulEle)const visible = ref(false)// 选中索引
const handleSelectCategory = (index) => {curretIndex.value = indexvisible.value = false// ulEle.value.scrollTo(scrollRaces.value[index], 0)run({ el: ulEle.value, position: scrollRaces.value[index], direction: 'l', time: 200 })
}
// 获取v-for遍历的子元素dom节点时,需要使用回调函数获取; 注意: 每次页面更新之后storeLiEle,都会重新执行一遍,这样会导致liEles中存储的都是重复的元素
// 所以可以使用Set来存储数据,避免存入重复的数据, 也可以在obBeforeUpdate前设置liEles.value的值为初始化值
const storeLiEle = (el) => {liEles.value.add(el)
}watch(curretIndex, (newIndex, oldIndex) => {// 保证渲染之后再进行计算元素的位置nextTick(() => {// 获取点击元素的距离左边屏幕的距离和元素的宽度const liEle = Array.from(liEles.value)[newIndex]if (!liEle) return falseconst { left, width, height } = liEle.getBoundingClientRect()sliderStyle.value = {left: `${left + ulScrollLeft.value}px`,width: `${width}px`,height: `${height}px`}})
}, {immediate: true
})// 监听data初次数据渲染之后,将slider条设置到第一项
watch(() => props.data,() => {nextTick(() => {if (props.data.length <= 0) returncurretIndex.value = 0// 获取1/2屏幕的宽度const halfScreenWidth = window.innerWidth / 2// 每一项向左滚动的距离 = 每一项距离屏幕左边的距离 - 1/2屏幕的宽度 + 1/2自身的宽度 scrollRaces.value = Array.from(liEles.value).map(el => el.getBoundingClientRect().left - halfScreenWidth + el.offsetWidth / 2)})}, {immediate: true}
)
</script><style scoped>
/* ul {scroll-behavior: smooth;
} */
</style>

13、封装通用组件 - popup
当我们点击面包屑按钮时,会有一个弹出窗口 popup自低而上弹出,那么这样的一个功能,我们一样可以把它处理为项目的通用组件
那么想要处理popup的话,首先就需要先搞清楚 popup的能力。
-
1.当 popup展开时,内容视图应该不属于任何一个组件内部,而应该直接被插入到 body下面
-
2、popup应该包含两部分内容,一部分为背景蒙版,一部分为内容的包裹容器
-
3、popup应该通过一个双向绑定进行控制展示和隐藏
-
4、popup展示时,滚动应该被锁定
-
5、内容区域应该接收所有的attrs,并且应该通过插槽让调用方指定其内容
那么明确好了这些能力之后,接下来大家可以先根据这些能力进行下通用组件 popup 的构建尝试,尝试之后再继续来看咱们的后续内容。
libs/popup/index.vue
<template><Teleport to="body"><Transition name="popup-mask" mode="out-in"><!-- 遮罩层 --><divclass="fixed left-0 top-0 right-0 bottom-0 bg-black/80 z-30"@click="onMask"v-if="modelValue"></div></Transition><Transition name="popup-slide" mode="out-in"><!-- 内容区域 --><divclass="bg-white overflow-y-auto z-30 fixed left-0 bottom-0 right-0":style="style"v-bind="$attrs"v-if="modelValue"><slot /></div></Transition></Teleport>
</template><script setup>
import { watch } from 'vue'
const props = defineProps({modelValue: Boolean,style: String | Object
})
const emits = defineEmits(['update:modelValue'])const onMask = () => {emits('update:modelValue', false)
}watch(() => props.modelValue,(v) => {const body = document.querySelector('body')let initStyle = ''if (v) {initStyle = body.style.overflowbody.style.overflow = 'hidden'} else {body.style.overflow = initStyle}}
)
</script><style scoped lang="scss">
.popup-mask-enter-from,
.popup-mask-leave-to {opacity: 0;
}
.popup-mask-enter-active,
.popup-mask-leave-active {transition: all 0.3s;
}.popup-slide-enter-from,
.popup-slide-leave-to {transform: translateY(100%);
}
.popup-slide-enter-active,
.popup-slide-leave-active {transition: all 0.3s;
}
</style>
通用组件注册
import SvgIcon from './svg-icon/index.vue'
import Popup from './popup/index.vue'// 导出对象、这个对象有install方法,这样既可以通过app.use(options)来使用
export default {install(app) {app.component('svg-icon', SvgIcon)app.component('Popup', Popup)}
}
在使用通用组件
<Popup v-model="visible" class="aaa" style="color: red" />const visible = ref(false)

14、Vite通用组件自动化注册
目前我们在项目中已经完成了两个通用组件,将来我们还会完成更多的通用组件开发。那么如果每次开发完成一个通用组件之后,都去手动进行注册,未免有些过于麻烦了,所以我们期望通过 vite 提供的功能,进行通用组件的自动化注册
那么,如果想要完成这个功能的话,就需要使用到两个关键的知识点:
-
1、vite的Glob 导入功能:该功能可以帮助我们在文件系统中导入多个模块
const modules = import.meta.glob('./dir/*.js') // 以上将会被转译为下面的样子: const modules = {'./dir/foo.js': () => import('./dir/foo.js'),'./dir/bar.js': () => import('./dir/bar.js') } -
2、vue的 defineAsyncComponent方法:该方法可以创建一个按需加载的异步组件
基于以上两个方法,实现组件自动注册
我们先来看下现在的代码:
import SvgIcon from './svg-icon/index.vue'
import Popup from './popup/index.vue'// 导出对象、这个对象有install方法,这样既可以通过app.use(options)来使用
export default {install(app) {app.component('svg-icon', SvgIcon)app.component('Popup', Popup)}
}
改成动态导入的形式:
import { defineAsyncComponent } from 'vue'// 导出对象、这个对象有install方法,这样既可以通过app.use(options)来使用
export default {install(app) {// 1、获取当前文件下所有以index.vue结尾的文件const components = import.meta.glob('./*/index.vue')for (const [path, fn] of Object.entries(components)) {// 2、根据path生成组件名称, defineAsyncComponent生成动态组件const componentName = path.replace(/(\.\/)|(\/index\.vue)/g, '')const Com = defineAsyncComponent(fn)// 3、将组件注册到app上app.component(componentName, Com)}}
}
15、封装通用的组件 - button
需要实现的组件如下

实现代码
<template><buttonclass="duration-300 inline-flex items-center justify-center active:scale-105":class="[sizeClass,typeClass,plainClass,block ? 'block' : '',{ 'opacity-50 active:scale-100': isDisbaled }]":disabled="isDisbaled"@mouseover="mouseIsOver = true"@mouseleave="mouseIsOver = false"><svg-iconv-if="loading"name="loading"class="w-[1em] h-[1em] duration-300 animate-spin":class="{ 'mr-0.5': !!$slots.default || icon }":color="svgColorClass"/><svg-iconv-if="icon":name="icon"class="w-[1em] h-[1em] duration-300":class="{ 'mr-0.5': !!$slots.default && icon }":color="svgColorClass"/><slot /></button>
</template><script>
const defineType = {primary:'bg-blue-400 hover:bg-blue-500 duration-300 text-white rounded-sm border border-blue-400',warning:'bg-amber-400 hover:bg-amber-500 duration-300 text-white rounded-sm border border-amber-400',danger:'bg-red-400 hover:bg-red-500 duration-300 text-white rounded-sm border border-red-400',success:'bg-emerald-400 hover:bg-emerald-500 duration-300 text-white rounded-sm border border-emerald-400',default:'bg-white hover:bg-zinc-200 duration-300 text-zinc-600 rounded-sm border border-white-400'
}const defineSize = {small: 'py-0.5 px-0.5 text-xs',middle: 'py-[6px] px-1 text-sm',default: 'py-[8px] px-1.5 text-sm',large: 'py-1 px-2 text-sm'
}
</script><script setup>
import { computed, ref, useSlots } from 'vue'
// const slot = useSlots()
// console.log(slot.default)
const mouseIsOver = ref(false)
const props = defineProps({type: {type: String,default: 'primary', // 'primary', 'warning', 'danger', 'success', 'default'validator(key) {const isContant = Object.keys(defineType).includes(key)if (!isContant) {throw new Error(`type must be 【${Object.keys(defineType).join('、')}】`)}return true}},size: {type: String,default: 'middle', // large , default, middle, smallvalidator(key) {const isContant = Object.keys(defineSize).includes(key)if (!isContant) {throw new Error(`size must be 【${Object.keys(defineSize).join('、')}】`)}return true}},icon: {type: String},loading: {type: Boolean,default: false},block: {type: Boolean,default: false},plain: {type: Boolean,default: false},icon: {type: String},disabled: {type: Boolean,default: false}
})const typeClass = computed(() =>defineType[props.type] ? defineType[props.type] : defineType.primary
)const sizeClass = computed(() =>defineSize[props.size] ? defineSize[props.size] : defineType.middle
)const plainClass = computed(() =>props.plain? `bg-transparent ${props.type === 'primary'? 'text-blue-400 hover:text-white': props.type === 'warning'? 'text-amber-400 hover:text-white': props.type === 'danger'? 'text-red-400 hover:text-white': props.type === 'success'? 'text-emerald-400 hover:text-white': props.type === 'default'? 'text-zinc-700 hover:text-white': ''}`: ''
)
const svgColorClass = computed(() =>props.plain && !mouseIsOver.value? `${props.type === 'primary'? 'rgb(96, 165, 250)': props.type === 'default'? 'rgb(63, 63, 70)': props.type === 'danger'? 'rgb(248, 113, 113)': props.type === 'success'? 'rgb(52, 211, 153)': props.type === 'warning'? 'rgb(251, 191, 36)': '#ffffff'}`: '#ffffff'
)
const isDisbaled = computed(() => props.disabled || props.loading)
</script><style></style>
16、封装通用组件 - popover
通用组件popover应具备以下功能:
- 1、指定两个插槽、分别插入触发内容和弹出内容
- 2、触发弹出内容的方式分为多种,
click、hover、focus、manual - 3、可以设定弹出层相对于触发元素的位置
bottom,bottom-start,bottom-end,top,top-start,top-end - 4、将弹出层指定挂载到body元素上、并且当页面滚动和页面尺寸发生变化时、弹出层也应虽则触发元素的位置改变而改变
- 5、弹出层展示和隐藏时要有过渡效果
实现思路
- 1、对用户指定的属性值进行校验
- 2、当页面挂载之后获取父元素的 宽度、高度、距离屏幕左边left、距离屏幕顶边top
- 3、当触发弹出元素显示后,立即获取显示元素的宽度、高度, 结合触发元素的属性与显示的位置,计算出弹出元素应该显示到的位置 left, top
- 4、当页面滚动/尺寸发生改变、重新计算生成新的显示到的位置 left, top
- 5、根据触发方式对应的显示和隐藏弹出元素;(注意: 在hover触发下、鼠标触发元素触发弹出元素显示后、然后再移动到显示元素上时,我们需要处理一下,避免弹出层先隐藏再展示的bug; 处理方法可以使用
setTimeout延时修改元素的隐藏、在定时器触发之前、如果触发元素的显示、则先清理定时器)
实现代码
<template><div ref="popoverRoot" class="select-none inline-flex" @click.stop><slot name="reference" /></div><Teleport to="body"><transition name="popover-tip"><divv-if="tipVisible"ref="tipRoot"class="fixed shadow-lg p-1 rounded-sm border border-zinc-100 z-20 bg-white":style="tipStyle"@click.stop><slot /></div></transition></Teleport>
</template><script>
const PLACEMENTS = ['bottom','bottom-start','bottom-end','top','top-start','top-end'
]
const TRIGGERS = ['click', 'focus', 'hover', 'manual']
</script><script setup>
import { ref, watch, computed, nextTick } from 'vue'
import useRootPosition from './useRootPosition'
import useTrigger from './useTrigger'
const props = defineProps({placement: {// 弹框显示位置type: String,

