Debian 环境使用 docker compose 部署 sentry
- Sentry 简介
- 什么是 Sentry ?
- Sentry 开发语言及支持的 SDK
- Sentry 功能架构
- 前置准备条件
- 规格配置说明
- Docker Desktop 安装
- WSL2/Debian11 环境准备
- Sentry 安装步骤
- docker 部署 sentry 步骤
- 演示过程说明
- 卸载关闭 Sentry
- 总结
Sentry 简介
什么是 Sentry ?
- 官方介绍:What’s Sentry?
Sentry is a developer-first error tracking and performance monitoring platform that helps developers see what actually matters, solve quicker, and learn continuously about their applications.
译文:Sentry 是一个开发人员优先的错误跟踪和性能监控平台,它可以帮助开发人员了解真正重要的内容,更快地解决问题,并不断了解他们的应用程序。
- 通俗的介绍
Sentry 是一个实时事件日志记录和聚合平台。(官方说的是错误监控 Error Monitor)它 专门用于监视错误和提取执行适当的事后操作所需的所有信息,而无需使用标准用户循环反馈的任何麻烦(不再麻烦地依赖用户反馈来定位问题)。
Sentry 开发语言及支持的 SDK
Sentry 使用 Python(Django) 开发,功能非常丰富,相比起 ExceptionLess 来说也重得多(在 .NetCore/.NET 平台通常使用 ExceptionLess ),其支持的平台很全,基本主流编程语言/框架都有,请看下图:
- 官网,
https://docs.sentry.io/ - github 地址,
https://github.com/getsentry/sentry

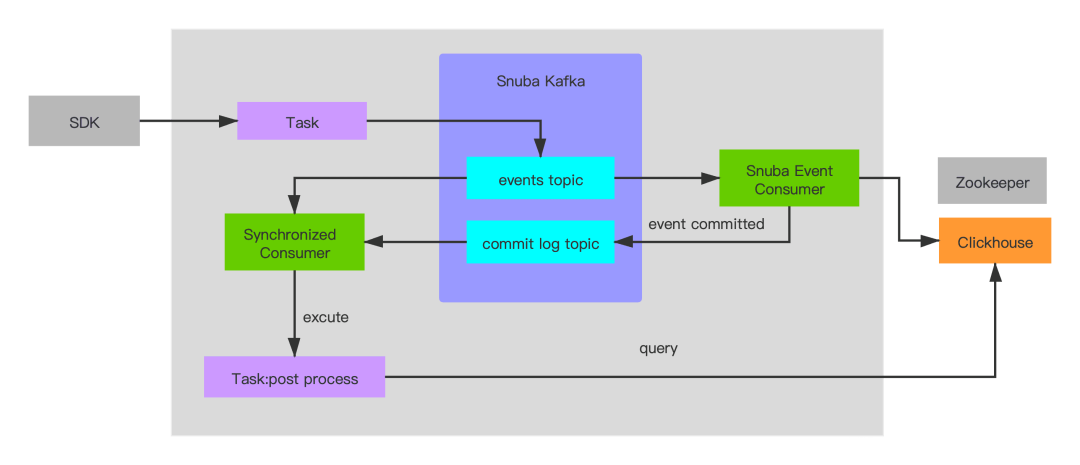
Sentry 功能架构
Sentry 是一个 SaaS 产品,提供开箱即用的功能集,它有开源版和商业 SaaS 两个版本,开源版可自行独立部署,接下来我们来看下 Sentry 的功能架构和运行流程:
- 功能架构

- 运行流程
关于【Sentry 开源版与商业 SaaS 版的区别】请查看 :https://blog.csdn.net/o__cc/article/details/122445341
前置准备条件
说明:在部署
Sentry之前,为了保障部署工作顺利进展,假定以下这些环境已经准备完成。
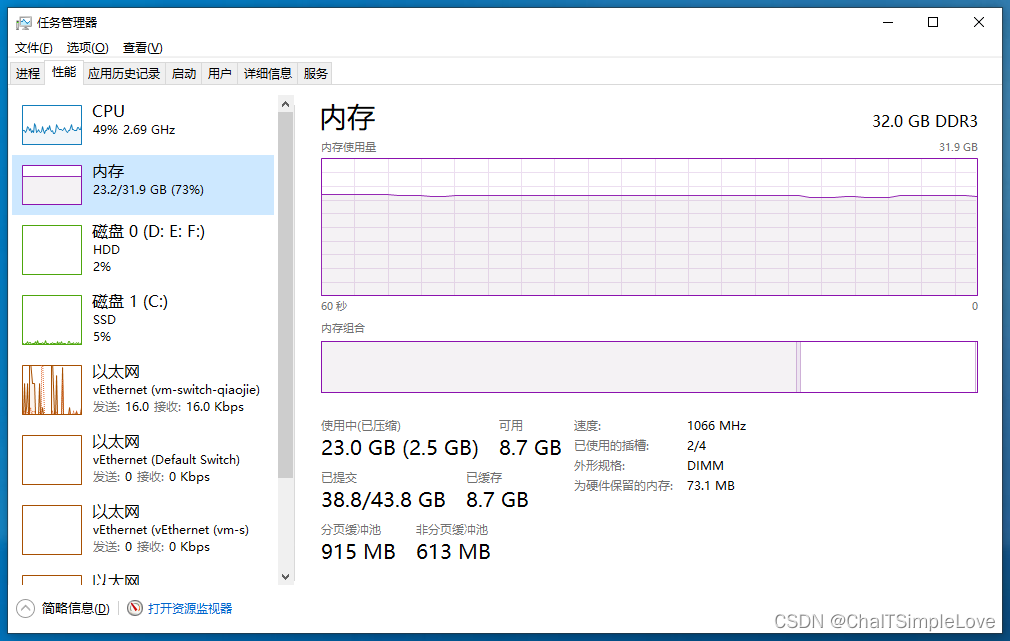
规格配置说明
说明:此处采用 Windows 10(22H2) + WSL2/Debian11 + Docker Desktop(v4.20.1) 部署。

Docker Desktop 安装
说明:
Docker + WSL2/Debian11安装说明请自行查看相关资料,此处不再讲述。
安装好 Docker Desktop 环境后,点击设置,修改【Docker Engine】添加如下信息:
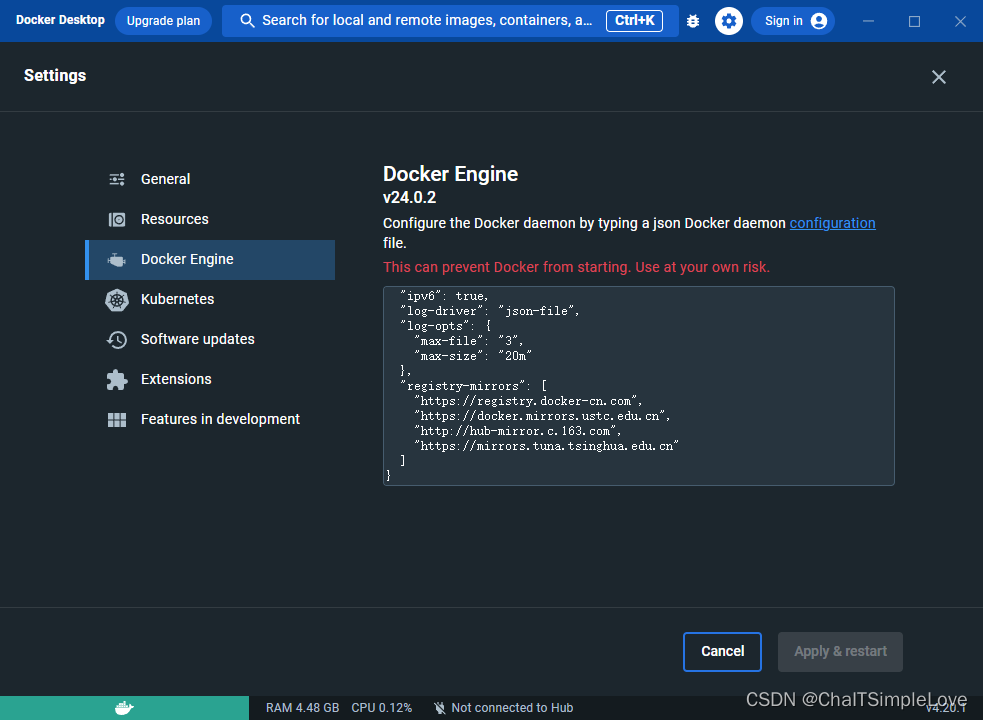
json 配置信息如下:
{"builder": {"gc": {"defaultKeepStorage": "40GB","enabled": true}},"experimental": true,"features": {"buildkit": true},"fixed-cidr-v6": "fd00:dead:beef:c0::/80","ip6tables": true,"ipv6": true,"log-driver": "json-file","log-opts": {"max-file": "3","max-size": "20m"},"registry-mirrors": ["https://registry.docker-cn.com", // Docker中国区官方"https://docker.mirrors.ustc.edu.cn", // 中国科学技术大学"http://hub-mirror.c.163.com", // 网易"https://mirrors.tuna.tsinghua.edu.cn" // 清华]
}
Linux 环境
/etc/docker/daemon.json完整配置示例请查看,https://docs.docker.com/engine/reference/commandline/dockerd/#daemon-configuration-file
继续点击【Resources】开启 Debian,如下所示:

完成上面操作后,点击右下角【Apply & restart】按钮,使配置信息在 docker 中生效。
相关文章:
- Debian 12 / Ubuntu 22.04 安装 Docker 以及 Docker Compose 教程,https://u.sb/debian-install-docker/
WSL2/Debian11 环境准备
使用 Windows Terminal 登录 WSL2/Debian 环境,执行如下操作:
- 在
/etc/apt/sources.list添加repo源
jeff@master-jeff:/$ cat /etc/apt/sources.list
deb http://deb.debian.org/debian bullseye main
deb http://deb.debian.org/debian bullseye-updates main
deb http://security.debian.org/debian-security bullseye-security main
deb http://ftp.debian.org/debian bullseye-backports main
Debian11(bullseye) 国内软件源,https://www.cnblogs.com/liuguanglin/p/debian11_repo.html
apt安装git
# 安装 git(如果没有,就安装,后面需要拉取代码)
sudo apt update && install git
Sentry 安装步骤
通过上面的环境准备后,接下来我们就开始进入 Sentry 的安装环节,操作步骤如下:
docker 部署 sentry 步骤
- 使用
git clone拉取sentry的self-hosted源码
# 拉取 sentry 的 self-hosted
git clone https://github.com/getsentry/self-hosted.git# 指定发布版本拉取(当下最新发布版本是23.6.1)
git clone https://github.com/getsentry/self-hosted/archive/refs/tags/23.6.1.tar.gz
cd到self-hosted目录,运行install.sh
此步骤是在 linux 环境安装 sentry 所需的依赖环境。
# 给 install.sh 文件执行权限
chmod +x install.sh # 执行 sh 安装
sudo ./install.sh
// 如果 git 链接不稳,可以跳过 commit 检查
sudo ./install.sh --skip-commit-check
查看 install.sh 脚本信息:
#!/usr/bin/env bash
set -eE# Pre-pre-flight? 🤷
if [[ -n "$MSYSTEM" ]]; thenecho "Seems like you are using an MSYS2-based system (such as Git Bash) which is not supported. Please use WSL instead."exit 1
fisource install/_lib.sh# Pre-flight. No impact yet.
source install/parse-cli.sh
source install/detect-platform.sh
source install/dc-detect-version.sh
source install/error-handling.sh
# We set the trap at the top level so that we get better tracebacks.
trap_with_arg cleanup ERR INT TERM EXIT
source install/check-latest-commit.sh
source install/check-minimum-requirements.sh# Let's go! Start impacting things.
source install/turn-things-off.sh
source install/create-docker-volumes.sh
source install/ensure-files-from-examples.sh
source install/ensure-relay-credentials.sh
source install/generate-secret-key.sh
source install/update-docker-images.sh
source install/build-docker-images.sh
source install/install-wal2json.sh
source install/bootstrap-snuba.sh
source install/create-kafka-topics.sh
source install/upgrade-postgres.sh
source install/set-up-and-migrate-database.sh
source install/geoip.sh
source install/wrap-up.sh
查看 docker-compose.yml 信息:
x-restart-policy: &restart_policyrestart: unless-stopped
x-depends_on-healthy: &depends_on-healthycondition: service_healthy
x-depends_on-default: &depends_on-defaultcondition: service_started
x-healthcheck-defaults: &healthcheck_defaults# Avoid setting the interval too small, as docker uses much more CPU than one would expect.# Related issues:# https://github.com/moby/moby/issues/39102# https://github.com/moby/moby/issues/39388# https://github.com/getsentry/self-hosted/issues/1000interval: "$HEALTHCHECK_INTERVAL"timeout: "$HEALTHCHECK_TIMEOUT"retries: $HEALTHCHECK_RETRIESstart_period: 10s
x-sentry-defaults: &sentry_defaults<<: *restart_policyimage: sentry-self-hosted-local# Set the platform to build for linux/arm64 when needed on Apple silicon Macs.platform: ${DOCKER_PLATFORM:-}build:context: ./sentryargs:- SENTRY_IMAGEdepends_on:redis:<<: *depends_on-healthykafka:<<: *depends_on-healthypostgres:<<: *depends_on-healthymemcached:<<: *depends_on-defaultsmtp:<<: *depends_on-defaultsnuba-api:<<: *depends_on-defaultsnuba-consumer:<<: *depends_on-defaultsnuba-outcomes-consumer:<<: *depends_on-defaultsnuba-sessions-consumer:<<: *depends_on-defaultsnuba-transactions-consumer:<<: *depends_on-defaultsnuba-subscription-consumer-events:<<: *depends_on-defaultsnuba-subscription-consumer-transactions:<<: *depends_on-defaultsnuba-replacer:<<: *depends_on-defaultsymbolicator:<<: *depends_on-defaultvroom:<<: *depends_on-defaultentrypoint: "/etc/sentry/entrypoint.sh"command: ["run", "web"]environment:PYTHONUSERBASE: "/data/custom-packages"SENTRY_CONF: "/etc/sentry"SNUBA: "http://snuba-api:1218"VROOM: "http://vroom:8085"# Force everything to use the system CA bundle# This is mostly needed to support installing custom CA certs# This one is used by botocoreDEFAULT_CA_BUNDLE: &ca_bundle "/etc/ssl/certs/ca-certificates.crt"# This one is used by requestsREQUESTS_CA_BUNDLE: *ca_bundle# This one is used by grpc/google modulesGRPC_DEFAULT_SSL_ROOTS_FILE_PATH_ENV_VAR: *ca_bundle# Leaving the value empty to just pass whatever is set# on the host system (or in the .env file)SENTRY_EVENT_RETENTION_DAYS:SENTRY_MAIL_HOST:SENTRY_MAX_EXTERNAL_SOURCEMAP_SIZE:OPENAI_API_KEY:volumes:- "sentry-data:/data"- "./sentry:/etc/sentry"- "./geoip:/geoip:ro"- "./certificates:/usr/local/share/ca-certificates:ro"
x-snuba-defaults: &snuba_defaults<<: *restart_policydepends_on:clickhouse:<<: *depends_on-healthykafka:<<: *depends_on-healthyredis:<<: *depends_on-healthyimage: "$SNUBA_IMAGE"environment:SNUBA_SETTINGS: self_hostedCLICKHOUSE_HOST: clickhouseDEFAULT_BROKERS: "kafka:9092"REDIS_HOST: redisUWSGI_MAX_REQUESTS: "10000"UWSGI_DISABLE_LOGGING: "true"# Leaving the value empty to just pass whatever is set# on the host system (or in the .env file)SENTRY_EVENT_RETENTION_DAYS:
services:smtp:<<: *restart_policyimage: tianon/exim4hostname: "${SENTRY_MAIL_HOST:-}"volumes:- "sentry-smtp:/var/spool/exim4"- "sentry-smtp-log:/var/log/exim4"memcached:<<: *restart_policyimage: "memcached:1.6.21-alpine"command: ["-I", "${SENTRY_MAX_EXTERNAL_SOURCEMAP_SIZE:-1M}"]healthcheck:<<: *healthcheck_defaults# From: https://stackoverflow.com/a/31877626/5155484test: echo stats | nc 127.0.0.1 11211redis:<<: *restart_policyimage: "redis:6.2.12-alpine"healthcheck:<<: *healthcheck_defaultstest: redis-cli pingvolumes:- "sentry-redis:/data"ulimits:nofile:soft: 10032hard: 10032postgres:<<: *restart_policy# Using the same postgres version as Sentry dev for consistency purposesimage: "postgres:14.5"healthcheck:<<: *healthcheck_defaults# Using default user "postgres" from sentry/sentry.conf.example.py or value of POSTGRES_USER if providedtest: ["CMD-SHELL", "pg_isready -U ${POSTGRES_USER:-postgres}"]command:["postgres","-c","wal_level=logical","-c","max_replication_slots=1","-c","max_wal_senders=1",]environment:POSTGRES_HOST_AUTH_METHOD: "trust"entrypoint: /opt/sentry/postgres-entrypoint.shvolumes:- "sentry-postgres:/var/lib/postgresql/data"- type: bindread_only: truesource: ./postgres/target: /opt/sentry/zookeeper:<<: *restart_policyimage: "confluentinc/cp-zookeeper:5.5.7"environment:ZOOKEEPER_CLIENT_PORT: "2181"CONFLUENT_SUPPORT_METRICS_ENABLE: "false"ZOOKEEPER_LOG4J_ROOT_LOGLEVEL: "WARN"ZOOKEEPER_TOOLS_LOG4J_LOGLEVEL: "WARN"KAFKA_OPTS: "-Dzookeeper.4lw.commands.whitelist=ruok"ulimits:nofile:soft: 4096hard: 4096volumes:- "sentry-zookeeper:/var/lib/zookeeper/data"- "sentry-zookeeper-log:/var/lib/zookeeper/log"- "sentry-secrets:/etc/zookeeper/secrets"healthcheck:<<: *healthcheck_defaultstest:["CMD-SHELL", 'echo "ruok" | nc -w 2 -q 2 localhost 2181 | grep imok']kafka:<<: *restart_policydepends_on:zookeeper:<<: *depends_on-healthyimage: "confluentinc/cp-kafka:5.5.7"environment:KAFKA_ZOOKEEPER_CONNECT: "zookeeper:2181"KAFKA_ADVERTISED_LISTENERS: "PLAINTEXT://kafka:9092"KAFKA_OFFSETS_TOPIC_REPLICATION_FACTOR: "1"KAFKA_OFFSETS_TOPIC_NUM_PARTITIONS: "1"KAFKA_LOG_RETENTION_HOURS: "24"KAFKA_MESSAGE_MAX_BYTES: "50000000" #50MB or bustKAFKA_MAX_REQUEST_SIZE: "50000000" #50MB on requests apparently tooCONFLUENT_SUPPORT_METRICS_ENABLE: "false"KAFKA_LOG4J_LOGGERS: "kafka.cluster=WARN,kafka.controller=WARN,kafka.coordinator=WARN,kafka.log=WARN,kafka.server=WARN,kafka.zookeeper=WARN,state.change.logger=WARN"KAFKA_LOG4J_ROOT_LOGLEVEL: "WARN"KAFKA_TOOLS_LOG4J_LOGLEVEL: "WARN"ulimits:nofile:soft: 4096hard: 4096volumes:- "sentry-kafka:/var/lib/kafka/data"- "sentry-kafka-log:/var/lib/kafka/log"- "sentry-secrets:/etc/kafka/secrets"healthcheck:<<: *healthcheck_defaultstest: ["CMD-SHELL", "nc -z localhost 9092"]interval: 10stimeout: 10sretries: 30clickhouse:<<: *restart_policyimage: clickhouse-self-hosted-localbuild:context: ./clickhouseargs:BASE_IMAGE: "${CLICKHOUSE_IMAGE:-}"ulimits:nofile:soft: 262144hard: 262144volumes:- "sentry-clickhouse:/var/lib/clickhouse"- "sentry-clickhouse-log:/var/log/clickhouse-server"- type: bindread_only: truesource: ./clickhouse/config.xmltarget: /etc/clickhouse-server/config.d/sentry.xmlenvironment:# This limits Clickhouse's memory to 30% of the host memory# If you have high volume and your search return incomplete results# You might want to change this to a higher value (and ensure your host has enough memory)MAX_MEMORY_USAGE_RATIO: 0.3healthcheck:test: ["CMD-SHELL",# Manually override any http_proxy envvar that might be set, because# this wget does not support no_proxy. See:# https://github.com/getsentry/self-hosted/issues/1537"http_proxy='' wget -nv -t1 --spider 'http://localhost:8123/' || exit 1",]interval: 10stimeout: 10sretries: 30geoipupdate:image: "maxmindinc/geoipupdate:v4.7.1"# Override the entrypoint in order to avoid using envvars for config.# Futz with settings so we can keep mmdb and conf in same dir on host# (image looks for them in separate dirs by default).entrypoint:["/usr/bin/geoipupdate", "-d", "/sentry", "-f", "/sentry/GeoIP.conf"]volumes:- "./geoip:/sentry"snuba-api:<<: *snuba_defaults# Kafka consumer responsible for feeding events into Clickhousesnuba-consumer:<<: *snuba_defaultscommand: consumer --storage errors --auto-offset-reset=latest --max-batch-time-ms 750 --no-strict-offset-reset# Kafka consumer responsible for feeding outcomes into Clickhouse# Use --auto-offset-reset=earliest to recover up to 7 days of TSDB data# since we did not do a proper migrationsnuba-outcomes-consumer:<<: *snuba_defaultscommand: consumer --storage outcomes_raw --auto-offset-reset=earliest --max-batch-time-ms 750 --no-strict-offset-reset# Kafka consumer responsible for feeding session data into Clickhousesnuba-sessions-consumer:<<: *snuba_defaultscommand: consumer --storage sessions_raw --auto-offset-reset=latest --max-batch-time-ms 750 --no-strict-offset-reset# Kafka consumer responsible for feeding transactions data into Clickhousesnuba-transactions-consumer:<<: *snuba_defaultscommand: consumer --storage transactions --consumer-group transactions_group --auto-offset-reset=latest --max-batch-time-ms 750 --no-strict-offset-resetsnuba-replays-consumer:<<: *snuba_defaultscommand: consumer --storage replays --auto-offset-reset=latest --max-batch-time-ms 750 --no-strict-offset-resetsnuba-replacer:<<: *snuba_defaultscommand: replacer --storage errors --auto-offset-reset=latest --no-strict-offset-resetsnuba-subscription-consumer-events:<<: *snuba_defaultscommand: subscriptions-scheduler-executor --dataset events --entity events --auto-offset-reset=latest --no-strict-offset-reset --consumer-group=snuba-events-subscriptions-consumers --followed-consumer-group=snuba-consumers --delay-seconds=60 --schedule-ttl=60 --stale-threshold-seconds=900snuba-subscription-consumer-sessions:<<: *snuba_defaultscommand: subscriptions-scheduler-executor --dataset sessions --entity sessions --auto-offset-reset=latest --no-strict-offset-reset --consumer-group=snuba-sessions-subscriptions-consumers --followed-consumer-group=sessions-group --delay-seconds=60 --schedule-ttl=60 --stale-threshold-seconds=900snuba-subscription-consumer-transactions:<<: *snuba_defaultscommand: subscriptions-scheduler-executor --dataset transactions --entity transactions --auto-offset-reset=latest --no-strict-offset-reset --consumer-group=snuba-transactions-subscriptions-consumers --followed-consumer-group=transactions_group --delay-seconds=60 --schedule-ttl=60 --stale-threshold-seconds=900snuba-profiling-profiles-consumer:<<: *snuba_defaultscommand: consumer --storage profiles --auto-offset-reset=latest --max-batch-time-ms 1000 --no-strict-offset-resetsnuba-profiling-functions-consumer:<<: *snuba_defaultscommand: consumer --storage functions_raw --auto-offset-reset=latest --max-batch-time-ms 1000 --no-strict-offset-resetsymbolicator:<<: *restart_policyimage: "$SYMBOLICATOR_IMAGE"volumes:- "sentry-symbolicator:/data"- type: bindread_only: truesource: ./symbolicatortarget: /etc/symbolicatorcommand: run -c /etc/symbolicator/config.ymlsymbolicator-cleanup:<<: *restart_policyimage: symbolicator-cleanup-self-hosted-localbuild:context: ./cronargs:BASE_IMAGE: "$SYMBOLICATOR_IMAGE"command: '"55 23 * * * gosu symbolicator symbolicator cleanup"'volumes:- "sentry-symbolicator:/data"web:<<: *sentry_defaultsulimits:nofile:soft: 4096hard: 4096healthcheck:<<: *healthcheck_defaultstest:- "CMD"- "/bin/bash"- "-c"# Courtesy of https://unix.stackexchange.com/a/234089/108960- 'exec 3<>/dev/tcp/127.0.0.1/9000 && echo -e "GET /_health/ HTTP/1.1\r\nhost: 127.0.0.1\r\n\r\n" >&3 && grep ok -s -m 1 <&3'cron:<<: *sentry_defaultscommand: run cronworker:<<: *sentry_defaultscommand: run workerevents-consumer:<<: *sentry_defaultscommand: run consumer ingest-events --consumer-group ingest-consumerattachments-consumer:<<: *sentry_defaultscommand: run consumer ingest-attachments --consumer-group ingest-consumertransactions-consumer:<<: *sentry_defaultscommand: run consumer ingest-transactions --consumer-group ingest-consumeringest-replay-recordings:<<: *sentry_defaultscommand: run consumer ingest-replay-recordings --consumer-group ingest-replay-recordingsingest-profiles:<<: *sentry_defaultscommand: run consumer --no-strict-offset-reset ingest-profiles --consumer-group ingest-profilespost-process-forwarder-errors:<<: *sentry_defaultscommand: run consumer post-process-forwarder-errors --consumer-group post-process-forwarder --synchronize-commit-log-topic=snuba-commit-log --synchronize-commit-group=snuba-consumerspost-process-forwarder-transactions:<<: *sentry_defaultscommand: run consumer post-process-forwarder-transactions --consumer-group post-process-forwarder --synchronize-commit-log-topic=snuba-transactions-commit-log --synchronize-commit-group transactions_groupsubscription-consumer-events:<<: *sentry_defaultscommand: run consumer events-subscription-results --consumer-group query-subscription-consumersubscription-consumer-transactions:<<: *sentry_defaultscommand: run consumer transactions-subscription-results --consumer-group query-subscription-consumersentry-cleanup:<<: *sentry_defaultsimage: sentry-cleanup-self-hosted-localbuild:context: ./cronargs:BASE_IMAGE: sentry-self-hosted-localentrypoint: "/entrypoint.sh"command: '"0 0 * * * gosu sentry sentry cleanup --days $SENTRY_EVENT_RETENTION_DAYS"'nginx:<<: *restart_policyports:- "$SENTRY_BIND:80/tcp"image: "nginx:1.22.0-alpine"volumes:- type: bindread_only: truesource: ./nginxtarget: /etc/nginx- sentry-nginx-cache:/var/cache/nginxdepends_on:- web- relayrelay:<<: *restart_policyimage: "$RELAY_IMAGE"volumes:- type: bindread_only: truesource: ./relaytarget: /work/.relay- type: bindread_only: truesource: ./geoiptarget: /geoipdepends_on:kafka:<<: *depends_on-healthyredis:<<: *depends_on-healthyweb:<<: *depends_on-healthyvroom:<<: *restart_policyimage: "$VROOM_IMAGE"environment:SENTRY_KAFKA_BROKERS_PROFILING: "kafka:9092"SENTRY_KAFKA_BROKERS_OCCURRENCES: "kafka:9092"SENTRY_BUCKET_PROFILES: file://localhost//var/lib/sentry-profilesSENTRY_SNUBA_HOST: "http://snuba-api:1218"volumes:- sentry-vroom:/var/lib/sentry-profilesdepends_on:kafka:<<: *depends_on-healthy
volumes:# These store application data that should persist across restarts.sentry-data:external: truesentry-postgres:external: truesentry-redis:external: truesentry-zookeeper:external: truesentry-kafka:external: truesentry-clickhouse:external: truesentry-symbolicator:external: true# This volume stores profiles and should be persisted.# Not being external will still persist data across restarts.# It won't persist if someone does a docker compose down -v.sentry-vroom:# These store ephemeral data that needn't persist across restarts.# That said, volumes will be persisted across restarts until they are deleted.sentry-secrets:sentry-smtp:sentry-nginx-cache:sentry-zookeeper-log:sentry-kafka-log:sentry-smtp-log:sentry-clickhouse-log:
扩展小知识:
Linux环境下不同的文件类型有不同的颜色。

- 蓝色表示目录;
- 绿色表示可执行文件,可执行的程序;
- 红色表示压缩文件或包文件;
- 浅蓝色表示链接文件;
- 灰色表示其它文件;
- 运动
docker compose命令
在 self-hosted 目录运行 docker compose,执行如下命令:
sudo docker compose --env-file .env.custom up -d
此处不出意外情况,等待安装完成,直接在浏览器访问 http://127.0.0.1:9000/ 即可,这里 Ubuntu/Debian 和 Windows 的端口是共用的。
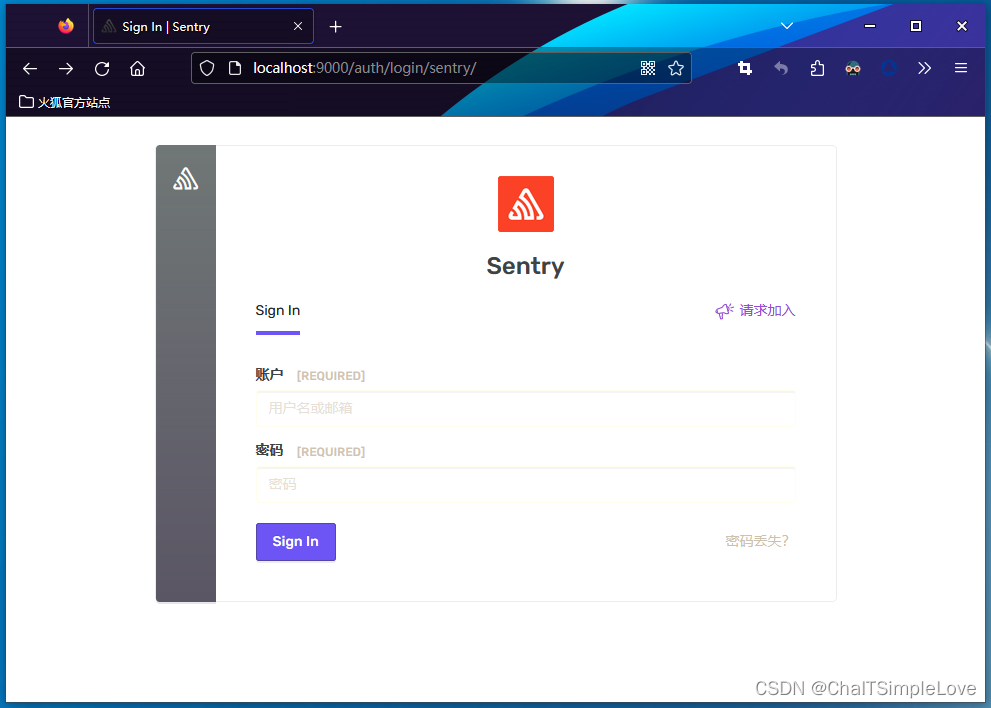
在上面的安装过程中会提示输入账号密码信息,此处填入该信息即可登录。
说明:安装 sentry 的过程有点漫长,受网络环境等因素影响,安装依赖,初始化镜像运行需要耐心等待。
其他环境安装,请查看相关文章:
- https://www.jb51.net/article/256519.htm
- Ubuntu下Sentry部署,https://www.cnblogs.com/Du704/p/15184228.html
演示过程说明
此时,我们可以在 docker 中查看 sentry 所需的相关镜像。
jeff@master-jeff:/mnt/c/Users/Jeffery.Chai$ docker image ls
REPOSITORY                               TAG             IMAGE ID       CREATED         SIZE
symbolicator-cleanup-self-hosted-local   latest          0a78e379e527   2 days ago      132MB
sentry-cleanup-self-hosted-local         latest          4e4186d222ea   2 days ago      949MB
<none>                                   <none>          1c5c191621d5   2 days ago      947MB
<none>                                   <none>          2e56488d9ca7   2 days ago      947MB
<none>                                   <none>          6c3a38538842   2 days ago      947MB
<none>                                   <none>          f610c450eb14   2 days ago      947MB
<none>                                   <none>          4fe6a3a4125e   2 days ago      947MB
<none>                                   <none>          896fd940c3b7   2 days ago      947MB
<none>                                   <none>          0a0db21d131c   2 days ago      947MB
<none>                                   <none>          07b4e8a187ba   2 days ago      947MB
<none>                                   <none>          04b4e5dc16be   2 days ago      947MB
sentry-self-hosted-local                 latest          075c3b95d316   2 days ago      947MB
<none>                                   <none>          9c05ee347871   2 days ago      947MB
<none>                                   <none>          6f0d3e316ecf   2 days ago      947MB
sentry-self-hosted-jq-local              latest          90ad6f6a6eb6   2 days ago      82.5MB
getsentry/sentry                         nightly         db241453686e   2 days ago      947MB
getsentry/relay                          nightly         363ed39f2234   2 days ago      254MB
getsentry/snuba                          nightly         e0fd19143e62   2 days ago      993MB
getsentry/symbolicator                   nightly         cb9fde9f635f   2 days ago      131MB
getsentry/vroom                          nightly         f44c0da3f4a9   3 days ago      42MB
busybox                                  latest          5242710cbd55   4 days ago      4.26MB
memcached                                1.6.21-alpine   1f7da6310656   11 days ago     9.7MB
redis                                    6.2.12-alpine   b9cad9a5aff9   2 weeks ago     27.4MB
tianon/exim4                             latest          6de8b48bcaf0   2 weeks ago     158MB
postgres                                 14.5            cefd1c9e490c   8 months ago    376MB
nginx                                    1.22.0-alpine   5685937b6bc1   8 months ago    23.5MB
confluentinc/cp-kafka                    5.5.7           b362671f2bc0   17 months ago   737MB
confluentinc/cp-zookeeper                5.5.7           22b646e1afd0   17 months ago   737MB
curlimages/curl                          7.77.0          e062233fb4a9   2 years ago     8.26MB
maxmindinc/geoipupdate                   v4.7.1          8ec32cc727c7   2 years ago     10.6MB
clickhouse-self-hosted-local             latest          3e6108f87619   3 years ago     497MB
然后 cd 进入 self-hosted 目录,ls 查看文件信息,里面有一个 sentry_install_log-xxx.txt 的安装日志文件。
使用 cat 命令查看 sentry_install_log-xxx.txt 日志文件:

看到输出如下信息:
-----------------------------------------------------------------You're all done! Run the following command to get Sentry running:docker compose up -d-----------------------------------------------------------------
说明上面安装的 步骤2 操作已经执行完成,此时可以开始运行容器化部署了。操作命令 docker compose up -d 启动容器,输出如下信息:
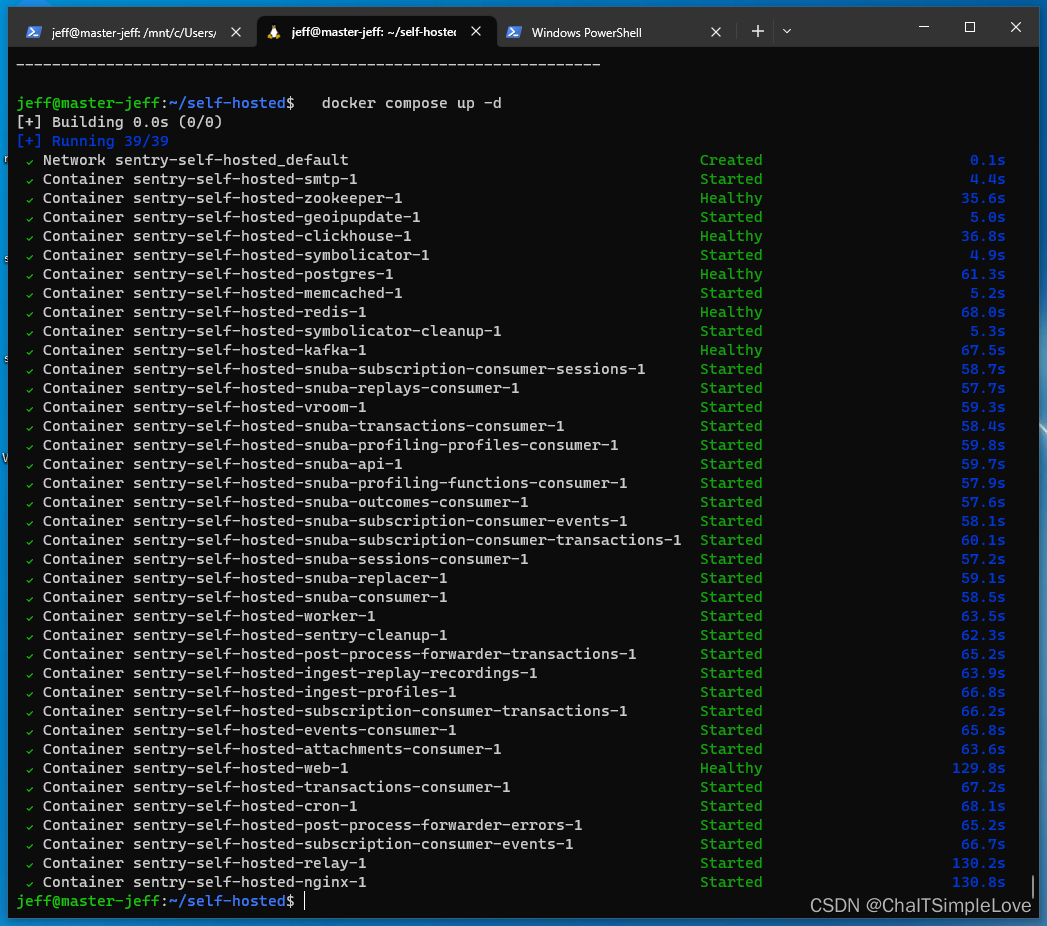
使用 docker compose ls 即可查看运行的容器。
jeff@master-jeff:~/self-hosted$ docker compose ls
NAME                 STATUS              CONFIG FILES
sentry-self-hosted   running(37)         /home/jeff/self-hosted/docker-compose.yml
卸载关闭 Sentry
如果想要卸载停止 Sentry ,也很简单,执行下面命令即可:
docker compose down
卸载成功,输出如下信息:

查看 docker compose down --help 命令帮信息:
jeff@master-jeff:/mnt/c/Users/Jeffery.Chai$ docker compose down --helpUsage: docker compose down [OPTIONS]Stop and remove containers, networksOptions:--dry-run Execute command in dry run mode--remove-orphans Remove containers for services not defined in the Compose file.--rmi string Remove images used by services. "local" remove only images that don't have acustom tag ("local"|"all")-t, --timeout int Specify a shutdown timeout in seconds (default 10)-v, --volumes volumes Remove named volumes declared in the volumes section of the Compose file andanonymous volumes attached to containers.
下一篇文章我们将介绍如何使用 .NET SDK 接入 Sentry,敬请观看后续。
总结
在安装 Sntery 时,一定要把前置环境准备完成,其次是部署规格要求必须满足,因为 Sentry 启动的资源多,产品相对偏重,所需的运行环境资源也是必不可少的,当部署规格资源不够时,在执行 ./install.sh 安装脚本时,首先会进行安装环境检测,不满足要求没法继续后续相关步骤。