文章目录
- @[toc]
- 前情提要
- 制作 centos 基础镜像
- 准备 efk 二进制文件
- 部署 efk 组件
- 配置 namespace
- 配置 gfs 的 endpoints
- 配置 pv 和 pvc
- 部署 elasticsearch
- efk-cm
- efk-svc
- efk-sts
- 部署 filebeat
- filebeat-cm
- filebeat-ds
- 部署 kibana
- kibana-cm
- kibana-svc
- kibana-dp
- 使用 nodeport 访问 kibana
- nodeport-kibana-svc
- 使用 ingress 的方式
- ingress yaml
前情提要
- 本实验环境信息如下:
- 本次实验使用的镜像非
efk自身的镜像,利用统一编译的centos镜像加上gfs持久化存储,将efk二进制文件挂载到容器内使用 - 本次实验依赖
gfs持久化,关于gfs的使用和部署,可以参考我之前的文档 Kubernetes 集群使用 GlusterFS 作为数据持久化存储 - k8s 版本:v1.23.17
- docker 版本:19.03.9
- efk 版本:7.9.2 (elasticsearch+filebeat+kibana)
- 本次实验使用的镜像非
制作 centos 基础镜像
- 为什么要使用统一的
centos镜像- 因为大部分镜像为了空间小,刨去了很多的工具,很大程度上影响了容器内的一些问题排查,尤其是网络层面,为了能安装更多自己需要的工具
- 如果需要针对一些组件升级,就可以只替换二进制文件,不需要修改镜像和维护镜像了
编写 dockerfile
FROM centos:7ENV LANG=C.UTF-8
ENV TZ "Asia/Shanghai"
ENV PS1 "\[\e[7;34m\]\u@\h\[\e[0m\]\[\e[0;35m\]:$(pwd) \[\e[0m\]\[\e[0;35m\]\t\[\e[0m\]\n\[\e[0;32m\]> \[\e[0m\]"# 让容器识别中文
RUN echo LANG='C.UTF-8' > /etc/locale.conf && \localedef -c -f UTF-8 -i zh_CN C.UTF-8# 将官方的源替换成清华源
## 安装一些可能用得到的调试工具
RUN sed -e 's|^mirrorlist=|#mirrorlist=|g' \-e 's|^#baseurl=http://mirror.centos.org/centos|baseurl=https://mirrors.tuna.tsinghua.edu.cn/centos|g' \-i.bak /etc/yum.repos.d/CentOS-*.repo && \yum install -y telnet \unzip \wget \curl \nmap-ncat \vim \net-tools \tree \bind-utils \jq \dig \less \more && yum clean all && \alias ll='ls -lh' && \alias tailf='tail -f'
构建镜像
docker build -t centos7:base_v1.0 .
准备 efk 二进制文件
Past Releases
- 打开上面的地址,在
Products里面分别输入elasticsearch,filebeat、kibana,在Version里面输入自己需要的版本号就可以下载了- 需要自己准备 java 8,去 oracle 官网就可以下载
# 这里选了一个官方不带 jdk 的 es,因为我这边要是用 java 8,不带 jdk 的 es 可以节省 150M 的空间
wget -c https://artifacts.elastic.co/downloads/elasticsearch/elasticsearch-7.9.2-no-jdk-linux-x86_64.tar.gz
wget -c https://artifacts.elastic.co/downloads/beats/filebeat/filebeat-7.9.2-linux-x86_64.tar.gz
wget -c https://artifacts.elastic.co/downloads/kibana/kibana-7.9.2-linux-x86_64.tar.gz
# 这个是 kibana 的一个插件,可以实时查看容器的尾部日志
wget -c https://github.com/sivasamyk/logtrail/releases/download/v0.1.31/logtrail-7.9.2-0.1.31.zip
- 我是利用 gfs 做的持久化,所以,这些二进制文件下载好以后,都会提前先解压出来(
除了 kibana 和 logtrail 不需要解压,其他的都需要解压)
部署 efk 组件
以下只提供 yaml 文件,大家自己按照下面的顺序整理,然后依次 apply 即可
配置 namespace
---
apiVersion: v1
kind: Namespace
metadata:annotations:labels:name: journal
配置 gfs 的 endpoints
- 这块大家以自己实际的架构为准,这里是为了让 k8s 集群可以连接 gfs 开放的端点
- 如果和我一样用的 gfs,注意修改
addresses下面的 ip,以自己实际的为准
---
apiVersion: v1
kind: Endpoints
metadata:annotations:name: glusterfsnamespace: journal
subsets:
# gfs 服务端的地址,要修改成自己的
- addresses:- ip: 172.72.0.96- ip: 172.72.0.98ports:- port: 49152protocol: TCP
---
apiVersion: v1
kind: Service
metadata:annotations:name: glusterfsnamespace: journal
spec:ports:- port: 49152protocol: TCPtargetPort: 49152sessionAffinity: Nonetype: ClusterIP
配置 pv 和 pvc
pv
---
apiVersion: v1
kind: PersistentVolume
metadata:annotations:labels:package: journalname: journal-software-pv
spec:accessModes:- ReadOnlyManycapacity:storage: 10Giglusterfs:endpoints: glusterfspath: online-share/kubernetes_data/software/readOnly: falsepersistentVolumeReclaimPolicy: Retain
pvc
---
apiVersion: v1
kind: PersistentVolumeClaim
metadata:annotations:labels:package: journalname: journal-software-pvcnamespace: journal
spec:accessModes:- ReadOnlyManyresources:requests:storage: 10Giselector:matchLabels:package: journal
创建完 pvc 后,需要确认一下 pvc 是否为 Bound 状态
部署 elasticsearch
efk-cm
---
apiVersion: v1
data:elasticsearch.yml: |-cluster.name: efk-escluster.max_shards_per_node: 20000node.attr.rack: ${NODE_NAME}path.data: ${DATA_DIR}path.logs: ${LOG_DIR}network.host: 0.0.0.0http.port: 9200cluster.initial_master_nodes: ["es-0"]http.cors.enabled: truehttp.cors.allow-origin: "*"xpack.security.enabled: falsenode.name: ${POD_NAME}node.master: truenode.data: truetransport.tcp.port: 9300discovery.zen.minimum_master_nodes: 2discovery.zen.ping.unicast.hosts: ["es-0.es-svc.journal.svc.cluster.local:9300","es-1.es-svc.journal.svc.cluster.local:9300","es-2.es-svc.journal.svc.cluster.local:9300"]start.sh: |-#!/bin/bashset -xexport ES_JAVA_OPTS="-Xmx${JAVA_OPT_XMX} -Xms${JAVA_OPT_XMS} -Xss512k -XX:MaxGCPauseMillis=200 -XX:InitiatingHeapOccupancyPercent=45 -Djava.io.tmpdir=/tmp -Dsun.net.inetaddr.ttl=10 -Xloggc:${LOG_DIR}/gc.log"CONFIG_FILE=(jvm.options log4j2.properties role_mapping.yml)for FILENAME in ${CONFIG_FILE[@]}docat ${ES_HOME}/config/${FILENAME} > ${ES_PATH_CONF}/${FILENAME}donecp ${CONFIG_MAP_DIR}/elasticsearch.yml ${ES_PATH_CONF}/${ES_HOME}/bin/elasticsearchinit.sh: |-#!/bin/bashset -xmkdir -p ${LOG_DIR} ${DATA_DIR}chown 1000 -R ${LOG_DIR}chown 1000 -R ${DATA_DIR}
kind: ConfigMap
metadata:annotations:labels:name: es-cmnamespace: journal
efk-svc
---
apiVersion: v1
kind: Service
metadata:annotations:labels:app: esname: es-svcnamespace: journal
spec:clusterIP: Noneports:- name: tcpport: 9300targetPort: 9300- name: httpport: 9200targetPort: 9200selector:app: es
efk-sts
- 在 apply 之前记得先给节点打上 label,在 yaml 文件里面配置了亲和性,需要节点有 es= 这个 label 才会调度
---
apiVersion: apps/v1
kind: StatefulSet
metadata:annotations:labels:app: esname: esnamespace: journal
spec:replicas: 3selector:matchLabels:app: esserviceName: es-svctemplate:metadata:labels:app: esspec:# 因为用的是 hostpath 做 es 的数据持久化,这里做了一个亲和性## nodeAffinity 是为了把 pod 绑定到指定的节点上affinity:nodeAffinity:requiredDuringSchedulingIgnoredDuringExecution:nodeSelectorTerms:- matchExpressions:- key: esoperator: Exists## podAntiAffinity 是为了一个节点上只能出现一个副本podAntiAffinity:requiredDuringSchedulingIgnoredDuringExecution:- labelSelector:matchExpressions:- key: appoperator: Invalues:- estopologyKey: kubernetes.io/hostnamecontainers:- command:- /bin/bash- -c- sh $CONFIG_MAP_DIR/start.shenv:- name: APP_NAMEvalue: es- name: NODE_NAMEvalueFrom:fieldRef:fieldPath: spec.nodeName- name: POD_NAMEvalueFrom:fieldRef:fieldPath: metadata.name- name: NAMESPACEvalueFrom:fieldRef:fieldPath: metadata.namespace- name: DATA_DIRvalue: /efk/es/data- name: LOG_DIRvalue: /efk/es/logs- name: ES_PATH_CONFvalue: /efk/es/conf- name: CONFIG_MAP_DIRvalue: /efk/es/configmap- name: ES_HOMEvalue: /appdata/software/elasticsearch-7.9.2- name: JAVA_HOMEvalue: /appdata/software/jdk1.8.0_231- name: JAVA_OPT_XMSvalue: 256M- name: JAVA_OPT_XMXvalue: 256Mimage: centos7:base_v1.0imagePullPolicy: IfNotPresentlivenessProbe:failureThreshold: 60initialDelaySeconds: 5periodSeconds: 10successThreshold: 1tcpSocket:port: tcptimeoutSeconds: 1name: esports:- containerPort: 9300name: tcp- containerPort: 9200name: httpreadinessProbe:failureThreshold: 60initialDelaySeconds: 5periodSeconds: 10successThreshold: 1tcpSocket:port: tcptimeoutSeconds: 1securityContext:runAsUser: 1000volumeMounts:- mountPath: /efk/es/dataname: data- mountPath: /efk/es/logsname: logs- mountPath: /efk/es/configmapname: configmap- mountPath: /efk/es/confname: conf- mountPath: /appdata/softwarename: softwarereadOnly: trueinitContainers:- command:- /bin/sh- -c- . ${CONFIG_MAP_DIR}/init.shenv:- name: NODE_NAMEvalueFrom:fieldRef:fieldPath: spec.nodeName- name: POD_NAMEvalueFrom:fieldRef:fieldPath: metadata.name- name: DATA_DIRvalue: /efk/es/data- name: LOG_DIRvalue: /efk/es/log- name: ES_PATH_CONFvalue: /efk/es/conf- name: ES_HOMEvalue: /appdata/software/elasticsearch-7.9.2- name: CONFIG_MAP_DIRvalue: /efk/es/configmapimage: centos7:base_v1.0name: initvolumeMounts:- mountPath: /efk/es/dataname: data- mountPath: /efk/es/logsname: logs- mountPath: /efk/es/configmapname: configmapterminationGracePeriodSeconds: 0volumes:- hostPath:path: /data/k8s_data/estype: DirectoryOrCreatename: data- emptyDir: {}name: logs- emptyDir: {}name: conf- configMap:name: es-cmname: configmap- name: softwarepersistentVolumeClaim:claimName: journal-software-pvc
- 依次 apply 之后,可以通过下面的命令进行验证
kubectl get pod -n journal -o wide
这边是起了三个副本
NAME   READY   STATUS    RESTARTS   AGE   IP            NODE          NOMINATED NODE   READINESS GATES
es-0   1/1     Running   0          75s   172.30.1.78   172.72.0.96   <none>           <none>
es-1   1/1     Running   0          54s   172.30.0.17   172.72.0.98   <none>           <none>
es-2   1/1     Running   0          33s   172.30.2.16   172.72.0.95   <none>           <none>
可以通过
pod ip来访问 es 集群
curl 172.30.1.78:9200/_cat/nodes
pod ip和pod 名字也是一一对应的
172.30.2.16 51 96 9 0.74 0.52 0.36 dilmrt - es-2
172.30.0.17 53 66 8 0.39 0.45 0.33 dilmrt - es-1
172.30.1.78 37 68 7 0.16 0.32 0.24 dilmrt * es-0
部署 filebeat
filebeat-cm
---
apiVersion: v1
data:filebeat.yaml: |-filebeat.inputs:- type: container# stream: stdoutencoding: utf-8paths:- /var/log/pods/*/*/*.logtail_files: true# 将error日志合并到一行multiline.pattern: '^([0-9]{4}|[0-9]{2})-[0-9]{2}'multiline.negate: truemultiline.match: aftermultiline.timeout: 10s# 设置条件logging.level: warninglogging.json: truelogging.metrics.enabled: falseoutput.elasticsearch:hosts: ["${ES_URL}"]indices:- index: "journal-center-%{+yyyy.MM.dd}"pipeline: k8s_pipelinek8s_pipeline.json: |-{"description": "解析k8s container日志","processors": [{"grok":{"field": "log.file.path","patterns": ["/var/log/pods/%{DATA:namespace}_%{DATA:pod_name}_.*/%{DATA:container_name}/.*"],"ignore_missing": true,"pattern_definitions":{"GREEDYMULTILINE": "(.|\n)*"}},"remove":{"field": "log.file.path"}}],"on_failure": [{"set":{"field": "error.message","value": "{{ _ingest.on_failure_message }}"}}]}startFilebeat.sh: |#!/bin/bashset -exDIR="$( cd "$( dirname "$0" )" && pwd )"LOG_DIR=/appdata/logs/${NAMESPACE}/${APP_NAME}DATA_DIR=/appdata/data/${NAMESPACE}/${APP_NAME}mkdir -p $LOG_DIR $DATA_DIRcurl -H 'Content-Type: application/json' -XPUT http://${ES_URL}/_ingest/pipeline/k8s_pipeline -d@${DIR}/k8s_pipeline.json$FILEBEAT_HOME/filebeat -e -c $DIR/filebeat.yaml --path.data $DATA_DIR --path.logs $LOG_DIR
kind: ConfigMap
metadata:annotations:labels:package: filebeatname: filebeat-cmnamespace: journal
filebeat-ds
---
apiVersion: apps/v1
kind: DaemonSet
metadata:annotations:labels:app: filebeatname: filebeatnamespace: journal
spec:selector:matchLabels:app: filebeattemplate:metadata:labels:app: filebeatspec:containers:- command:- /bin/bash- /appdata/init/filebeat/startFilebeat.shenv:- name: APP_NAMEvalue: filebeat-pod- name: NODE_NAMEvalueFrom:fieldRef:fieldPath: spec.nodeName- name: POD_NAMEvalueFrom:fieldRef:fieldPath: metadata.name- name: NAMESPACEvalueFrom:fieldRef:fieldPath: metadata.namespace- name: ES_URLvalue: es-0.es-svc.journal.svc.cluster.local:9200- name: FILEBEAT_HOMEvalue: /appdata/software/filebeat-7.9.2-linux-x86_64image: centos7:base_v1.0imagePullPolicy: IfNotPresentname: filebeatvolumeMounts:- mountPath: /appdata/init/filebeatname: init- mountPath: /appdata/softwarename: softwarereadOnly: true- mountPath: /var/log/podsname: pod-logsreadOnly: true- mountPath: /data/crt-data/containersname: container-logreadOnly: trueterminationGracePeriodSeconds: 0volumes:- name: softwarepersistentVolumeClaim:claimName: journal-software-pvc- configMap:name: filebeat-cmname: init- hostPath:path: /var/log/podsname: pod-logs- hostPath:path: /data/crt-data/containersname: container-log
- 验证索引的创建
- 这里的 ip 记得换成自己的 es ip
curl -s -XGET 172.30.1.78:9200/_cat/indices | grep 'journal-center'
返回类似如下的信息
不一定会立刻生成,具体要看实际的环境是否有 pod 产生日志,需要等一会再看看
green open journal-center-2023.08.03 J-Ylys9ES2CGovXrYwjCsg 1 1 7 0 129kb 70.8kb
部署 kibana
kibana-cm
---
apiVersion: v1
data:kibana.yml: |-server.port: 5601server.host: "0.0.0.0"elasticsearch.hosts: ["http://${ES_URL}"]pid.file: ${DATA_DIR}/kibana.pidi18n.locale: "zh-CN"path.data: ${DATA_DIR}xpack.infra.enabled: falsexpack.logstash.enabled: falselogging.quiet: truestartKibana.sh: |#!/bin/bashset -exDIR="$( cd "$( dirname "$0" )" && pwd )"mkdir -p $LOG_DIR $DATA_DIR ${APP_HOME}[[ -d "${KIBANA_HOME}" ]] || tar xf /appdata/software/kibana-7.9.2-linux-x86_64.tar.gz -C ${APP_HOME}${KIBANA_HOME}/bin/kibana-plugin install file:///appdata/software/logtrail-7.9.2-0.1.31.zip# 创建 logtrail 使用的索引curl -XPUT "${ES_URL}/.logtrail/config/1?pretty" -H 'Content-Type: application/json' -d '{"version" : 2,"index_patterns" : [{"es": {"default_index": "journal-center-*"},"tail_interval_in_seconds": 10,"es_index_time_offset_in_seconds": 0,"display_timezone": "local","display_timestamp_format": "MM-DD HH:mm:ss","max_buckets": 500,"default_time_range_in_days" : 0,"max_hosts": 100,"max_events_to_keep_in_viewer": 5000,"default_search": "","fields" : {"mapping" : {"timestamp" : "@timestamp","message": "message"},"message_format": "[{{{namespace}}}].[{{{pod_name}}}].[{{{container_name}}}] {{{message}}}","keyword_suffix" : "keyword"},"color_mapping" : {}}]}'# 配置索引生命周期,保留三天的日志curl -XPUT "${ES_URL}/_ilm/policy/journal-center_policy?pretty" -H 'Content-Type: application/json' -d '{"policy": {"phases": {"delete": {"min_age": "3d","actions": {"delete": {}}}}}}'# 配置索引的分片和副本数curl -XPUT "${ES_URL}/_template/journal-center_template?pretty" -H 'Content-Type: application/json' -d '{"index_patterns": ["journal-center-*"],"settings": {"number_of_shards": 1,"number_of_replicas": 1,"index.lifecycle.name": "journal-center_policy"}}'# 应用到现有的多个索引中curl -XPUT "${ES_URL}/journal-center-*/_settings?pretty" -H 'Content-Type: application/json' -d '{"index": {"lifecycle": {"name": "journal-center_policy"}}}'${KIBANA_HOME}/bin/kibana -c ${DIR}/kibana.yml
kind: ConfigMap
metadata:annotations:labels:app: kibananame: kibana-cmnamespace: journal
kibana-svc
---
apiVersion: v1
kind: Service
metadata:annotations:labels:app: kibananame: kibana-svcnamespace: journal
spec:ports:- name: kibanawebport: 5601protocol: TCPtargetPort: 5601selector:app: kibana
kibana-dp
---
apiVersion: apps/v1
kind: Deployment
metadata:annotations:labels:app: kibananame: kibananamespace: journal
spec:replicas: 1selector:matchLabels:app: kibanatemplate:metadata:labels:app: kibanaspec:containers:- command:- /bin/bash- /appdata/init/kibana/startKibana.shenv:- name: APP_NAMEvalue: kibana- name: NODE_NAMEvalueFrom:fieldRef:fieldPath: spec.nodeName- name: POD_NAMEvalueFrom:fieldRef:fieldPath: metadata.name- name: NAMESPACEvalueFrom:fieldRef:fieldPath: metadata.namespace- name: ES_URLvalue: es-0.es-svc.journal.svc.cluster.local:9200- name: KIBANA_HOMEvalue: /kibana/kibana-7.9.2-linux-x86_64- name: APP_HOMEvalue: /kibana- name: LOG_DIRvalue: /appdata/kibana/logs- name: DATA_DIRvalue: /appdata/kibana/dataimage: centos7:base_v1.0livenessProbe:failureThreshold: 60initialDelaySeconds: 5periodSeconds: 20successThreshold: 1tcpSocket:port: kibanawebtimeoutSeconds: 1name: kibanaports:- containerPort: 5601name: kibanawebprotocol: TCPreadinessProbe:failureThreshold: 60initialDelaySeconds: 5periodSeconds: 20successThreshold: 1tcpSocket:port: kibanawebtimeoutSeconds: 1securityContext:runAsUser: 1000volumeMounts:- mountPath: /appdata/init/kibananame: init- mountPath: /appdata/softwarename: softwarereadOnly: true- mountPath: /appdata/kibananame: kibanas- mountPath: /kibananame: kibanainstallterminationGracePeriodSeconds: 0volumes:- name: softwarepersistentVolumeClaim:claimName: journal-software-pvc- configMap:name: kibana-cmname: init- emptyDir: {}name: kibanas- emptyDir: {}name: kibanainstall
- 关于 kibana 的访问,这边提供两种方式供大家选择
使用 nodeport 访问 kibana
nodeport-kibana-svc
---
apiVersion: v1
kind: Service
metadata:annotations:labels:app: kibananame: kibana-nodeport-svcnamespace: journal
spec:type: NodePortports:- name: kibanawebport: 5601protocol: TCPtargetPort: 5601nodePort: 30007selector:app: kibana
apply 之后,就可以使用任一节点的 ip 加上 30007 去访问 kibana 的界面
使用 ingress 的方式
- 使用 ingress 需要先部署 ingress-controller ,我这边使用的是 nginx-ingress-controller,具体部署可以参考我另一篇博客:
- kubernetes 部署 nginx-ingress-controller
ingress yaml
---
apiVersion: networking.k8s.io/v1
kind: Ingress
metadata:annotations:kubernetes.io/ingress.class: nginxname: ingress-journalnamespace: journal
spec:rules:# host 字段不写,表示使用 ip 访问## host 字段可以写域名,如果没有 dns 解析,可以本地做 hosts 来验证- host: logs.study.comhttp:paths:- backend:service:name: kibana-svcport:number: 5601path: /pathType: Prefix
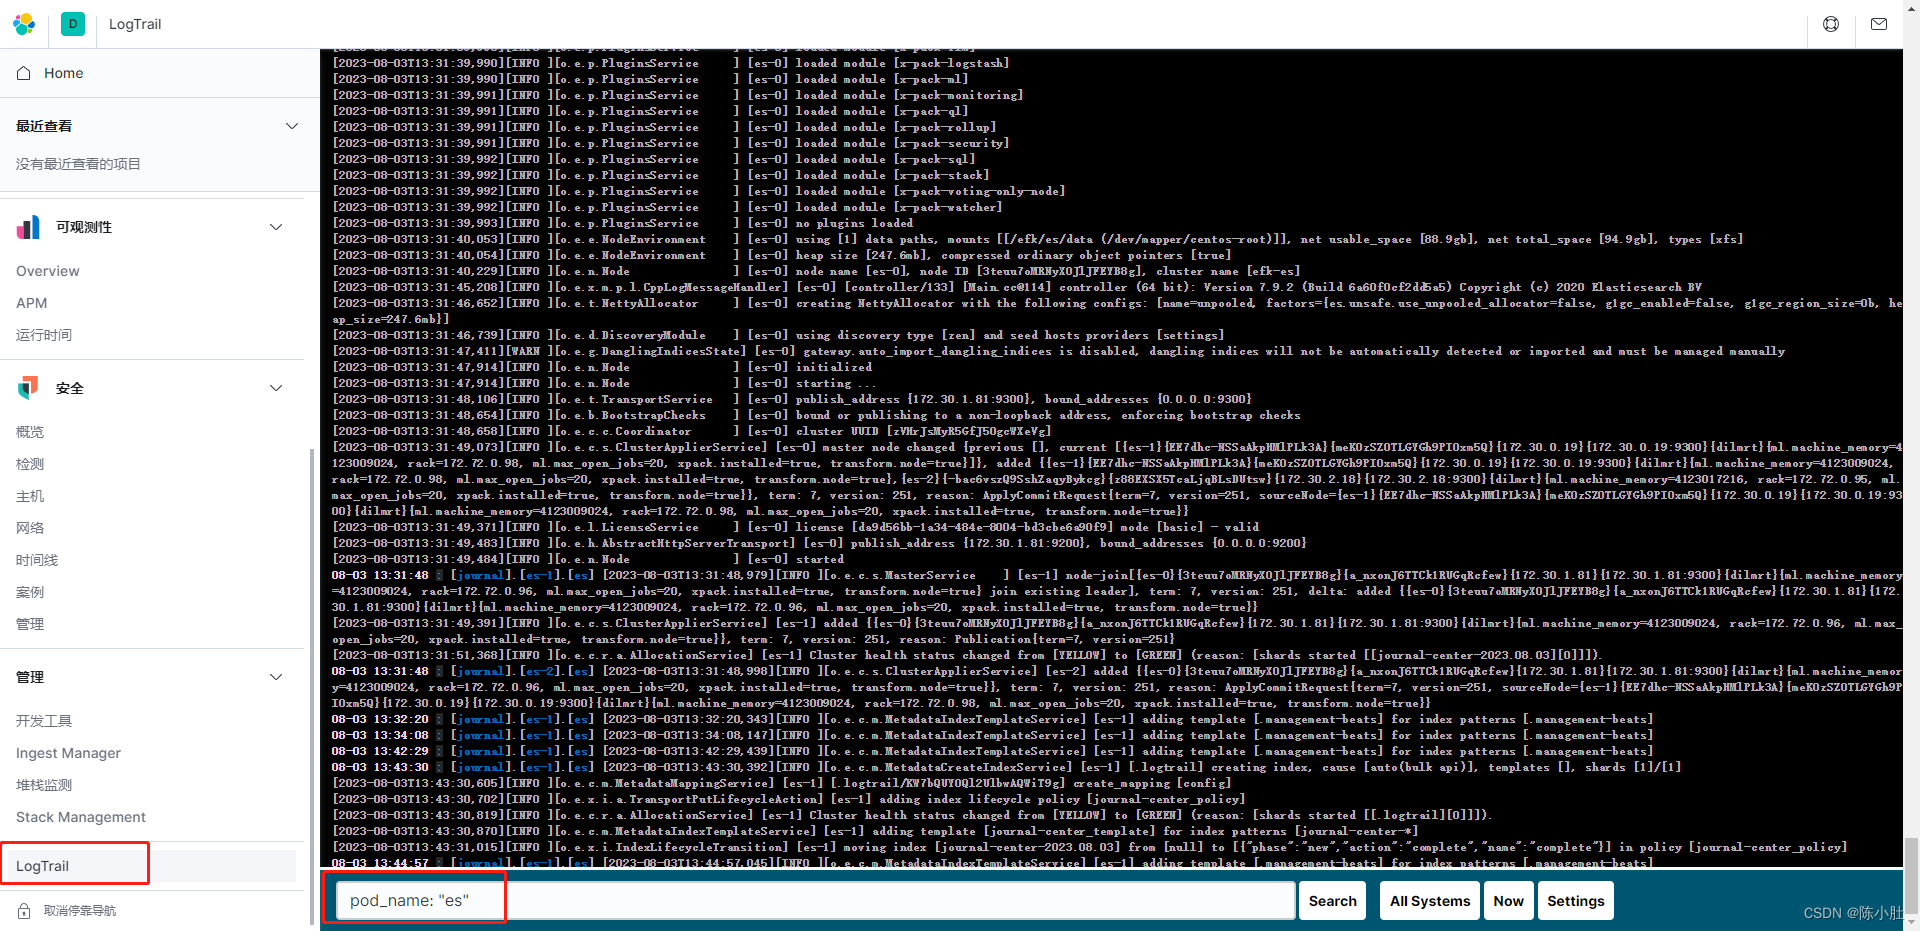
找到导航栏的 logtrail,然后在输入框输入 pod_name: “<pod名字>” 来看指定容器的日志
