一个更好用的文档
添加链接描述
箭头函数的简化
//简化前
function countIncreAction(data) {return {type:"INCREMENT",data}
}
//简化后
const countIncreAction =data=>({type:"INCREMENT",data
})
react UI组件库相关资料
组件库连接和推荐
antd组件库文档
Material UI
举例
import React, {Component} from 'react';
import { Button, DatePicker } from 'antd';class App extends Component {render() {return (// 注意此处要用BrowserRouter包括根组件,可以提到index.js里面包裹App标签<div><ul><Button type="primary">PRESS ME</Button><DatePicker placeholder="select date" /></ul></div>);}
}
export default App;
export和export default区别
- export 和 export default 都是es6语法中用来导出组件的
- 可以导出的文档类型有( 数据、常量、函数、js文件、模块等)
区别
- 一个文件中如果有多个模块需要export,则使用export
export  class Com extends Component{render() {return (<div ><h1>这是头部</h1></div>)}
}export const str = '我是要被导出的str'// import 引入方式
import { Com , str } // 引入时需要解构出来 可以解构多个 用 , 号隔开
- export default 看名字就知道了,一个文件中只有一个模块被声明
function  fn (){console.log('我是fn函数')
}export default fn //exprot default  导出时不会去关注 文件内容  只要名称对应即可//export 必须写在 文件最后;// 引入方式
import fn from '../'
redux
- redux是一个专门用于做状态怪的js库
- 可以用在vue、react、angular项目中,但基本与react配合使用
- 作用:集中式管理react应用中的多个组件共享的状态,可以把组件内需要共享的状态交给redux管理
应用场景
- 状态共享:某个组件的状态,需要让其他组件可以随时拿到(共享)
- 组件通信:一个组件需要改变另一个组件的状态(通信)
- 总体原则:能不用就不用,如果不用比较吃力才用
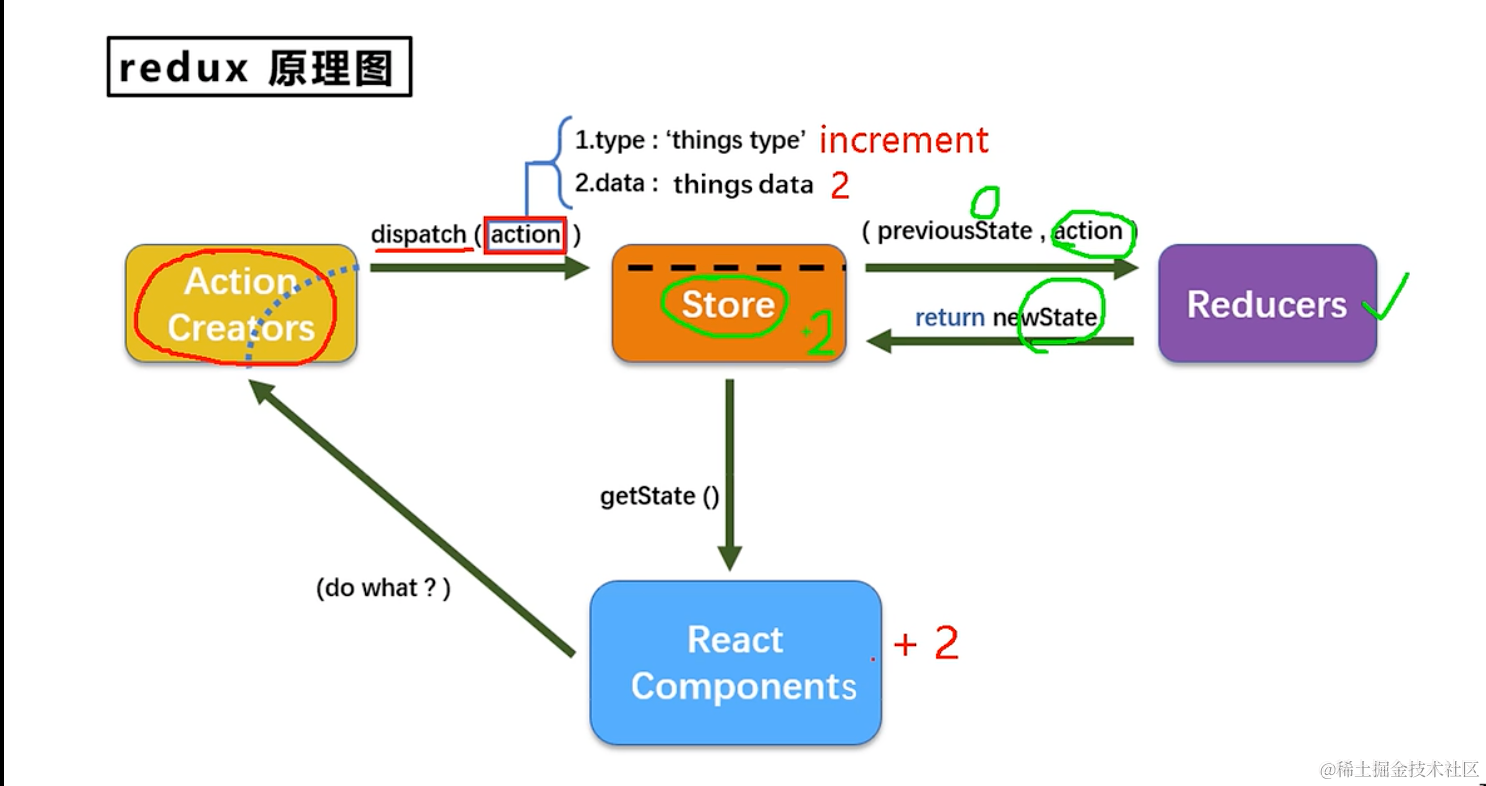
流程图
我们先来看一下redux的工作流程,可以有一个大概的印象,我们看到,redux的核心有三个,一个是action creator, 一个是store,一个是reducers,其中redux的核心是什么?是store,我们调用redux,其实就是调用store的api,那么store负责api,谁负责干活呢?reducer,真正负责处理逻辑是在reducer里面。react component 我们自己的组件,负责和store交互
我们可以先来看一个简单的列子
- store的实现,其实store是不用我们实现的,我们只需要引入redux包,create一个store就可以了。
//引入store
import {createStore} from "redux"
import {countReducer} from "./count_reducer"
//引入reducer
export default createStore(countReducer)- store负责和组件交互,但是需要依赖注入,即store要把任务交给谁处理,真正处理的这个人,就是reducer,所以我们写一个reducer的逻辑,reducer就是一个纯function,接收两个参数,一个是基础数据,一个是操作方式。
export function countReducer(state = 1, action) {const {type,data}=actionconsole.log(state,action);switch (type) {case 'INCREMENT'://注意,这个return的值就是statereturn state + data*1;case 'DECREMENT':return state - data*1;default:return state;}
}
- 至此 store和reducer我们都编辑完毕了,但是我们在组建中怎么调用呢?我们接下来编写组件
import React, {Component, createRef} from 'react';
import store from "../../redux/store"class Count extends Component {sel=createRef();increment=()=>{const {value}=this.sel.current//store去分发任务store.dispatch({type: "INCREMENT",data:value})}decrement=()=>{const {value}=this.sel.current//store去分发任务store.dispatch({type: "DECREMENT",data:value})}incrementOdd=()=>{const {value}=this.sel.currentconst oldVal=store.getState()//store去分发任务if(oldVal%2===0){return}store.dispatch({type: "INCREMENT",data:value})}incrementAsync=()=>{const {value}=this.sel.currentsetTimeout(()=>{//store去分发任务store.dispatch({type: "INCREMENT",data:value})},1000)}render() {return (<div>{/*store.getState() 后去state的值*/}<h1>当前求和为:{store.getState()}</h1><select name="" id="" ref={this.sel}><option value="1">1</option><option value="2">2</option><option value="3">3</option></select><button onClick={this.increment}>+</button><button onClick={this.decrement}>-</button><button onClick={this.incrementOdd}>奇数加</button><button onClick={this.incrementAsync}>异步加</button></div>);}
}export default Count;
- 我们通过store.dispatch去分发任务,修改了state,但是redux有一个问题,他只负责存储和更新state,但是不负责调render,这就导致我们的state变化之后页面不能刷新,所以,我们还得调用一下setstate接口来更新render,那么另一个问题又来了,什么时候去setstate呢?我们需要redux告知我们,这个api就是
store.subscribe,所以我们在index.js就给监听上
import React from 'react';
import ReactDOM from "react-dom/client";
import App from "./App";
import store from "./redux/store"
// ReactDOM.createRoot(document.getElementById("root")).render(app)
const root=ReactDOM.createRoot(document.getElementById("root"))
root.render(<App />)//注意App标签一定不要预先定义,否则会编译为静态标签而导致无法更新
store.subscribe(()=>{root.render(<App />)
})- 自此,一个简单的redux功能实现了。
redux demo实例
- 前面我们用了store和reducer,但是action是什么我并未涉及,接下来我们看怎么创建一个action文件count_action.js
const countIncreAction =data=>({type:"INCREMENT",data
})const countdecreAction = (data) => ({type: "DECREMENT",data
})
- 诶,我们发现一个现象,这个写法和我们使用store分发任务有点像
decrement=()=>{const {value}=this.sel.current//store去分发任务store.dispatch({type: "DECREMENT",data:value})}
- 那我们怎么把我们自己写的换成action呢,我们来替换一下,我们先引入,再替换
import React, {Component, createRef} from 'react';
import store from "../../redux/store"
import {countIncreAction,countdecreAction} from "../../redux/count_action"class Count extends Component {sel=createRef();increment=()=>{const {value}=this.sel.current//store去分发任务store.dispatch(countIncreAction(value))}
}export default Count;
- 关于一些优化,我们知道,在代码中,如果能用常量或者变量代替字符串,那么就用变量或者常量在代码中使用,那么我们可以使用一个常量文件来管理这些
异步action
action 可以返回一个对象,交由store去用,但是如果是我们想要一个异步的action怎么办呢?我们的对象里面也不支持自定义时间啊。redux很明显不支持,但是有一个组件提供了这种功能,就是redux-thunk,它通过store可以接收第二个参数,以applyMiddleware的形式让store可以接收function。我们来看一下,首先我们创建一个可以接收function的store
//引入store
import {applyMiddleware, createStore} from "redux"
import {countReducer} from "./count_reducer"
import {thunk} from "redux-thunk"
//引入reducer
export default createStore(countReducer,applyMiddleware(thunk))
- 那么我们在使用的时候就可以简单这样使用
incrementAsync=()=>{const {value}=this.sel.currentstore.dispatch(countIncreAsyncAction(value,1000))}
react-redux
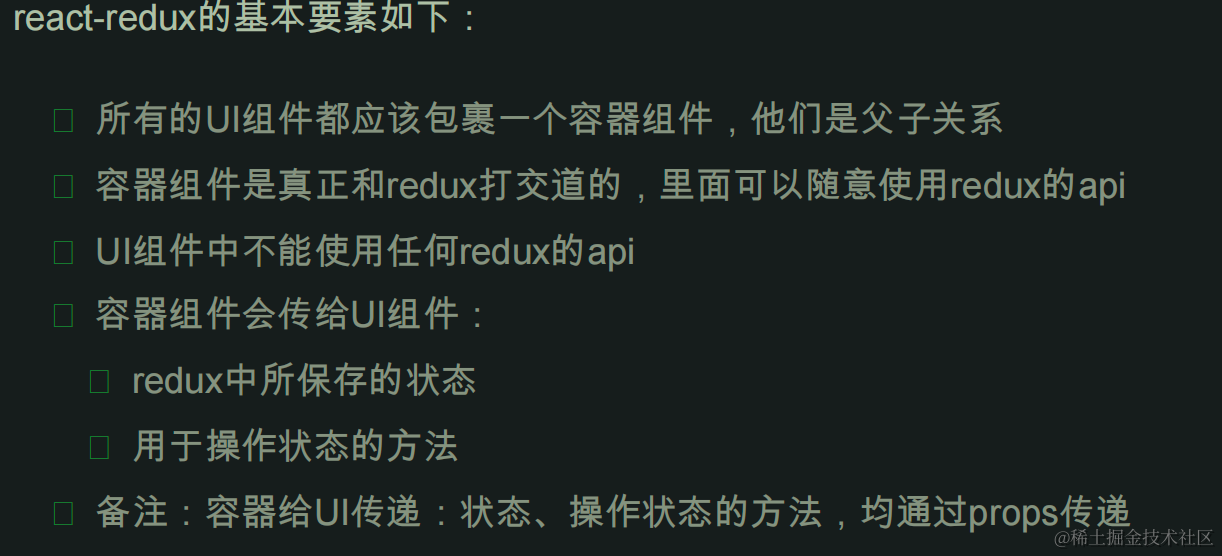
react-redux是由官方出的一个组件库,用来简化对redux的操作。redux对组件做了区分,一种是UI组件,负责页面展示,一种是容器组件负责逻辑处理,既然是这样,那么和redux能交互的就只有容器组件(container),容器组件拿到数据后通过props传递给UI组件(component)
我们把count.jsx改成纯UI组件,如下
import React, {Component, createRef} from 'react';
class CountUI extends Component {sel=createRef();increment=()=>{const {value}=this.sel.current}decrement=()=>{const {value}=this.sel.current}incrementOdd=()=>{const {value}=this.sel.current}incrementAsync=()=>{const {value}=this.sel.current}render() {return (<div><h1>当前求和为:0</h1><select name="" id="" ref={this.sel}><option value="1">1</option><option value="2">2</option><option value="3">3</option></select><button onClick={this.increment}>+</button><button onClick={this.decrement}>-</button><button onClick={this.incrementOdd}>奇数加</button><button onClick={this.incrementAsync}>异步加</button></div>);}
}
export default CountUI;
- 我们创建一个container组件
//这个文件就是容器组件,负责和redux交互并传递数据给UI组件
//引入UI组件
import {CountUI} from "../../components/count/count"
import {connect} from "react-redux"
//创建一个
//创建一个容器组件并暴露
export default connect()(CountUI)
- 我们说过,容器不仅要传递数据给UI组件,还需要和redux交互呢,和redux交互其实就是调用store的接口,那么我们怎么和store联系上呢?我们在App里面改一下。
    render() {return (<div><Count store={store} /></div>);}
}
connect
具体来说,connect接收两个参数,
- 一个是mapStateToProps,默认传入state参数,也就是讲state数据以props的形式传递给子组件
- 一个是mapDispathcToProps ,默认传入一个dispatch参数,用来指定分发任务给哪个action,接下来我们看一下这redux,component,container的交互
//这个文件就是容器组件,负责和redux交互并传递数据给UI组件
//引入UI组件
import {CountUI} from "../../components/count/count"
import {connect} from "react-redux"
import {countDecreAction, countIncreAction, countIncreAsyncAction} from "../../redux/count_action"
//在此指定数据,即把那些state赋值给props
function mapStateToProps(state) {return {count: state}
}
//在此指定redux,即让哪个redux来处理数据
function mapDispathcToProps(dispatch) {return {add: (data) =>dispatch(countIncreAction(data)),addOdd: (data) =>dispatch(countIncreAction(data)),addAsync: (data) =>dispatch(countIncreAsyncAction(data,1000)),sub: (data) => dispatch(countDecreAction(data))}
}
//创建一个容器组件并暴露
//参数解释:mapStateToProps用来传递数据  mapDispathcToProps用来指定redux ,返回一个函数后,然后指定要绑定哪个UI组件
export default connect(mapStateToProps, mapDispathcToProps)(CountUI)- 容器组件写好之后,我们在UI组件怎么调用呢,很简单,从props获取即可
import React, {Component, createRef} from 'react';
export class CountUI extends Component {sel=createRef();increment=()=>{const {value}=this.sel.currentthis.props.add(value)}decrement=()=>{const {value}=this.sel.currentthis.props.sub(value)}incrementOdd=()=>{const oldValue=this.props.countconst {value}=this.sel.currentif (oldValue%2===0){return}this.props.addOdd(value)}incrementAsync=()=>{const {value}=this.sel.currentthis.props.addAsync(value)}render() {return (<div><h1>当前求和为:{this.props.count}</h1><select name="" id="" ref={this.sel}><option value="1">1</option><option value="2">2</option><option value="3">3</option></select><button onClick={this.increment}>+</button><button onClick={this.decrement}>-</button><button onClick={this.incrementOdd}>奇数加</button><button onClick={this.incrementAsync}>异步加</button></div>);}
}
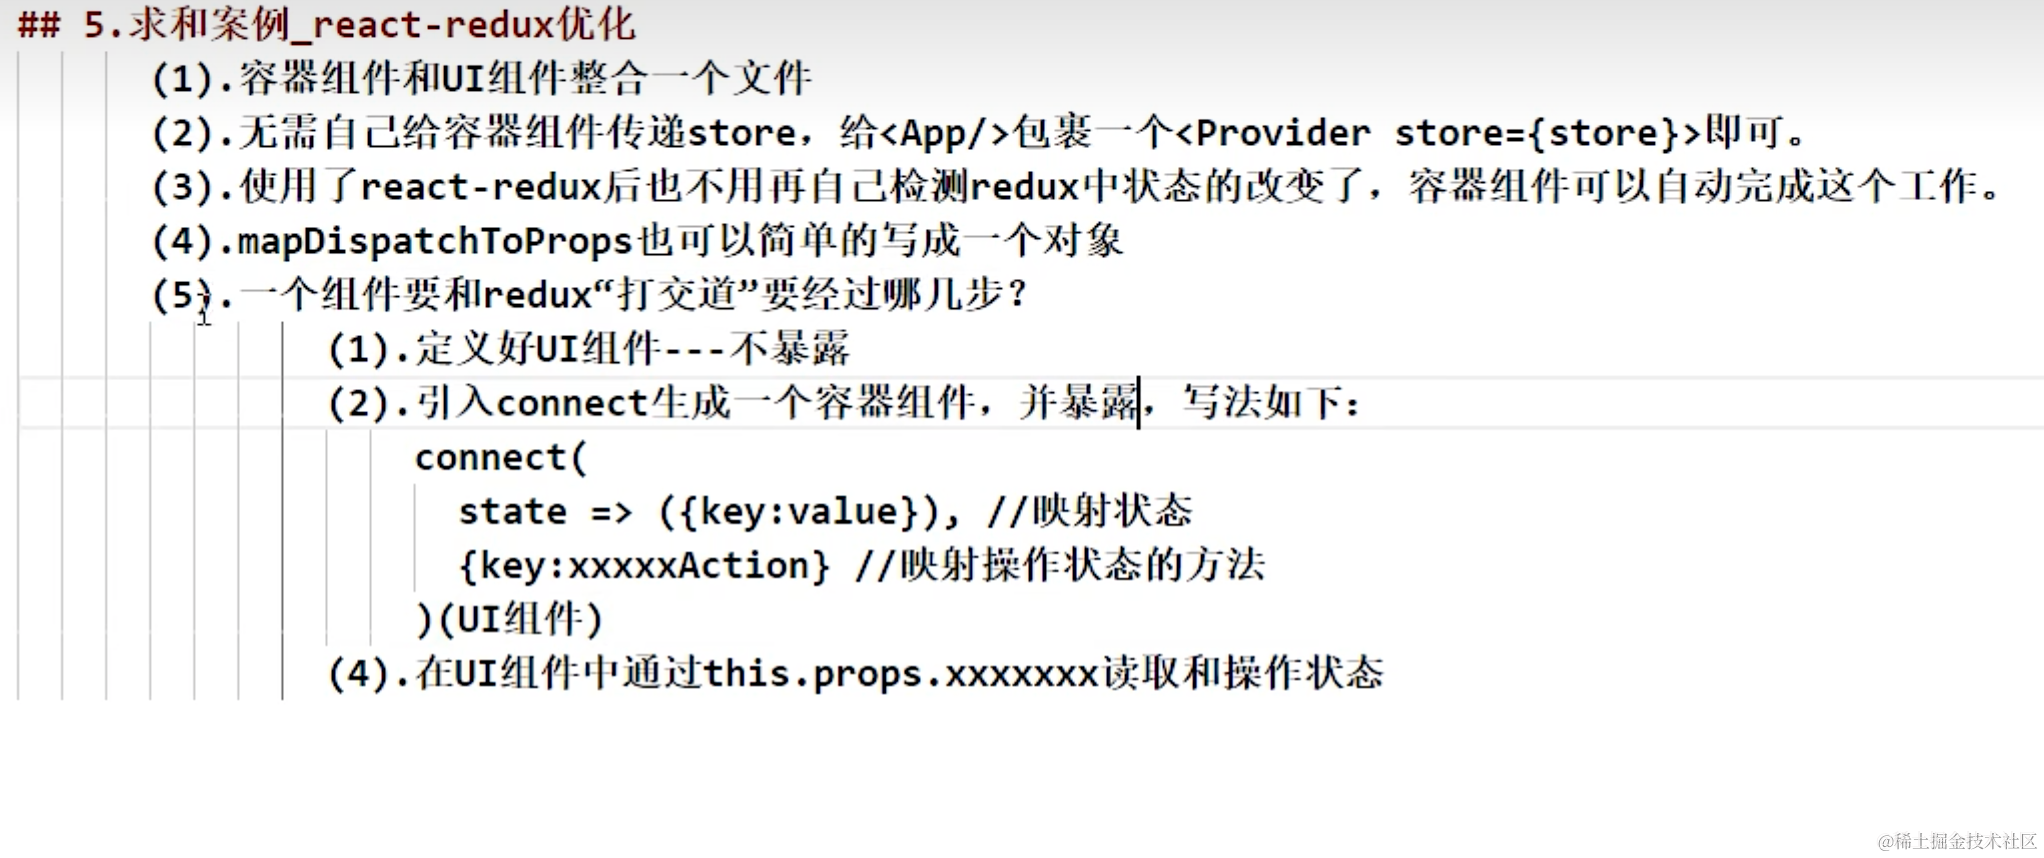
- 简化版
//这个文件就是容器组件,负责和redux交互并传递数据给UI组件
//引入UI组件
import {CountUI} from "../../components/count/count"
import {connect} from "react-redux"
import {countDecreAction, countIncreAction, countIncreAsyncAction} from "../../redux/count_action"
export default connect(state => ({count: state}),{add: countIncreAction,addOdd: countIncreAction,addAsync: countIncreAsyncAction,sub: countDecreAction}
)(CountUI)
react-redux的优化
- 既然react-redux 是对redux进行了优化,那么react-redux会不会在state发生变化的时候来实现自动render呢?答案是肯定的,我们来试一下
import React from 'react';
import ReactDOM from "react-dom/client";
import App from "./App";
import store from "./redux/store"
// ReactDOM.createRoot(document.getElementById("root")).render(app)
const root=ReactDOM.createRoot(document.getElementById("root"))
root.render(<App />)
// 使用react-redux 注释掉监听store
// store.subscribe(()=>{
//     root.render(<App />)
// })- provider
我们知道,每个容器组件我们都需要传递一个store,像这样
<Count1 store={store} />
<Count2 store={store} />
<Count3 store={store} />
这样看起来明显是不科学的,那么有没有一种方法,让我们写一次,就可以不用写了呢,有,首先第一点我想到的就是用一个特殊标签包裹一下这些组件,只要在标签内的,都默认传递了store,react真的这么做了,这饿就是provider ,我们来看一下怎么用
import React from 'react';
import ReactDOM from "react-dom/client";
import App from "./App";
import {Provider} from "react-redux"
import store from "./redux/store"
const root=ReactDOM.createRoot(document.getElementById("root"))
root.render(<Provider store={store}><App /></Provider>)
- 我们还可以把UI组件整合到container里面去,组成一个文件
多组件数据共享
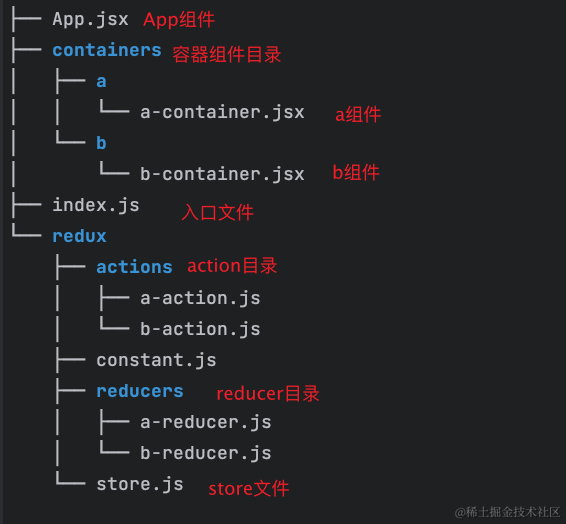
- 我们先来创建这样一个项目目录,在src目录下,来实现数据共享
- 我们先从最简单的来,先来定义action文件
a-action.js
export const AAction = data=>({data:data,type:'AAction'})
b-action.js
export const BAction = data=>({data:data,type:'BAction'})
- 再来编写reducer
a-reducer.js
const initUser=[{id:1,name:'小a',age:18}]
export const aReducer = (state = initUser, action) => {
const {type, data} = action
switch (action.type) {
case 'AAction':
return [data,...state]
default:
return state
}
}
b-reducer.js
const initUser=[{id:1,name:'小b',age:118}]
export const bReducer = (state = initUser, action) => {
const {type, data} = action
switch (action.type) {
case 'BAction':
return [data,...state]
default:
return state
}
}
- action reducer都有了,我们开始写store,我们知道创建store的这行代码
export default createStore(countReducer,applyMiddleware(thunk)),里面的参数接收的是一个reducer,那么如果我有多个reducer怎么办呢?我们就用到了combineReducers
//引入store
import {combineReducers, createStore} from "redux"
//引入reducer  import {aReducer} from "./reducers/a-reducer"
import {bReducer} from "./reducers/b-reducer"
//将多个reducer写入一个对象 注意是key=>value 格式书写
const rootReducer = combineReducers({
"areducer":aReducer,
"breducer":bReducer
})
export default createStore(rootReducer)
- 我们在index.js中引入store,使用provider支持对容器的store传递
import React from 'react';
import ReactDOM from "react-dom/client";
import App from "./App";
import {Provider} from "react-redux"
import store from "./redux/store"
const root=ReactDOM.createRoot(document.getElementById("root"))
root.render(<Provider store={store}><App /></Provider>)
- 在a容器组件中暴露connect
import React, {Component, createRef} from 'react';
import {nanoid} from "nanoid";
import {AAction} from "../../redux/actions/a-action";
import {connect} from "react-redux";  class AUI extends Component {  nameRef=createRef();
ageRef=createRef();  addUser=()=>{
let id=nanoid();
let name=this.nameRef.current.value;
let age=this.ageRef.current.value;
this.props.addAUser({id,name,age});
}
render() {
// console.log(this.props);
const {auser,buser}=this.props
return (
<div>
<h2>我是a组件</h2>
<input type="text" ref={this.nameRef} placeholder="name"/>
<input type="text" ref={this.ageRef} placeholder="age"/>
<button onClick={this.addUser}>添加用户</button>
<h4>a组件用户</h4>
<ul>
{auser.map((item=><li key={item.id}>name: {item.name} | age: {item.age}</li>))}
</ul>
<h4>b组件用户</h4>
<ul>
{buser.map((item=><li key={item.id}>name: {item.name} | age: {item.age}</li>))}
</ul>
</div>
);
}
}
//注意,取state的时候要根据前面定义的key来取
export default connect(state=>({auser:state.areducer,buser:state.breducer}),{addAUser:AAction})(AUI);
- 在b容器组件中暴露connect
import React, {Component, createRef} from 'react';
import {nanoid} from "nanoid";
import {connect} from "react-redux";
import {BAction} from "../../redux/actions/b-action";  class BUI extends Component {
nameRef=createRef();
ageRef=createRef();  addUser=()=>{
let id=nanoid();
let name=this.nameRef.current.value;
let age=this.ageRef.current.value;
this.props.addBUser({id,name,age});
}
render() {
return (
<div>
<h2>我是组b件</h2>
<input type="text" ref={this.nameRef} placeholder="name"/>
<input type="text" ref={this.ageRef} placeholder="age"/>
<button onClick={this.addUser}>添加用户</button>
</div>
);
}
}  export default connect(state=>({buser:state.breducer}),{addBUser:BAction})(BUI);
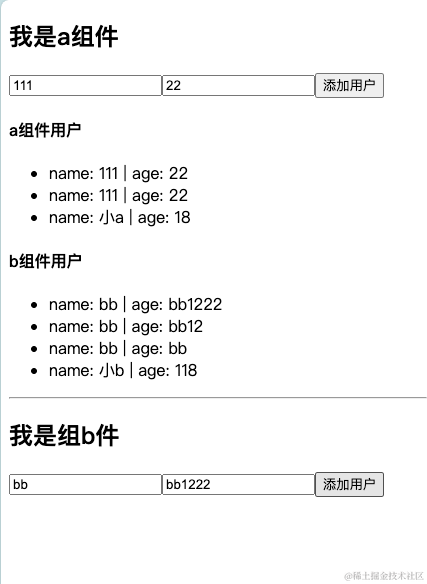
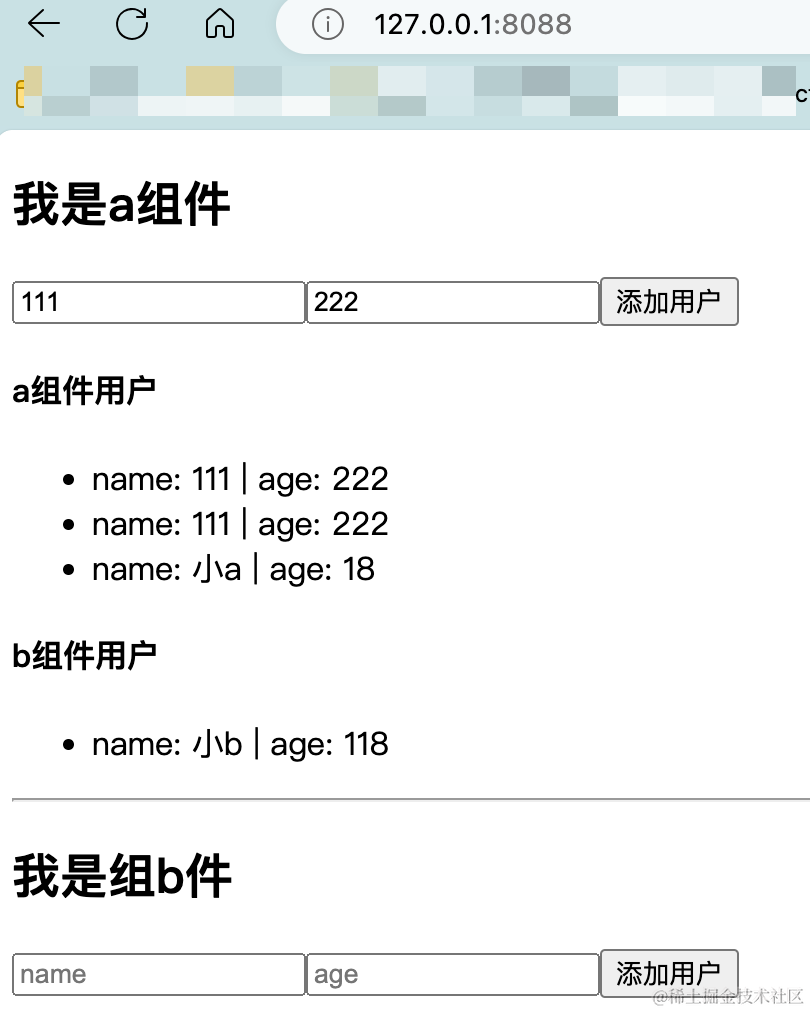
- 最终效果如下,b组件添加用户,会在a组件中展示
-
组件数据的交互,关键在于给某个组件state赋值的时候,
{auser:state.areducer,buser:state.breducer} -
注意数组和对象的地址引用,这种引用只对比引用地址是否一致,并不会对比地址指向的数据是否一致,从而导致页面不会更新。
redux-devtool
拓展安装 npm install redux-devtools-extension --legacy-peer-deps
//引入store
import {combineReducers, createStore} from "redux"
//引入reducer  import {aReducer} from "./reducers/a-reducer"
import {bReducer} from "./reducers/b-reducer"
//引入devtools
import {composeWithDevTools} from "redux-devtools-extension"
//将多个reducer写入一个对象 注意是key=>value 格式书写
const rootReducer = combineReducers({
"areducer":aReducer,
"breducer":bReducer
})
export default createStore(rootReducer,composeWithDevTools())
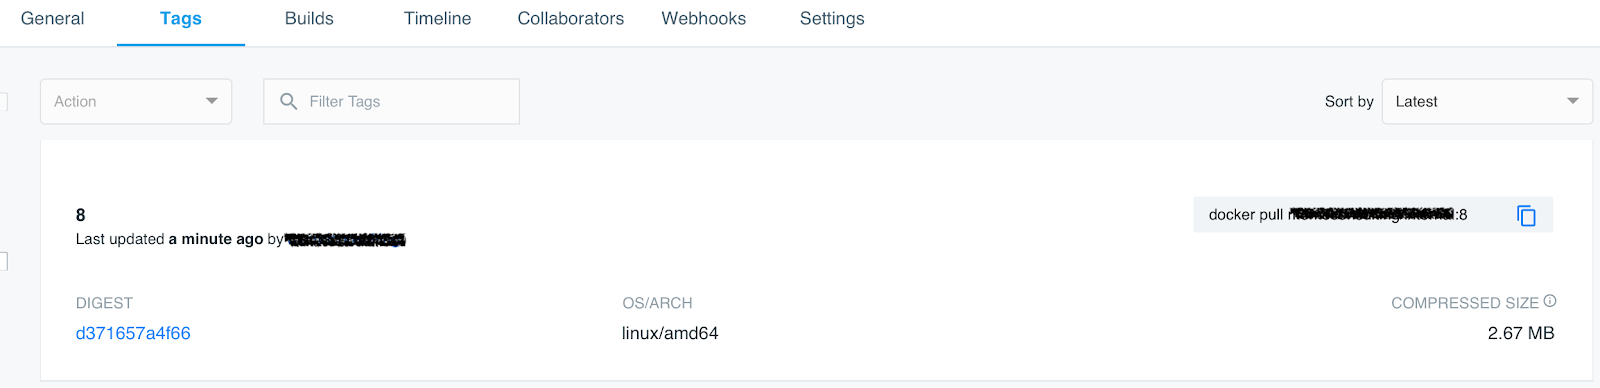
打包
执行打包命令npm run build开始编译,编译完毕,会在项目根目录生成一个build目录,我们启动一个服务器指定目录即可执行
比如我使用go作为服务器来执行build目录,即可正常访问目录,用nginx,node也是同理
package mainimport ("fmt""net/http""os"
)func main() {//     设置静态文件目录为React应用程序的build文件夹路径fmt.Println(os.Getwd())fs := http.FileServer(http.Dir("./tmp/build"))// 创建一个处理静态文件的handlerhttp.Handle("/", fs)// 启动服务器并监听端口err := http.ListenAndServe(":8088", nil)if err != nil {panic(err)}
}
- 我们也可以使用serve来启动项目
安装serve$ npm install -g serve,启动serve,在build同目录下,serve build即可启动服务。
一般上线的话需要搭配node 或者nginx来启动。

![Exam in MAC [容斥]](https://img-blog.csdnimg.cn/direct/5098002066b24924a086c0221723f525.png)