https://zhuanlan.zhihu.com/p/136253346
启动
因为 gin 的安装教程已经到处都有了,所以这里省略如何安装, 建议直接去 github 官方地址的 README 中浏览安装步骤,顺便了解 gin 框架的功能。https://github.com/gin-gonic/gin
最简单的代码
package main
import "github.com/gin-gonic/gin"
func main() {r := gin.Default()r.Run() // 监听并在 0.0.0.0:8080 上启动服务
}
上面就是使用了 gin 框架的最简单的 demo,接下来通过这个 demo 去一步步阅读分析 gin 是如何启动的。
gin.Run()
这里是服务器启动的地方,进去看看这个函数有什么奥秘:
func (engine *Engine) Run(addr ...string) (err error) {defer func() { debugPrintError(err) }()
address := resolveAddress(addr)debugPrint("Listening and serving HTTP on %s\n", address)err = http.ListenAndServe(address, engine)return
}
除去第一行和第四行打印,是不是有点像 go 原生的 http 库?来看看 http 库的 web 服务简单 demo
package main
import ("log""net/http"
)
func main() {http.HandleFunc("/", indexHandler)
log.Fatal(http.ListenAndServe(":8080", nil))
}
可以看到 gin 框架启动的时候,也是基于 http.ListenAndServe(addr string, handler Handler) 这个方法的,与原生的 http 库的区别就是,ListenAndServe(addr string, handler Handler) 这个方法的第二个参数,传入的是 engine,我们继续来看看 ListenAndServe 方法的具体代码:
func ListenAndServe(addr string, handler Handler) error {server := &Server{Addr: addr, Handler: handler}return server.ListenAndServe()
}
server.ListenAndServe() 已经是服务监听并启动的方法,所以关键点在 Handler 这里:
// A Handler responds to an HTTP request.
// ...
type Handler interface {ServeHTTP(ResponseWriter, *Request)
}
这是 http 包里的源码注释,其实写得很详细了,注释很多,我直接省略了,感兴趣的可以去阅读一下,不出意外,这个 Handler 是一个接口,从 gin.engine 的传入已经可以看出来了吧?注释的意思是这个接口是处理程序响应HTTP请求,可以理解为,实现了这个接口,就可以接收所有的请求并进行处理。
因此 gin 框架的入口就是从这里开始,gin engine 实现了 ServeHTTP,然后接管所有的请求走 gin 框架的处理方式。细心的读者应该能发现,原生的 http web 服务传入了 nil,事实上是 http 库也有一个默认的请求处理器,感兴趣的读者可以去仔细阅读研究一下 go 官方团队的请求处理器实现哦~
那我们继续来看下 gin 框架是怎么实现这个 ServeHTTP 方法的:
// gin.go
// ServeHTTP conforms to the http.Handler interface.
func (engine *Engine) ServeHTTP(w http.ResponseWriter, req *http.Request) {c := engine.pool.Get().(*Context) // 从池里获取资源处理请求c.writermem.reset(w) // 重置资源的 ResponseWriterc.Request = req // 赋值请求给 contextc.reset()
engine.handleHTTPRequest(c) // 将资源信息给到 handler 进一步处理
engine.pool.Put(c) // 请求处理结束,将资源放回池子
}
可以看到实现并不难,代码的含义我已经写上了注释,这里的重点是 Context,但不是这一篇文章的重点,我放在这一系列的后面进行讲解。
我们只需要知道,gin 也是实现了 Handler 接口,所以可以将请求按 gin 的处理方式进行处理,也就是我们可以使用 gin 来做 web 服务框架的起点。
gin.Default()
接下来进去 Default函数去看具体实现,代码如下:
// gin.go
// Default returns an Engine instance with the Logger and Recovery middleware already attached.
func Default() *Engine {debugPrintWARNINGDefault() // 忽略engine := New()engine.Use(Logger(), Recovery()) // 暂时忽略return engine
}
其实单单看函数名,已经知道这是构造默认的 gin engine,可以看到 engine 是通过 New() 方法得到的,我们选忽略第一行和第三行。
// gin.go
func New() *Engine {debugPrintWARNINGNew() // 忽略engine := &Engine{RouterGroup: RouterGroup{ // 路由组,后面再分析Handlers: nil,basePath: "/",root:     true,},FuncMap:                template.FuncMap{},RedirectTrailingSlash:  true,RedirectFixedPath:      false,HandleMethodNotAllowed: false,ForwardedByClientIP:    true,AppEngine:              defaultAppEngine, // bool,是否为默认处理 engineUseRawPath:             false,UnescapePathValues:     true,MaxMultipartMemory:     defaultMultipartMemory,trees:                  make(methodTrees, 0, 9),delims:                 render.Delims{Left: "{{", Right: "}}"},secureJsonPrefix:       "while(1);",}engine.RouterGroup.engine = engine  // 重点,将 engine 重新赋值给路由组对象中的 engineengine.pool.New = func() interface{} { // 重点,资源池return engine.allocateContext()}return engine
}
到这里,我们不用看 engine 结构的具体定义,也已经看出来比较多的信息了,主要用路由组和资源池,这两个都可以分别展开写一篇文章,由于篇幅有限,这里就先不介绍了。
值得注意的是这里面有两个地方很巧妙:
engine.RouterGroup.engine = engine
很明显,路由组 RouterGroup 中还有个 engine 的指针对象,为什么要这么设计呢?读者们可以思考一下。
engine.pool.New = func() interface{} { // 对象池return engine.allocateContext()
}
看下 engine.allocateContext()方法:
func (engine *Engine) allocateContext() *Context {return &Context{engine: engine}
}
可以看到 engine 中包含了 pool 对象池,这个对象池是对 gin.Context 的重用,进一步减少开销,关于 sync.pool 对象池我就不在这里细说了, 后续再更新关于 sync.pool 的文章。
engine
最后再来看看 engine 的结构:
type Engine struct {// 路由组RouterGroup
// 如果true,当前路由匹配失败但将路径最后的 / 去掉时匹配成功时自动匹配后者// 比如:请求是 /foo/ 但没有命中,而存在 /foo,// 对get method请求,客户端会被301重定向到 /foo// 对于其他method请求,客户端会被307重定向到 /fooRedirectTrailingSlash bool
// 如果true,在没有处理者被注册来处理当前请求时router将尝试修复当前请求路径// 逻辑为:// - 移除前面的 ../ 或者 //// - 对新的路径进行大小写不敏感的查询// 如果找到了处理者,请求会被301或307重定向// 比如: /FOO 和 /..//FOO 会被重定向到 /foo// RedirectTrailingSlash 参数和这个参数独立RedirectFixedPath bool
// 如果true,当路由没有被命中时,去检查是否有其他method命中// 如果命中,响应405 (Method Not Allowed)// 如果没有命中,请求将由 NotFound handler 来处理HandleMethodNotAllowed boolForwardedByClientIP bool
// #726 #755 If enabled, it will thrust some headers starting with// 'X-AppEngine...' for better integration with that PaaS.AppEngine bool
// 如果true, url.RawPath 会被用来查找参数UseRawPath bool
// 如果true, path value 会被保留// 如果 UseRawPath是false(默认),UnescapePathValues为true// url.Path会被保留并使用UnescapePathValues bool
// Value of 'maxMemory' param that is given to http.Request's ParseMultipartForm// method call.MaxMultipartMemory int64
delims render.DelimssecureJsonPrefix stringHTMLRender render.HTMLRenderFuncMap template.FuncMapallNoRoute HandlersChainallNoMethod HandlersChainnoRoute HandlersChainnoMethod HandlersChainpool sync.Pool//每个http method对应一棵树trees methodTrees
}
上面提到过 ServeHTTP 这个方法,其中engine.handleHTTPRequest©这行代码就是具体的处理操作。
可以看到 engine 的结构中有这么一个字段 RedirectTrailingSlash ,在 Default() 初始化方法中为 true,我对此比较感兴趣,大家也可以根据注释的意思来测试一下,最终会走到下面的代码中:
func (engine *Engine) handleHTTPRequest(c *Context) {……if httpMethod != "CONNECT" && rPath != "/" {if value.tsr && engine.RedirectTrailingSlash {// 这里就是尝试纠正请求路径的函数redirectTrailingSlash(c)return}if engine.RedirectFixedPath && redirectFixedPath(c, root, engine.RedirectFixedPath) {return}}……
}
总结一下

上图就是本文的核心了,可以结合图来理解一下 gin 启动的过程及设计,下一篇会将 gin 的路由,敬请期待~
本系列 “拆轮子系列:gin 框架” 的第一篇就到这里了,这么通读下来,发现 gin 框架的设计和实现真的太棒了,简洁清晰,又不失巧妙,很适合大家也去阅读学习一下,墙裂推荐!!!
路由 gin.RouterGroup结构体及其方法
用法
还是老样子,先从使用方式开始:
func main() {r := gin.Default()
r.GET("/hello", func(context *gin.Context) {fmt.Fprint(context.Writer, "hello world")})
r.POST("/somePost", func(context *gin.Context) {context.String(http.StatusOK, "some post")})
r.Run() // 监听并在 0.0.0.0:8080 上启动服务
}
平时开发中,用得比较多的就是 Get 和 Post 的方法,上面简单的写了个 demo,注册了两个路由及处理器,接下来跟着我一起一探究竟
注册路由
从官方文档和其他大牛的文章中可以知道,gin的路由是借鉴了 httprouter 实现的路由算法,所以得知 gin 的路由算法是基于前缀树这个数据结构的。
从 Get 方法进去看源码:
r.GET("/hello", func(context *gin.Context) {fmt.Fprint(context.Writer, "hello world")
})
会来到 routergroup.go 的 Get 函数,可以发现方法的承载者已经是 *RouterGroup:
// GET is a shortcut for router.Handle("GET", path, handle).
func (group *RouterGroup) GET(relativePath string, handlers ...HandlerFunc) IRoutes {return group.handle("GET", relativePath, handlers)
}
从注释中我们可以看到 `GET is a shortcut for router.Handle("GET", path, handle)`
也就是说 GET 方法的注册也可以等价于:
helloHandler := func(context *gin.Context) {fmt.Fprint(context.Writer, "hello world")}
r.Handle("GET", "/hello", helloHandler)
再来看一下 Handle 方法的具体实现:
func (group *RouterGroup) Handle(httpMethod, relativePath string, handlers ...HandlerFunc) IRoutes {if matches, err := regexp.MatchString("^[A-Z]+$", httpMethod); !matches || err != nil {panic("http method " + httpMethod + " is not valid")}return group.handle(httpMethod, relativePath, handlers)
}
不难发现,无论是 r.GET 还是 r.Handle 最终都是指向了 group.handle:
func (group *RouterGroup) handle(httpMethod, relativePath string, handlers HandlersChain) IRoutes {// 计算绝对路径,这是因为可能会有路由组会在外层包裹的原因absolutePath := group.calculateAbsolutePath(relativePath)// 联合路由组的 handler 和新注册的 handlerhandlers = group.combineHandlers(handlers)// 注册路由的真正入口group.engine.addRoute(httpMethod, absolutePath, handlers)// 返回 IRouter 接口对象,这个放在路由组进行分析return group.returnObj()
}
接下来又回到了 gin.go ,可以看到上面的注册入口是通过group.engine 调用的,大家不用看 routerGroup 的结构也大致猜出来了吧,其实 engine 才是真正的路由树 router,而 gin 为了实现路由组的功能,所以在外面又包了一层 routerGroup,实现路由分组,路由路径组合隔离的功能。
func (engine *Engine) addRoute(method, path string, handlers HandlersChain) {// 基础校验assert1(path[0] == '/', "path must begin with '/'")assert1(method != "", "HTTP method can not be empty")assert1(len(handlers) > 0, "there must be at least one handler")debugPrintRoute(method, path, handlers)// 每个httpMethod都拥有自己的一颗树root := engine.trees.get(method)if root == nil {root = new(node)root.fullPath = "/"engine.trees = append(engine.trees, methodTree{method: method, root: root})}// 在路由树中添加路径及请求处理handlerroot.addRoute(path, handlers)
}
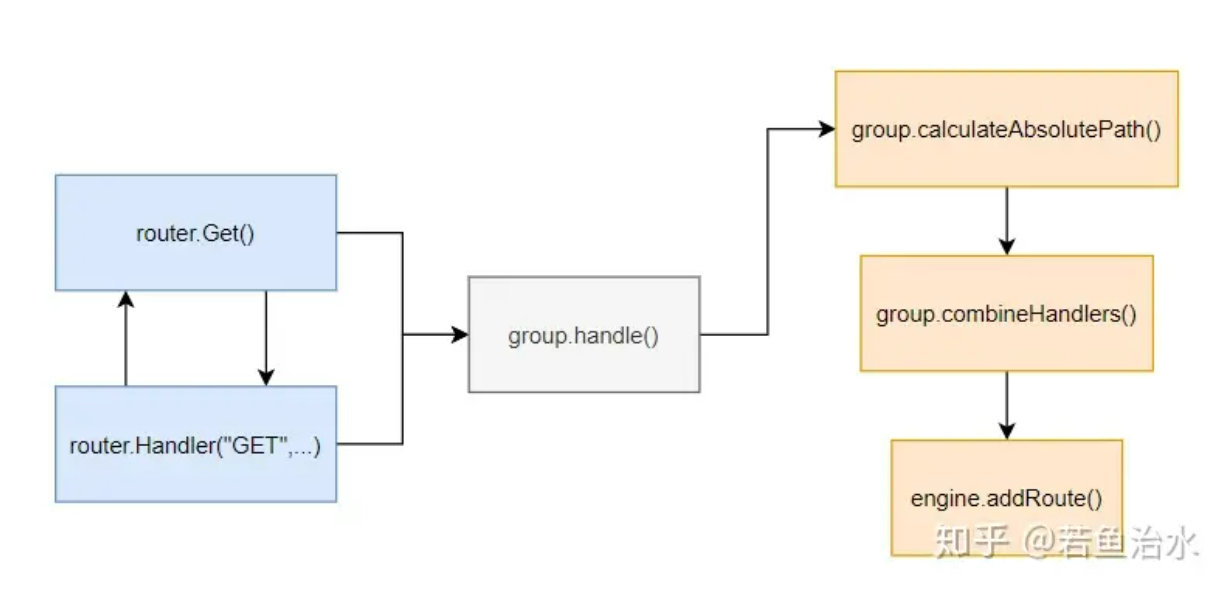
以上就是注册路由的过程,整体流程其实挺清晰的。
路由树
终于来到了关键的实现路由树的地方tree.go:
先来看看 tree 的结构:
type methodTree struct {method stringroot *node
}
type methodTrees []methodTree
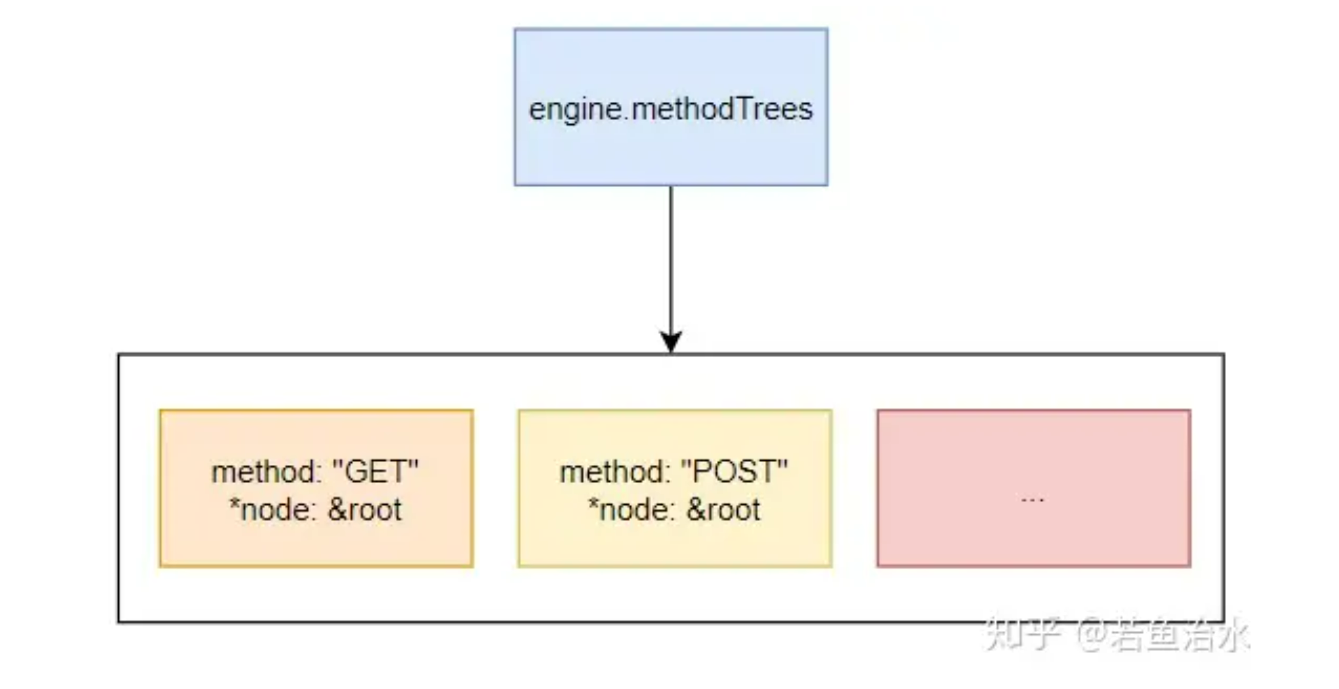
上面的 engine.trees.get(method) 就是遍历这个以 httpMethod 分隔的数组:
func (trees methodTrees) get(method string) *node {for _, tree := range trees {if tree.method == method {return tree.root}}return nil
}
关键在于 node:
type node struct {path      string // 当前节点相对路径(与祖先节点的 path 拼接可得到完整路径)indices   string // 所有孩子节点的path[0]组成的字符串children  []*node // 孩子节点handlers  HandlersChain // 当前节点的处理函数(包括中间件)priority  uint32 // 当前节点及子孙节点的实际路由数量nType     nodeType // 节点类型maxParams uint8 // 子孙节点的最大参数数量wildChild bool // 孩子节点是否有通配符(wildcard)fullPath  string // 路由全路径
}
nType 有这几个值:
const (static nodeType = iota // 普通节点,默认root // 根节点param // 参数路由,比如 /user/:idcatchAll // 匹配所有内容的路由,比如 /article/*key
)
下面的 addRoute 方法就是对这棵前缀树的构建过程,实际上就是不断寻找最长前缀的过程。
func (n *node) addRoute(path string, handlers HandlersChain) {……// non-empty treeif len(n.path) > 0 || len(n.children) > 0 {walk:……
// Make new node a child of this nodeif i < len(path) {……c := path[0]// 一系列的判断与校验……// Otherwise insert itif c != ':' && c != '*' {// []byte for proper unicode char conversion, see #65n.indices += string([]byte{c})child := &node{maxParams: numParams,fullPath: fullPath,}n.children = append(n.children, child)n.incrementChildPrio(len(n.indices) - 1)n = child}// 经过重重困难,终于可以摇到号了n.insertChild(numParams, path, fullPath, handlers)return
} else if i == len(path) { // Make node a (in-path) leaf// 路由重复注册if n.handlers != nil {panic("handlers are already registered for path '" + fullPath + "'")}n.handlers = handlers}return}} else { // Empty tree// 空树则直接插入新节点n.insertChild(numParams, path, fullPath, handlers)n.nType = root}
}
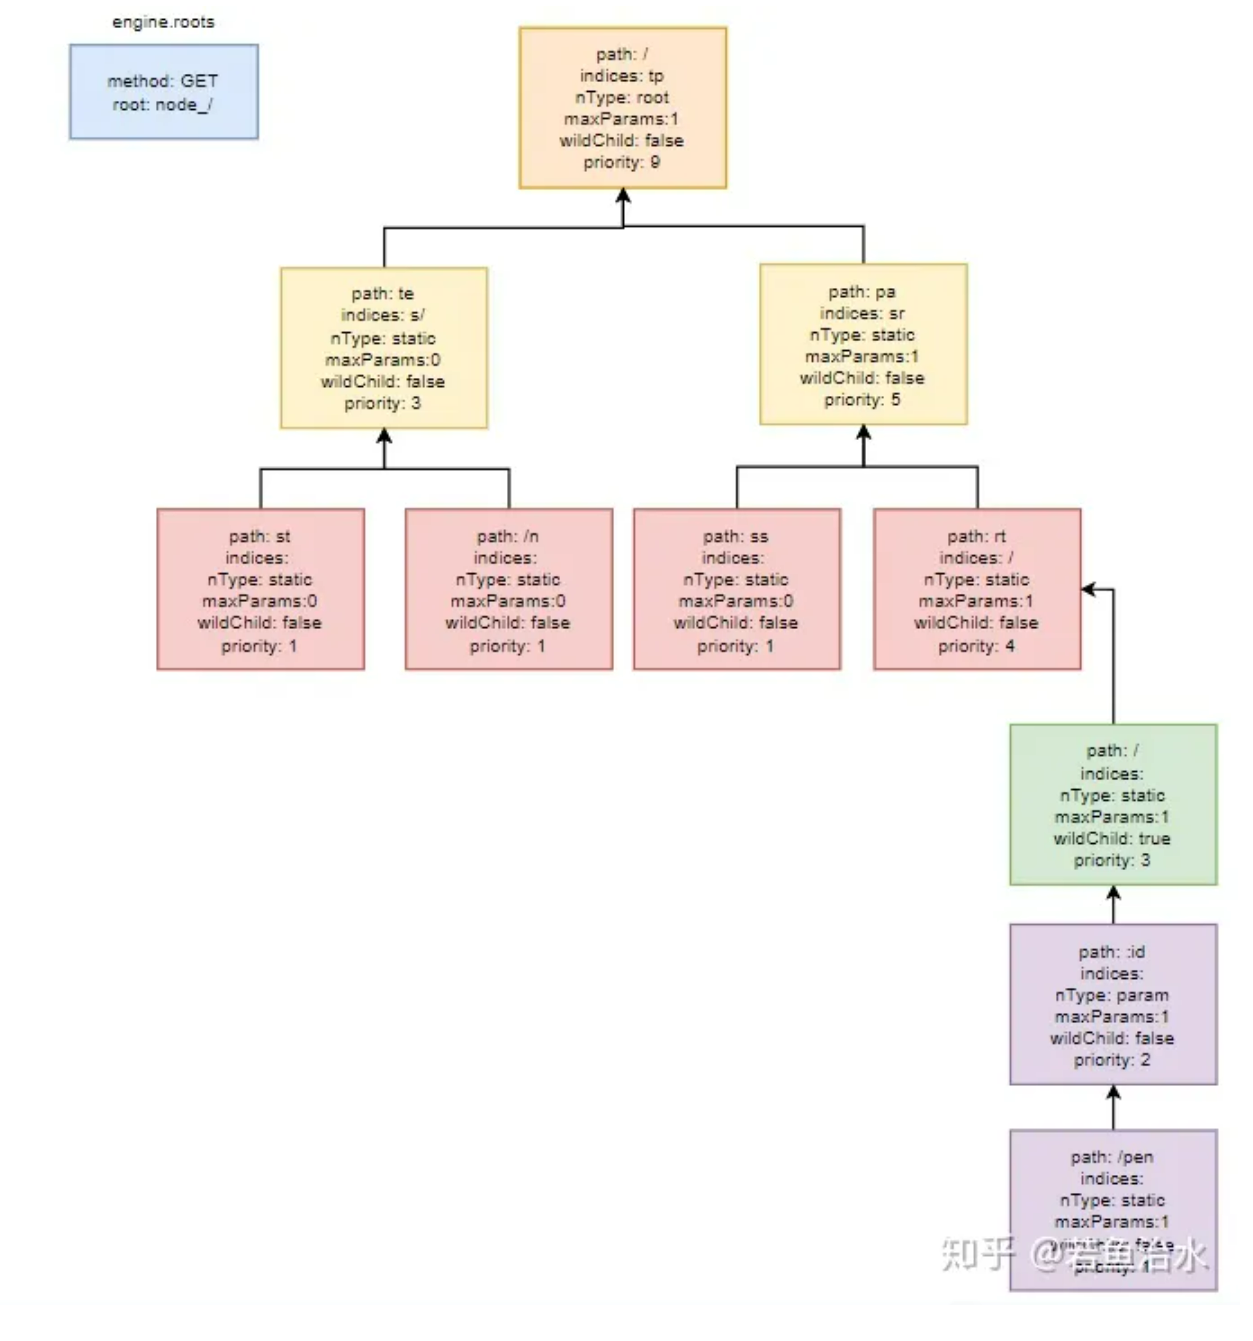
最后画一下 gin 构建前缀树的示意图:
r.GET(“/”, func(context *gin.Context) {})
r.GET(“/test”, func(context *gin.Context) {})
r.GET(“/te/n”, func(context *gin.Context) {})
r.GET(“/pass”, func(context *gin.Context) {})
r.GET(“/part/:id”, func(context *gin.Context) {})
r.GET(“/part/:id/pen”, func(context *gin.Context) {})
动态路由
在画前缀树的时候,写到一个了路由 /part/:id,这里的 :id 就是动态路由了,可以根据路由中指定的参数来解析 url 中对应动态路由里的参数值。
其实在说到 node 的数据结构的时候,已经提到了 nType、maxParams、wildChild这三个字段与动态路由的设计实现有关的,下面就是关于路由注册时如果是动态路由时的处理:
// tree.go
func (n *node) insertChild(numParams uint8, path string, fullPath string, handlers HandlersChain) {……if c == ':' { // param// 在通配符开头拆分路径if i > 0 {n.path = path[offset:i]offset = i}
child := &node{nType: param,maxParams: numParams,fullPath: fullPath,}n.children = []*node{child}// 如果孩子节点是参数路由,就会将本节点wildChild设置为truen.wildChild = truen = childn.priority++numParams--
// 如果路径没有以通配符结尾,则将有另一个以"/" 开头的非通配符子路径// 可以理解为后面还有节点if end < max {n.path = path[offset:end]offset = end
child := &node{maxParams: numParams,priority: 1,fullPath: fullPath,}n.children = []*node{child}n = child}
} else { // catchAll……
n.path = path[offset:i]
// 匹配所有内容的通配符 如 /*key// first node: catchAll node with empty pathchild := &node{wildChild: true,nType: catchAll,maxParams: 1,fullPath: fullPath,}n.children = []*node{child}n.indices = string(path[i])// 在这里将 node 进行赋值了n = childn.priority++
// second node: node holding the variablechild = &node{path: path[i:],nType: catchAll,maxParams: 1,handlers: handlers,priority: 1,fullPath: fullPath,}n.children = []*node{child}
return}}
// insert remaining path part and handle to the leafn.path = path[offset:]n.handlers = handlersn.fullPath = fullPath
}
我们知道 gin 框架中对于动态路由参数接收时是用 context.Param(key string) 的,下面跟着一个简单的 demo 来做
helloHandler := func(context *gin.Context) {name := context.Param("name")fmt.Fprint(context.Writer, name)}
r.Handle("GET", "/hello/:name", helloHandler)
来看下 Param 写了啥:// Param returns the value of the URL param.
// It is a shortcut for c.Params.ByName(key)
// router.GET("/user/:id", func(c *gin.Context) {
// // a GET request to /user/john
// id := c.Param("id") // id == "john"
// })
func (c *Context) Param(key string) string {return c.Params.ByName(key)
}
看注释,其实写得已经很明白了,这个函数会返回动态路由中关于参数在请求 url 里的值,再往深处走,Params 和 ByName 其实来自 tree.go:
// context.go
type Context struct {……
Params Params……
}
// tree.go
type Param struct {Key stringValue string
}
// Params 是有个有序的 Param 切片,路由中的第一个参数会对应切片的第一个索引
type Params []Param
// 遍历 Params 获取值
func (ps Params) Get(name string) (string, bool) {for _, entry := range ps {if entry.Key == name {return entry.Value, true}}return "", false
}
// 封装了一下,调用上面的 Get 方法
func (ps Params) ByName(name string) (va string) {va, _ = ps.Get(name)return
}
获取参数 key 的地方找到了,那从路由里拆解并设置 Params 的地方呢?// tree.go
type nodeValue struct {handlers HandlersChainparams Paramstsr boolfullPath string
}
// getValue 返回的 nodeValue 的结构,里面包含处理好的 Params
func (n *node) getValue(path string, po Params, unescape bool) (value nodeValue) {value.params = po
walk: // Outer loop for walking the treefor {if len(path) > len(n.path) {if path[:len(n.path)] == n.path {path = path[len(n.path):]// 如果这个节点没有通配符,就进行往孩子节点遍历if !n.wildChild {c := path[0]for i := 0; i < len(n.indices); i++ {if c == n.indices[i] {n = n.children[i]continue walk}}
// 如果没找到有通配符标识的节点,直接重定向到该 urlvalue.tsr = path == "/" && n.handlers != nilreturn}
// handle wildcard childn = n.children[0]switch n.nType {//可以看到这里是用 nType 来判断的case param:// find param end (either '/' or path end)end := 0for end < len(path) && path[end] != '/' {end++}
// 遍历 url 获取参数对应的值// save param valueif cap(value.params) < int(n.maxParams) {value.params = make(Params, 0, n.maxParams)}i := len(value.params)value.params = value.params[:i+1] // expand slice within preallocated capacityvalue.params[i].Key = n.path[1:] // 除去 ":",如 :id -> idval := path[:end]// url 编码解析以及 params 赋值if unescape {var err errorif value.params[i].Value, err = url.QueryUnescape(val); err != nil {value.params[i].Value = val // fallback, in case of error}} else {value.params[i].Value = val}……}}
}
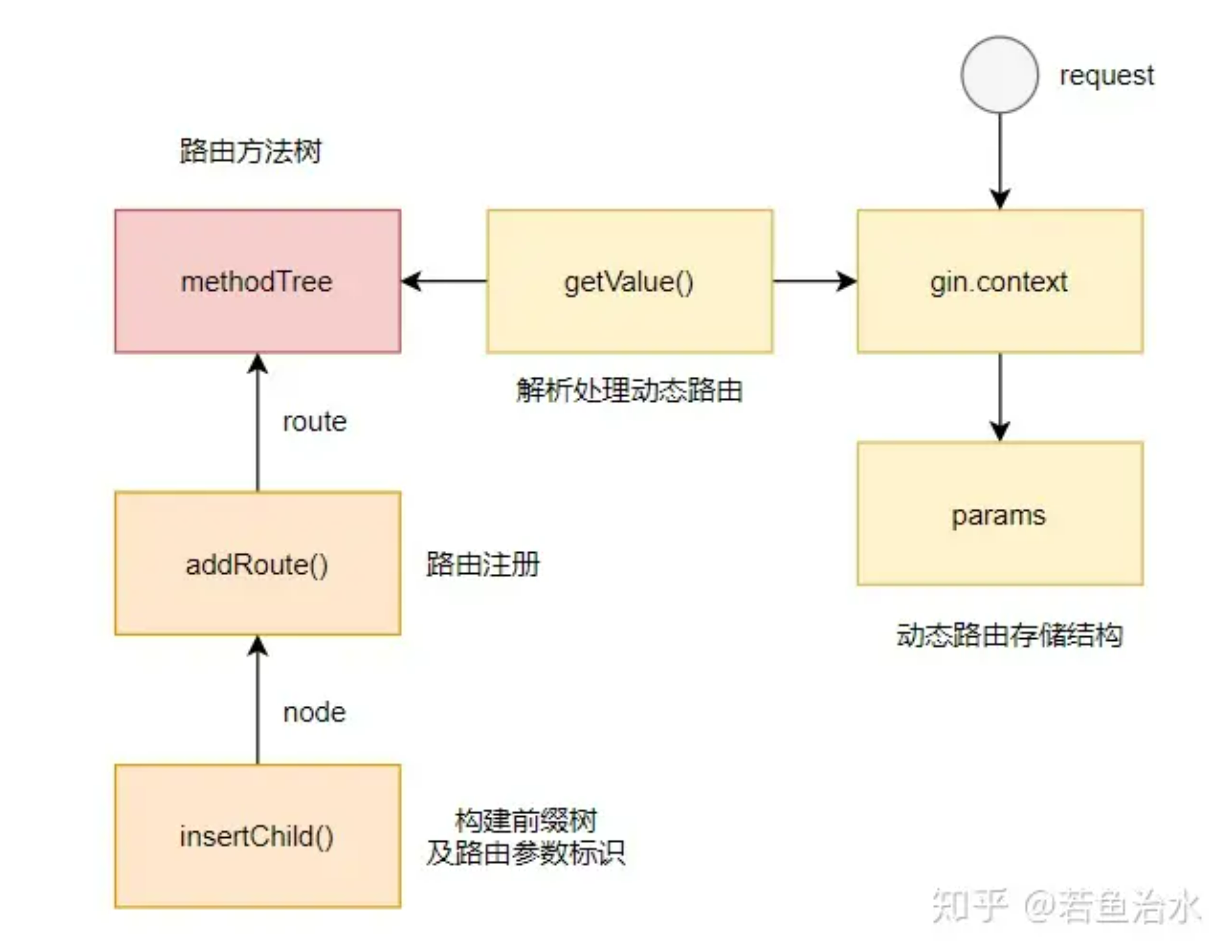
讲到这里就已经对路由注册和动态路由的实现流程和原理分析得差不多了,画一个核心流程图总结一下:
路由组
gin 用 RouterGroup 路由组包住了路由实现了路由分组功能。之前说到 engine 的时候说到 engine 的结构中是组合了 RouterGroup 的,而 RouterGroup 中其实也包含了 engine:
type RouterGroup struct {Handlers HandlersChainbasePath stringengine *Engineroot bool
}
type Engine struct {RouterGroup...
}
这样的做法让 engine 直接拥有了管理路由的能力,也就是 engine.GET(xxx) 可以直接注册路由的来由。而 RouterGroup 中包含了 engine 的指针,这样实现了 engine 的单例,这个也是比较巧妙的做法之一。
不仅如此,RouterGroup 实现了 IRouter 接口,接口中的方法都是通过调用 engine.addRoute()` 将handler链接到路由树中:
var _ IRouter = &RouterGroup{}
type IRouter interface {IRoutesGroup(string, ...HandlerFunc) *RouterGroup
}
type IRoutes interface {Use(...HandlerFunc) IRoutes
Handle(string, string, ...HandlerFunc) IRoutesAny(string, ...HandlerFunc) IRoutesGET(string, ...HandlerFunc) IRoutesPOST(string, ...HandlerFunc) IRoutesDELETE(string, ...HandlerFunc) IRoutesPATCH(string, ...HandlerFunc) IRoutesPUT(string, ...HandlerFunc) IRoutesOPTIONS(string, ...HandlerFunc) IRoutesHEAD(string, ...HandlerFunc) IRoutes
StaticFile(string, string) IRoutesStatic(string, string) IRoutesStaticFS(string, http.FileSystem) IRoutes
}
路由组的功能显而易见,就是让路由分组管理,在组内的路由的前缀都统一加上组路由的路径,看下 demo:
router := gin.Default()
v1 := router.Group("/v1")
{v1.POST("/hello", helloworld) // /v1/hellov1.POST("/hello2", helloworld2) // /v1/hello2
}
包住路由并在注册路由时进行拼接的地方是在注册路由的函数中:
// routergroup.go
func (group *RouterGroup) handle(httpMethod, relativePath string, handlers HandlersChain) IRoutes {// 拼接获取绝对路径absolutePath := group.calculateAbsolutePath(relativePath)// 合并路由处理器集合handlers = group.combineHandlers(handlers)……
}



![C++初阶 | [九] list 及 其模拟实现](https://img-blog.csdnimg.cn/direct/8c3a103837d44647bb678924151f8e5e.png)

