自定义认证数据源
- 前言
- 认证流程分析
- 易混梳理
- AuthenticationManager 与 ProviderManager
- ProviderManager 与 AuthenticationProvider
- 难点:为什么ProviderManager会有一个parent?
- 数据源的获取
- 配置AuthenticationManager
- 默认的全局 AuthenticationManager
- 自定义AuthenticationManager
- 库表设计
- 代码实现
- 踩坑点
- 引入依赖
- 配置 springboot 配置⽂件
- 创建entity
- 创建User对象
- 创建Role对象
- 创建UserDao接口
- 创建UserMapper实现
- 创建 UserDetailService 实例
- 配置 authenticationManager 使⽤⾃定义UserDetailService
- 最后启动测试
前言
看这篇文章前,请确保有一定security基础或者看过上篇文章,没基础看不太好理解。
认证流程分析
流程分析我们在上一篇每一步都debug看一了下,这里我们进行一个梳理。
我们先看一下这张图:
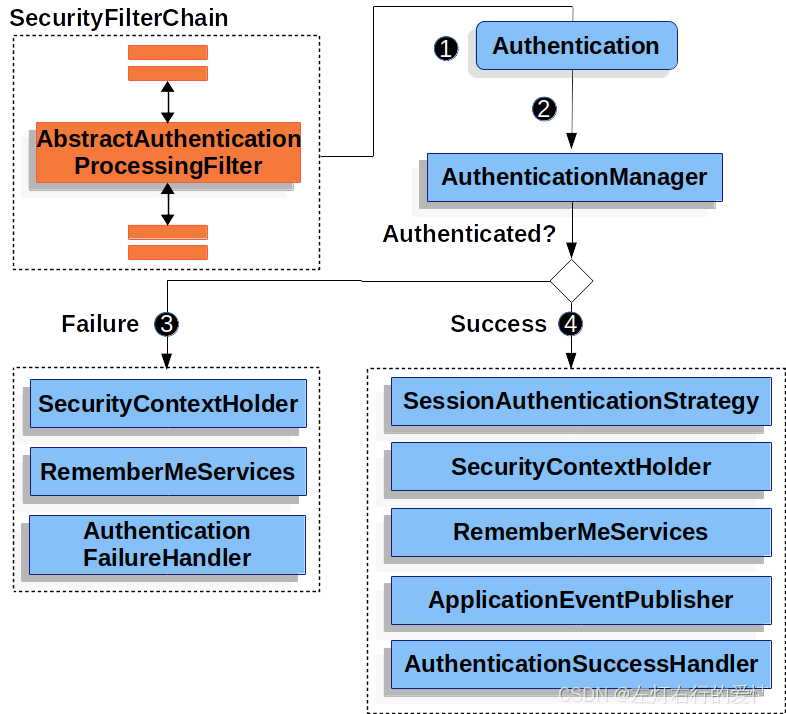
- 发起认证请求,请求中携带⽤户名、密码,该请求会被
UsernamePasswordAuthenticationFilter拦截 - 在
UsernamePasswordAuthenticationFilter的attemptAuthentication⽅法
中将请求中⽤户名和密码,封装为Authentication对象,并交给
AuthenticationManager进⾏认证 - 认证成功,将认证信息存储到
SecurityContextHodler以及调⽤记住我等,并回调AuthenticationSuccessHandler处理 - 认证失败,清除
SecurityContextHodler以及 记住我中信息,回调AuthenticationFailureHandler处理
易混梳理
不知道在上一篇我们debug时,你是不是有点迷,搞不清AuthenticationManager,ProviderManager,AuthenticationProvider 的关系,
AuthenticationManager 是认证的核⼼类,但实际上在底层真正认
证时还离不开 ProviderManager 以及 AuthenticationProvider 。下面我们来梳理一下:
AuthenticationManager是⼀个认证管理器,它定义了Spring Security过滤
器要执⾏认证操作。
public interface AuthenticationManager {Authentication authenticate(Authentication authentication) throws AuthenticationException;}
ProviderManager是AuthenticationManager接⼝的实现类。Spring Security
认证时默认使⽤就是ProviderManager。
//代码太多,只列举较关键的代码
public class ProviderManager implements AuthenticationManager, MessageSourceAware, InitializingBean {private AuthenticationEventPublisher eventPublisher = new NullEventPublisher();private List<AuthenticationProvider> providers = Collections.emptyList();private AuthenticationManager parent;@Overridepublic Authentication authenticate(Authentication authentication) throws AuthenticationException {Class<? extends Authentication> toTest = authentication.getClass();AuthenticationException lastException = null;AuthenticationException parentException = null;Authentication result = null;Authentication parentResult = null;int currentPosition = 0;int size = this.providers.size();for (AuthenticationProvider provider : getProviders()) {if (!provider.supports(toTest)) {continue;}try {result = provider.authenticate(authentication);if (result != null) {copyDetails(authentication, result);break;}}catch (AccountStatusException | InternalAuthenticationServiceException ex) {prepareException(ex, authentication);throw ex;}catch (AuthenticationException ex) {lastException = ex;}}if (result == null && this.parent != null) {// Allow the parent to try.try {parentResult = this.parent.authenticate(authentication);result = parentResult;}catch (ProviderNotFoundException ex) {
//默认为空}catch (AuthenticationException ex) {parentException = ex;lastException = ex;}}if (result != null) {if (this.eraseCredentialsAfterAuthentication && (result instanceof CredentialsContainer)) ((CredentialsContainer) result).eraseCredentials();}if (parentResult == null) {this.eventPublisher.publishAuthenticationSuccess(result);}return result;}if (lastException == null) {lastException = new ProviderNotFoundException(this.messages.getMessage("ProviderManager.providerNotFound",new Object[] { toTest.getName() }, "No AuthenticationProvider found for {0}"));}if (parentException == null) {prepareException(lastException, authentication);}throw lastException;}AuthenticationProvider就是针对不同的身份类型执⾏的具体的身份认证。
public interface AuthenticationProvider {Authentication authenticate(Authentication authentication) throws AuthenticationException;boolean supports(Class<?> authentication);
}
AuthenticationManager 与 ProviderManager
先看一下结构图:
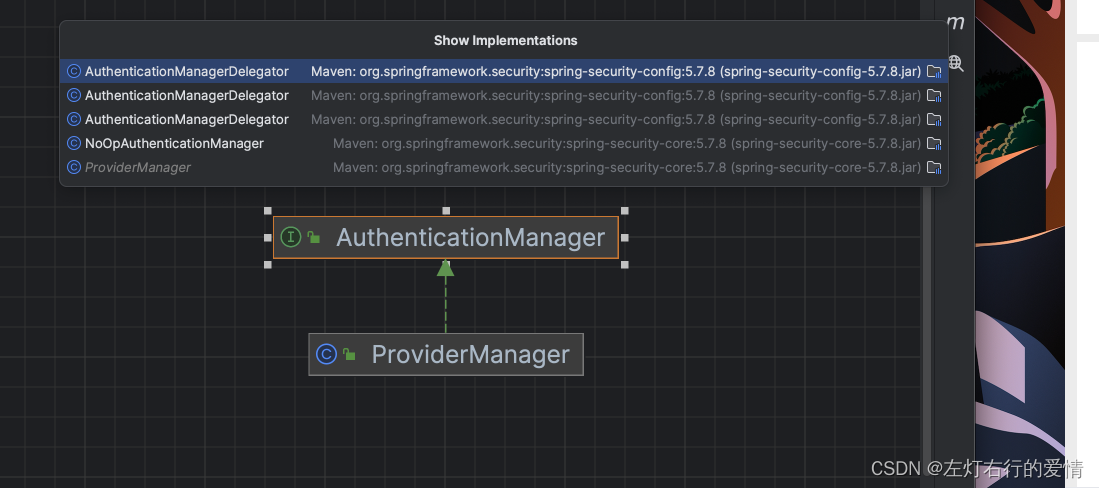
为什么列表有五个,但是我只显示了ProviderManager,因为其他四个都是内部类(感兴趣可以去看看)。
所以我们可以看出来:ProviderManager 是AuthenticationManager的唯⼀实现,也是 Spring Security默认使⽤实现。从这⾥不难看出默认情况下AuthenticationManager 就是⼀个ProviderManager。
ProviderManager 与 AuthenticationProvider
看一下官网的介绍图:
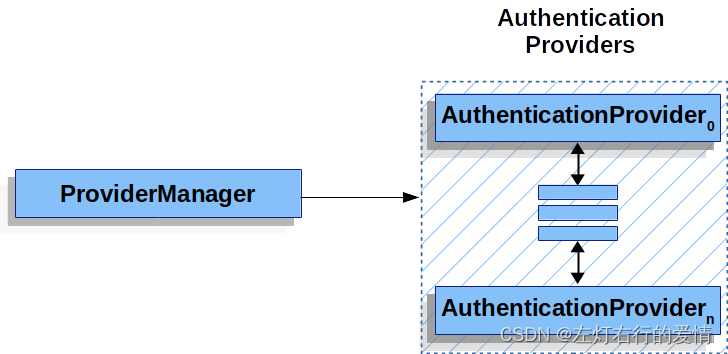
在 Spring Seourity中,允许系统同时⽀持多种不同的认证⽅式,例如同时⽀持⽤
户名/密码认证、ReremberMe 认证、⼿机号码动态认证等,⽽不同的认证⽅式对应了不同
的 AuthenticationProvider,所以⼀个完整的认证流程可能由多个
AuthenticationProvider 来提供。
多个 AuthenticationProvider 将组成⼀个列表,这个列表将由
ProviderManager 代理。换句话说,在ProviderManager 中存在⼀个
AuthenticationProvider 列表,在Provider Manager 中遍历列表中的每⼀个
AuthenticationProvider 去执⾏身份认证,最终得到认证结果。
ProviderManager 本身也可以再配置⼀个 AuthenticationManager 作为
parent,这样当ProviderManager 认证失败之后,就可以进⼊到 parent 中再次进⾏认
证。
理论上来说,ProviderManager的 parent 可以是任意类型的
AuthenticationManager,但是通常都是由
ProviderManager 来扮演 parent 的⻆⾊,也就是 ProviderManager 是
ProviderManager 的 parent。
难点:为什么ProviderManager会有一个parent?
ProviderManager 本身也可以有多个,多个ProviderManager 共⽤同⼀个
parent。
因为有时,⼀个应⽤程序有受保护资源的逻辑组(例如,所有符合路径模式的⽹络资
源,如/api!!*),每个组可以有⾃⼰的专⽤ AuthenticationManager。通常,每个组
都是⼀个ProviderManager,它们共享⼀个⽗级。然后,⽗级是⼀种 全局资源,作为所有
提供者的后备资源。
根据上⾯的介绍,我们绘出新的 AuthenticationManager、ProvideManager 和
AuthentictionProvider关系:

数据源的获取
默认情况下AuthenticationProvider 是由 DaoAuthenticationProvider 类来实现认证的(上篇文章有提到过,不清楚的可以去看一下debug的过程,这个是parent的默认provider),在DaoAuthenticationProvider 认证时⼜通过 UserDetailsService 完成数据源的
校验。
下面我们debug看一下这个流程:
- 首先我们执行到DaoAuthenticationProvider这块内容:

- 执行到authenticate方法下:
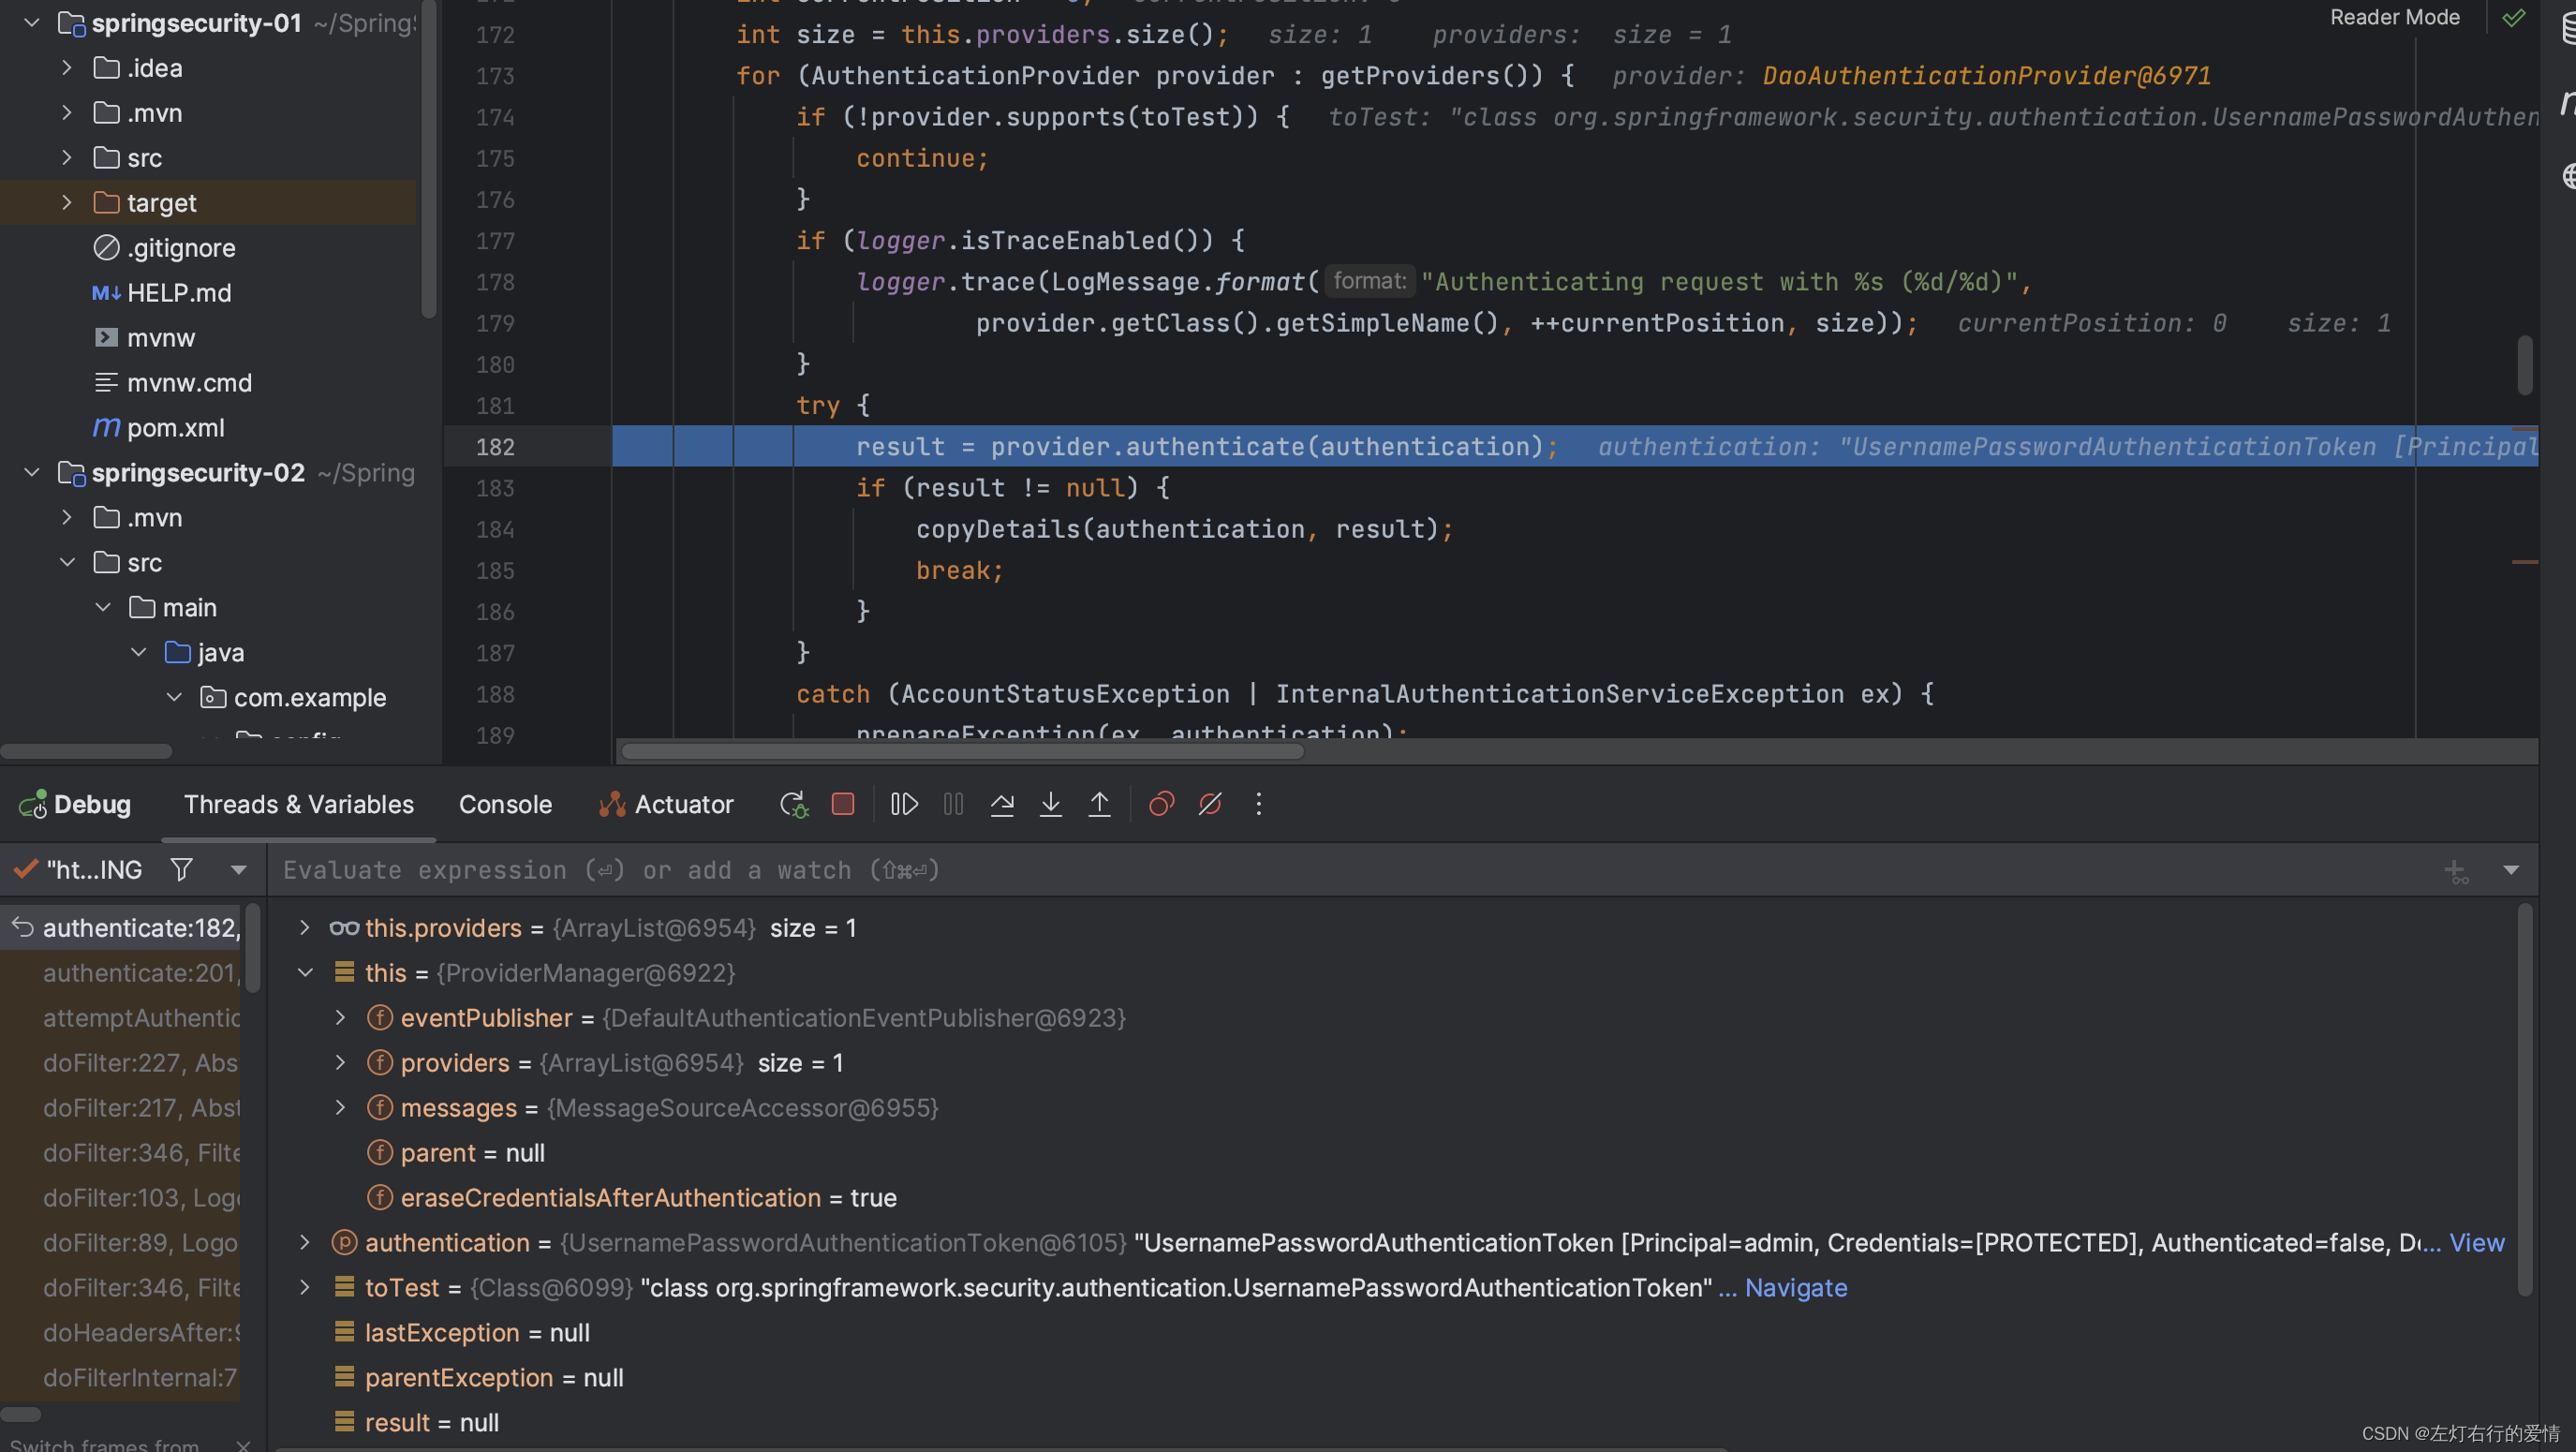
- 执行
authenticate方法,跳转到AbstractUserDetailsAuthenticationProvider这个方法下的authenticate:
为什么会跳转到跳转到AbstractUserDetailsAuthenticationProvider,因为DaoAuthenticationProvider没有覆盖这个方法,所以用的是父类AbstractUserDetailsAuthenticationProvider的。

- 一路执行到执行
retrieveUser方法并进入到方法里面:
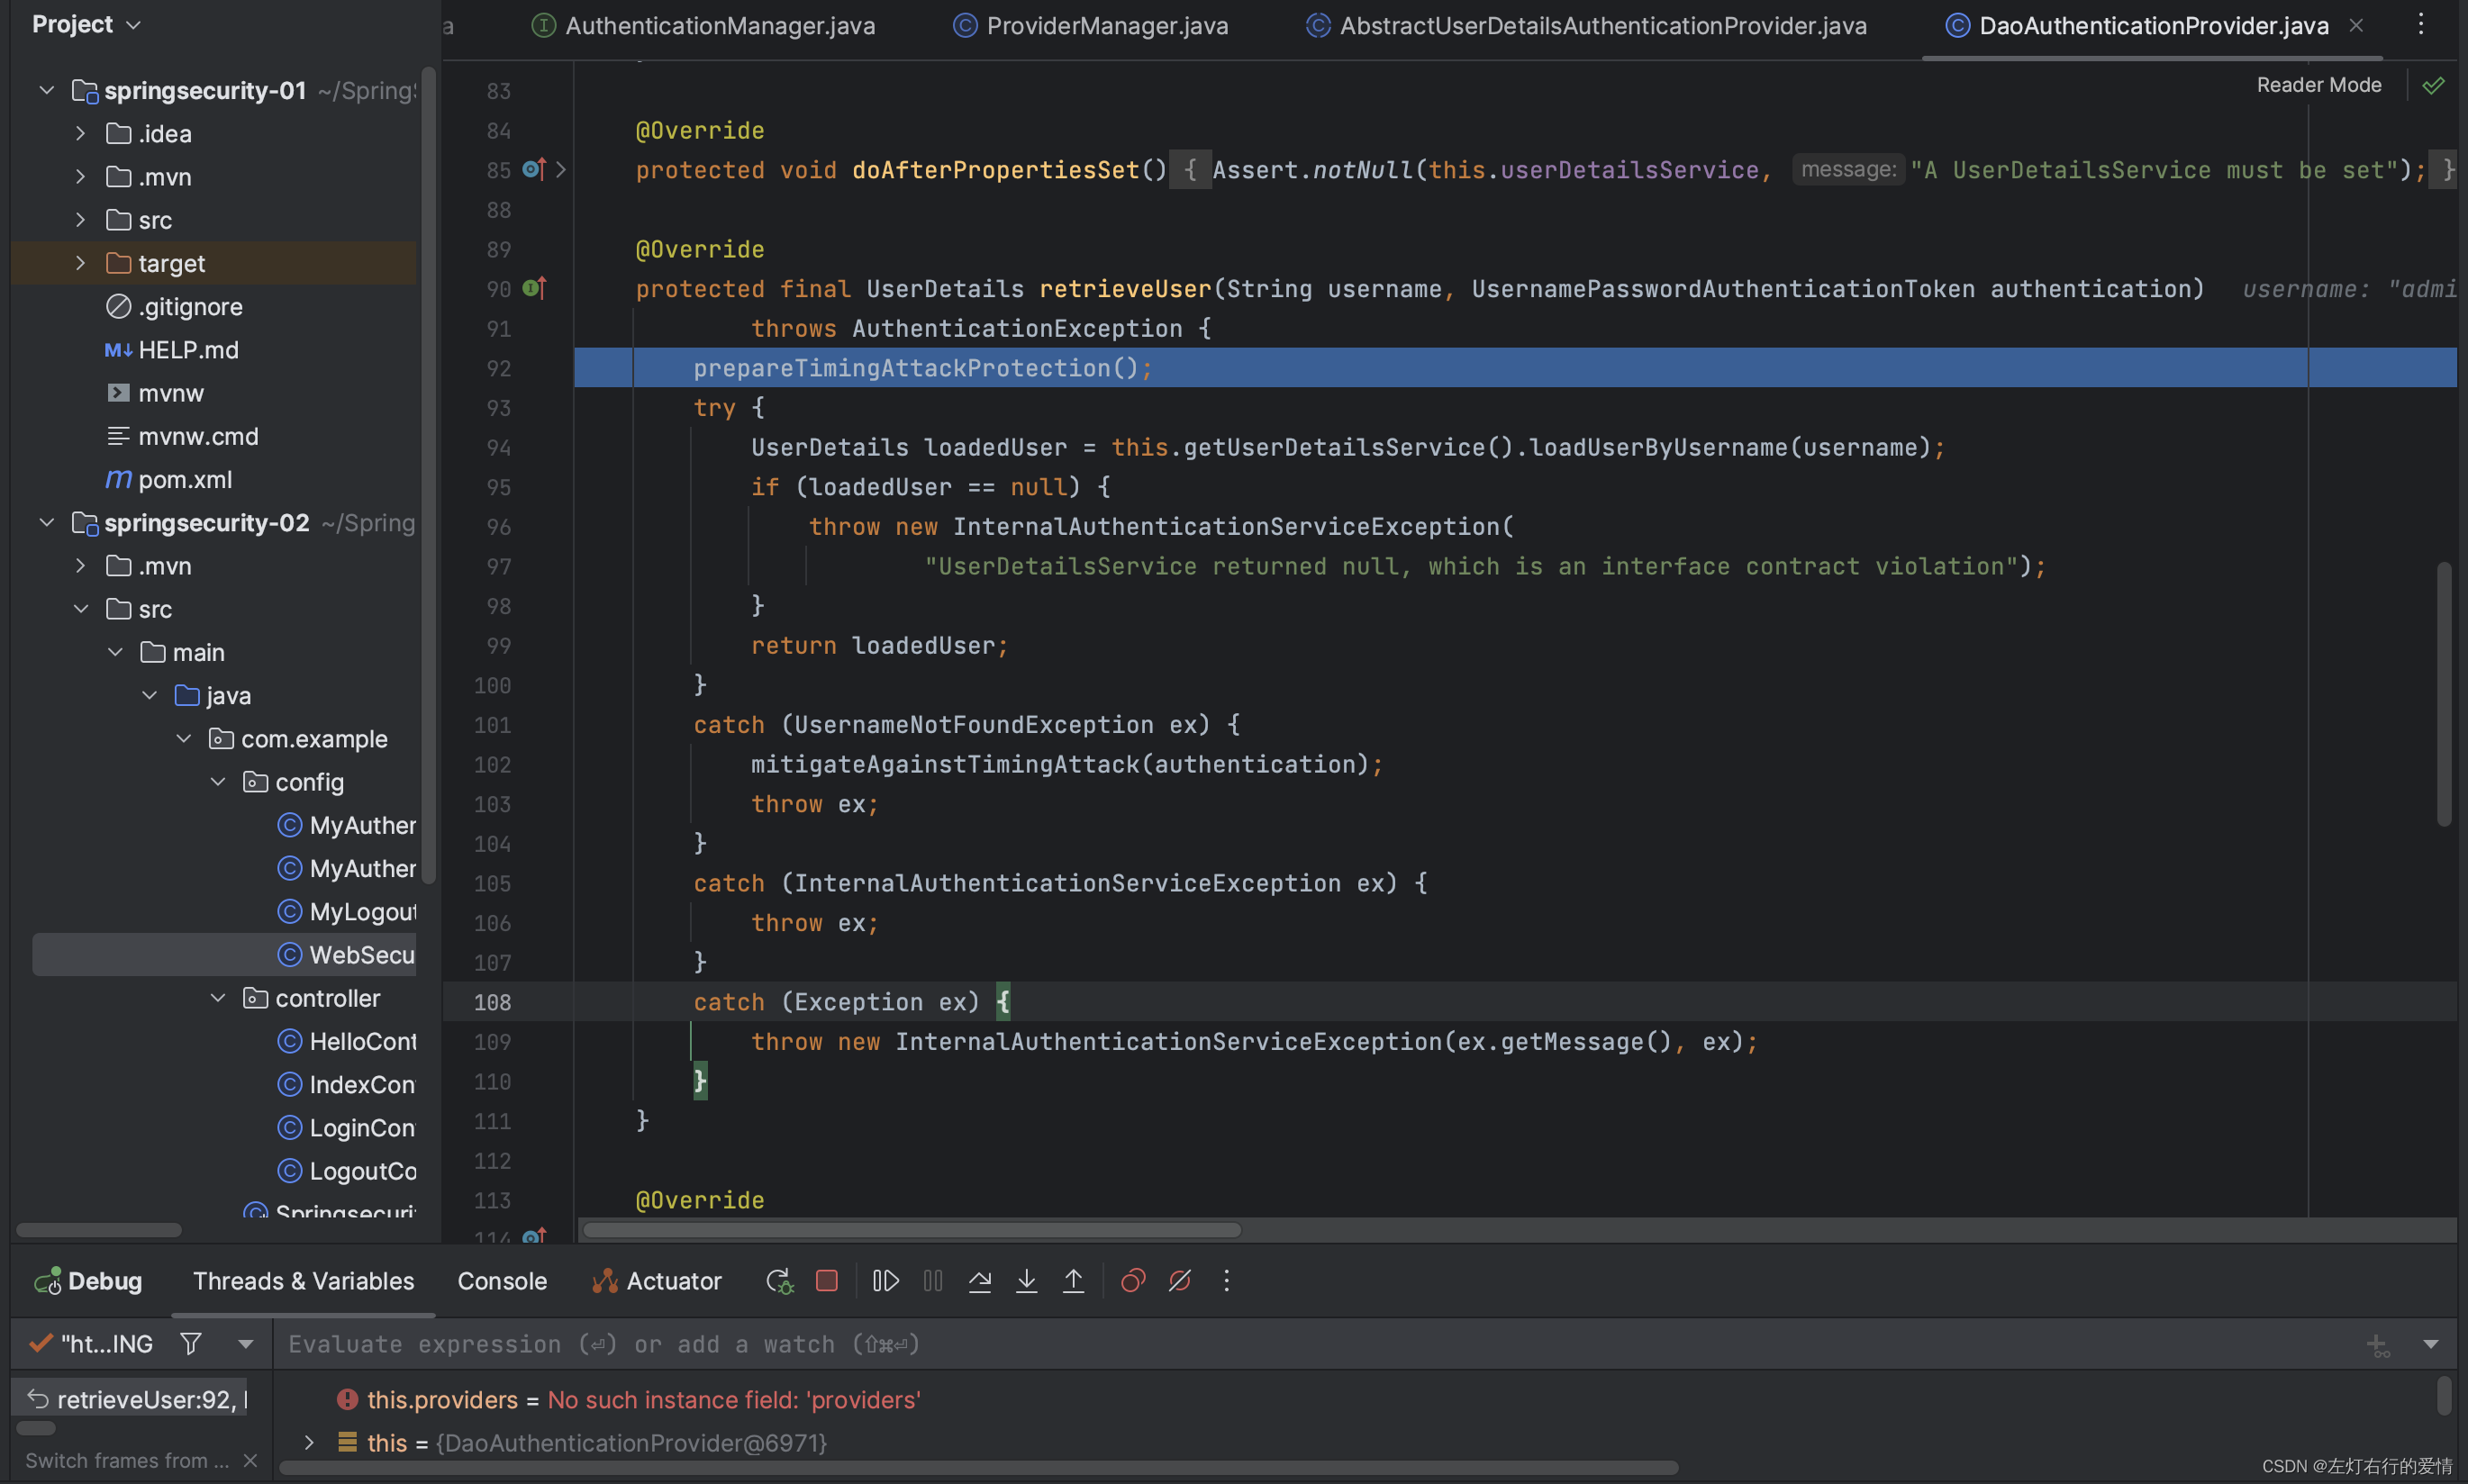
- 往下执行到
loadUserByUsername方法并进入,通过调用内存中的数据完成认证:

下面是一个流程图:
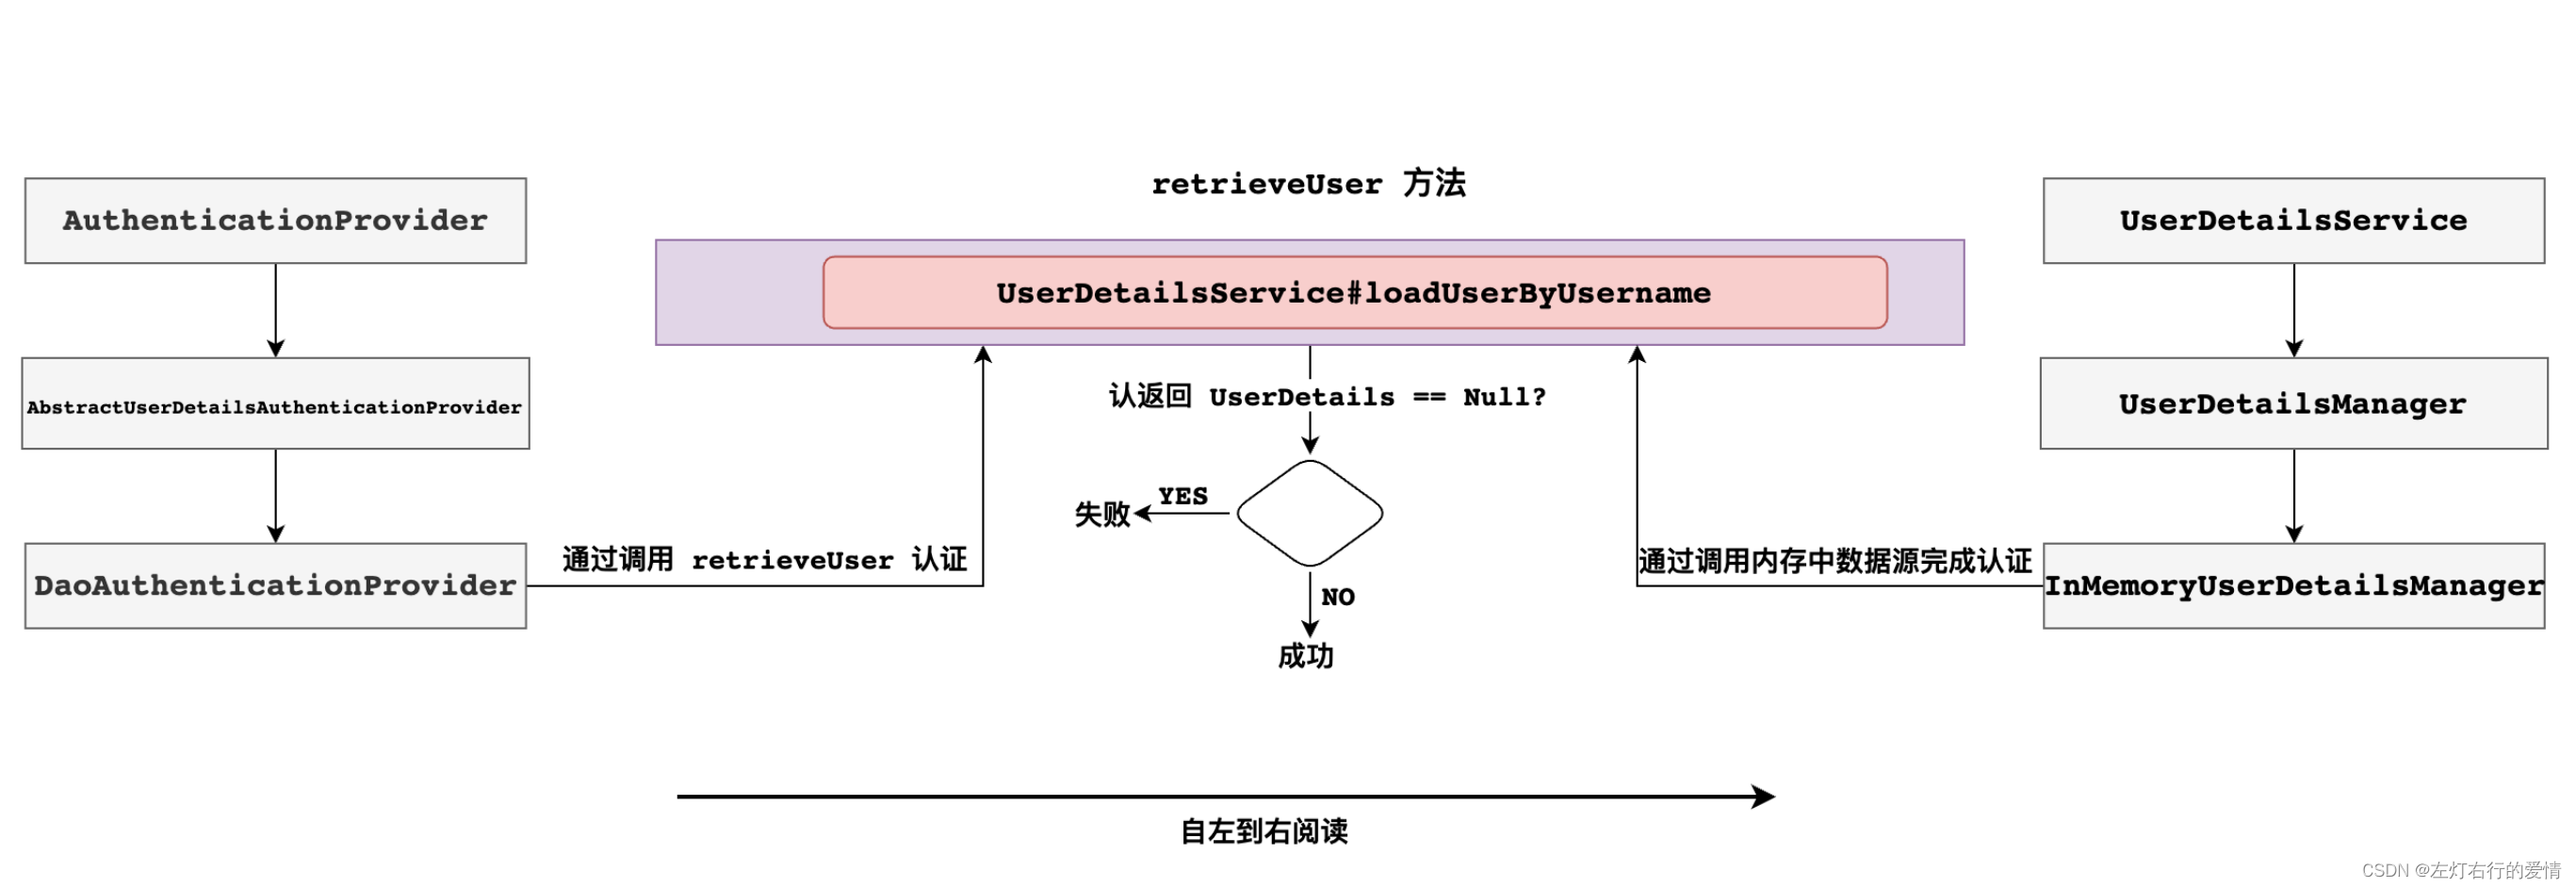
总结:
AuthenticationManager是认证管理器,在Spring Security中有全局
AuthenticationManager,也可以有局部AuthenticationManager。
全局的AuthenticationManager⽤来对全局认证进⾏处理,局部的AuthenticationManager⽤来对某些特殊资源认证处理。
当然⽆论是全局认证管理器还是局部认证管理器都是由ProviderManger进⾏实现。
每⼀个ProviderManger中都代理⼀个AuthenticationProvider的列表,列表中每⼀个实现代表⼀种身份认证⽅式。认证时底层数据源需要调⽤UserDetailService来实现。
配置AuthenticationManager
上面我们了解到AuthenticationManager的作用是什么,接下来我们去写一下这个,如果业务工作有需求,可以自定义配置。
首先,我们之前在application.properties里面配置的账号信息(名称,密码,权限)注释一下。
默认的全局 AuthenticationManager
springboot 对 security 进⾏⾃动配置时⾃动在⼯⼚中创建⼀个全局AuthenticationManager。
代码例子如下(不优化版本):
@Configuration
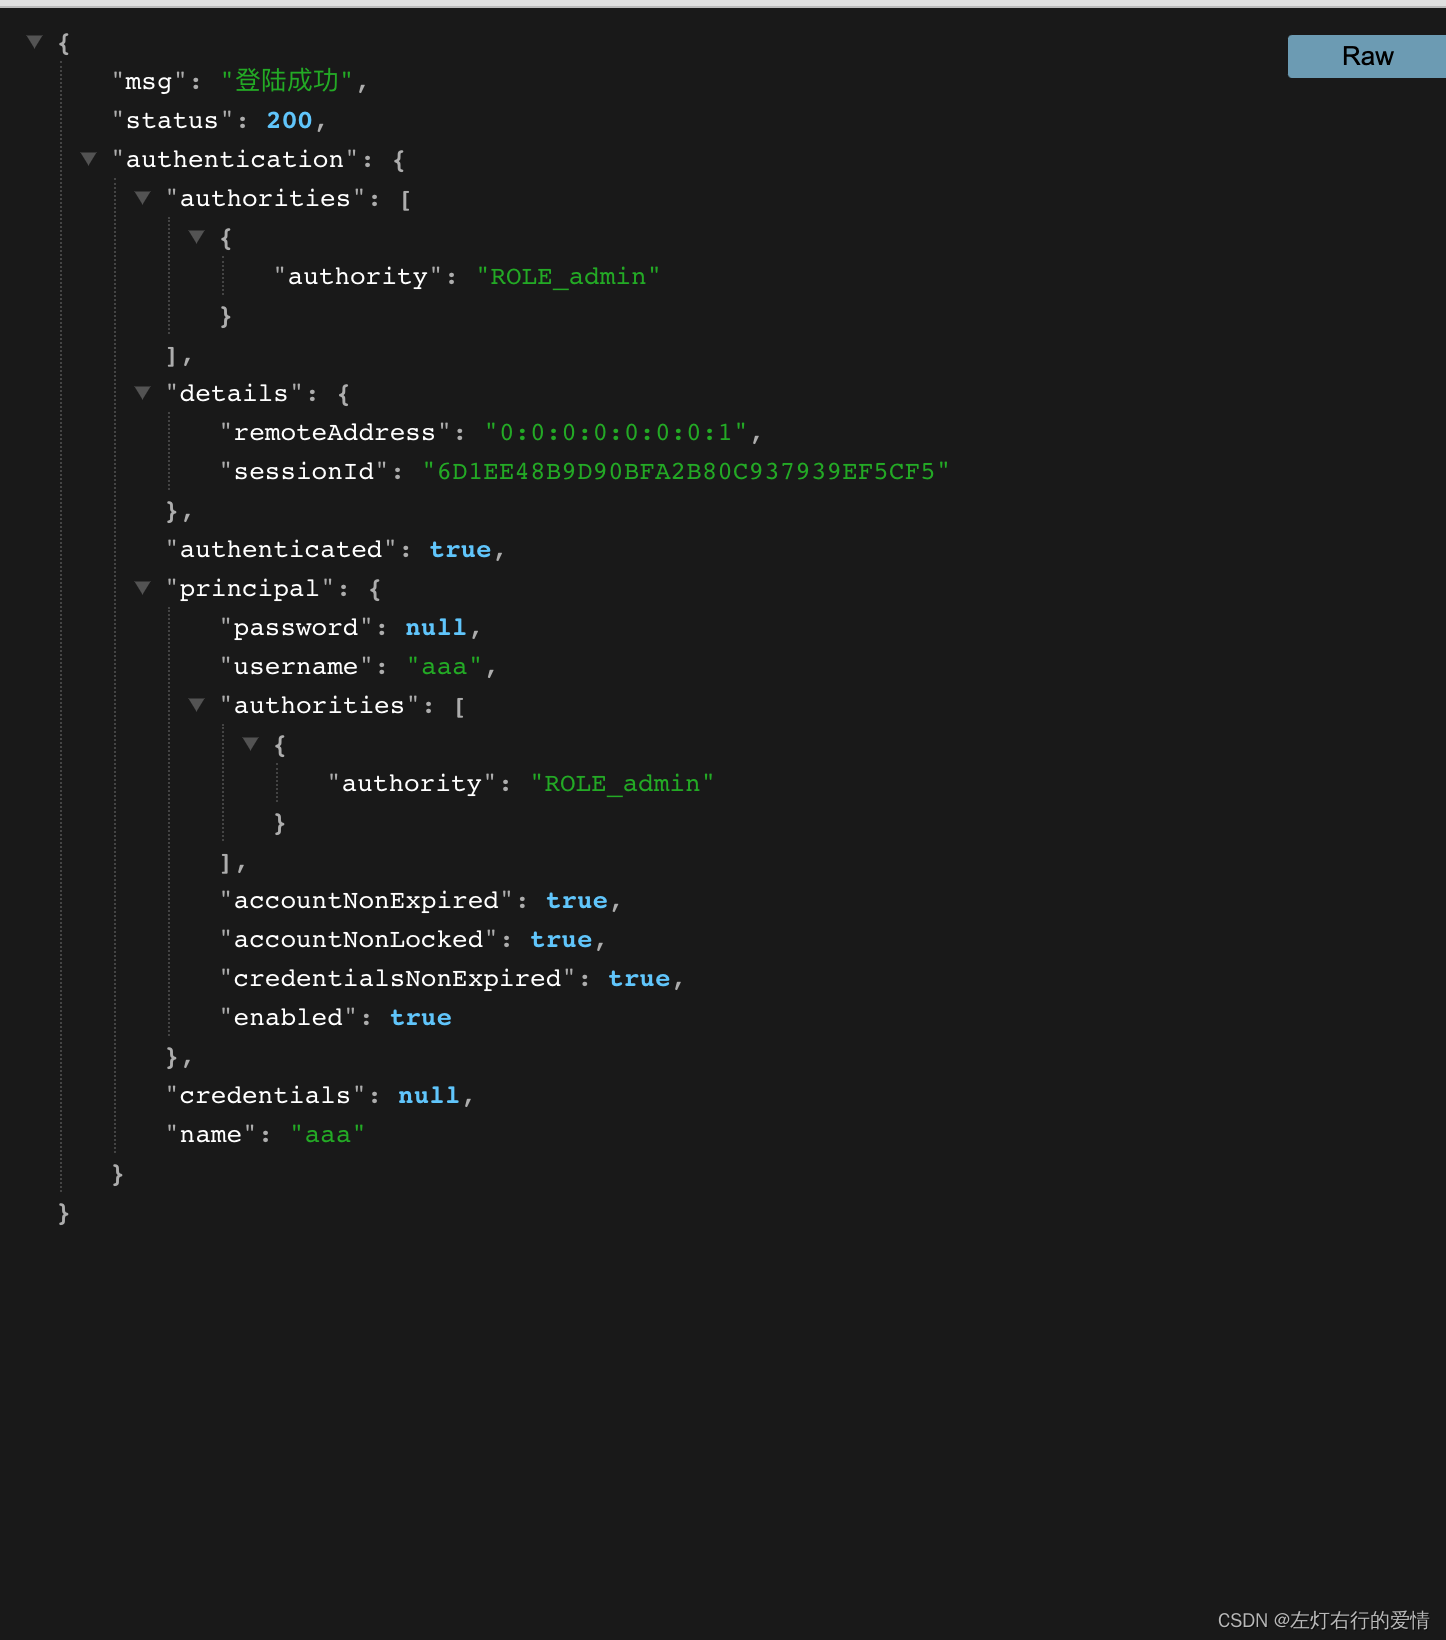
public class WebSecurityConfigurer extends WebSecurityConfigurerAdapter {@Autowiredpublic void initialize(AuthenticationManagerBuilder builder) throws Exception {System.out.println("SpringBoot默认配置:"+ builder);InMemoryUserDetailsManager userDetailsService = new InMemoryUserDetailsManager();userDetailsService.createUser(User.withUsername("aaa").password("{noop}123").roles("admin").build());builder.userDetailsService(userDetailsService);}//configue方法省略 }
结果如下:
第二种(优化后版本):
优化思路:
AuthenticationManagerBuilder是默认配置对象,它默认找当前项目中是否存在自定义UserDetailService实例自动将当前项目UserDetailService实例设置为数据源。
我们看一下UserDetailServiceAutoConfigutation源码:
@AutoConfiguration
@ConditionalOnClass(AuthenticationManager.class)
@ConditionalOnBean(ObjectPostProcessor.class)
@ConditionalOnMissingBean(value = { AuthenticationManager.class,AuthenticationProvider.class,   UserDetailsService.class,AuthenticationManagerResolver.class },
public class UserDetailsServiceAutoConfiguration {
//...@Bean@Lazypublic InMemoryUserDetailsManager inMemoryUserDetailsManager(SecurityProperties properties,ObjectProvider<PasswordEncoder> passwordEncoder) {SecurityProperties.User user = properties.getUser();List<String> roles = user.getRoles();return new InMemoryUserDetailsManager(User.withUsername(user.getName()).password(getOrDeducePassword(user, passwordEncoder.getIfAvailable())).roles(StringUtils.toStringArray(roles)).build());}
//...
我们在最上面的注解@ConditionalOnMissingBean中发现 UserDetailsService.class,意思是如果有这个类,那么就不调用下面
inMemoryUserDetailsManager这个方法,就会直接用我们的给到AuthenticationManagerBuilder。
那么我们可以优化,代码如下:
    @Beanpublic UserDetailsService userDetailsService() {InMemoryUserDetailsManager userDetailsService = new InMemoryUserDetailsManager();userDetailsService.createUser(User.withUsername("aaa").password("{noop}123").roles("admin").build());return userDetailsService;}//    @Autowired
//    public void initialize(AuthenticationManagerBuilder builder) throws Exception {
//        System.out.println("SpringBoot默认配置:" + builder);
//        InMemoryUserDetailsManager userDetailsService = new InMemoryUserDetailsManager();
//        userDetailsService.createUser(User.withUsername("aaa").password("{noop}123").roles("admin").build());
//        builder.userDetailsService(userDetailsService);
//    }
只要我们有自定义的UserDetailService,工厂默认的就不生效了。而且SpringBoot会自动将我们创建的Bean—userDetailsService赋值给默认创建出来的AuthenticationManager(AuthenticationManager会自动检测)。
自定义AuthenticationManager
自定义代码(错误版本)如下:
@Beanpublic UserDetailsService userDetailsService() {InMemoryUserDetailsManager userDetailsService = new InMemoryUserDetailsManager();userDetailsService.createUser(User.withUsername("aaa").password("{noop}123").roles("admin").build());return userDetailsService;}@Overridepublic void configure(AuthenticationManagerBuilder builder){System.out.println("自定义Authenticationmanager:"+builder);}
这样会配置失败,因为自定义时,会覆盖掉工厂默认方法,SpringBoot就不会再自动配置了,所以此时我们的AuthenticationManagerBuilder就不会自动去找userDetailsService了,需要手动设置。
正确版本:
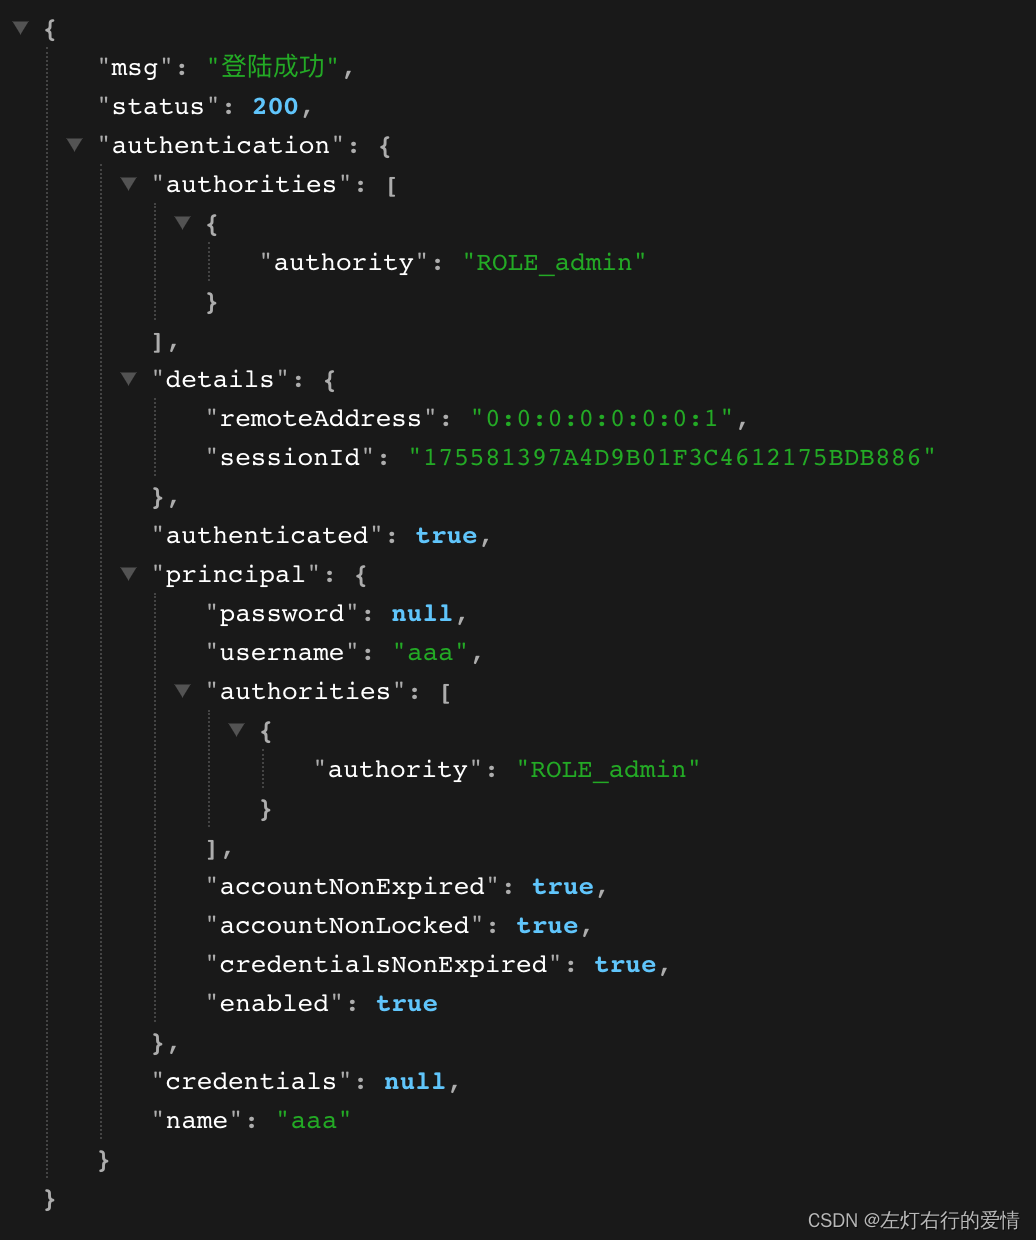
@Beanpublic UserDetailsService userDetailsService() {InMemoryUserDetailsManager userDetailsService = new InMemoryUserDetailsManager();userDetailsService.createUser(User.withUsername("aaa").password("{noop}123").roles("admin").build());return userDetailsService;}//自定义AuthenticationManager@Overridepublic void configure(AuthenticationManagerBuilder builder) throws Exception {System.out.println("自定义Authenticationmanager:"+builder);builder.userDetailsService(userDetailsService());}结果如下:
但是上面还存在一个问题——自定义的AuthenticationManager并没有在工厂中暴露出来,只能这个类中使用。
如果我们想让它在工厂中暴露,可以在任何位置注入,添加覆盖下面的方法即可:
@Override@Beanpublic AuthenticationManager authenticationManagerBean() throws Exception {return super.authenticationManagerBean();}
我们进去简单看看,它会调用父类的实现:
protected AuthenticationManager authenticationManager() throws Exception {if (!this.authenticationManagerInitialized) {configure(this.localConfigureAuthenticationBldr);如果是本地的,暴露本地的if (this.disableLocalConfigureAuthenticationBldr) {this.authenticationManager = this.authenticationConfiguration.getAuthenticationManager();}else {this.authenticationManager = this.localConfigureAuthenticationBldr.build();}this.authenticationManagerInitialized = true;}//如果不是,暴露是springboot默认的return this.authenticationManager;}
库表设计
从上面的内容我们可以看出,真正帮我们做底层用户认证的是UserDetailsService,它有一个loadUserByUsername方法,传入一个用户名,默认是在内存中。
所以我们自己写实现这个方法,并设置给AuthenticationManager,实现更换数据源。
我们来看一下UserDetailsService的loadUserByUsername方法:
UserDetails loadUserByUsername(String username) throws UsernameNotFoundException;
它的返回值是UserDetails,我们来看看它(注意,这是一个接口:
public interface UserDetails extends Serializable {Collection<? extends GrantedAuthority> getAuthorities();String getPassword();String getUsername();boolean isAccountNonExpired();boolean isAccountNonLocked();boolean isCredentialsNonExpired();boolean isEnabled();}
它最底层的实现类我们可以返回一个User‘实例:
public class User implements UserDetails, CredentialsContainer 。
因为我们后面数据源要切换为数据库实现,所以需要一张用户表,那么我们就参考User来设计表,User源码如下:
public class User implements UserDetails, CredentialsContainer {private static final long serialVersionUID = SpringSecurityCoreVersion.SERIAL_VERSION_UID;private static final Log logger = LogFactory.getLog(User.class);private String password;private final String username;private final Set<GrantedAuthority> authorities;private final boolean accountNonExpired;private final boolean accountNonLocked;private final boolean credentialsNonExpired;private final boolean enabled;
//...
根据上面信息,设计出表结构,如下:
// ⽤户表
CREATE TABLE `user`
(
`id` int(11) NOT NULL AUTO_INCREMENT,
`username` varchar(32) DEFAULT NULL,
`password` varchar(255) DEFAULT NULL,
`enabled` tinyint(1) DEFAULT NULL,
`accountNonExpired` tinyint(1) DEFAULT NULL,
`accountNonLocked` tinyint(1) DEFAULT NULL,
`credentialsNonExpired` tinyint(1) DEFAULT NULL,
PRIMARY KEY (`id`) ) ENGINE=InnoDB AUTO_INCREMENT=4 DEFAULT CHARSET=utf8;
// ⻆⾊表
CREATE TABLE `role`
(
`id` int(11) NOT NULL AUTO_INCREMENT,
`name` varchar(32) DEFAULT NULL,
`name_zh` varchar(32) DEFAULT NULL,
PRIMARY KEY (`id`) ) ENGINE=InnoDB AUTO_INCREMENT=4 DEFAULT CHARSET=utf8;
// ⽤户⻆⾊关系表
CREATE TABLE `user_role`
(
`id` int(11) NOT NULL AUTO_INCREMENT,
`uid` int(11) DEFAULT NULL,
`rid` int(11) DEFAULT NULL,
PRIMARY KEY (`id`),
KEY `uid` (`uid`),
KEY `rid` (`rid`) ) ENGINE=InnoDB AUTO_INCREMENT=5 DEFAULT CHARSET=utf8;------------------------
//插入数据
BEGIN;
INSERT INTO `user`
VALUES (1, 'root', '{noop}123', 1, 1, 1, 1);
INSERT INTO `user`
VALUES (2, 'admin', '{noop}123', 1, 1, 1, 1);
INSERT INTO `user`
VALUES (3, 'blr', '{noop}123', 1, 1, 1, 1);
COMMIT;
// 插⼊⻆⾊数据
BEGIN;
INSERT INTO `role`
VALUES (1, 'ROLE_product', '商品管理员');
INSERT INTO `role`
VALUES (2, 'ROLE_admin', '系统管理员');
INSERT INTO `role`
VALUES (3, 'ROLE_user', '⽤户管理员');
COMMIT;
// 插⼊⽤户⻆⾊数据
BEGIN;
INSERT INTO `user_role`
VALUES (1, 1, 1);
INSERT INTO `user_role`
VALUES (2, 1, 2);
INSERT INTO `user_role`
VALUES (3, 2, 2);
INSERT INTO `user_role`
VALUES (4, 3, 3);
COMMIT;
代码实现
踩坑点
- 请确认你的MySQL版本是否为8.0以上,如果为8.0以上,那么mysql引入的依赖注意版本参数,配置 springboot 配置⽂件时,
spring.datasource.driver-class-name参数为:com.mysql.cj.jdbc.Driver。 - mapper的xml文件中,如果resultTppe爆红,使用全路径即可。
引入依赖
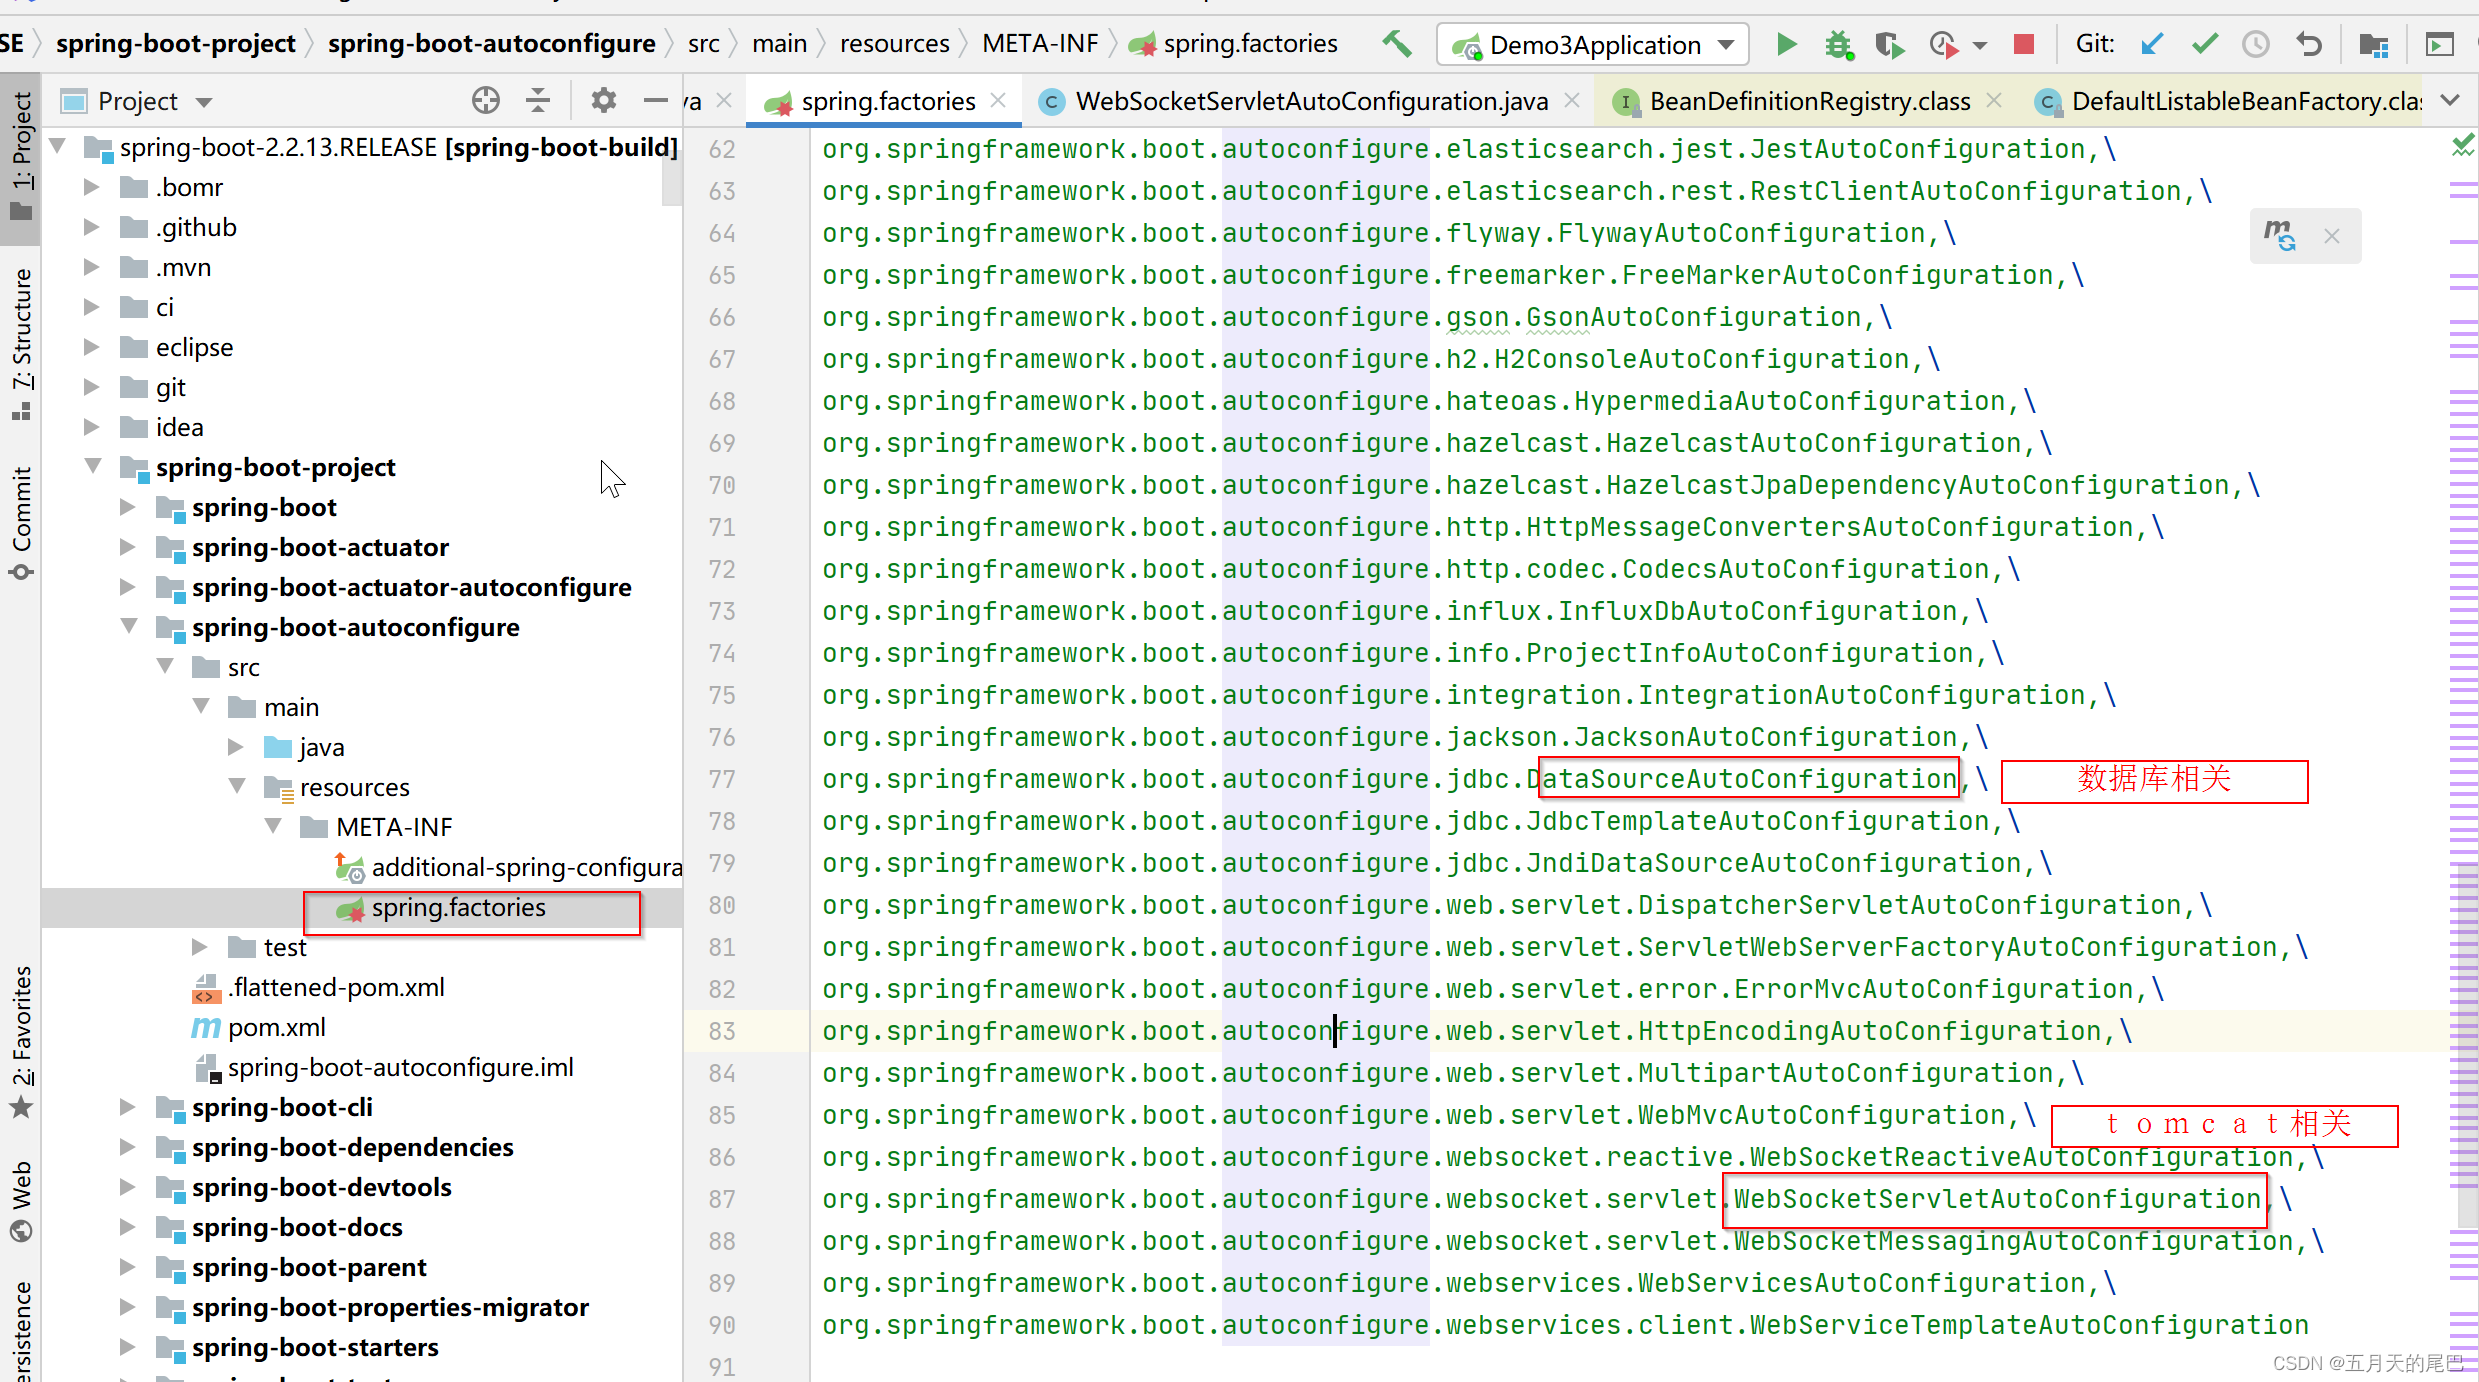
<dependency><groupId>com.alibaba</groupId><artifactId>druid</artifactId><version>1.1.16</version></dependency>这里我用的是8.0版本的,请注意!!!<dependency><groupId>mysql</groupId><artifactId>mysql-connector-java</artifactId><version>8.0.18</version></dependency><dependency><groupId>org.mybatis.spring.boot</groupId><artifactId>mybatis-spring-boot-starter</artifactId><version>2.2.0</version></dependency>
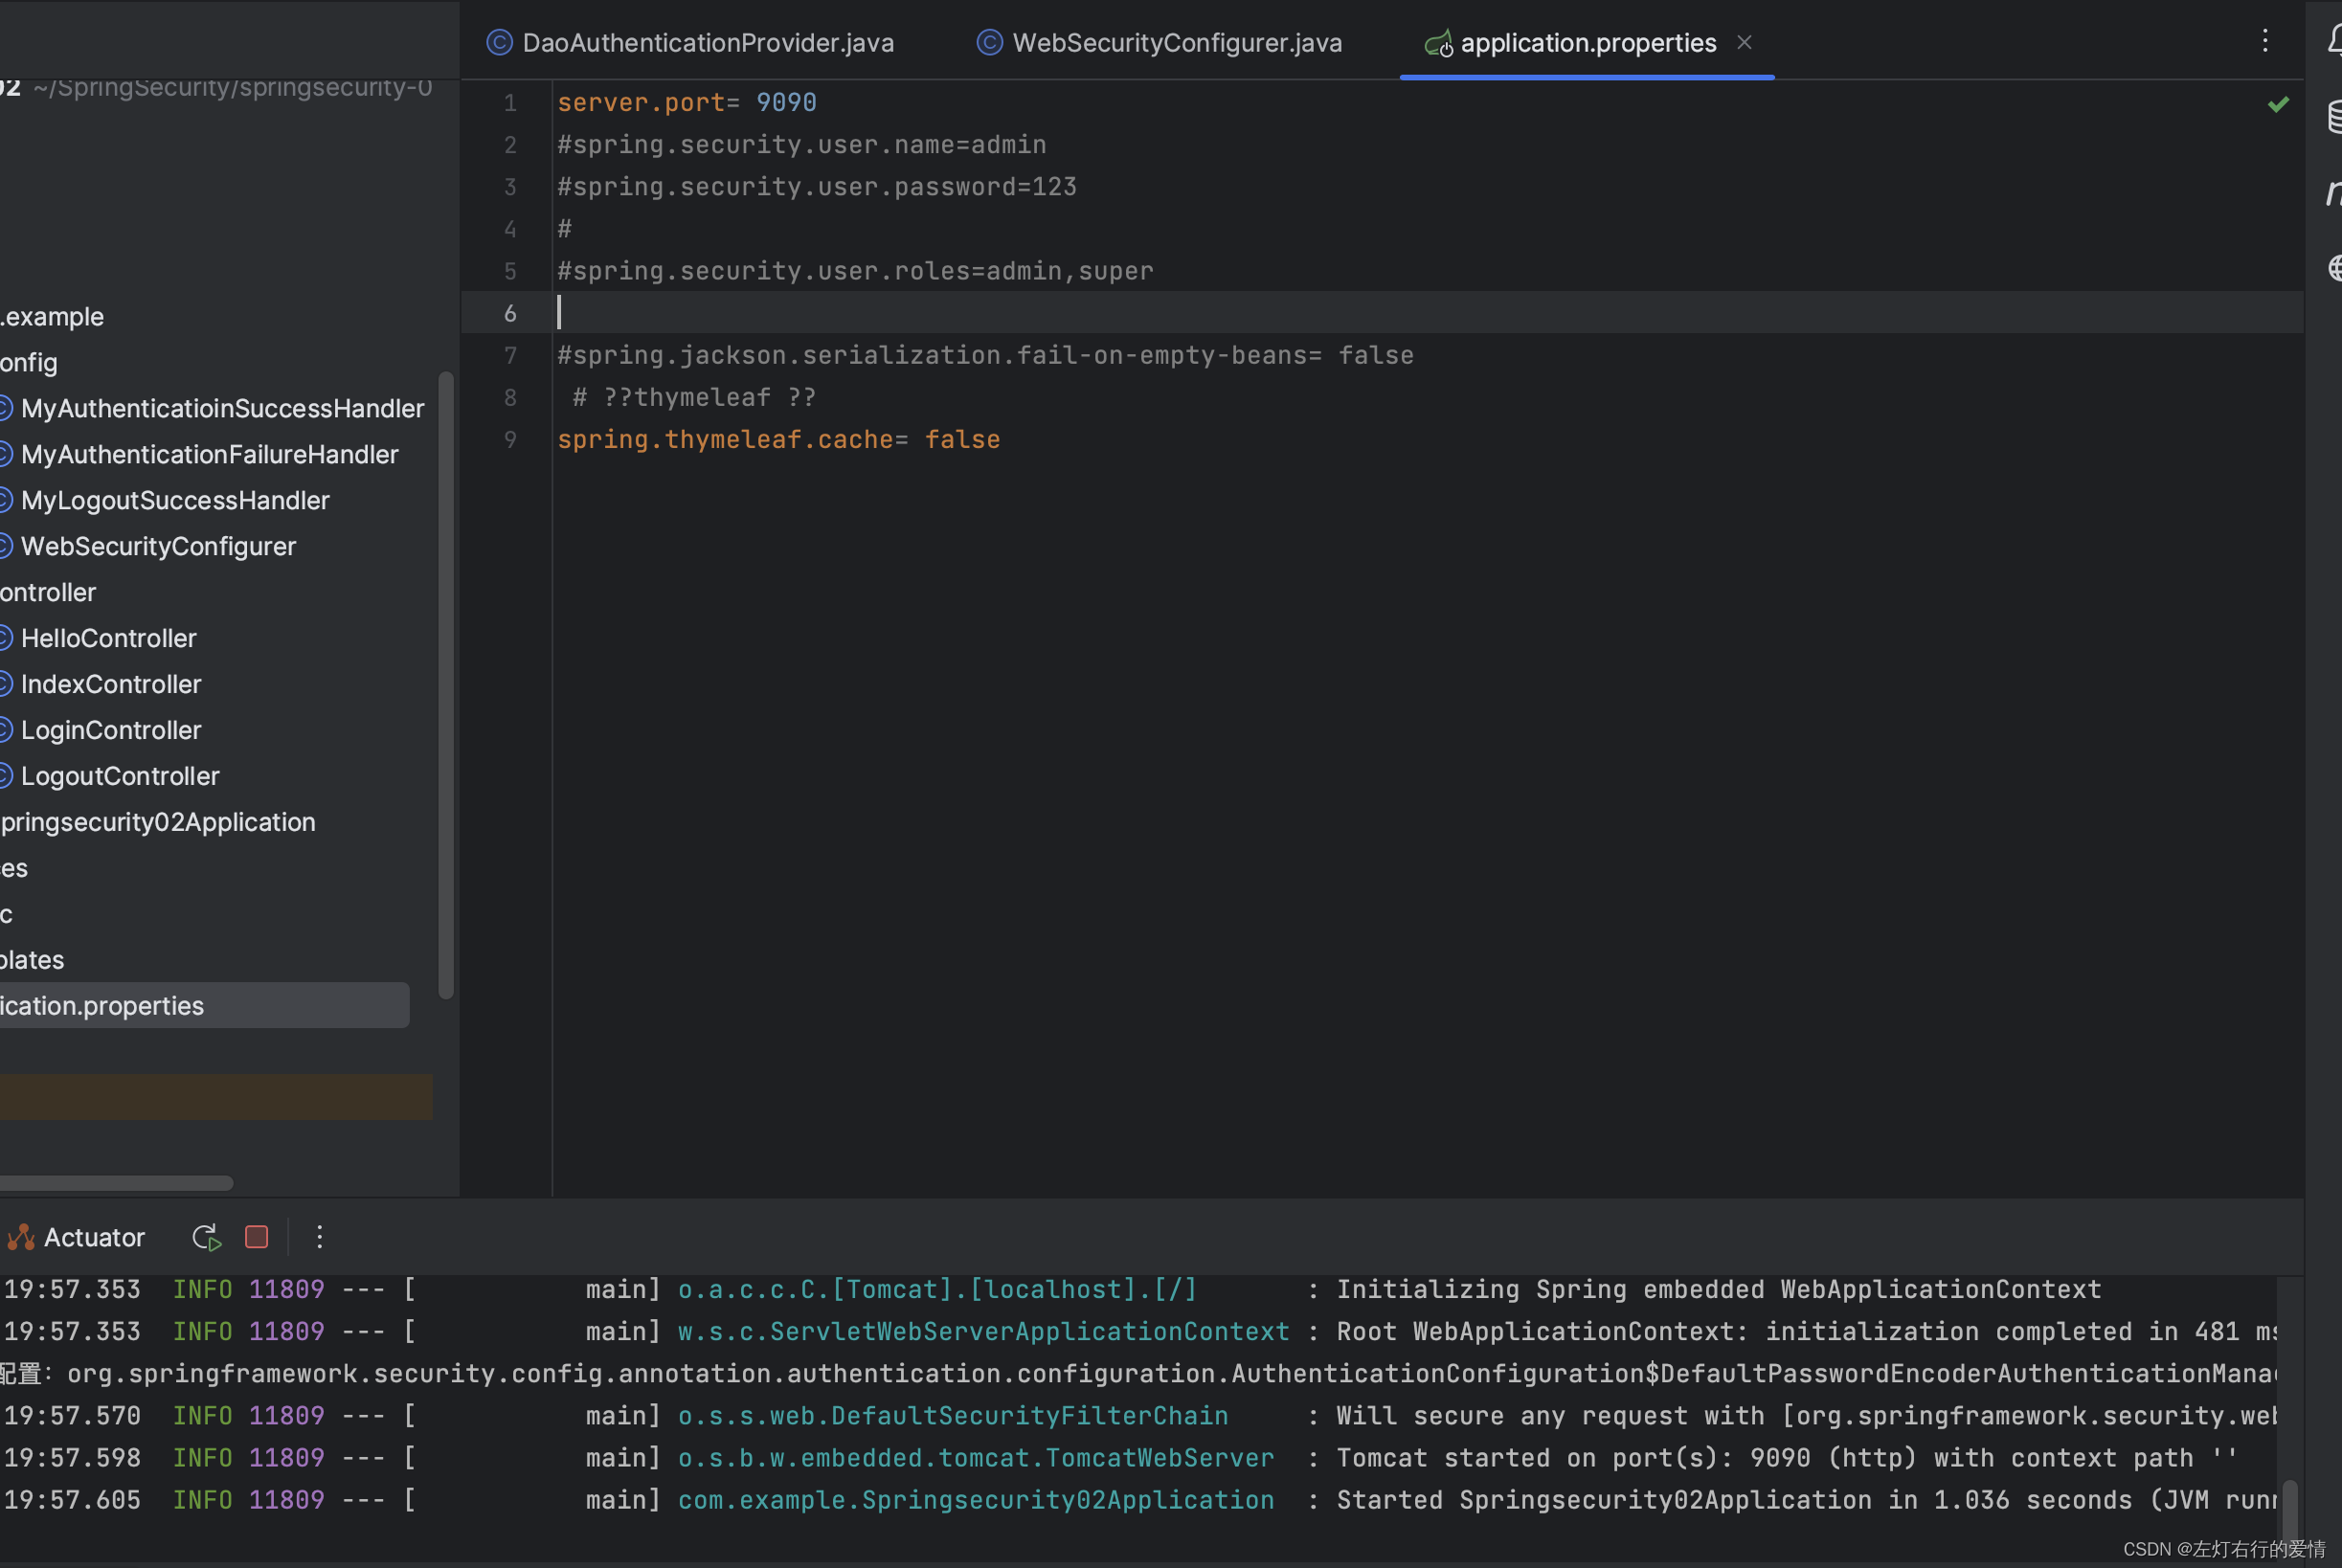
配置 springboot 配置⽂件
server.port= 9090# 关闭thymeleaf 缓存
spring.thymeleaf.cache= false# 配置数据源
spring.datasource.type= com.alibaba.druid.pool.DruidDataSource
spring.datasource.driver-class-name= com.mysql.cj.jdbc.Driver
spring.datasource.url= jdbc:mysql://localhost:3306/security?characterEncoding=UTF-8&useSSL=false&&serverTimezone=CST
spring.datasource.username= 输入你的用户名
spring.datasource.password= 输入你的密码# Mybatis配置
# 注意mapper目录必须用"/"
mybatis.mapper-locations= classpath:com/wang/mapper/*.xml
mybatis.type-aliases-package=com.example.eneity# 日志处理
logging.level.com.example = debug
创建entity
创建User对象
import org.springframework.security.core.GrantedAuthority;
import org.springframework.security.core.authority.SimpleGrantedAuthority;
import org.springframework.security.core.userdetails.UserDetails;import java.util.*;public class User implements UserDetails {private Integer id;private String username;private String password;private Boolean enabled;private Boolean accountNonExpired;private Boolean accountNonLocked;private Boolean credentialsNonExpired;private List<Role> roles = new ArrayList();@Overridepublic Collection<? extends GrantedAuthority> getAuthorities() {Set<GrantedAuthority> authorities = new HashSet();roles.forEach(role->{SimpleGrantedAuthority simpleGrantedAuthority = new SimpleGrantedAuthority(role.getName());authorities.add(simpleGrantedAuthority);});return authorities;}@Overridepublic String getPassword() {return password;}@Overridepublic String getUsername() {return username;}@Overridepublic boolean isAccountNonExpired() {return accountNonExpired;}@Overridepublic boolean isAccountNonLocked() {return accountNonLocked;}@Overridepublic boolean isCredentialsNonExpired() {return credentialsNonExpired;}@Overridepublic boolean isEnabled() {return enabled;}public void setRoles(List<Role> roles) {this.roles = roles;}public Integer getId() {return id;}public void setUsername(String username) {this.username = username;}public void setPassword(String password) {this.password = password;}public Boolean getEnabled() {return enabled;}public void setEnabled(Boolean enabled) {this.enabled = enabled;}public Boolean getAccountNonExpired() {return accountNonExpired;}public void setAccountNonExpired(Boolean accountNonExpired) {this.accountNonExpired = accountNonExpired;}public Boolean getAccountNonLocked() {return accountNonLocked;}public void setAccountNonLocked(Boolean accountNonLocked) {this.accountNonLocked = accountNonLocked;}public Boolean getCredentialsNonExpired() {return credentialsNonExpired;}public void setCredentialsNonExpired(Boolean credentialsNonExpired) {this.credentialsNonExpired = credentialsNonExpired;}public List<Role> getRoles() {return roles;}
}
创建Role对象
public class Role {private Integer id;private String name;private String nameZh;public Integer getId() {return id;}public void setId(Integer id) {this.id = id;}public String getName() {return name;}public void setName(String name) {this.name = name;}public String getNameZh() {return nameZh;}public void setNameZh(String nameZh) {this.nameZh = nameZh;}
}
创建UserDao接口
//注意这里引用的是我们自定义的类型
import com.example.entity.Role;
import com.example.entity.User;
import org.apache.ibatis.annotations.Mapper;
import java.util.List;
@Mapper
public interface UserDao {//提供根据用户名返回方法User loadUserByUsername(String username);//提供根据用户id查询用户角色信息方法List<Role> getRoleByUid(Integer id);
}
创建UserMapper实现
<?xml version="1.0" encoding="UTF-8"?>
<!DOCTYPE mapperPUBLIC "-//mybatis.org//DTD Mapper 3.0//EN""http://mybatis.org/dtd/mybatis-3-mapper.dtd">
<mapper namespace="com.example.dao.UserDao"><!--        更具用户名查询用户方法--><select id="loadUserByUsername" resultType="com.example.entity.User">select id,username,password,enabled,accountNonExpired,accountNonLocked,credentialsNonExpiredfrom userwhere username = #{username}</select>
<!--        查询指定⾏数据--><select id="getRoleByUid" resultType="com.example.entity.Role">select r.id,r.name,r.name_zh nameZhfrom role r,user_role urwhere r.id = ur.ridand ur.uid = #{uid}</select>
</mapper>
创建 UserDetailService 实例
import com.example.dao.UserDao;
import com.example.entity.Role;
import com.example.entity.User;
import org.springframework.beans.factory.annotation.Autowired;
import org.springframework.security.core.userdetails.UserDetails;
import org.springframework.security.core.userdetails.UserDetailsService;
import org.springframework.security.core.userdetails.UsernameNotFoundException;
import org.springframework.stereotype.Component;
import org.springframework.util.ObjectUtils;import java.util.List;@Component
public class MyUserDetailService implements UserDetailsService {private final UserDao userDao;@Autowiredpublic MyUserDetailService(UserDao userDao){this.userDao = userDao;}@Overridepublic UserDetails loadUserByUsername(String username) throws UsernameNotFoundException {//1. 查询用户User user = userDao.loadUserByUsername(username);if (ObjectUtils.isEmpty(user)) {throw new UsernameNotFoundException("用户名不正确");}//2. 查询权限信息List<Role> roles = userDao.getRoleByUid(user.getId());user.setRoles(roles);return user;}
}
配置 authenticationManager 使⽤⾃定义UserDetailService
   private final MyUserDetailService myUserDetailService;//    @Bean
//    public UserDetailsService userDetailsService() {
//        InMemoryUserDetailsManager userDetailsService = new InMemoryUserDetailsManager();
//        userDetailsService.createUser(
//                User.withUsername("aaa")
//                .password("{noop}123")
//                .roles("admin")
//                .build());
//     return userDetailsService;
//    }@Autowiredpublic WebSecurityConfigurer(MyUserDetailService myUserDetailService){this.myUserDetailService = myUserDetailService;}//自定义AuthenticationManager@Overridepublic void configure(AuthenticationManagerBuilder builder) throws Exception {System.out.println("自定义Authenticationmanager:"+builder);builder.userDetailsService(myUserDetailService);}
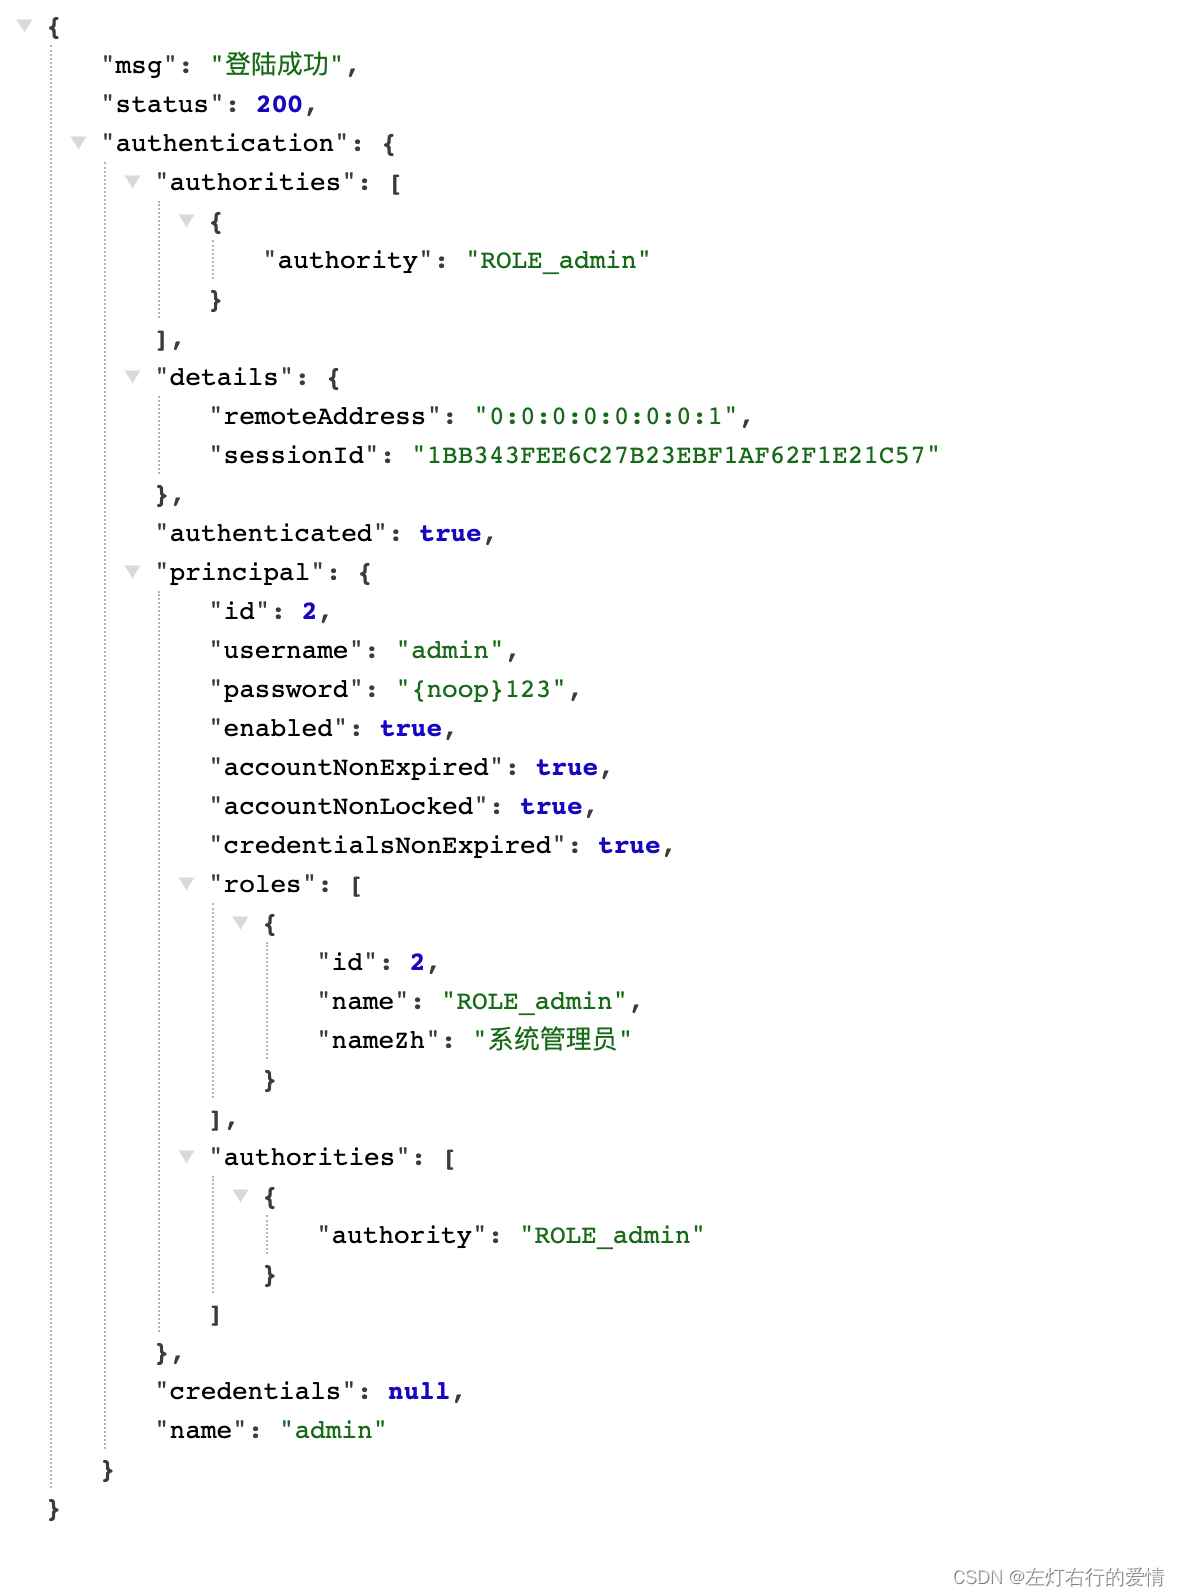
最后启动测试
- 请确保你的数据库版本
- 确保你的数据在数据库里面
最后结果: