1、加入准备的工具类
package com.ly.cloud.utils.exportUtil;import java.util.Map;public interface TemplateRenderer {Writable render(Map<String, Object> dataSource) throws Throwable;}
package com.ly.cloud.utils.exportUtil;import java.util.Map;public interface ExportedFileNameFactory {String getName(Map<String, Object> dataSource);}
package com.ly.cloud.utils.exportUtil;import java.io.IOException;
import java.io.OutputStream;public interface Writable {void write(OutputStream outputStream) throws IOException;}
package com.ly.cloud.utils.exportUtil;import org.slf4j.Logger;
import org.slf4j.LoggerFactory;import java.io.File;
import java.io.FileOutputStream;
import java.util.Map;public abstract class AbsExporter implements TemplateRenderer {private static final Logger LOGGER = LoggerFactory.getLogger(AbsExporter.class);public void doExport(Map<String, Object> dataSource, File exportedFile) throws Throwable {try(FileOutputStream fos = new FileOutputStream(exportedFile)) {Writable writable = this.render(dataSource);writable.write(fos);}}public abstract String getTargetFileSuffix();public void afterExport() {}
}
package com.ly.cloud.utils.exportUtil;import org.slf4j.Logger;
import org.slf4j.LoggerFactory;import java.io.BufferedOutputStream;
import java.io.File;
import java.io.FileOutputStream;
import java.util.ArrayList;
import java.util.List;
import java.util.Map;
import java.util.UUID;
import java.util.zip.ZipOutputStream;public class ExportProcess {private static final Logger LOGGER = LoggerFactory.getLogger(ExportProcess.class);/*** 要导出的数据源*/private List<Map<String, Object>> dataSourceList = new ArrayList<>();/*** 是否为多文件导出*/private boolean multiFile;/*** 导出器*/private AbsExporter exporter;/*** 导出文件名*/private String exportedFilename;/*** 导出为多文件时的文件名命名工厂*/private ExportedFileNameFactory nameFactory;private ExportProcess(Map<String, Object> dataSource, AbsExporter exporter, String exportedFilename) {this.dataSourceList.add(dataSource);this.multiFile = false;this.exporter = exporter;this.exportedFilename = exportedFilename;}private ExportProcess(List<Map<String, Object>> dataSourceList, AbsExporter exporter, String exportedFilename, ExportedFileNameFactory nameFactory) {this.dataSourceList.addAll(dataSourceList);this.multiFile = true;this.exporter = exporter;this.exportedFilename = exportedFilename;this.nameFactory = nameFactory;}public static ExportProcess newProcess(Map<String, Object> dataSource, AbsExporter exporter, String exportedFilename) {return new ExportProcess(dataSource, exporter, exportedFilename);}public static ExportProcess newProcess(List<Map<String, Object>> dataSourceList, AbsExporter exporter, String exportedFilename, ExportedFileNameFactory nameFactory) {return new ExportProcess(dataSourceList, exporter, exportedFilename, nameFactory);}public ExportResult export() {ExportResult exportResult = new ExportResult(this.multiFile ? exportAsZipFile() : exportAsSingleFile());this.exporter.afterExport();return exportResult;}/*** 导出为单文件* @return 导出结果*/private File exportAsSingleFile() {Map<String, Object> dataSource = this.dataSourceList.get(0);// 导出文件所在目录路径String exportedFileDirPath = FileUtils.filePathJoin(FileUtils.TEMP_FILE_PATH, "exportedFileDir" + UUID.randomUUID().toString());// 创建导出文件所在目录File exportedFileDir = FileUtils.createDir(exportedFileDirPath);String exportedFilePath = FileUtils.filePathJoin(exportedFileDirPath, this.exportedFilename + this.exporter.getTargetFileSuffix());File exportedFile = new File(exportedFilePath);try {this.exporter.doExport(dataSource, exportedFile);return exportedFile;} catch (Throwable t) {LOGGER.error(t.getMessage(), t);FileUtils.deleteDir(exportedFileDir);}return null;}/*** 导出为压缩文件* @return 导出结果*/private File exportAsZipFile() {String tempFileDirPath = FileUtils.filePathJoin(FileUtils.TEMP_FILE_PATH, "tempFile" + UUID.randomUUID().toString());File tempFileDir = FileUtils.createDir(tempFileDirPath);// 导出文件所在目录路径String exportedFileDirPath = FileUtils.filePathJoin(FileUtils.TEMP_FILE_PATH, "exportedFileDir" + UUID.randomUUID().toString());// 创建导出文件所在目录File exportedFileDir = FileUtils.createDir(exportedFileDirPath);File exportedFile = new File(FileUtils.filePathJoin(exportedFileDirPath, this.exportedFilename + ".zip"));try {for (Map<String, Object> dataSource : this.dataSourceList) {this.exporter.doExport(dataSource, new File(FileUtils.filePathJoin(tempFileDirPath, this.nameFactory.getName(dataSource) + this.exporter.getTargetFileSuffix())));}try (ZipOutputStream out = new ZipOutputStream(new FileOutputStream(exportedFile));BufferedOutputStream bos = new BufferedOutputStream(out)) {FileUtils.zipDir(tempFileDirPath, out, bos);}return exportedFile;} catch (Throwable t) {LOGGER.error(t.getMessage(), t);FileUtils.deleteDir(exportedFileDir);} finally {FileUtils.deleteDir(tempFileDir);}return null;}
}
package com.ly.cloud.utils.exportUtil;import eu.bitwalker.useragentutils.Browser;
import eu.bitwalker.useragentutils.UserAgent;
import org.apache.commons.lang3.StringUtils;
import org.slf4j.Logger;
import org.slf4j.LoggerFactory;import javax.servlet.http.HttpServletRequest;
import javax.servlet.http.HttpServletResponse;
import java.io.*;
import java.net.URLEncoder;public class ExportResult {private static final Logger LOGGER = LoggerFactory.getLogger(ExportResult.class);private File exportedFile;ExportResult(File exportedFile) {this.exportedFile = exportedFile;}public File getExportedFile() {if (null == this.exportedFile) {throw new NullPointerException("exportedFile 为 null");}return exportedFile;}public void download(HttpServletRequest request, HttpServletResponse response) {File exportedFile = getExportedFile();// 用于清除首部的空白行response.reset();response.setContentType("application/x-download; charset=utf-8");setFileDownloadHeader(request, response, this.exportedFile.getName());doDownload(response, exportedFile);}private void setFileDownloadHeader(HttpServletRequest request, HttpServletResponse response, String filename) {//获取浏览器信息String ua = request.getHeader("USER-AGENT");//转成UserAgent对象UserAgent userAgent = UserAgent.parseUserAgentString(ua);//获取浏览器信息Browser browser = userAgent.getBrowser();//浏览器名称String browserName = browser.getName();String encodedFilename;try {encodedFilename = URLEncoder.encode(filename, "UTF8");if (StringUtils.contains(browserName, "Internet Explorer")) {response.setHeader("Content-Disposition", "attachment; filename=\"" + encodedFilename + "\"");} else if (StringUtils.contains(browserName, "Chrome") || StringUtils.contains(browserName, "Firefox")) {response.setHeader("Content-Disposition", "attachment; filename*=UTF-8''" + encodedFilename);} else {// 其他浏览器response.setHeader("Content-Disposition", "attachment; filename=\"" + encodedFilename + "\"");}} catch (UnsupportedEncodingException e) {LOGGER.error(e.getMessage(), e);}}private void doDownload(HttpServletResponse response, File exportedFile) {OutputStream os = null;byte[] buffer = new byte[1024];BufferedInputStream bis = null;FileInputStream exportedFileInputStream = null;try {exportedFileInputStream = new FileInputStream(exportedFile);response.addHeader("content-length", exportedFileInputStream.available() + "");os = response.getOutputStream();bis = new BufferedInputStream(exportedFileInputStream);int i = bis.read(buffer);while (i != -1) {os.write(buffer, 0, i);i = bis.read(buffer);}os.flush();} catch (IOException e) {LOGGER.error(e.getMessage(), e);} finally {if (exportedFileInputStream != null) {try {exportedFileInputStream.close();} catch (IOException e) {LOGGER.error(e.getMessage(), e);}}if (bis != null) {try {bis.close();} catch (IOException e) {LOGGER.error(e.getMessage(), e);}}if (os != null) {try {os.close();} catch (IOException e) {LOGGER.error(e.getMessage(), e);}}// 下载完成后删除临时文件if (exportedFile.exists()) {File exportedFileDir = exportedFile.getParentFile();FileUtils.deleteDir(exportedFileDir);}}}
}
package com.ly.cloud.utils.exportUtil;import org.apache.commons.lang3.StringUtils;import java.io.*;
import java.util.zip.ZipEntry;
import java.util.zip.ZipOutputStream;public class FileUtils {static {// 当文件系统中没有nhtemp文件夹的时候,创建File sf = new File(FileUtils.filePathJoin(System.getProperty("java.io.tmpdir"), "nhtemp"));if (!sf.exists()) {sf.mkdirs();}}/*** 临时文件夹,在临时文件夹中创建nhtemp,用来保存所有使用本工具类创建的文件,以便于统一清空临时文件夹,并且已经包含了文件分割符号,请注意*/public static final String TEMP_FILE_PATH = FileUtils.filePathJoin(System.getProperty("java.io.tmpdir"), "nhtemp");/*** 向文件写入数据** @param is* @param file* @throws IOException*/public static void writeToFile(InputStream is, File file) throws IOException {FileOutputStream fs = null;try {fs = new FileOutputStream(file);byte[] buffer = new byte[1024];int byteread = 0;while ((byteread = is.read(buffer)) != -1) {fs.write(buffer, 0, byteread);}} catch (IOException e) {throw e;} finally {if (fs != null) {fs.close();}is.close();}}/*** 删除文件夹(会删除文件夹下所有的文件)** @param dir* @return*/public static boolean deleteDir(File dir) {if (dir.isDirectory()) {String[] children = dir.list();//递归删除目录中的子目录下for (int i = 0; i < children.length; i++) {boolean success = deleteDir(new File(dir, children[i]));if (!success) {return false;}}}// 目录此时为空,可以删除return dir.delete();}public static File createDir(String dirPath) {File dir = new File(dirPath);//如果文件夹不存在if (!dir.exists()) {//创建文件夹dir.mkdir();}return dir;}public static void zipDir(String directoryName, ZipOutputStream zos, BufferedOutputStream bos) {File file = new File(directoryName);if (file.exists()) {File[] fileList = file.listFiles();assert fileList != null;for (File f : fileList) {// 压缩单个文件到 zosString zipName = f.getName();try {zos.putNextEntry(new ZipEntry(zipName));int len;FileInputStream is = new FileInputStream(f);BufferedInputStream bis = new BufferedInputStream(is);byte[] bytes = new byte[1024];while ((len = bis.read(bytes)) != -1) {bos.write(bytes, 0, len);}bos.flush();zos.flush();//                    结束当前压缩文件的添加bis.close();is.close();} catch (IOException e) {e.printStackTrace();}}}}/*** 路径拼接工具方法* @param filePath 文件路径* @return 拼接结果*/public static String filePathJoin(String... filePath) {return StringUtils.join(filePath, File.separator);}}
package com.ly.cloud.utils.exportUtil;import cn.afterturn.easypoi.excel.ExcelXorHtmlUtil;
import cn.afterturn.easypoi.excel.entity.enmus.ExcelType;
import org.apache.poi.ss.usermodel.Workbook;
import org.slf4j.Logger;
import org.slf4j.LoggerFactory;import java.util.Map;public class VelocityTemplateExporter extends AbsExporter {private static final Logger LOGGER = LoggerFactory.getLogger(VelocityTemplateExporter.class);private String templateFilename;public VelocityTemplateExporter(String templateFilename) {this.templateFilename = templateFilename;}@Overridepublic String getTargetFileSuffix() {return ".xlsx";}@Overridepublic Writable render(Map<String, Object> dataSource) {String html = VelocityUtils.render(this.templateFilename + ".vm", dataSource);LOGGER.trace("渲染的html为:\n{}", html);Workbook workbook = ExcelXorHtmlUtil.htmlToExcel(html, ExcelType.XSSF);if (null == workbook) {throw new NullPointerException("workbook 为 null");}return new WorkbookWrapper(workbook);}
}
package com.ly.cloud.utils.exportUtil;import org.apache.velocity.VelocityContext;
import org.apache.velocity.app.Velocity;
import org.apache.velocity.exception.VelocityException;import java.io.StringWriter;
import java.util.Map;
import java.util.Properties;public class VelocityUtils {/*** 模板文件所在目录*/private static final String TEMPLATE_FILE_DIR = FileUtils.filePathJoin("file", "velocityTemp");static {//初始化参数Properties properties = new Properties();//设置 velocity 资源加载方式为 classproperties.setProperty("resource.loader", "class");//设置 velocity 资源加载方式为 class 时的处理类properties.setProperty("class.resource.loader.class", "org.apache.velocity.runtime.resource.loader.ClasspathResourceLoader");// 执行初始化Velocity.init(properties);}/*** 渲染对应模板,并输出渲染结果* @param templateFileName 模板文件名* @param velocityContext 上下文对象,即渲染使用的数据源* @return 渲染结果*/public static String render(String templateFileName, VelocityContext velocityContext) throws VelocityException {StringWriter writer = new StringWriter();Velocity.mergeTemplate(FileUtils.filePathJoin(TEMPLATE_FILE_DIR, templateFileName), "UTF-8", velocityContext, writer);return writer.toString();}/*** 渲染对应模板,并输出渲染结果* @param templateFileName 模板文件名* @param renderDataSource 渲染使用的数据源* @return 渲染结果*/public static String render(String templateFileName, Map<String, Object> renderDataSource) throws VelocityException {VelocityContext velocityContext = new VelocityContext(renderDataSource);return render(templateFileName, velocityContext);}
}
package com.ly.cloud.utils.exportUtil;import org.apache.poi.ss.usermodel.Workbook;import java.io.IOException;
import java.io.OutputStream;public class WorkbookWrapper implements Writable {private Workbook workbook;public WorkbookWrapper(Workbook workbook) {this.workbook = workbook;}@Overridepublic void write(OutputStream outputStream) throws IOException {this.workbook.write(outputStream);}
}
package com.ly.cloud.utils.exportUtil;import cn.afterturn.easypoi.excel.ExcelExportUtil;
import cn.afterturn.easypoi.excel.entity.TemplateExportParams;
import org.apache.poi.ss.usermodel.Workbook;import java.util.Map;
import java.util.function.Function;public class ExcelTemplateExporter extends AbsExporter {private TemplateExportParams templateExportParams;private Function<Workbook, Workbook> afterRender;public ExcelTemplateExporter(String templateFilename) {this(templateFilename, null);}public ExcelTemplateExporter(String templateFilename, Function<Workbook, Workbook> afterRender) {this.templateExportParams = new TemplateExportParams("file/excelTemp/" + templateFilename + ".xlsx");this.afterRender = afterRender;}@Overridepublic Writable render(Map<String, Object> dataSource) {Workbook workbook = ExcelExportUtil.exportExcel(this.templateExportParams, dataSource);if (null == workbook) {throw new NullPointerException("workbook 为 null");}if (this.afterRender != null) {workbook = this.afterRender.apply(workbook);}return new WorkbookWrapper(workbook);}@Overridepublic String getTargetFileSuffix() {return ".xlsx";}
}
package com.lili.exportUtil;import org.apache.poi.xwpf.usermodel.XWPFDocument;import java.io.IOException;
import java.io.OutputStream;public class XWPFDocumentWrapper implements Writable {private XWPFDocument xwpfDocument;public XWPFDocumentWrapper(XWPFDocument xwpfDocument) {this.xwpfDocument = xwpfDocument;}@Overridepublic void write(OutputStream outputStream) throws IOException {this.xwpfDocument.write(outputStream);}
}
package com.lili.exportUtil;import cn.afterturn.easypoi.word.WordExportUtil;import org.apache.poi.xwpf.usermodel.XWPFDocument;import java.util.Map;public class WordTemplateExporter extends AbsExporter {private String templateFilePath;public WordTemplateExporter(String templateFilename) {this.templateFilePath = "file/excelTemp/" + templateFilename + ".docx";}@Overridepublic String getTargetFileSuffix() {return ".docx";}@Overridepublic Writable render(Map<String, Object> dataSource) throws Exception {XWPFDocument xwpfDocument = WordExportUtil.exportWord07(templateFilePath, dataSource);XWPFDocumentWrapper xwpfDocumentWrapper = new XWPFDocumentWrapper(xwpfDocument);return xwpfDocumentWrapper;}
}
2、引入所需依赖
<dependency><groupId>cn.afterturn</groupId><artifactId>easypoi-web</artifactId><version>3.2.0</version></dependency><dependency><groupId>eu.bitwalker</groupId><artifactId>UserAgentUtils</artifactId><version>1.21</version></dependency><dependency><groupId>org.apache.velocity</groupId><artifactId>velocity-engine-core</artifactId><version>2.0</version></dependency><dependency><groupId>org.jsoup</groupId><artifactId>jsoup</artifactId><version>1.12.1</version></dependency>3、导出案例
3.1、导出以下excel
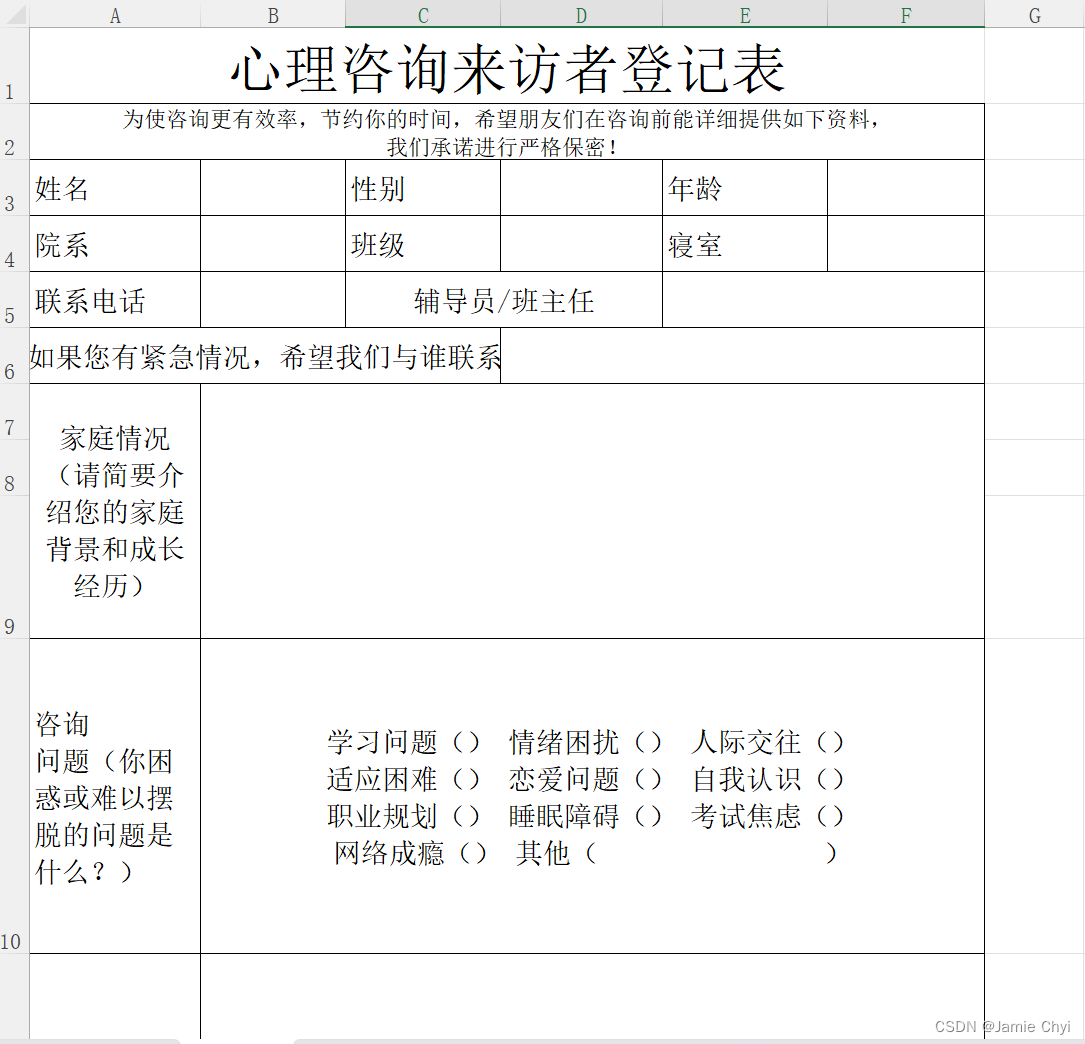
方式一:
操作步骤:

放的位置要和工具类设置位置一样即可。

然后编写下载接口即可完成。

访问接口即可下载成功,如下

方式二:
操作步骤:
新建vm文件。放入合适位置(位置取自工具类,可以自行调整)

vm文件内容示例:
## 各个列的样式,主要是加上边框
#set($style = 'style="border: 1; height:50;width:12"')
#set($height = 'style="height:30;font-size:9"')
#set($fontSize = 'style="font-size: 20;"')
## 方法,如果存在则显示否则显示空
#macro(displayValue $value)#if($value)$value#else#end
#end## sheetName 必须存在
<table sheetName="心理咨询来访者登记表"><tr><th colspan="6" $fontSize>心理咨询来访者登记表</th></tr><tr><th $height colspan="6">为使咨询更有效率,节约你的时间,希望朋友们在咨询前能详细提供如下资料,我们承诺进行严格保密!</th></tr><tr><th $style>姓名</th><th $style>#displayValue($xm)</th><th $style>性别</th><th $style>#displayValue($xb)</th><th $style>年龄</th><th $style>#displayValue($age)</th></tr><tr><th $style>院系</th><th $style>#displayValue($yx)</th><th $style>班级</th><th $style>#displayValue($bj)</th><th $style>寝室</th><th $style>#displayValue($qs)</th></tr><tr><th $style>联系电话</th><th $style>#displayValue($lxfs)</th><th colspan="2" $style>辅导员/班主任</th><th colspan="2" $style>#displayValue($fdyxm)</th></tr><tr><th colspan="3" $style>如果您有紧急情况,希望我们与谁联系</th><th colspan="3" $style>#displayValue($jjlxr)</th></tr><tr><th $style>家庭情况(请简要介绍您的家庭背景和成长经历)</th><th $style colspan="5">#displayValue($jtqk)</th></tr><tr><th $style>咨询问题(你困惑或难以摆脱的问题是什么?)</th><th $style colspan="5">#displayValue($zxwt)</th></tr><tr><th $style>你期望达到的咨询目的</th><th $style colspan="5">#displayValue($zxmd)</th></tr><tr><th colspan="2" $style>以前是否接受过心理咨询或治疗</th><th  $style>#displayValue($sfkgys)</th><th colspan="2" $style>是否做过相关的心理测验</th><th  $style>#displayValue($fxlcy)</th></tr><tr><th colspan="2" $style>若做过,结果是:</th><th colspan="4" $style>#displayValue($xlcyjg)</th></tr><tr><th colspan="2" $style>预约咨询时间(至少需提前三天预约)</th><th colspan="4" $style>#displayValue($yysj) #displayValue($yysd)</th></tr>
</table>
这里无非是自己将页面通过tr,th并且合并单元格的方式画出来。
使用方法:

结果如下:
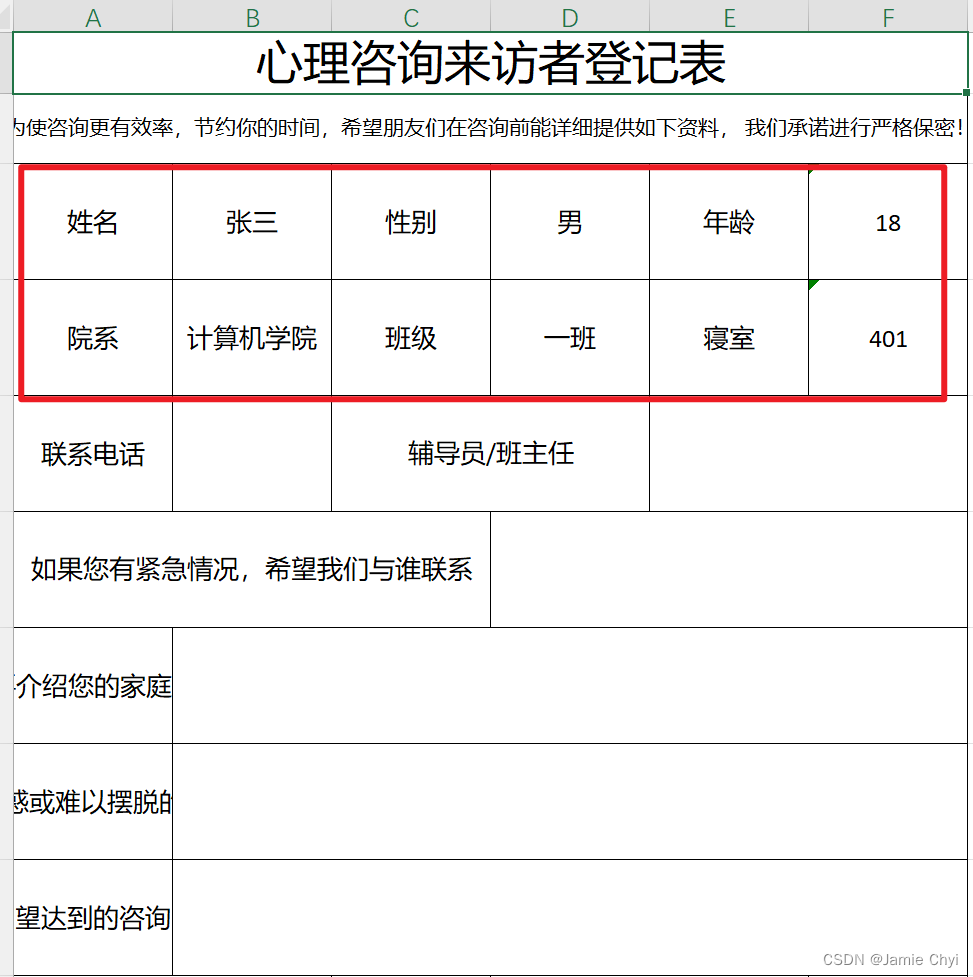
总结:
方式一:适合那些单条数据,没有变化的excel,直接制作好excel文件,放入项目里面即可完成
方式二:vm模板可以定义方法与变量,比较适合动态导出sql,可以根据不同map的结果导出不同样子的excel。
3.2、导出以下excel
这种就很常见了,平常简单的导出都是这个样子的。今天就用这个工具类来实现一下

方式一:还是直接放入项目里面的方式

编写接口进行下载测试:

下载结果如下:

注意:这里开头要加{{fe:maplist 结尾要加}},其余就是t.变量名字。其中maplist跟接口设置数据的key对应即可
方式二:采用vm的方式
这个时候就用到foreach循环了,vm文件如下
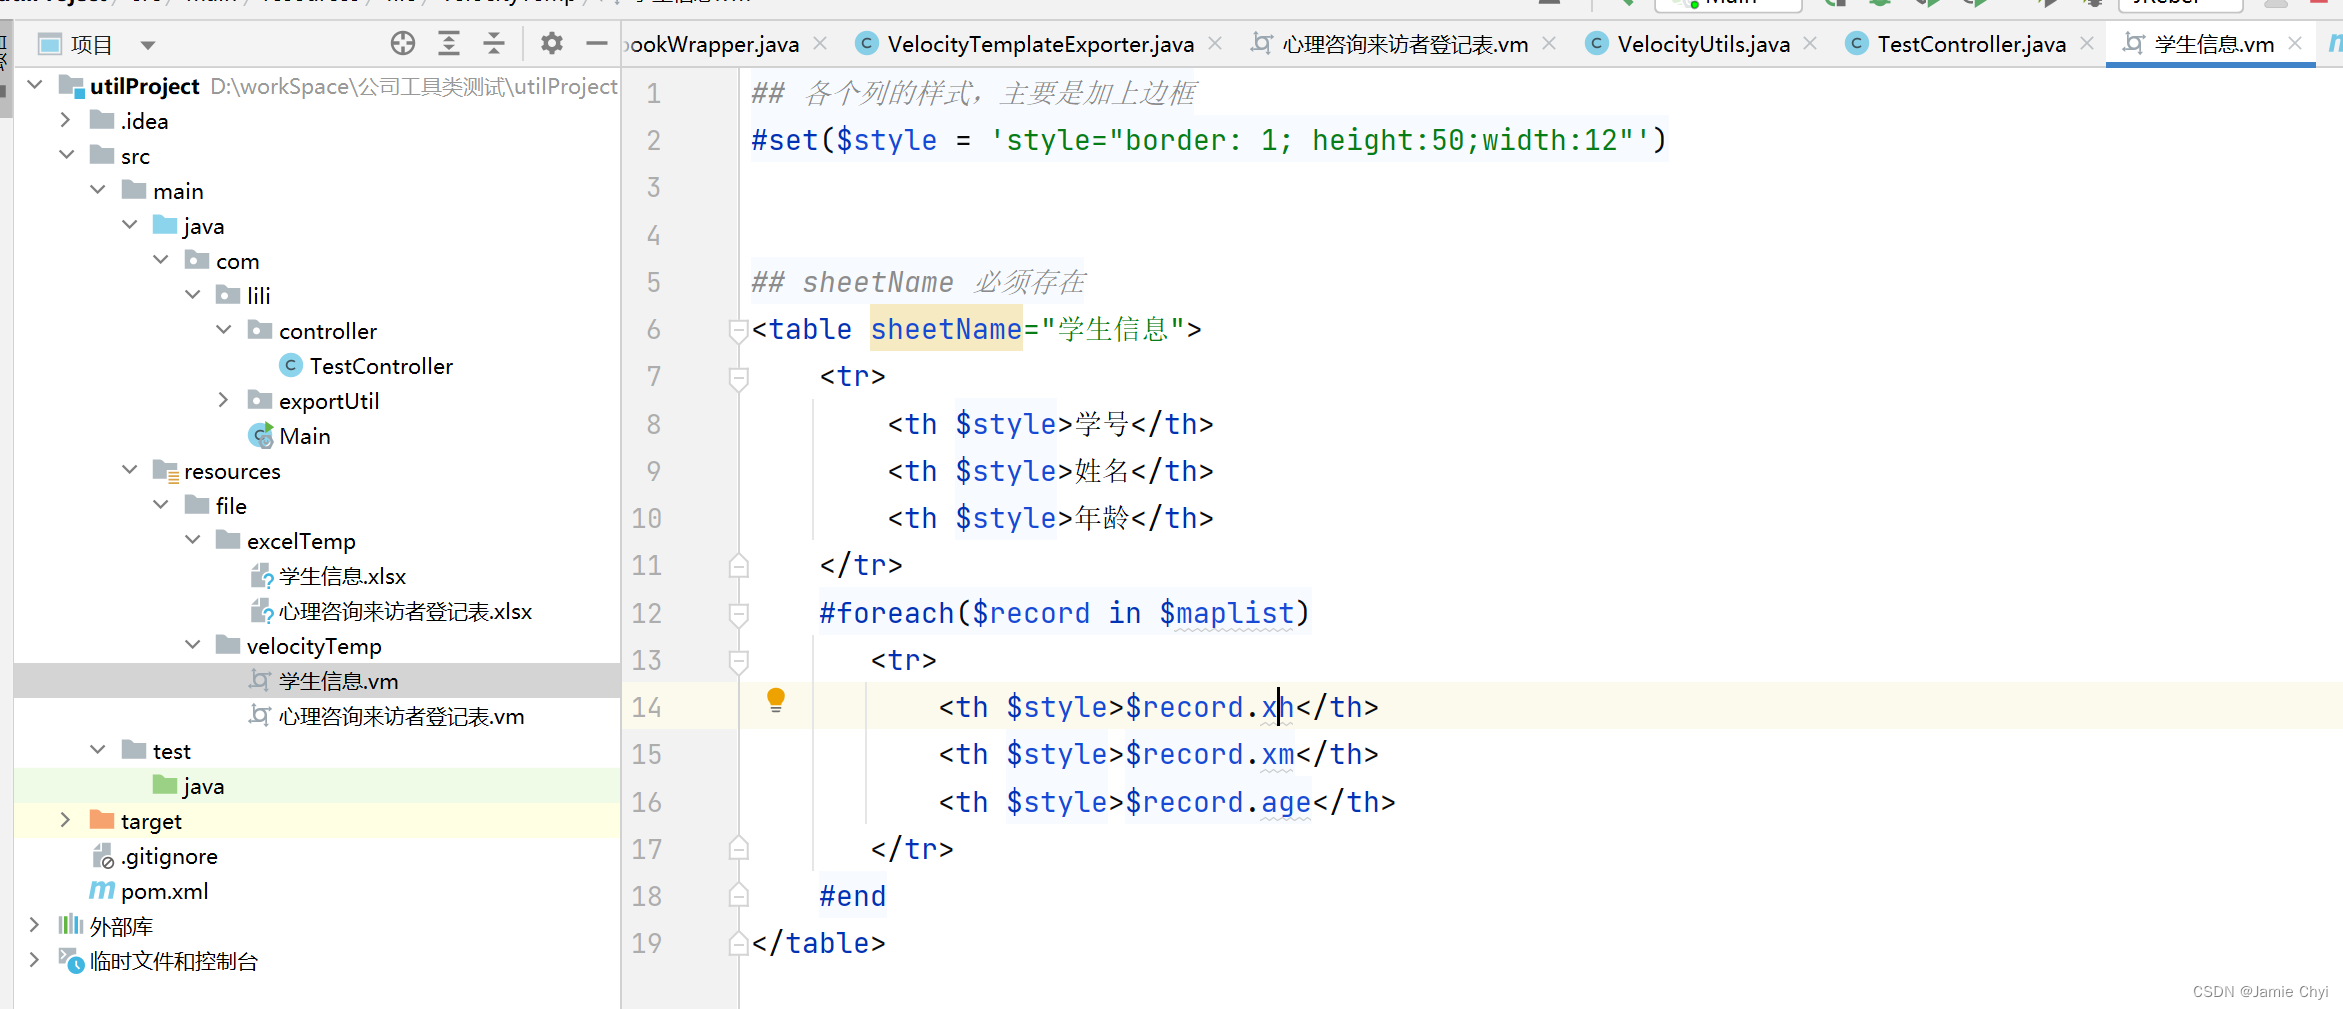
然后修改接口的实现类
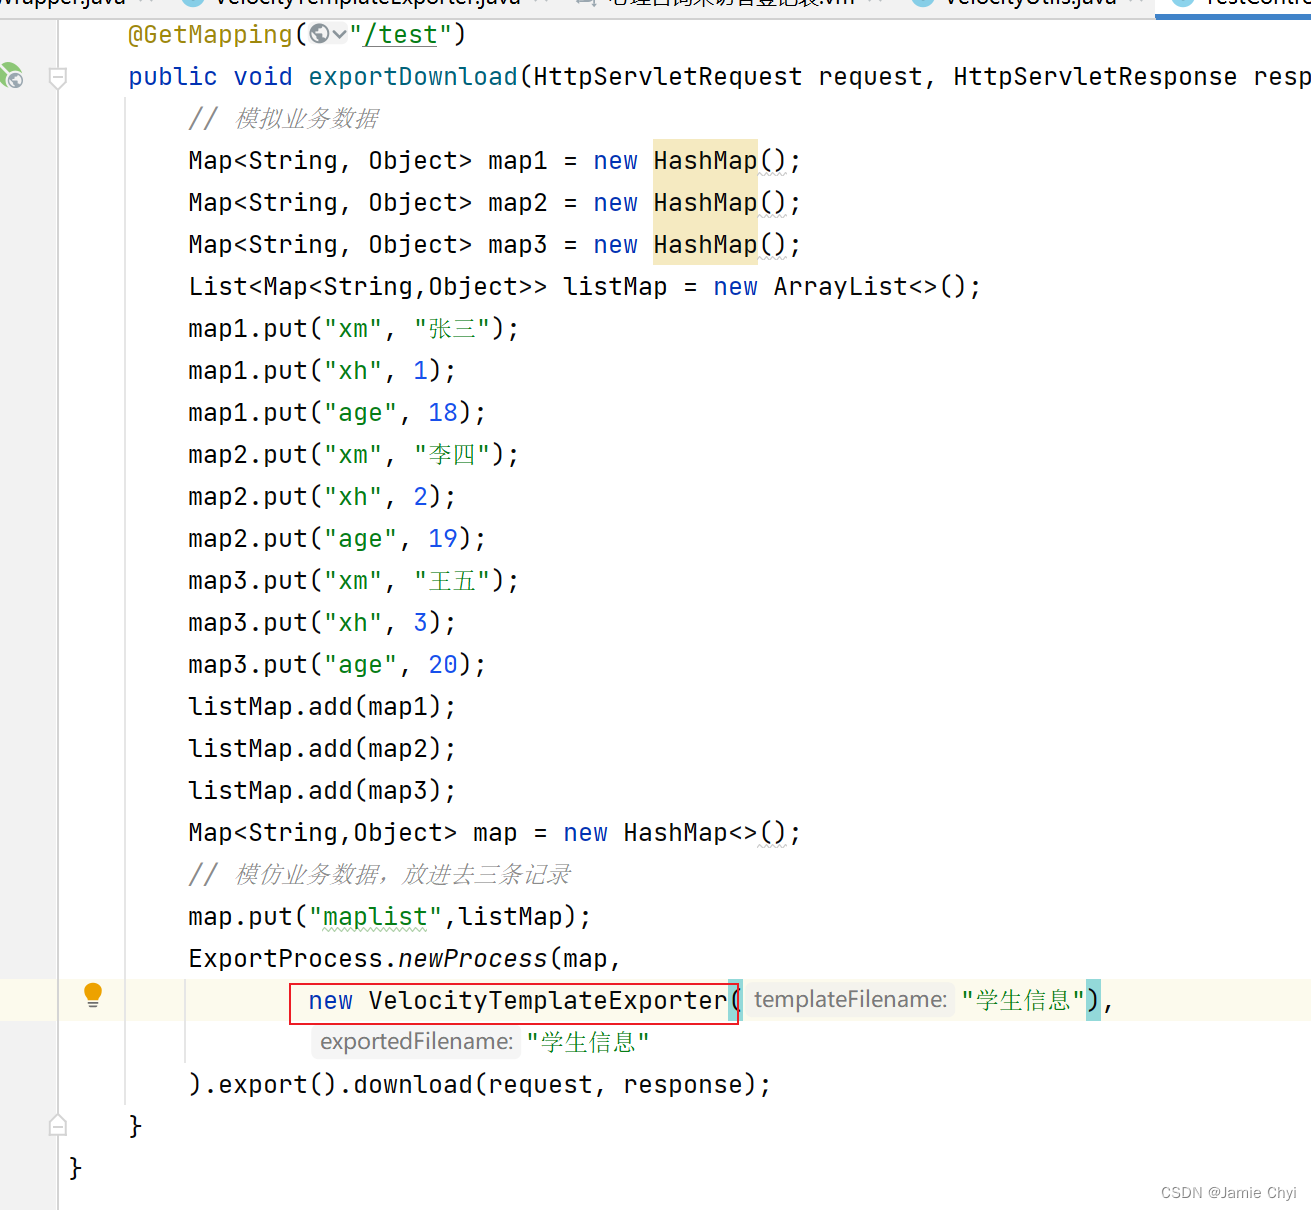
结果如下:

总结:
两种方式都很不错,可以实现效果,但是前者针对那种一成不变的或者简单的很方便。后者对于那种内部循环的就很见效了,比如下面这个。
红圈的部分就是需要根据次数来循环的部分,这个时候就非常适合用vm模板的方式了。

拓展
这个vm文件可自行扩展。非常灵活。下面是我用过的几个vm实战例子
## 二级列(等级)标题 list
#set($subColumnTitleList = [])
## 数据索引 list
#set($dataIndexList = [])
## 各个列的样式,主要是加上边框
#set($style = 'style="border: 1"')
#set($styleW = 'style="border: 1 solid black; width: 25;"')
#set($fontSize = 'style="border: 1 solid black; font-size: 20;"')
#set($bgck = 'style="border: 1 solid black; background-color: yellow;"')
#set($colspanValue = $lbmc.size() + 1)
## sheetName 必须存在
<table sheetName="columnsExportTest"><tr><th colspan="$num" $fontSize>$title</th></tr><tr><th colspan="$num" $style style="font-weight: bold">单位:XXX技术学院</th></tr><tr><th rowspan="2" $style>院系</th><th colspan="$colspanValue" $style>学校总人数</th>#foreach($column in $columns)#if($column.children)
##                <th colspan="$column.children.size()" $style>$column.title</th>#foreach($subColumn in $column.children)<th rowspan="1" colspan="2" $style>$subColumn.title</th>## 因为 add 方法有返回值,所以这里需要用 html 的方式注释一下,下面同理<!--$subColumnTitleList.add("人数")--><!--$subColumnTitleList.add("金额")--><!--$dataIndexList.add($subColumn.dataIndex)--><!--$dataIndexList.add($subColumn.dataIndexTemp)-->#end#else<th rowspan="1" colspan="2" $style>$column.title</th><!--$subColumnTitleList.add("人数")--><!--$subColumnTitleList.add("金额")--><!--$dataIndexList.add($column.dataIndex)--><!--$dataIndexList.add($column.dataIndexTemp)-->#end#end<th colspan="2" $style>合计</th></tr><tr>#foreach($mc in $lbmc)<th $style>$mc</th>#end<th $style>合计</th>#if($subColumnTitleList)#set($count = 1)#foreach($subColumnTitle in $subColumnTitleList)#if ($count % 2 == 0)<th $bgck>$subColumnTitle</th>#else<th $style>$subColumnTitle</th>#end#set($count = $count + 1)#end#end<th $style>人数</th><th $bgck>发放金额</th></tr>#foreach($record in $dataSource)<tr><td $styleW>$record.BMMC</td>#set($sum = 0)#foreach($dm in $lbdm)<td $style>$record.get($dm)</td>#set($currentValue = $record.get($dm))  ## 获取当前值#set($sum = $sum + $currentValue)  ## 累加值到 $sum 变量#end<td $style>$sum</td>#set($count = 1)#foreach($dataIndex in $dataIndexList)#if($count % 2 == 0)<td $bgck>$record.get($dataIndex)</td>#else<td $style>$record.get($dataIndex)</td>#end#set($count = $count + 1)#end#if($record.BMMC == "合计")<td colspan="1" $style>$record.HJRC</td><td colspan="1" $bgck>$record.HJJE</td>#else<td $style>$record.HJRC</td><td $bgck>$record.HJJE</td>#end</tr>#end
</table>
## 各个列的样式,主要是加上边框
#set($style = 'style="border: 1; height:50;width:18"')
#set($bold = 'style="border: 1; height:50;width:18;font-weight: bold;"')
#set($fontSize = 'style="font-size: 20;"')
#macro(displayValue $value)#if($value)$value#else#end
#end
## sheetName 必须存在
<table sheetName="心理咨询个案记录表"><tr><th colspan="6" $fontSize>心理咨询个案记录表</th></tr><tr><th $style>咨询师</th><th $style>#displayValue($ZXS)</th><th $style>咨询次数</th><th $style>#displayValue($dataSource.size())</th><th $style>来访日期</th><th $style>#displayValue($dataSource.get(0).ZXSJ)</th></tr><tr><th $style>来访者</th><th $style>#displayValue($LFZ)</th><th $style>性别</th><th $style>#displayValue($XB)</th><th $style>年龄</th><th $style>#displayValue($AGE)</th></tr><tr><th $style>系部班级</th><th $style>#displayValue($XBBJ)</th><th $style>辅导员/班主任</th><th $style>#displayValue($FDYXM)</th><th $style>联系人及联系方式</th><th $style>#displayValue($JJLXR)</th></tr>#foreach($record in $dataSource)<tr><th rowspan="11" $bold>#displayValue($record.title)</th><th $bold colspan="5">表现出的问题</th></tr><tr><th $style>来访者自述</th><th colspan="4" $style>#displayValue($record.LFZZS)</th></tr><tr><th $bold colspan="5">问题原因</th></tr><tr><th $style>促使因素</th><th colspan="4" $style>#displayValue($record.CSYS)</th></tr><tr><th $style>先前因素</th><th colspan="4" $style>#displayValue($record.XQYS)</th></tr><tr><th $style>社会因素</th><th colspan="4" $style>#displayValue($record.SHYS)</th></tr><tr><th $style>健康状况及治疗史</th><th colspan="4" $style>#displayValue($record.JKZTJZLS)</th></tr><tr><th $bold colspan="5">分析、评估与咨询方案</th></tr><tr><th $style>评估诊断</th><th colspan="4" $style>#displayValue($record.PGZD)</th></tr><tr><th $style>咨询目标</th><th colspan="4" $style>#displayValue($record.ZXMB)</th></tr><tr><th $style>咨询方法</th><th colspan="4" $style>#displayValue($record.ZXFF)</th></tr>#end
</table>3.3、导出word

接口:

结果:
