需求背景:
鼠标悬浮在图片上 出现编辑按钮 点击编辑 对该图片进行编辑(输入文案、涂鸦、标记、裁剪等)
可以体验一下它线上编辑器
Image-editor | TOAST UI :: Make Your Web Delicious!
使用
- 首先在你的前端项目中安装:
npm i tui-image-editor
// or
yarn add tui-image-editor
我是封装成一个单独的组件 使用的时候直接引入就行
- 新建一个.vue文件
-
<template><div class="container"><div id="tui-image-editor"></div><div slot="footer" class="dialog-footer"><el-button size="mini" @click="close">取消</el-button><el-button size="mini" type="primary" @click="uploadImg">完成并保存</el-button></div></div><!-- <el-dialog append-to-body :visible.sync="editor" :before-close="closeFun" title="详情" top="0" width="95%"><div class="container"><div id="tui-image-editor"></div></div><span slot="footer" class="dialog-footer"><el-button size="mini">下载</el-button><el-button size="mini">保存至服务器</el-button></span></el-dialog> -->
</template>
<script>
import {getSubToken} from '@/api/index'
import 'tui-image-editor/dist/tui-image-editor.css';
import 'tui-color-picker/dist/tui-color-picker.css';
const ImageEditor = require('tui-image-editor');
const localeZh = {// override default English locale to your customCrop: '裁剪',DeleteAll: '全部删除',Delete: '删除',Undo: '撤销',Redo: '反撤销',Reset: '重置',Flip: '镜像',Rotate: '旋转',Draw: '画',Shape: '形状标注',Icon: '图标标注',Text: '文字标注',Mask: '遮罩',Filter: '滤镜',Bold: '加粗',Italic: '斜体',Underline: '下划线',Left: '左对齐',Center: '居中',Right: '右对齐',Color: '颜色','Text size': '字体大小',Custom: '自定义',Square: '正方形',Apply: '应用',Cancel: '取消','Flip X': 'X 轴','Flip Y': 'Y 轴',Range: '区间',Stroke: '描边',Fill: '填充',Circle: '圆',Triangle: '三角',Rectangle: '矩形',Free: '曲线',Straight: '直线',Arrow: '箭头','Arrow-2': '箭头2','Arrow-3': '箭头3','Star-1': '星星1','Star-2': '星星2',Polygon: '多边形',Location: '定位',Heart: '心形',Bubble: '气泡','Custom icon': '自定义图标','Load Mask Image': '加载蒙层图片',Grayscale: '灰度',Blur: '模糊',Sharpen: '锐化',Emboss: '浮雕','Remove White': '除去白色',Distance: '距离',Brightness: '亮度',Noise: '噪音','Color Filter': '彩色滤镜',Sepia: '棕色',Sepia2: '棕色2',Invert: '负片',Pixelate: '像素化',Threshold: '阈值',Tint: '色调',Multiply: '正片叠底',Blend: '混合色'// etc...
};
const customTheme = {// image 坐上角度图片'common.bi.image': '', // 在这里换上你喜欢的logo图片'common.bisize.width': '0px','common.bisize.height': '0px','common.backgroundImage': 'none','common.backgroundColor': '#f3f4f6','common.border': '1px solid #444',// header'header.backgroundImage': 'none','header.backgroundColor': '#f3f4f6','header.border': '0px','header.display': 'none',// load button'loadButton.backgroundColor': '#fff','loadButton.border': '1px solid #ddd','loadButton.color': '#222','loadButton.fontFamily': 'NotoSans, sans-serif','loadButton.fontSize': '12px','loadButton.display': 'none', // 可以直接隐藏掉// download button'downloadButton.backgroundColor': '#fdba3b','downloadButton.border': '1px solid #fdba3b','downloadButton.color': '#fff','downloadButton.fontFamily': 'NotoSans, sans-serif','downloadButton.fontSize': '12px','downloadButton.display': 'none', // 可以直接隐藏掉// icons default'menu.normalIcon.color': '#8a8a8a','menu.activeIcon.color': '#555555','menu.disabledIcon.color': '#434343','menu.hoverIcon.color': '#e9e9e9','submenu.normalIcon.color': '#8a8a8a','submenu.activeIcon.color': '#e9e9e9','menu.iconSize.width': '24px','menu.iconSize.height': '24px','submenu.iconSize.width': '32px','submenu.iconSize.height': '32px',// submenu primary color'submenu.backgroundColor': '#1e1e1e','submenu.partition.color': '#858585',// submenu labels'submenu.normalLabel.color': '#858585','submenu.normalLabel.fontWeight': 'lighter','submenu.activeLabel.color': '#fff','submenu.activeLabel.fontWeight': 'lighter',// checkbox style'checkbox.border': '1px solid #ccc','checkbox.backgroundColor': '#fff',// rango style'range.pointer.color': '#fff','range.bar.color': '#666','range.subbar.color': '#d1d1d1','range.disabledPointer.color': '#414141','range.disabledBar.color': '#282828','range.disabledSubbar.color': '#414141','range.value.color': '#fff','range.value.fontWeight': 'lighter','range.value.fontSize': '11px','range.value.border': '1px solid #353535','range.value.backgroundColor': '#151515','range.title.color': '#fff','range.title.fontWeight': 'lighter',// colorpicker style'colorpicker.button.border': '1px solid #1e1e1e','colorpicker.title.color': '#fff'
};
export default {props: ['editor', 'editImgUrl', 'editFile'],watch: {'editImgUrl': {deep: true,handler: function (newVal, oldVal) {console.log(newVal, oldVal, '000000000000000')}}},data () {return {instance: null};},mounted () {this.init()},methods: {init () {this.instance = new ImageEditor(document.querySelector('#tui-image-editor'),{includeUI: {loadImage: {path: this.editImgUrl,name: 'image'},initMenu: 'draw',menu: ['crop', // 裁切'draw', // 添加绘画'text', // 添加文本'rotate', // 旋转'flip' // 翻转// 'shape', // 添加形状// 'icon', // 添加图标// 'mask', // 添加覆盖// 'filter' // 添加滤镜],menuBarPosition: 'bottom',locale: localeZh,theme: customTheme,cssMaxWidth: 800,cssMaxHeight: 500}});document.getElementsByClassName('tui-image-editor-main')[0].style.top = 0;// document.querySelector('[tooltip-content="ZoomIn"]').style.display = 'none' // 放大// document.querySelector('[tooltip-content="ZoomOut"]').style.display = 'none' // 缩小document.querySelector('[tooltip-content="Hand"]').style.display = 'none' // 拖动界面document.querySelector('[tooltip-content="History"]').style.display = 'none'document.querySelector('.tie-btn-deleteAll').style.display = 'none' // 清空},uploadImg () {const base64String = this.instance.toDataURL();const data = window.atob(base64String.split(',')[1]);const ia = new Uint8Array(data.length);for (let i = 0; i < data.length; i++) {ia[i] = data.charCodeAt(i);}const blob = new Blob([ia], { type: 'image/png' });var abc = new File([blob], this.editFile.fileName, {type: 'image/png', lastModified: Date.now()});const file = new FormData();console.log(abc)file.append('file', abc);// axios请求代码...},close () {this.$emit('close')}}
};
</script><style lang="scss" scoped>
.container {height: 100%;text-align: left;
}
.dialog-footer{position: absolute;bottom: 8px;right: 10px;
}
</style>
默认的样式如下

说明:直接按照官方的 有很多东西是我们不需要的比如上面的logo 和右上角的按钮 可以通过自定义样式去掉 参考代码里的customTheme 还有官方的提示都是英文的 所以需要汉化 参考代码里的localeZh
调整完之后

引用组件
import tuiImageEditor from '../../tuiImageEditor';
components: { tuiImageEditor },
<el-dialog class="body" append-to-body :visible.sync="editor" :before-close="close" title="编辑" top="0" width="95%"><tui-image-editor ref="tuiImageEditor" :editor="editor" :editImgUrl='editImgUrl' :editFile="editFile"@close="close" @uploadImg="uploadImg"></tui-image-editor></el-dialog>有很多涉及传值的地方 可以根据自己项目的场景删掉或者替换
到这里就差不多可以了 说下我遇到的问题
1.刚开始的时候 我的悬浮气泡里文字样式错位 我自己重新安装了一下 就又好了
2.我的需求是在弹窗内编辑 所以理所当然的是把这个编辑器放在弹窗里再装成组件之后 但是引入后 就报错 不知道啥原因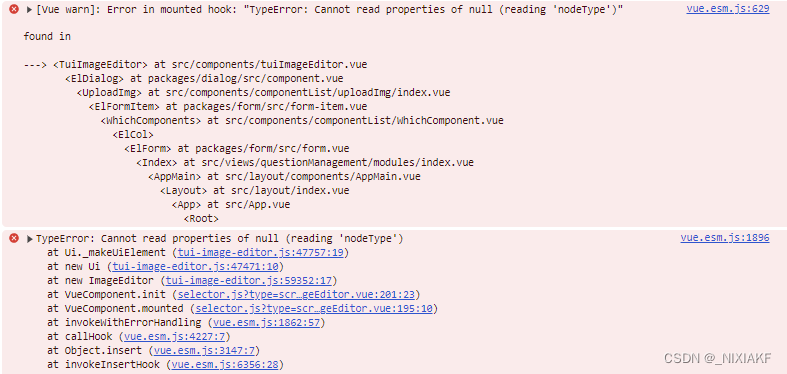 所以我就在引入组件的时候 用弹窗包起来 大家如果有知道原因的 欢迎评论区留言
