一、基本使用
Thread、Runnable、FutureTask
Java多线程-CSDN博客![]() https://blog.csdn.net/m0_71534259/article/details/132381495?spm=1001.2014.3001.5501
https://blog.csdn.net/m0_71534259/article/details/132381495?spm=1001.2014.3001.5501
二、查看进程线程的方法
windows
任务管理器可以查看进程和线程数,也可以用来杀死进程
tasklist 查看进程
taskkill 杀死进程
linux
ps - fe 查看所有进程
ps - fT - p <PID> 查看某个进程( PID )的所有线程
kill 杀死进程
top 按大写 H 切换是否显示线程
top - H - p <PID> 查看某个进程( PID )的所有线程
Java
jps 命令查看所有 Java 进程
jstack <PID> 查看某个 Java 进程( PID )的所有线程状态
jconsole 来查看某个 Java 进程中线程的运行情况(图形界面)
jconsole 远程监控配置
需要以如下方式运行你的 java 类
java -Djava.rmi.server.hostname=ip地址 -Dcom.sun.management.jmxremote -
Dcom.sun.management.jmxremote.port=连接端口 -Dcom.sun.management.jmxremote.ssl=是否安全连接 -
Dcom.sun.management.jmxremote.authenticate=是否认证 java类
修改 /etc/hosts 文件将 127.0.0.1 映射至主机名
如果要认证访问,还需要做如下步骤
复制 jmxremote.password 文件
修改 jmxremote.password 和 jmxremote.access 文件的权限为 600 即文件所有者可读写
连接时填入 controlRole (用户名), R&D (密码)
三、线程的常见方法

(一)、run与start
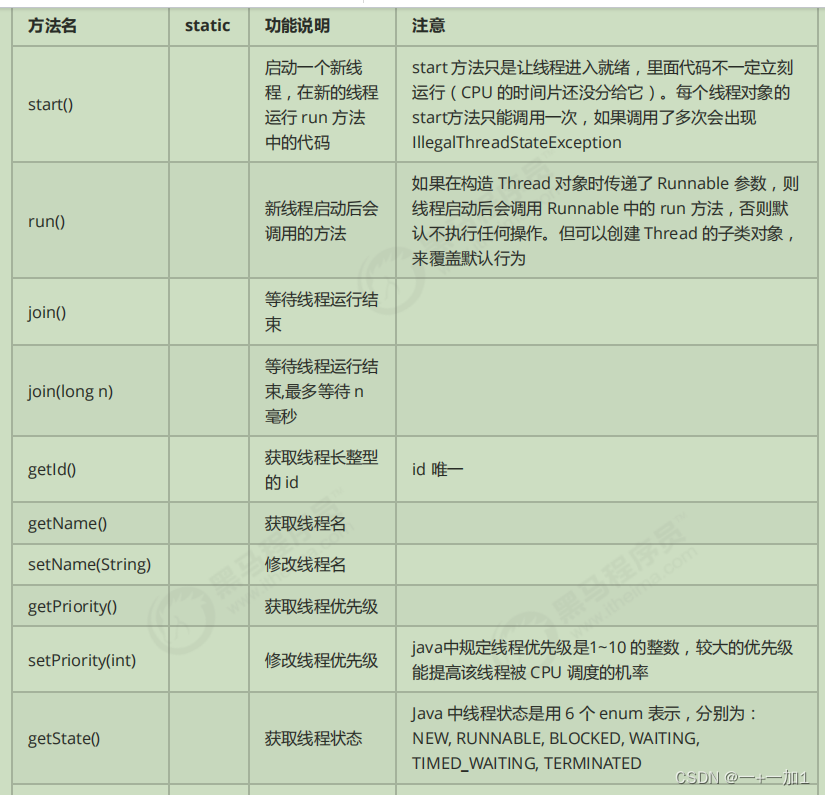
直接调用 run 是在主线程中执行了 run ,没有启动新的线程
使用 start 是启动新的线程,通过新的线程间接执行 run 中的代码
(二)、sleep与yield
sleep
1. 调用 sleep 会让当前线程从 Running 进入 Timed Waiting 状态(阻塞)
2. 其它线程可以使用 interrupt 方法打断正在睡眠的线程,这时 sleep 方法会抛出 InterruptedException
3. 睡眠结束后的线程未必会立刻得到执行
4. 建议用 TimeUnit 的 sleep 代替 Thread 的 sleep 来获得更好的可读性
yield
1. 调用 yield 会让当前线程从 Running 进入 Runnable 就绪状态,然后调度执行其它线程
2. 具体的实现依赖于操作系统的任务调度器
(三)、interrupt 方法详解
1、打断 sleep,wait,join 的线程
这几个方法都会让线程进入阻塞状态
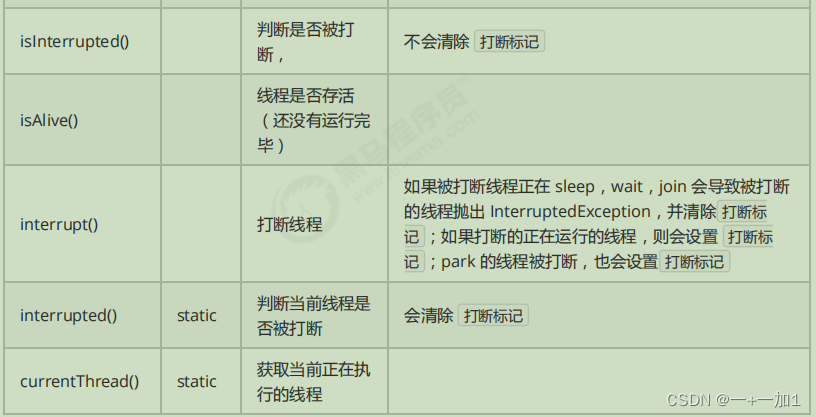
打断 这些 线程,会抛出InterruptedException异常,会清空打断状态( isInterrupted = false ),同时并不会退出当前线程,只是打断了当前状态(如打断睡眠状态。)
2、打断正常运行的线程
打断正常运行的线程 , 不会清空打断状态
private static void test2() throws InterruptedException {Thread t2 = new Thread(()->{while(true) {Thread current = Thread.currentThread();boolean interrupted = current.isInterrupted();if(interrupted) {log.debug(" 打断状态: {}", interrupted);break;}}}, "t2");t2.start();sleep(0.5);t2.interrupt();
}正常运行的线程被interrupt()后,并不是直接终止线程,而是把打断标记置为true,然后由编程者确定是否打断,isInterrupted 也不会重置,isInterrupted = true
3、两阶段终止(优雅的终止线程)
package com.itcast.test;import lombok.extern.slf4j.Slf4j;@Slf4j(topic = "c.Test5")
public class Test5 {public static void main(String[] args) throws InterruptedException {TwoPhaseTermination twoPhaseTermination = new TwoPhaseTermination();twoPhaseTermination.start();Thread.sleep(3500);twoPhaseTermination.stop();}
}@Slf4j(topic = "c.TwoPhaseTermination")
class TwoPhaseTermination{private Thread monitor;public void start(){monitor = new Thread(new Runnable() {@Overridepublic void run() {while (true){Thread current = Thread.currentThread();if (current.isInterrupted()){log.debug("进程结束之前进行的工作(料理后事)");break;}try {Thread.sleep(1000);  //睡眠过程中被打断,抛出异常,isInterrupted重置为falselog.debug("执行业务的相关功能"); //此时被打断,直接在下次循环中执行打断程序} catch (InterruptedException e){log.debug("在睡眠时被打断");current.interrupt(); //将打断标记重新置为true,下次循环时执行结束程序}}}});monitor.start();}public void stop(){monitor.interrupt();}
}
4、打断 park 线程
打断 park 线程 , 不会清空打断状态
private static void test3() throws InterruptedException {Thread t1 = new Thread(() -> {log.debug("park...");LockSupport.park();log.debug("unpark...");log.debug("打断状态:{}", Thread.currentThread().isInterrupted());}, "t1");t1.start();sleep(0.5);t1.interrupt();
}
如果打断标记已经是 true, 则 park 会失效
可以使用 Thread.interrupted() 清除打断状态
private static void test4() {Thread t1 = new Thread(() -> {for (int i = 0; i < 5; i++) {log.debug("park...");LockSupport.park();log.debug("打断状态:{}", Thread.currentThread().isInterrupted());}});t1.start();sleep(1);t1.interrupt();
}
(四)、主线程与守护线程
默认情况下, Java 进程需要等待所有线程都运行结束,才会结束。有一种特殊的线程叫做守护线程,只要其它非守 护线程运行结束了,即使守护线程的代码没有执行完,也会强制结束。
// 设置该线程为守护线程
t1.setDaemon(true);
垃圾回收器线程就是一种守护线程
Tomcat 中的 Acceptor 和 Poller 线程都是守护线程,所以 Tomcat 接收到 shutdown 命令后,不会等
待它们处理完当前请求
四、线程的状态
(一)、五种状态
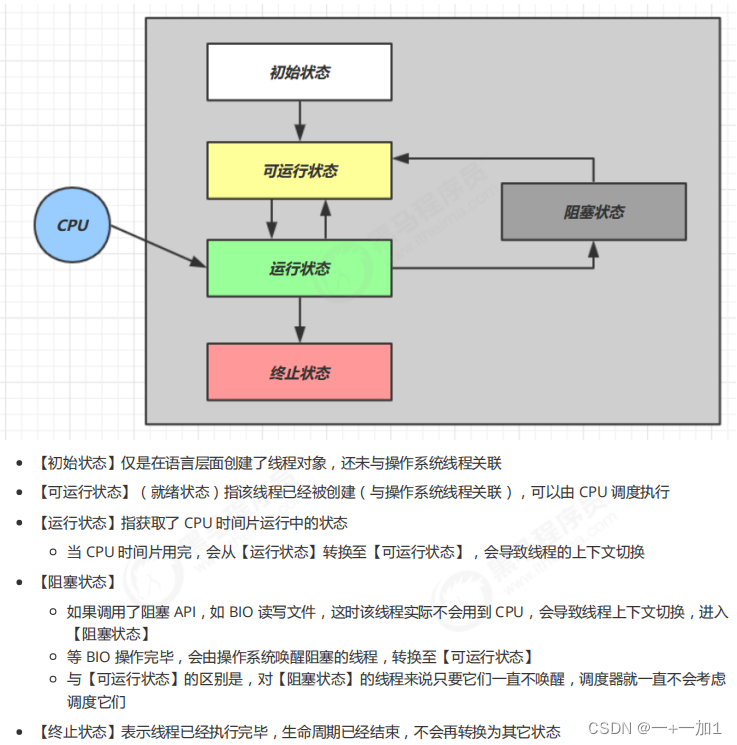
(二)、六种状态
这是从 Java API 层面来描述的
根据 Thread.State 枚举,分为六种状态

NEW 线程刚被创建,但是还没有调用 start() 方法
RUNNABLE 当调用了 start() 方法之后,注意, Java API 层面的 RUNNABLE 状态涵盖了 操作系统 层面的 【可运行状态】、【运行状态】和【阻塞状态】(由于 BIO 导致的线程阻塞,在 Java 里无法区分,仍然认为 是可运行)
BLOCKED(例如因为得不到锁导致的阻塞) , WAITING(例如join(),一直等待造成的阻塞) , TIMED_WAITING(例如sleep()时的阻塞状态) 都是 Java API 层面对【阻塞状态】的细分,后面会在状态转换一节 详述
TERMINATED 当线程代码运行结束
五、共享模型之无锁
(一)、CAS 与 volatile
class AccountSafe {private AtomicInteger balance;public AccountSafe(Integer balance) {this.balance = new AtomicInteger(balance);}public Integer getBalance() {return balance.get();}public void withdraw(Integer amount) {while (true) {int prev = balance.get();int next = prev - amount;if (balance.compareAndSet(prev, next)) {break;}}// 可以简化为下面的方法// balance.addAndGet(-1 * amount);}
}
获取共享变量时,为了保证该变量的可见性,需要使用 volatile 修饰。
它可以用来修饰成员变量和静态成员变量,他可以避免线程从自己的工作缓存中查找变量的值,必须到主存中获取它的值,线程操作 volatile 变量都是直接操作主存。即一个线程对 volatile 变量的修改,对另一个线程可见。
注意
volatile 仅仅保证了共享变量的可见性,让其它线程能够看到最新值,但不能解决指令交错问题(不能保证原
子性)
CAS 必须借助 volatile 才能读取到共享变量的最新值来实现【比较并交换】的效果
(二)、原子整数
J.U.C 并发包提供了:
- AtomicBoolean
- AtomicInteger
- AtomicLong
以 AtomicInteger 为例
AtomicInteger i = new AtomicInteger(0);
// 获取并自增(i = 0, 结果 i = 1, 返回 0),类似于 i++
System.out.println(i.getAndIncrement());
// 自增并获取(i = 1, 结果 i = 2, 返回 2),类似于 ++i
System.out.println(i.incrementAndGet());
// 自减并获取(i = 2, 结果 i = 1, 返回 1),类似于 --i
System.out.println(i.decrementAndGet());
// 获取并自减(i = 1, 结果 i = 0, 返回 1),类似于 i--
System.out.println(i.getAndDecrement());
// 获取并加值(i = 0, 结果 i = 5, 返回 0)
System.out.println(i.getAndAdd(5));
// 加值并获取(i = 5, 结果 i = 0, 返回 0)
System.out.println(i.addAndGet(-5));
// 获取并更新(i = 0, p 为 i 的当前值, 结果 i = -2, 返回 0)
// 其中函数中的操作能保证原子,但函数需要无副作用
System.out.println(i.getAndUpdate(p -> p - 2));
// 更新并获取(i = -2, p 为 i 的当前值, 结果 i = 0, 返回 0)
// 其中函数中的操作能保证原子,但函数需要无副作用
System.out.println(i.updateAndGet(p -> p + 2));
// 获取并计算(i = 0, p 为 i 的当前值, x 为参数1, 结果 i = 10, 返回 0)
// 其中函数中的操作能保证原子,但函数需要无副作用
// getAndUpdate 如果在 lambda 中引用了外部的局部变量,要保证该局部变量是 final 的
// getAndAccumulate 可以通过 参数1 来引用外部的局部变量,但因为其不在 lambda 中因此不必是 final
System.out.println(i.getAndAccumulate(10, (p, x) -> p + x));
// 计算并获取(i = 10, p 为 i 的当前值, x 为参数1, 结果 i = 0, 返回 0)
// 其中函数中的操作能保证原子,但函数需要无副作用
System.out.println(i.accumulateAndGet(-10, (p, x) -> p + x));
(三)、原子引用(更改引用本身)
为什么需要原子引用类型?
- AtomicReference
- AtomicMarkableReference
- AtomicStampedReference
有如下方法
1、AtomicReference
public interface DecimalAccount {// 获取余额BigDecimal getBalance();// 取款void withdraw(BigDecimal amount);/*** 方法内会启动 1000 个线程,每个线程做 -10 元 的操作* 如果初始余额为 10000 那么正确的结果应当是 0*/static void demo(DecimalAccount account) {List<Thread> ts = new ArrayList<>();for (int i = 0; i < 1000; i++) {ts.add(new Thread(() -> {account.withdraw(BigDecimal.TEN);}));}ts.forEach(Thread::start);ts.forEach(t -> {try {t.join();} catch (InterruptedException e) {e.printStackTrace();}});System.out.println(account.getBalance());}
}
class DecimalAccountSafeCas implements DecimalAccount {AtomicReference<BigDecimal> ref;public DecimalAccountSafeCas(BigDecimal balance) {ref = new AtomicReference<>(balance);}@Overridepublic BigDecimal getBalance() {return ref.get();}@Overridepublic void withdraw(BigDecimal amount) {while (true) {BigDecimal prev = ref.get();BigDecimal next = prev.subtract(amount);if (ref.compareAndSet(prev, next)) {break;}}}
}2、AtomicStampedReference
ABA问题
A->B->A 在比对时最终仍然是A,仍然可以进行
ABA问题的解决
static AtomicStampedReference<String> ref = new AtomicStampedReference<>("A", 0);
public static void main(String[] args) throws InterruptedException {log.debug("main start...");// 获取值 AString prev = ref.getReference();// 获取版本号int stamp = ref.getStamp();log.debug("版本 {}", stamp);// 如果中间有其它线程干扰,发生了 ABA 现象other();sleep(1);// 尝试改为 Clog.debug("change A->C {}", ref.compareAndSet(prev, "C", stamp, stamp + 1));
}
private static void other() {new Thread(() -> {log.debug("change A->B {}", ref.compareAndSet(ref.getReference(), "B",ref.getStamp(), ref.getStamp() + 1));log.debug("更新版本为 {}", ref.getStamp());}, "t1").start();sleep(0.5);new Thread(() -> {log.debug("change B->A {}", ref.compareAndSet(ref.getReference(), "A",ref.getStamp(), ref.getStamp() + 1));log.debug("更新版本为 {}", ref.getStamp());}, "t2").start();
}3、AtomicMarkableReference
简化版的AtomicStampedReference
public class TestABAAtomicMarkableReference {public static void main(String[] args) throws InterruptedException {GarbageBag bag = new GarbageBag("装满了垃圾");// 参数2 mark 可以看作一个标记,表示垃圾袋满了AtomicMarkableReference<GarbageBag> ref = new AtomicMarkableReference<>(bag, true);log.debug("主线程 start...");GarbageBag prev = ref.getReference();log.debug(prev.toString());new Thread(() -> {log.debug("打扫卫生的线程 start...");bag.setDesc("空垃圾袋");while (!ref.compareAndSet(bag, bag, true, false)) {}log.debug(bag.toString());}).start();Thread.sleep(1000);log.debug("主线程想换一只新垃圾袋?");boolean success = ref.compareAndSet(prev, new GarbageBag("空垃圾袋"), true, false);log.debug("换了么?" + success);log.debug(ref.getReference().toString());}
}
(四)、原子数组(改变引用所指向的内容)

- AtomicIntegerArray
- AtomicLongArray
- AtomicReferenceArray
(五)、字段更新器
- AtomicReferenceFieldUpdater // 域 字段
- AtomicIntegerFieldUpdater
- AtomicLongFieldUpdater
利用字段更新器,可以针对对象的某个域( Field )进行原子操作,只能配合 volatile 修饰的字段使用,否则会出现异常
public class Test5 {private volatile int field;public static void main(String[] args) {AtomicIntegerFieldUpdater fieldUpAtomicIntegerFieldUpdater.newUpdater(Test5.class, "field");Test5 test5 = new Test5();fieldUpdater.compareAndSet(test5, 0, 10);// 修改成功 field = 10System.out.println(test5.field);// 修改成功 field = 20fieldUpdater.compareAndSet(test5, 10, 20);System.out.println(test5.field);// 修改失败 field = 20fieldUpdater.compareAndSet(test5, 10, 30);System.out.println(test5.field);}
}
(六)、原子累加器
LongAdder
(七)、Unsafe
Unsafe 对象提供了非常底层的,操作内存、线程的方法, Unsafe 对象不能直接调用,只能通过反射获得
public class UnsafeAccessor {static Unsafe unsafe;static {try {Field theUnsafe = Unsafe.class.getDeclaredField("theUnsafe");theUnsafe.setAccessible(true);unsafe = (Unsafe) theUnsafe.get(null);} catch (NoSuchFieldException | IllegalAccessException e) {throw new Error(e);}}static Unsafe getUnsafe() {return unsafe;}
}
Unsafe CAS 操作
@Data
class Student {volatile int id;volatile String name;
}
Unsafe unsafe = UnsafeAccessor.getUnsafe();
Field id = Student.class.getDeclaredField("id");
Field name = Student.class.getDeclaredField("name");
// 获得成员变量的偏移量
long idOffset = UnsafeAccessor.unsafe.objectFieldOffset(id);
long nameOffset = UnsafeAccessor.unsafe.objectFieldOffset(name);Student student = new Student();
// 使用 cas 方法替换成员变量的值
UnsafeAccessor.unsafe.compareAndSwapInt(student, idOffset, 0, 20); // 返回 true
UnsafeAccessor.unsafe.compareAndSwapObject(student, nameOffset, null, "张三"); // 返回 trueSystem.out.println(student);六、共享模型之不可变
(一)、不可变日期类
如果一个对象在不能够修改其内部状态(属性),那么它就是线程安全的,因为不存在并发修改啊!这样的对象在Java 中有很多,例如在 Java 8 后,提供了一个新的日期格式化类
DateTimeFormatter dtf = DateTimeFormatter.ofPattern("yyyy-MM-dd");
for (int i = 0; i < 10; i++) {new Thread(() -> {LocalDate date = dtf.parse("2018-10-01", LocalDate::from);log.debug("{}", date);}).start();}
七、线程池
(一)、自定义线程池
1、自定义拒绝策略接口
当等待队列满了的时候,采取什么拒绝策略
@FunctionalInterface // 拒绝策略
interface RejectPolicy<T> {void reject(BlockingQueue<T> queue, T task);
}2、自定义任务队列
@FunctionalInterface // 任务队列已满时再向其中添加任务的拒绝策略
interface RejectPolicy<T> {void reject(BlockingQueue<T> queue, T task);
}@Slf4j
class BlockingQueue<T> {// 1. 任务队列private Deque<T> queue = new ArrayDeque<>();// 2. 锁private ReentrantLock lock = new ReentrantLock();// 3. 生产者条件变量private Condition fullWaitSet = lock.newCondition();// 4. 消费者条件变量private Condition emptyWaitSet = lock.newCondition();// 5. 容量private int capcity;public BlockingQueue(int capcity) {this.capcity = capcity;}// 带超时阻塞获取(在任务队列中取出一个任务,如果队列为空等待超出时间则返回null)public T poll(long timeout, TimeUnit unit) {lock.lock();try {// 将 timeout 统一转换为 纳秒long nanos = unit.toNanos(timeout);while (queue.isEmpty()) {try {// 返回值是剩余时间if (nanos <= 0) {return null;}nanos = emptyWaitSet.awaitNanos(nanos);} catch (InterruptedException e) {e.printStackTrace();}}T t = queue.removeFirst();fullWaitSet.signal();return t;} finally {lock.unlock();}}// 阻塞获取(在任务队列中取出一个任务,如果队列为空则一直等待)public T take() {lock.lock();try {while (queue.isEmpty()) {try {emptyWaitSet.await();} catch (InterruptedException e) {e.printStackTrace();}}T t = queue.removeFirst();fullWaitSet.signal();return t;} finally {lock.unlock();}}// 阻塞添加(向队列中添加一个任务,如果队列已满则一直等待)public void put(T task) {lock.lock();try {while (queue.size() == capcity) {try {log.debug("等待加入任务队列 {} ...", task);fullWaitSet.await();} catch (InterruptedException e) {e.printStackTrace();}}log.debug("加入任务队列 {}", task);queue.addLast(task);emptyWaitSet.signal();} finally {lock.unlock();}}// 带超时时间阻塞添加(向队列中添加一个任务,添加成功返回true,如果队列已满则等待一段时间,然后返回false)public boolean offer(T task, long timeout, TimeUnit timeUnit) {lock.lock();try {long nanos = timeUnit.toNanos(timeout);while (queue.size() == capcity) {try {if (nanos <= 0) {return false;}log.debug("等待加入任务队列 {} ...", task);nanos = fullWaitSet.awaitNanos(nanos);} catch (InterruptedException e) {e.printStackTrace();}}log.debug("加入任务队列 {}", task);queue.addLast(task);emptyWaitSet.signal();return true;} finally {lock.unlock();}}//返回当前任务队列的大小public int size() {lock.lock();try {return queue.size();} finally {lock.unlock();}}//向任务队列添加一个任务public void tryPut(RejectPolicy<T> rejectPolicy, T task) {lock.lock();try {// 判断队列是否满if (queue.size() == capcity) { //任务队列已满//制定任务队列已满时的拒绝策略//具体的拒绝策略由调用者指定,封装在RejectPolicy接口中,由用户实现拒绝策略//在rejectPolicy的reject方法中,用户可以调用上面的put()或offer()或其他方法。rejectPolicy.reject(this, task);} else { // 有空闲log.debug("加入任务队列 {}", task);queue.addLast(task);emptyWaitSet.signal();}} finally {lock.unlock();}}
}3、自定义线程池
@Slf4j
class ThreadPool {// 任务队列private BlockingQueue<Runnable> taskQueue;// 线程集合private HashSet<Worker> workers = new HashSet<>();// 核心线程数private int coreSize;// 获取任务时的超时时间private long timeout;//时间单位private TimeUnit timeUnit;//创建线程池时实现的拒绝策略private RejectPolicy<Runnable> rejectPolicy;public ThreadPool(int coreSize, long timeout, TimeUnit timeUnit, int queueCapcity,RejectPolicy<Runnable> rejectPolicy) {this.coreSize = coreSize;this.timeout = timeout;this.timeUnit = timeUnit;this.taskQueue = new BlockingQueue<>(queueCapcity);this.rejectPolicy = rejectPolicy;}// 执行任务public void execute(Runnable task) {// 当任务数没有超过 coreSize 时,直接交给 worker 对象执行// 如果任务数超过 coreSize 时,加入任务队列暂存synchronized (workers) {if (workers.size() < coreSize) {  //任务的数量小于核心线程数Worker worker = new Worker(task);log.debug("新增 worker{}, {}", worker, task);workers.add(worker);//直接开启线程执行任务worker.start();} else {  //任务数大于核心线程数//向任务队列中添加任务// taskQueue.put(task);// 1) 死等// 2) 带超时等待// 3) 让调用者放弃任务执行// 4) 让调用者抛出异常// 5) 让调用者自己执行任务taskQueue.tryPut(rejectPolicy, task); //主线程调用时在rejectPolicy中实现拒绝策略}}}class Worker extends Thread {private Runnable task;public Worker(Runnable task) {this.task = task;}@Overridepublic void run() {// 执行任务// 1) 当 task 不为空,直接执行任务// 2) 当 task 执行完毕,再接着从任务队列获取任务并执行// while(task != null || (task = taskQueue.take()) != null) {  //当任务队列为空时,当前线程一直等待、空转while (task != null || (task = taskQueue.poll(timeout, timeUnit)) != null) {  //当任务队列为空时,等待一段时间,超过时间后当前线程结束try {log.debug("正在执行...{}", task);task.run();} catch (Exception e) {e.printStackTrace();} finally {task = null;}}synchronized (workers) {log.debug("worker 被移除{}", this);workers.remove(this);}}}
}
4、测试
public static void main(String[] args) {ThreadPool threadPool = new ThreadPool(1,1000, TimeUnit.MILLISECONDS, 1, (queue, task)->{ //创建线程池时自定义拒绝策略// 1. 死等// queue.put(task);// 2) 带超时等待// queue.offer(task, 1500, TimeUnit.MILLISECONDS);// 3) 让调用者放弃任务执行// log.debug("放弃{}", task);// 4) 让调用者抛出异常// throw new RuntimeException("任务执行失败 " + task);// 5) 让调用者自己执行任务task.run();});for (int i = 0; i < 4; i++) {int j = i;threadPool.execute(new Runnable() {@Overridepublic void run() {try {Thread.sleep(1000L);} catch (InterruptedException e) {e.printStackTrace();}log.debug("{}", j);}});}
}(二)、ThreadPoolExecutor
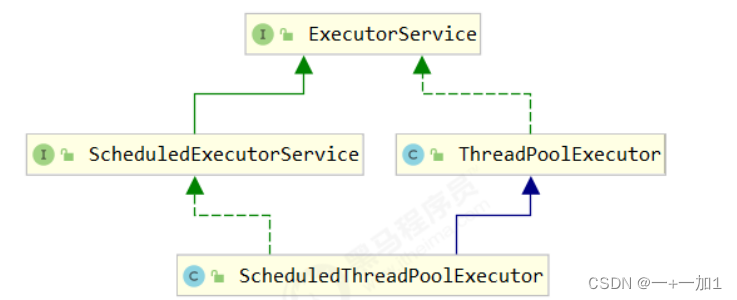
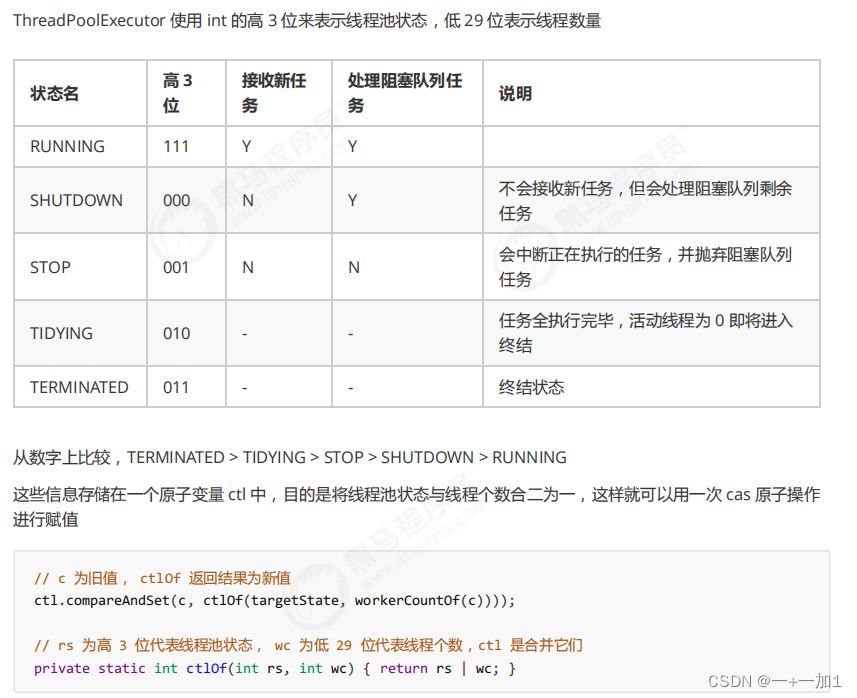
1、线程池状态
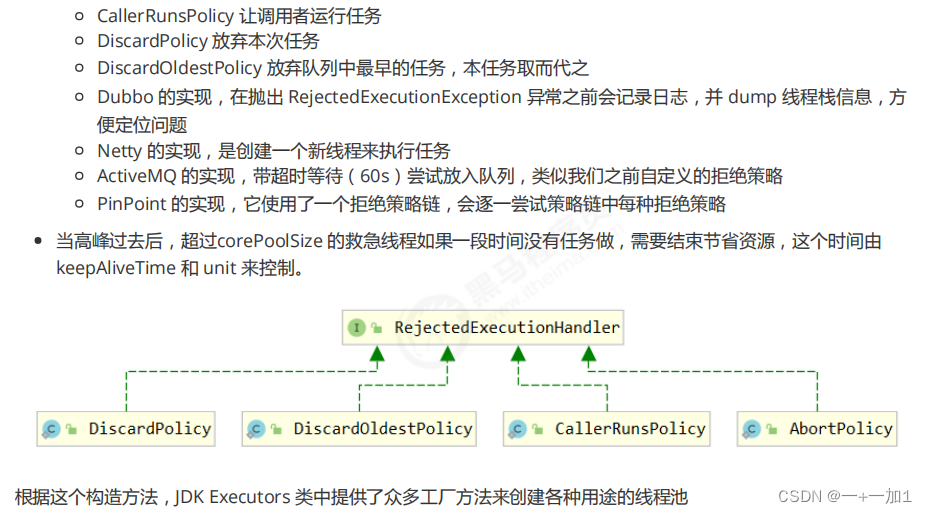
2、构造方法
public ThreadPoolExecutor( int corePoolSize,int maximumPoolSize,long keepAliveTime,TimeUnit unit,BlockingQueue<Runnable> workQueue,ThreadFactory threadFactory,RejectedExecutionHandler handler)- corePoolSize 核心线程数目 (最多保留的线程数)
- maximumPoolSize 最大线程数目
- keepAliveTime 生存时间 - 针对救急线程
- unit 时间单位 - 针对救急线程
- workQueue 阻塞队列
- threadFactory 线程工厂 - 可以为线程创建时起个好名字
- handler 拒绝策略
工作方式:
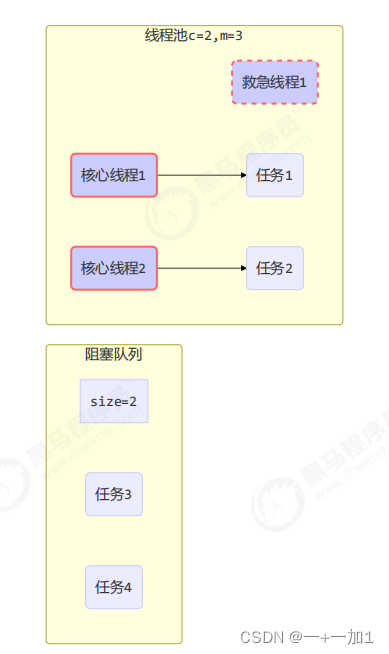

3、newFixedThreadPool
public static ExecutorService newFixedThreadPool(int nThreads) {return new ThreadPoolExecutor(nThreads, nThreads,0L, TimeUnit.MILLISECONDS,new LinkedBlockingQueue<Runnable>());
}
4、newCachedThreadPool
public static ExecutorService newCachedThreadPool() {return new ThreadPoolExecutor(0, Integer.MAX_VALUE,60L, TimeUnit.SECONDS,new SynchronousQueue<Runnable>());
}

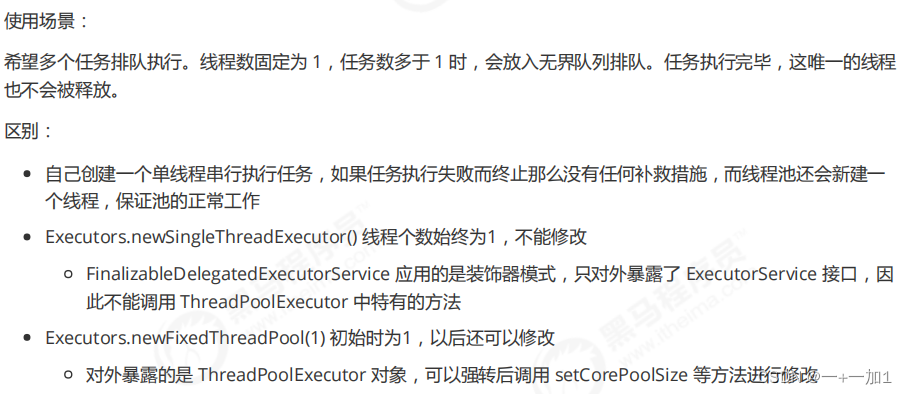
5、newSingleThreadExecutor
public static ExecutorService newSingleThreadExecutor() {return new FinalizableDelegatedExecutorService(new ThreadPoolExecutor(1, 1,0L, TimeUnit.MILLISECONDS,new LinkedBlockingQueue<Runnable>()));
}
6、提交任务
// 执行任务
void execute(Runnable command);
// 提交任务 task,用返回值 Future 获得任务执行结果
<T> Future<T> submit(Callable<T> task);
// 提交 tasks 中所有任务
<T> List<Future<T>> invokeAll(Collection<? extends Callable<T>> tasks)throws InterruptedException;
// 提交 tasks 中所有任务,带超时时间
<T> List<Future<T>> invokeAll(Collection<? extends Callable<T>> tasks,long timeout, TimeUnit unit)throws InterruptedException;
// 提交 tasks 中所有任务,哪个任务先成功执行完毕,返回此任务执行结果,其它任务取消
<T> T invokeAny(Collection<? extends Callable<T>> tasks)throws InterruptedException, ExecutionException;
// 提交 tasks 中所有任务,哪个任务先成功执行完毕,返回此任务执行结果,其它任务取消,带超时时间
<T> T invokeAny(Collection<? extends Callable<T>> tasks,long timeout, TimeUnit unit)throws InterruptedException, ExecutionException, TimeoutException;
7、关闭线程池
(1)、shutdown
/*
线程池状态变为 SHUTDOWN
- 不会接收新任务
- 但已提交任务会执行完(包括正在运行中的任务和在任务队列中的任务)
- 此方法不会阻塞调用线程的执行
*/
void shutdown();
(2)、shutdownNow
/*
线程池状态变为 STOP
- 不会接收新任务
- 会将队列中的任务返回
- 并用 interrupt 的方式中断正在执行的任务
*/
List<Runnable> shutdownNow();
8、任务调度线程池
(1)、Timer
在『任务调度线程池』功能加入之前,可以使用 java.util.Timer 来实现定时功能, Timer 的优点在于简单易用,但由于所有任务都是由同一个线程来调度,因此所有任务都是串行执行的,同一时间只能有一个任务在执行,前一个任务的延迟或异常都将会影响到之后的任务。
public static void main(String[] args) {Timer timer = new Timer();TimerTask task1 = new TimerTask() {@Overridepublic void run() {log.debug("task 1");sleep(2);}};TimerTask task2 = new TimerTask() {@Overridepublic void run() {log.debug("task 2");}};// 使用 timer 添加两个任务,希望它们都在 1s 后执行// 但由于 timer 内只有一个线程来顺序执行队列中的任务,因此『任务1』的延时,影响了『任务2』的执行timer.schedule(task1, 1000);timer.schedule(task2, 1000);
}
任务1执行时间过长会影响任务二的执行
(2)、ScheduledExecutorService
延迟执行
ScheduledExecutorService executor = Executors.newScheduledThreadPool(2);
// 添加两个任务,希望它们都在 1s 后执行
executor.schedule(() -> {System.out.println("任务1,执行时间:" + new Date());try { Thread.sleep(2000); } catch (InterruptedException e) { }}, 1000, TimeUnit.MILLISECONDS);executor.schedule(() -> {System.out.println("任务2,执行时间:" + new Date());}, 1000, TimeUnit.MILLISECONDS);
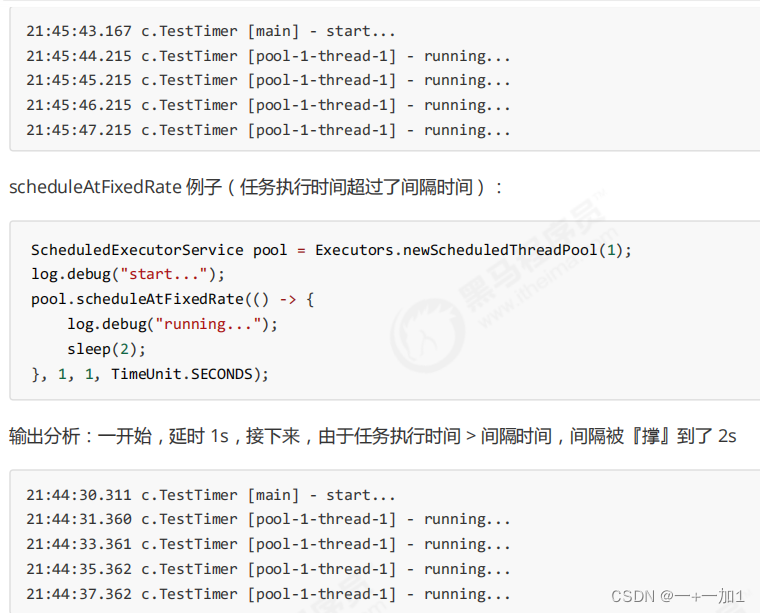
(3)、scheduleAtFixedRate
按固定时间执行
ScheduledExecutorService pool = Executors.newScheduledThreadPool(1);
log.debug("start...");
pool.scheduleAtFixedRate(() -> {log.debug("running...");
}, 1, 1, TimeUnit.SECONDS);
输出
(4)、scheduleWithFixedDelay
ScheduledExecutorService pool = Executors.newScheduledThreadPool(1);
log.debug("start...");
pool.scheduleWithFixedDelay(()-> {log.debug("running...");sleep(2);
}, 1, 1, TimeUnit.SECONDS);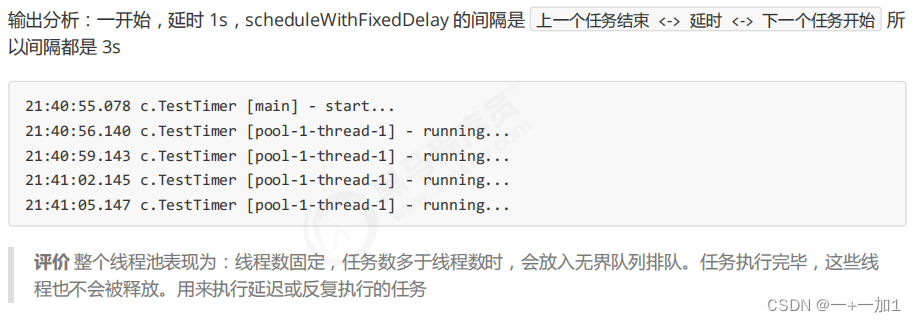
9、正确处理执行任务异常
方法 1 :主动捉异常
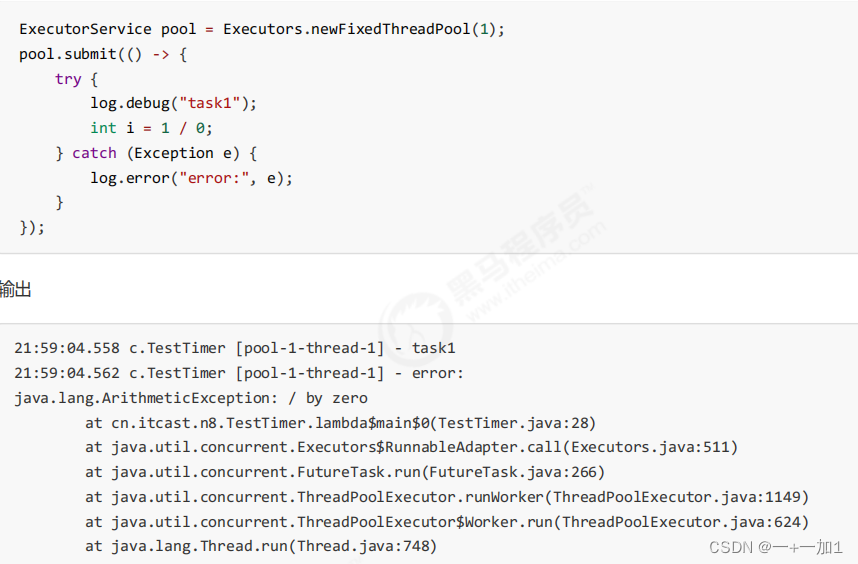
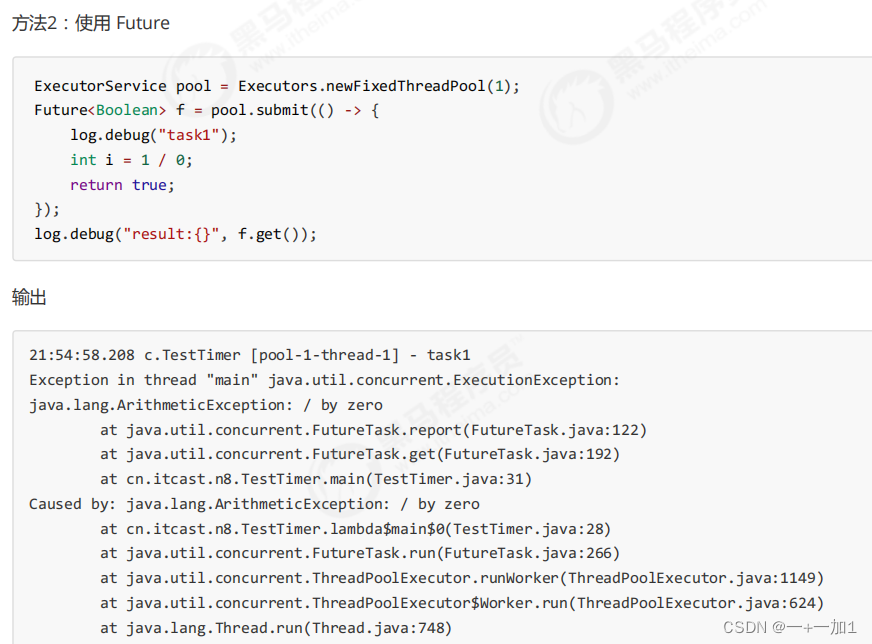
10、定时执行应用
如何让每周四 18:00:00 定时执行任务?
// 获得当前时间
LocalDateTime now = LocalDateTime.now();
// 获取本周四 18:00:00.000
LocalDateTime thursday =now.with(DayOfWeek.THURSDAY).withHour(18).withMinute(0).withSecond(0).withNano(0);
// 如果当前时间已经超过 本周四 18:00:00.000, 那么找下周四 18:00:00.000
if(now.compareTo(thursday)>=0){
thursday=thursday.plusWeeks(1);
}
// 计算时间差,即延时执行时间
long initialDelay=Duration.between(now,thursday).toMillis();
// 计算间隔时间,即 1 周的毫秒值
long oneWeek=7*24*3600*1000;
ScheduledExecutorService executor=Executors.newScheduledThreadPool(2);
System.out.println("开始时间:"+new Date());
executor.scheduleAtFixedRate(()->{
System.out.println("执行时间:"+new Date());
},initialDelay,oneWeek,TimeUnit.MILLISECONDS);(三)、Fork/Join
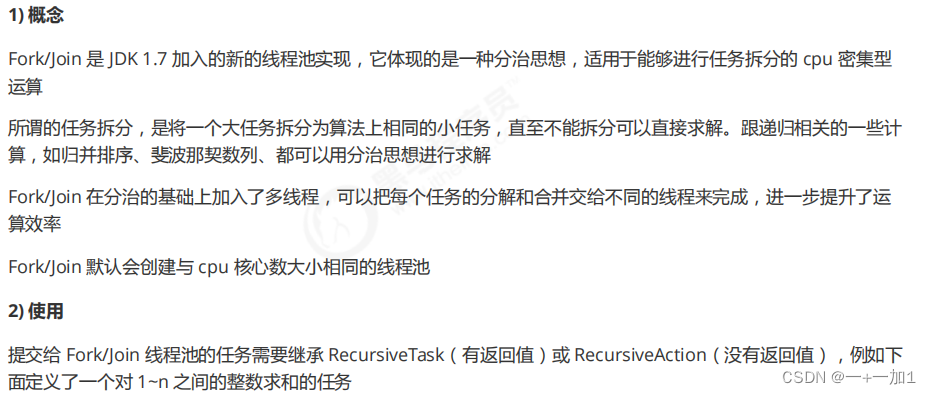
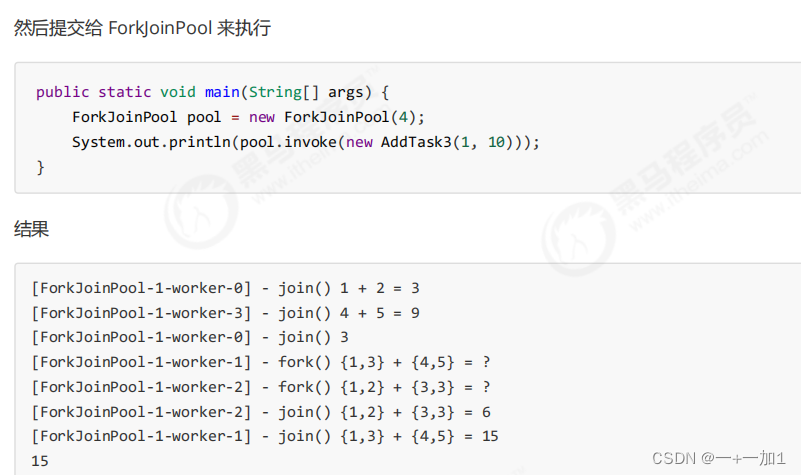
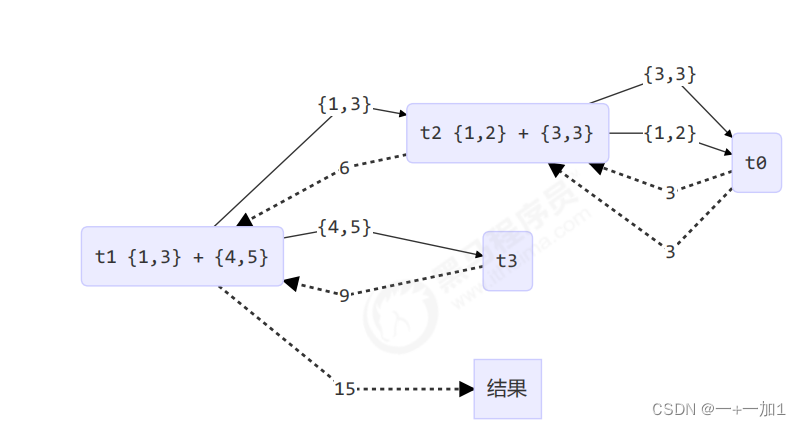
class AddTask3 extends RecursiveTask<Integer> {int begin;int end;public AddTask3(int begin, int end) {this.begin = begin;this.end = end;}@Overridepublic String toString() {return "{" + begin + "," + end + '}';}@Overrideprotected Integer compute() {// 5, 5if (begin == end) {log.debug("join() {}", begin);return begin;}// 4, 5if (end - begin == 1) {log.debug("join() {} + {} = {}", begin, end, end + begin);return end + begin;}// 1 5int mid = (end + begin) / 2; // 3AddTask3 t1 = new AddTask3(begin, mid); // 1,3t1.fork();AddTask3 t2 = new AddTask3(mid + 1, end); // 4,5t2.fork();log.debug("fork() {} + {} = ?", t1, t2);int result = t1.join() + t2.join();log.debug("join() {} + {} = {}", t1, t2, result);return result;}
}
八、读写锁
ReentrantReadWriteLock
StampedLock
九、Semaphore
信号量,用来限制能同时访问共享资源的线程上限。
(一)、基本使用
public static void main(String[] args) {// 1. 创建 semaphore 对象Semaphore semaphore = new Semaphore(3);// 2. 10个线程同时运行for (int i = 0; i < 10; i++) {new Thread(() -> {// 3. 获取许可try {semaphore.acquire();} catch (InterruptedException e) {e.printStackTrace();}try {log.debug("running...");sleep(1);log.debug("end...");} finally {// 4. 释放许可semaphore.release();}}).start();}
}
(二)、应用
实现连接池
@Slf4j(topic = "c.Pool")
class Pool {// 1. 连接池大小private final int poolSize;// 2. 连接对象数组private Connection[] connections;// 3. 连接状态数组 0 表示空闲, 1 表示繁忙private AtomicIntegerArray states;private Semaphore semaphore;// 4. 构造方法初始化public Pool(int poolSize) {this.poolSize = poolSize;// 让许可数与资源数一致this.semaphore = new Semaphore(poolSize);this.connections = new Connection[poolSize];this.states = new AtomicIntegerArray(new int[poolSize]);for (int i = 0; i < poolSize; i++) {connections[i] = new MockConnection("连接" + (i + 1));}}// 5. 借连接public Connection borrow() {// t1, t2, t3// 获取许可try {semaphore.acquire(); // 没有许可的线程,在此等待} catch (InterruptedException e) {e.printStackTrace();}for (int i = 0; i < poolSize; i++) {// 获取空闲连接if (states.get(i) == 0) {if (states.compareAndSet(i, 0, 1)) {log.debug("borrow {}", connections[i]);return connections[i];}}}// 不会执行到这里return null;}// 6. 归还连接public void free(Connection conn) {for (int i = 0; i < poolSize; i++) {if (connections[i] == conn) {states.set(i, 0);log.debug("free {}", conn);semaphore.release();break;}}}
}十、CountdownLatch
用来进行线程同步协作,等待所有线程完成倒计时。
其中构造参数用来初始化等待计数值, await() 用来等待计数归零, countDown() 用来让计数减一
public static void main(String[] args) throws InterruptedException {CountDownLatch latch = new CountDownLatch(3);ExecutorService service = Executors.newFixedThreadPool(4);service.submit(() -> {log.debug("begin...");sleep(1);latch.countDown();log.debug("end...{}", latch.getCount());});service.submit(() -> {log.debug("begin...");sleep(1.5);latch.countDown();log.debug("end...{}", latch.getCount());});service.submit(() -> {log.debug("begin...");sleep(2);latch.countDown();log.debug("end...{}", latch.getCount());});service.submit(()->{try {log.debug("waiting...");latch.await();log.debug("wait end...");} catch (InterruptedException e) {e.printStackTrace();}});
}十一、CyclicBarrier
循环栅栏,用来进行线程协作,等待线程满足某个计数。构造时设置『计数个数』,每个线程执
行到某个需要 “ 同步 ” 的时刻调用 await() 方法进行等待,当等待的线程数满足『计数个数』时,继续执行
CyclicBarrier cb = new CyclicBarrier(2); // 个数为2时才会继续执行
new Thread(()->{System.out.println("线程1开始.."+new Date());try {cb.await(); // 当个数不足时,等待} catch (InterruptedException | BrokenBarrierException e) {e.printStackTrace();}System.out.println("线程1继续向下运行..."+new Date());}).start();new Thread(()->{System.out.println("线程2开始.."+new Date());try { Thread.sleep(2000); } catch (InterruptedException e) { }try {cb.await(); // 2 秒后,线程个数够2,继续运行} catch (InterruptedException | BrokenBarrierException e) {e.printStackTrace();}System.out.println("线程2继续向下运行..."+new Date());}).start();
当数量减为0之后,在调用await方法,仍然会从开始设置的值计数。

