前言
分布式锁主要是解决集群,分布式下数据一致性的问题。在单机的环境下,应用是在同一进程下的,只需要保证单进程多线程环境中的线程安全性,通过 JAVA 提供的 volatile、ReentrantLock、synchronized 以及 concurrent 并发包下一些线程安全的类等就可以做到。
分布式锁的实现主要有以下方式:
-
基于数据库
-
基于分布式协调系统
-
基于缓存
-
基于redis命令。如:setnx等操作
-
基于redis Lua脚本能力(本文介绍的实现方式 redisson)
-
一、Redisson的使用
Redisson 支持单点模式、主从模式、哨兵模式、集群模式,这里以单点模式为例
引入maven依赖
<!-- maven版本号根据项目版本自行调整 -->
<!--redis-->
<dependency><groupId>org.springframework.boot</groupId><artifactId>spring-boot-starter-data-redis</artifactId><version>2.4.0</version>
</dependency>
<!--使用redisson作为分布式锁-->
<dependency><groupId>org.redisson</groupId><artifactId>redisson</artifactId><version>3.16.8</version>
</dependency>
yml配置
spring:redis:# Redis数据库索引(默认为0)database: 0# Redis服务器地址host: 127.0.0.1# Redis服务器连接端口port: 6379# Redis服务器链接密码(默认为空)password:jedis:pool:# 连接池最大链接数(负值表示没有限制)max-active: 20# 连接池最大阻塞等待时间(负值表示没有限制)max-wait: -1# 链接池中最大空闲链接max-idle: 10# 连接池中最小空闲链接min-idle: 0# 链接超市时间(毫秒)timeout: 1000
Redisson配置
@Configuration
public class RedissonConfig {@Value("${spring.redis.host}")private String redisHost;@Value("${spring.redis.password}")private String redisPassword;@Value("${spring.redis.port}")private String port;@Bean@ConditionalOnMissingBeanpublic RedissonClient redissonClient() {Config config = new Config();//单机模式  依次设置redis地址和密码System.out.println(redisHost);// config.useSingleServer().setAddress("redis://" + redisHost + ":" + port).setPassword(redisPassword);// 没有配置redis密码config.useSingleServer().setAddress("redis://" + redisHost + ":" + port);return Redisson.create(config);}
}
测试用例
package com.example.aopdemo;import com.example.aopdemo.springbootaopdemo.SpringBootDemoxzApplication;
import java.util.concurrent.TimeUnit;
import javax.annotation.Resource;
import lombok.extern.slf4j.Slf4j;
import org.junit.jupiter.api.Test;
import org.redisson.api.RLock;
import org.redisson.api.RedissonClient;
import org.springframework.boot.test.context.SpringBootTest;
import org.springframework.scheduling.concurrent.ThreadPoolTaskExecutor;/*** @ClassName RedissonTest* @Description Redisson测试用例* @Author 阿Q* @Date 2022/11/26*/
@Slf4j
@SpringBootTest(classes = SpringBootDemoxzApplication.class)
public class RedissonTest {@Resourceprivate RedissonClient redissonClient;@Resourceprivate ThreadPoolTaskExecutor executor;// redisson分布式锁的keyprivate static final String LOCK_TEST_KEY = "redisson:lock:test";int n = 500;/*** 分布式锁测试用例*/@Testpublic void lockTest() {// 利用 循环+多线程 模仿高并发请求for (int i = 0; i < 10; i++) {executor.execute(() -> {// 这里获取公平锁,遵循先进先出原则,方便测试RLock fairLock = redissonClient.getFairLock(LOCK_TEST_KEY);try {// 尝试加锁// waitTimeout 尝试获取锁的最大等待时间,超过这个值,则认为获取锁失败// leaseTime   锁的持有时间,超过这个时间锁会自动失效(值应设置为大于业务处理的时间,确保在锁有效期内业务能处理完)boolean lock = fairLock.tryLock(3000, 30, TimeUnit.MILLISECONDS);if (lock){log.info("线程:" + Thread.currentThread().getName() + "获得了锁");log.info("剩余数量:{}", --n);}} catch (InterruptedException e) {e.printStackTrace();} finally {log.info("线程:" + Thread.currentThread().getName() + "准备释放锁");// 注意,无论出现任何情况,都要主动解锁fairLock.unlock();}});}try {// ->_-> 这里使当前方法占用的线程休息10秒,不要立即结束Thread.sleep(10000);} catch (InterruptedException e) {e.printStackTrace();}}
}
二、Redisson源码分析
redisson这个框架的实现依赖了Lua脚本和Netty,以及各种Future及FutureListener的异步、同步操作转换,加锁和解锁过程中还巧妙地利用了redis的发布订阅功能
简单了解Lua脚本(Redisson 版本 3.16.8)
想要真正读懂redisson底层的加锁解锁实现,基本的lua脚本还是要了解一下的,这里作者就不深入了(毕竟我也是门外汉),大家有兴趣的可以去深入一下,这里只针对锁的实现来解释一下。另外,搜索公众号Linux就该这样学后台回复“猴子”,获取一份惊喜礼包。
加锁脚本
-
KEYS[1] 锁的名字
-
ARGV[1] 锁自动失效时间(毫秒,默认30s(看门狗续期时长))
-
ARGV[2] hash子项的key(uuid+threadId)
--如果锁不存在
if (redis.call('exists', KEYS[1]) == 0) then
--重入次数初始为0后加一
redis.call('hincrby', KEYS[1], ARGV[2], 1);
--设锁的过期时间
redis.call('pexpire', KEYS[1], ARGV[1]);
--返回null-代表加锁成功
return nil;
--结束符
end;
--如果加锁的进程已存在
if (redis.call('hexists', KEYS[1], ARGV[2]) == 1) then
--重入次数加一
redis.call('hincrby', KEYS[1], ARGV[2], 1);
--更新锁的过期时间(毫秒)
redis.call('pexpire', KEYS[1], ARGV[1]);
--返回null-代表重入成功
return nil;
--结束符
end;
--返回锁的剩余时间(毫秒)-代表加锁失败
return redis.call('pttl', KEYS[1]);

❝结论:当且仅当返回nil,才表示加锁成功;
❞
解锁脚本
-
KEYS[1] 锁的名字
-
KEYS[2] 发布订阅的
channel=redisson_lock__channel:{lock_name} -
ARGV[1] 发布订阅中解锁消息=0
-
ARGV[2] 看门狗续期时间
-
ARGV[3] hash子项的
key=uuid+threadId
--如果锁不存在
if (redis.call('hexists', KEYS[1], ARGV[3]) == 0) then
--返回null-代表解锁成功
return nil;
end;
--重入次数减一
local counter = redis.call('hincrby', KEYS[1], ARGV[3], -1);
--如果重入次数不为0,对锁进行续期(使用看门狗的续期时间,默认续期30s)
if (counter > 0) then
redis.call('pexpire', KEYS[1], ARGV[2]);
--返回0-代表锁的重入次数减一,解锁成功
return 0;
--否则重入次数<=0
else
--删除key
redis.call('del', KEYS[1]);
--向channel中发布删除key的消息
redis.call('publish', KEYS[2], ARGV[1]);
--返回1-代表锁被删除,解锁成功
return 1;
end;
return nil;
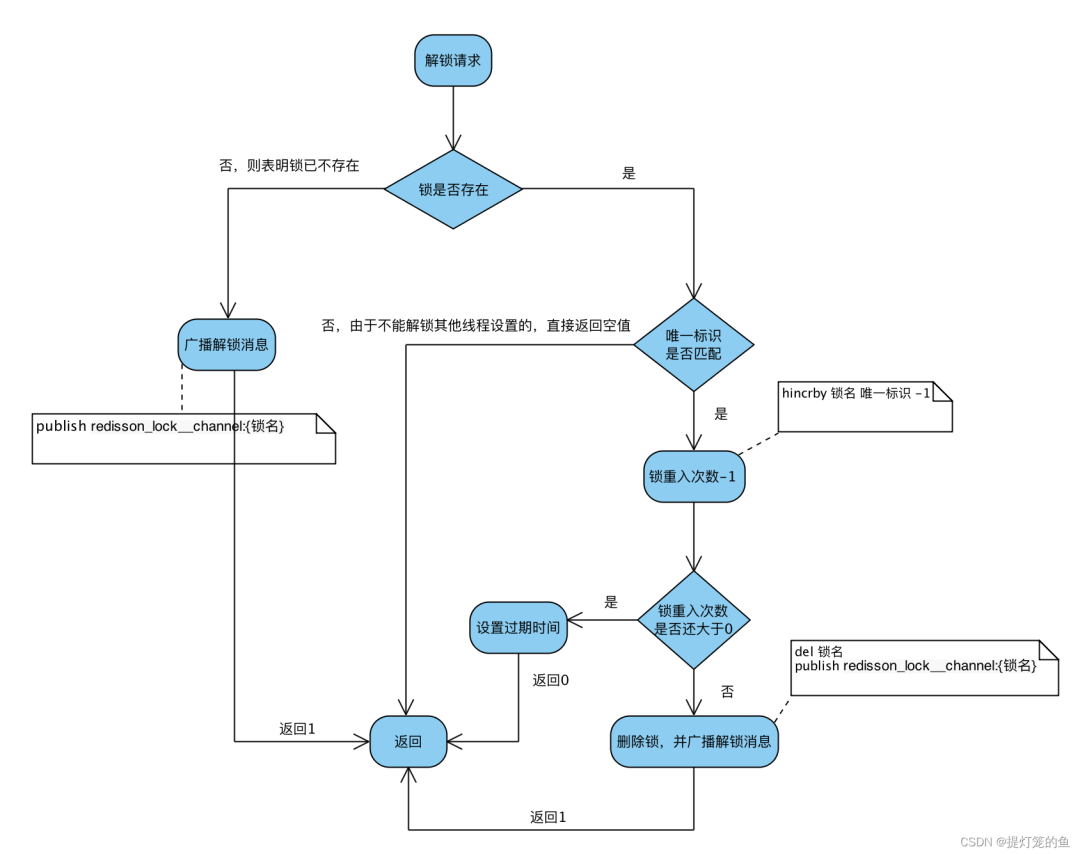
❝结论:当且仅当返回1,才表示当前请求真正解锁;
❞
看门口续期lua脚本
io.netty.util.TimerTask每10秒执行一次(30(续期时间)/3)
-
KEYS[1] 锁的名字
-
ARGV[1]
--自己加的锁存在
if (redis.call('hexists', KEYS[1], ARGV[2]) == 1) then
--续期
redis.call('pexpire', KEYS[1], ARGV[1]);
--1代表续期成功
return 1;
end;
--自己加的锁不存在,后续不需要再续期
return 0;
源码鉴赏
加锁逻辑
// tryLock 是Redisson加锁的核心代码,在这里,我们基本可以了解加锁的整个逻辑流程
@Override
public boolean tryLock(long waitTime, long leaseTime, TimeUnit unit) throws InterruptedException {// 获取锁能容忍的最大等待时长long time = unit.toMillis(waitTime);// 获取当前系统时间 - 节点一long current = System.currentTimeMillis();// 获取当前线程idlong threadId = Thread.currentThread().getId();// 【核心点1】尝试获取锁,若返回值为null,则表示已获取到锁Long ttl = tryAcquire(waitTime, leaseTime, unit, threadId);if (ttl == null) {return true;}// 剩余等待时长 =   最大等待时长-(当前时间-节点一)time -= System.currentTimeMillis() - current;if (time <= 0) {acquireFailed(waitTime, unit, threadId);return false;}current = System.currentTimeMillis();// 【核心点2】订阅解锁消息CompletableFuture<RedissonLockEntry> subscribeFuture = subscribe(threadId);try {// 以阻塞的方式获取订阅结果,最大等待时常timesubscribeFuture.toCompletableFuture().get(time, TimeUnit.MILLISECONDS);} catch (ExecutionException | TimeoutException e) {// 判断异步任务是否不存在if (!subscribeFuture.cancel(false)) {subscribeFuture.whenComplete((res, ex) -> {// 异步任务出现异常,取消订阅if (ex == null) {unsubscribe(res, threadId);}});}acquireFailed(waitTime, unit, threadId);return false;}try {// 剩余等待时长time -= System.currentTimeMillis() - current;if (time <= 0) {acquireFailed(waitTime, unit, threadId);return false;}// 循环获取锁      while (true) {long currentTime = System.currentTimeMillis();// 再次获取锁,成功则返回ttl = tryAcquire(waitTime, leaseTime, unit, threadId);// lock acquiredif (ttl == null) {return true;}time -= System.currentTimeMillis() - currentTime;if (time <= 0) {acquireFailed(waitTime, unit, threadId);return false;}currentTime = System.currentTimeMillis();// 【核心点3】阻塞等待信号量唤醒或者超时,接收到订阅时唤醒// 使用的是Semaphore#tryAcquire()// 判断 锁的占有时间(ttl)是否小于等待时间  if (ttl >= 0 && ttl < time) {commandExecutor.getNow(subscribeFuture).getLatch().tryAcquire(ttl, TimeUnit.MILLISECONDS);} else {commandExecutor.getNow(subscribeFuture).getLatch().tryAcquire(time, TimeUnit.MILLISECONDS);}time -= System.currentTimeMillis() - currentTime;if (time <= 0) {acquireFailed(waitTime, unit, threadId);return false;}}} finally {// 因为是同步操作,所以无论加锁成功或失败,都取消订阅unsubscribe(commandExecutor.getNow(subscribeFuture), threadId);}
}
接下来,我们再一起看一下 tryAcquire()
private Long tryAcquire(long waitTime, long leaseTime, TimeUnit unit, long threadId) {// get方法就是以线程阻塞的方式获取结果,这里不再展示,有兴趣的朋友可以自行查看源码return get(tryAcquireAsync(waitTime, leaseTime, unit, threadId));
}
/*** 异步的方式尝试获取锁*/
private <T> RFuture<Long> tryAcquireAsync(long waitTime, long leaseTime, TimeUnit unit, long threadId) {RFuture<Long> ttlRemainingFuture;// 占有时间等于 -1 表示会一直持有锁,直到业务进行完成,主动解锁(这里就显示出了finally的重要性)if (leaseTime != -1) {// 【核心点4】这里就是直接使用lua脚本ttlRemainingFuture = tryLockInnerAsync(waitTime, leaseTime, unit, threadId, RedisCommands.EVAL_LONG);} else {ttlRemainingFuture = tryLockInnerAsync(waitTime, internalLockLeaseTime,TimeUnit.MILLISECONDS, threadId, RedisCommands.EVAL_LONG);}CompletionStage<Long> f = ttlRemainingFuture.thenApply(ttlRemaining -> {// lock acquiredif (ttlRemaining == null) {if (leaseTime != -1) {internalLockLeaseTime = unit.toMillis(leaseTime);} else {scheduleExpirationRenewal(threadId);}}return ttlRemaining;});return new CompletableFutureWrapper<>(f);}
/*** 兄弟们看到这里应该就恍然大悟了吧,redisson最底层就是lua脚本的直接调用* 这里就不作说明了,上面的lua脚本分析已经说的很明白了*/
<T> RFuture<T> tryLockInnerAsync(long waitTime, long leaseTime, TimeUnit unit, long threadId, RedisStrictCommand<T> command) {return evalWriteAsync(getRawName(), LongCodec.INSTANCE, command,"if (redis.call('exists', KEYS[1]) == 0) then " +"redis.call('hincrby', KEYS[1], ARGV[2], 1); " +"redis.call('pexpire', KEYS[1], ARGV[1]); " +"return nil; " +"end; " +"if (redis.call('hexists', KEYS[1], ARGV[2]) == 1) then " +"redis.call('hincrby', KEYS[1], ARGV[2], 1); " +"redis.call('pexpire', KEYS[1], ARGV[1]); " +"return nil; " +"end; " +"return redis.call('pttl', KEYS[1]);",Collections.singletonList(getRawName()), unit.toMillis(leaseTime), getLockName(threadId));}
解锁逻辑
/**
* 解锁逻辑
*/
@Override
public void unlock() {try {// 相信看来上面的逻辑,兄弟们应该已经很熟悉redisson作者的编码习惯了,照例get还是以线程阻塞的方式获取结果get(unlockAsync(Thread.currentThread().getId()));} catch (RedisException e) {if (e.getCause() instanceof IllegalMonitorStateException) {throw (IllegalMonitorStateException) e.getCause();} else {throw e;}}
}
// 异步解锁
@Override
public RFuture<Void> unlockAsync(long threadId) {// 调用异步解锁方法// unlockInnerAsync() 是抽象方法,所有的实现方法都是直接调用lua脚本,这里不做展示,感兴趣的同学可以自行查看// 调用真正的实现取决于上面我们创建什么样的lock对象        RFuture<Boolean> future = unlockInnerAsync(threadId);CompletionStage<Void> f = future.handle((opStatus, e) -> {cancelExpirationRenewal(threadId);if (e != null) {throw new CompletionException(e);}if (opStatus == null) {IllegalMonitorStateException cause = new IllegalMonitorStateException("attempt to unlock lock, not locked by current thread by node id: "+ id + " thread-id: " + threadId);throw new CompletionException(cause);}return null;});return new CompletableFutureWrapper<>(f);
}