基于51单片机智能加湿器控制系统
(仿真+程序+原理图)
功能介绍
具体功能:
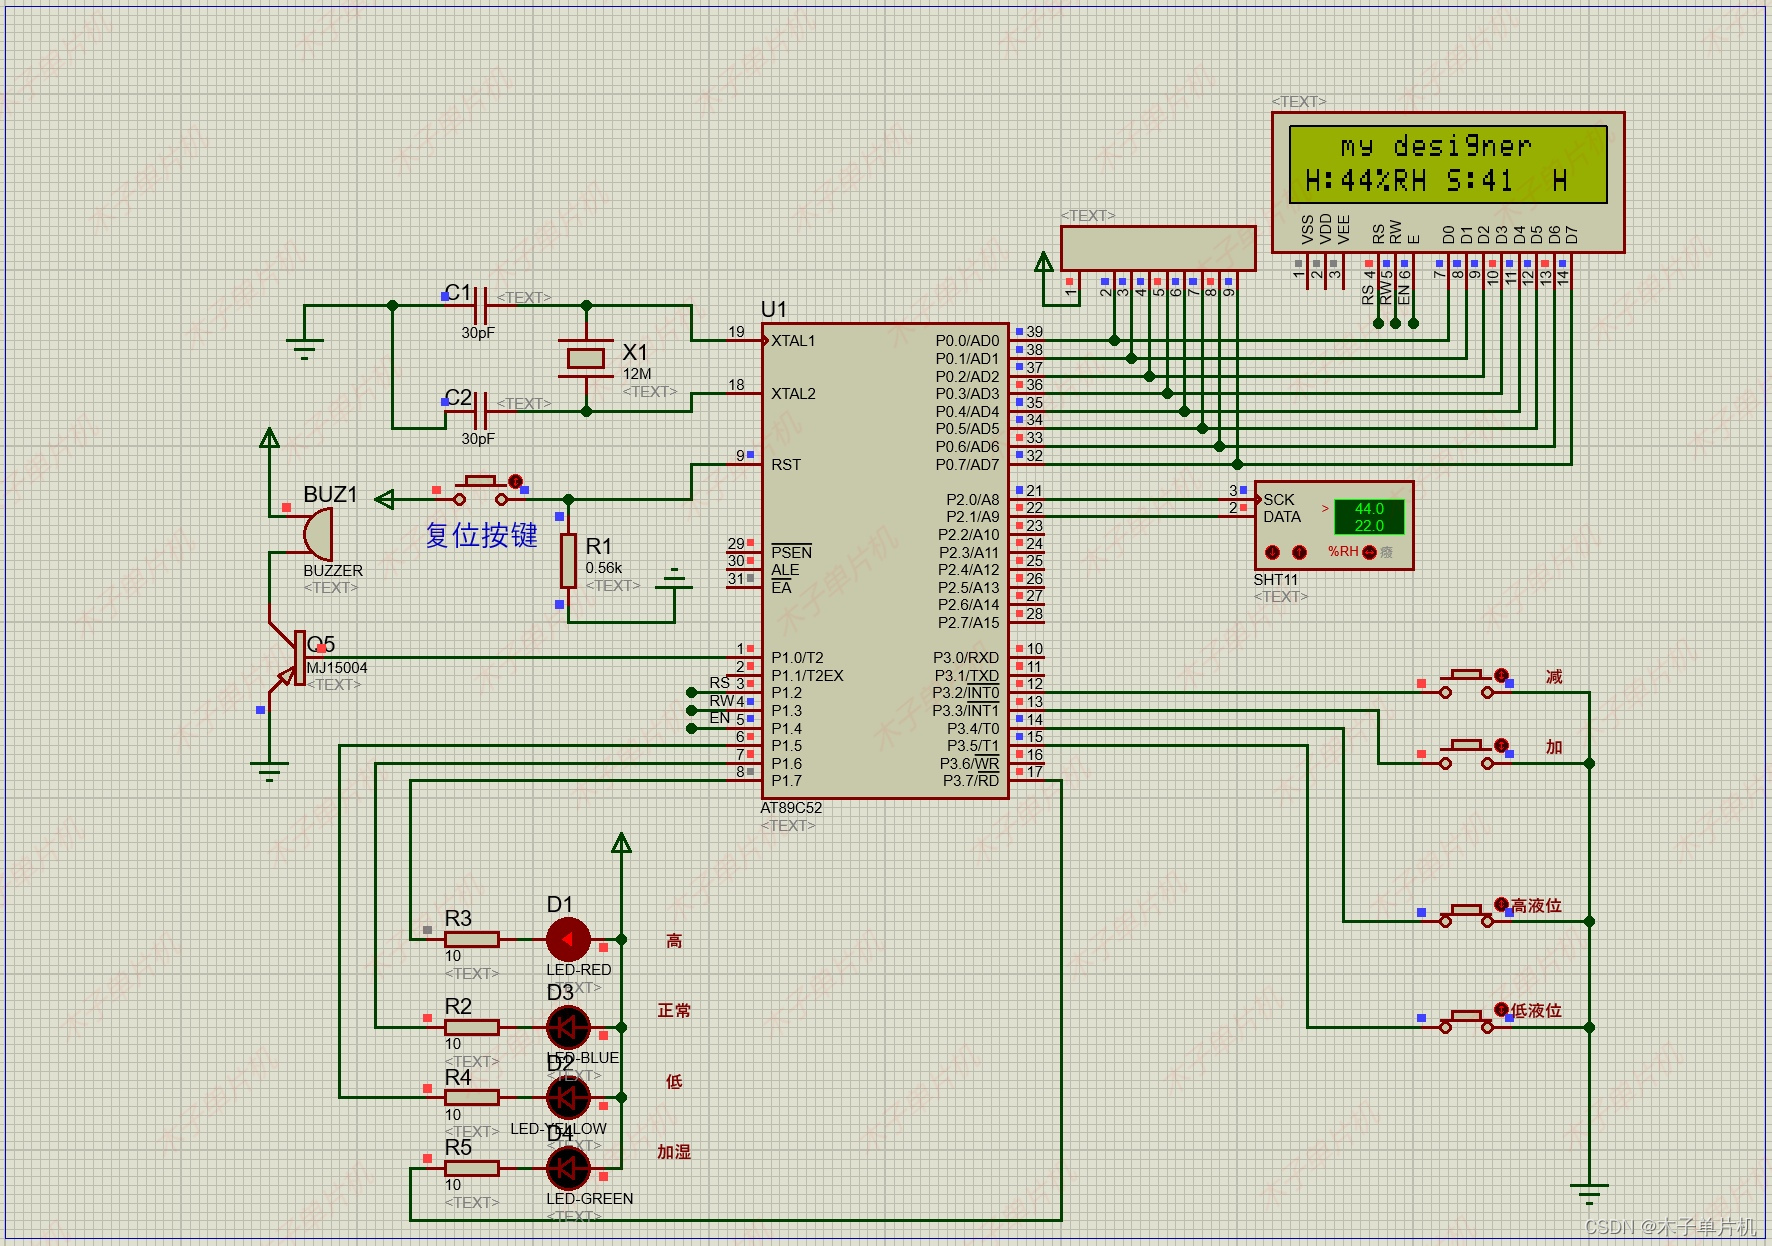
1.LCD1602实时显示湿度值(湿度范围10%-95%)和湿度阈值;
2.可以通过按键设置湿度阈值范围;
3.当湿度值小于阈值时,开启加湿(绿灯模拟);
4.液位用按键模拟3种状态:低(L)、正常(N)、高(H),并在液晶实时显示;
5.用3个指示灯模拟显示。低液位时黄灯亮,正常液位蓝灯亮,高液位是红灯亮;
6.当液位低于低液位时,蜂鸣器报警,停止加湿(如果在加湿);
演示视频:
基于51单片机智能加湿器控制系统
#include <reg52.h>	 					// 头文件包含
#include <intrins.h>#define uint  unsigned int 		// 以后unsigned char就可以用uchar代替
#define uchar unsigned char  	// 以后unsigned int 就可以用uint 代替#define STATUS_REG_W 0x06
#define STATUS_REG_R 0x07
#define RESET        0x1e typedef union              		//定义共用同类型
{    unsigned int i; float f;
}value; sbit Buzzer_P  = P1^0;     	// 蜂鸣器
sbit LcdRs_P   = P1^2; 			// 1602液晶的RS管脚
sbit LcdRw_P   = P1^3;			// 1602液晶的RW管脚
sbit LcdEn_P   = P1^4;			// 1602液晶的EN管脚sbit Sck_P     = P2^0;			// SHT11传感器的时钟管脚
sbit Data_P    = P2^1;			// SHT11传感器的数据管脚uchar temp;							// 保存温度
uchar humi;				  		// 保存湿度uchar AlarmTL=20;				// 温度下限报警值
uchar AlarmTH=30;				// 温度上限报警值
uchar AlarmHL=40; 			// 湿度下限报警值
uchar AlarmHH=80;				// 湿度上限报警值/*********************************************************/
// 毫秒级的延时函数,time是要延时的毫秒数
/*********************************************************/
void DelayMs(uint time)
{uint i,j;for(i=0;i<time;i++)for(j=0;j<112;j++);
} /*********************************************************/
// 1602液晶写命令函数,cmd就是要写入的命令
/*********************************************************/
void LcdWriteCmd(uchar cmd)
{ LcdRs_P = 0;LcdRw_P = 0;LcdEn_P = 0;P0=cmd;DelayMs(2);LcdEn_P = 1;    DelayMs(2);LcdEn_P = 0;
}/*********************************************************/
// 1602液晶写数据函数,dat就是要写入的数据
/*********************************************************/
void LcdWriteData(uchar dat)
{LcdRs_P = 1; LcdRw_P = 0;LcdEn_P = 0;P0=dat;DelayMs(2);LcdEn_P = 1;    DelayMs(2);LcdEn_P = 0;
}/*********************************************************/
// 1602液晶初始化函数
/*********************************************************/
void LcdInit()
{LcdWriteCmd(0x38);        // 16*2显示,5*7点阵,8位数据口LcdWriteCmd(0x0C);        // 开显示,不显示光标LcdWriteCmd(0x06);        // 地址加1,当写入数据后光标右移LcdWriteCmd(0x01);        // 清屏
}/*********************************************************/
// 液晶光标定位函数
/*********************************************************/
void LcdGotoXY(uchar line,uchar column)
{// 第一行if(line==0)        LcdWriteCmd(0x80+column); // 第二行if(line==1)        LcdWriteCmd(0x80+0x40+column);
}/*********************************************************/
// 液晶输出字符串函数
/*********************************************************/
void LcdPrintStr(uchar *str)
{while(*str!='\0') 			// 判断是否到字符串的尽头了LcdWriteData(*str++);
}/*********************************************************/
// 液晶输出数字
/*********************************************************/
void LcdPrintNum(uchar num)
{LcdWriteData(num/10+48);	// 十位LcdWriteData(num%10+48); 	// 个位
}/*********************************************************/
// 往SHT11写入一个字节
/*********************************************************/
char ShtWriteByte(uchar value)
{uchar i,error=0;for(i=128;i>0;i>>=1)  // 高位为1,循环右移{if (i&value) Data_P=1;       	// 和要发送的数相与,结果为发送的位else Data_P=0;Sck_P=1;_nop_();						// 延时3us_nop_();_nop_();     Sck_P=0;}Data_P=1;    					// 释放数据线Sck_P=1;error=Data_P;  				// 检查应答信号,确认通讯正常_nop_();_nop_();_nop_();Sck_P=0;Data_P=1;return error; 				// error=1 通讯错误
}/*********************************************************/
// 从SHT11读出一个字节
/*********************************************************/
char ShtReadByte(uchar ack)
{unsigned char i,val=0;Data_P=1; 						// 释放数据线for(i=0x80;i>0;i>>=1)	// 高位为1,循环右移{Sck_P=1;if(Data_P) val=(val|i);    	// 读一位数据线的值Sck_P=0;}Data_P=!ack;    			// 如果是校验,读取完后结束通讯Sck_P=1;_nop_();							// 延时3us_nop_();_nop_();Sck_P=0;_nop_();_nop_();_nop_();Data_P=1; 						// 释放数据线return val;
}/*********************************************************/
// SHT11启动传输
/*********************************************************/
void ShtTransStart(void)
{Data_P=1;   Sck_P=0;    _nop_();Sck_P=1;_nop_();Data_P=0;_nop_();Sck_P=0;_nop_();_nop_();_nop_();Sck_P=1;_nop_();Data_P=1;_nop_();Sck_P=0;
}/*********************************************************/
// SHT11连接复位
/*********************************************************/
void ShtConnectReset(void)
{unsigned char i;Data_P=1; 		   		//准备Sck_P=0;              for(i=0;i<9;i++)  	//DATA保持高,SCK时钟触发9次,发送启动传输,通迅即复位{Sck_P=1;Sck_P=0;}ShtTransStart();   	//启动传输
}/*********************************************************/
// SHT11温湿度检测
/*********************************************************/
char ShtMeasure(unsigned char *p_value, unsigned char *p_checksum, uchar mode)
{unsigned error=0;unsigned int i;ShtTransStart();  		// 启动传输switch(mode)       		// 选择发送命令{case 1 :   					// 测量温度error+=ShtWriteByte(0x03); break;    case 2 :   					// 测量湿度error+=ShtWriteByte(0x05); break;    default: break;}for(i=0;i<65535;i++) if(Data_P==0) break;  					// 等待测量结束if(Data_P) error+=1;   			// 如果长时间数据线没有拉低,说明测量错误*(p_value) =ShtReadByte(1);  		// 读第一个字节,高字节 (MSB)*(p_value+1)=ShtReadByte(1); 		// 读第二个字节,低字节 (LSB)*p_checksum =ShtReadByte(0);  	// read CRC校验码return error;  									// error=1 通讯错误
}/*********************************************************/
// SHT11温湿度值标度变换及温度补偿
/*********************************************************/
void CalcSHT11(float *p_humidity ,float *p_temperature)
{const float C1=-4.0;	 			// 12位湿度精度 修正公式const float C2=+0.0405;			// 12位湿度精度 修正公式const float C3=-0.0000028;	// 12位湿度精度 修正公式const float T1=+0.01;	 			// 14位温度精度 5V条件 修正公式const float T2=+0.00008;	 	// 14位温度精度 5V条件 修正公式float rh=*p_humidity;	 			// rh: 12位 湿度float t=*p_temperature;			// t:  14位 温度float rh_lin;								// rh_lin: 湿度 linear值float rh_true;							// rh_true: 湿度 ture值float t_C;	 								// t_C : 温度 ℃t_C=t*0.01 - 40;	 					//补偿温度rh_lin=C3*rh*rh + C2*rh + C1;					//相对湿度非线性补偿rh_true=(t_C-25)*(T1+T2*rh)+rh_lin;		//相对湿度对于温度依赖性补偿*p_temperature=t_C;	 				//返回温度结果*p_humidity=rh_true;	 			//返回湿度结果
}/*********************************************************/
// 温度校正
/*********************************************************/
uchar TempCorrect(int temp)
{if(temp<0)	temp=0;if(temp>970)  temp=970;if(temp>235)  temp=temp+10;if(temp>555)  temp=temp+10;if(temp>875)  temp=temp+10;temp=(temp%1000)/10;return temp;
}/*********************************************************/
// 湿度校正
/*********************************************************/
uchar HumiCorrect(uint humi)
{if(humi>999)  humi=999;if((humi>490)&&(humi<951))  humi=humi-10;humi=(humi%1000)/10;return humi;
}/*********************************************************/
// 读取SHT11的温湿度数据
/*********************************************************/
void ReadShtData()
{value humi_val,temp_val;  	// 定义两个共同体,一个用于湿度,一个用于温度uchar error;  							// 用于检验是否出现错误uchar checksum;  						// CRCuint temp1,humi1;						// 临时读取到的温湿度数据	error=0; 										//初始化error=0,即没有错误error+=ShtMeasure((unsigned char*)&temp_val.i,&checksum,1); 	//温度测量error+=ShtMeasure((unsigned char*)&humi_val.i,&checksum,2); 	//湿度测量if(error!=0) 		  					//如果发生错误,系统复位ShtConnectReset();  else{humi_val.f=(float)humi_val.i; 				//转换为浮点数temp_val.f=(float)temp_val.i;  				//转换为浮点数CalcSHT11(&humi_val.f,&temp_val.f);  	//修正相对湿度及温度temp1=temp_val.f*10;temp=TempCorrect(temp1);humi1=humi_val.f*10-50;humi=HumiCorrect(humi1);}}
sbit key1 =P3^2; //接口定义
sbit key2 =P3^3;
sbit yeweiG =P3^4;
sbit yeweiD =P3^5;
sbit led_red =P1^7;
sbit led_blu =P1^6;
sbit led_yel =P1^5;
sbit led_gre =P3^7;
sbit buzzer = P1^0;unsigned char yeweiFlag = 'N';//液位标志unsigned char setH= 40; //设置值
unsigned char later = 0;  //延时void CheckKey(void);
硬件设计
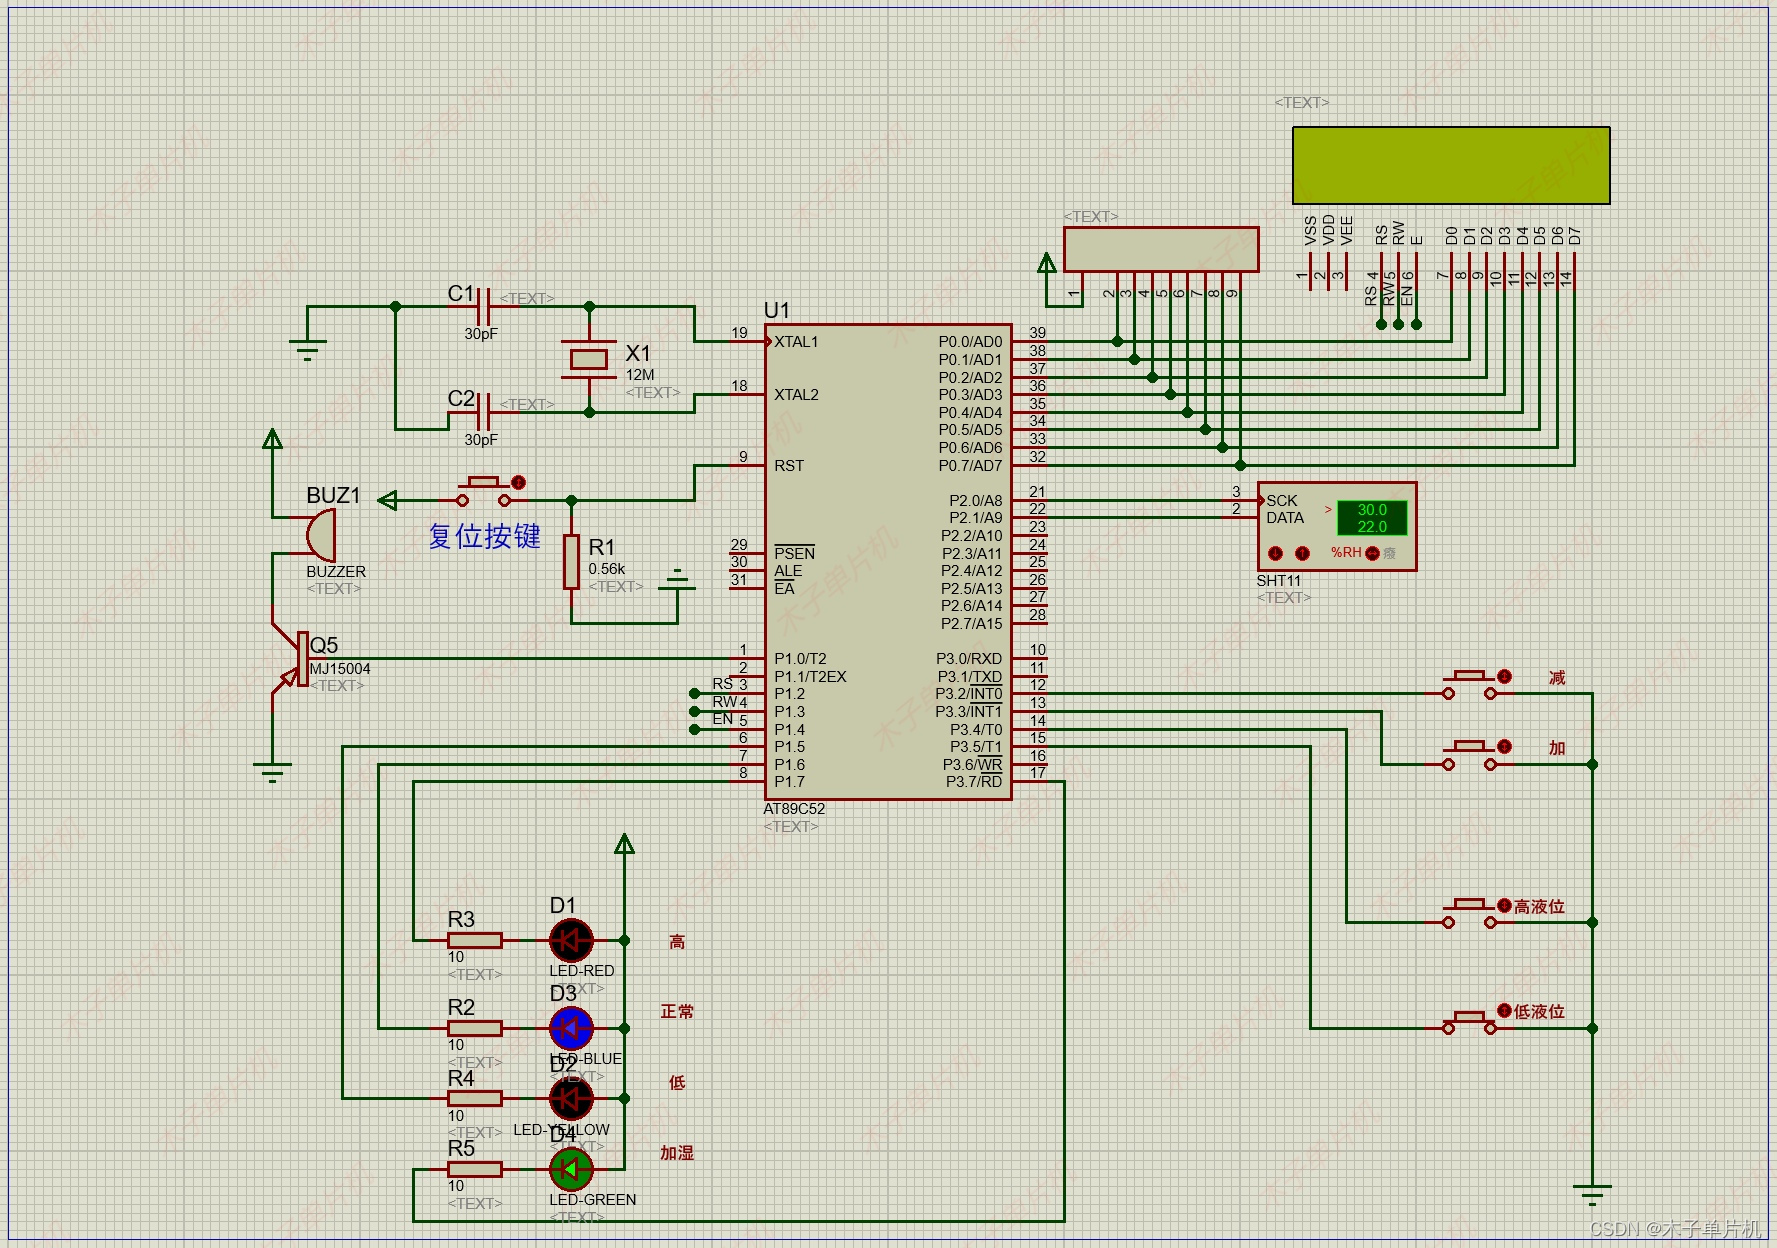
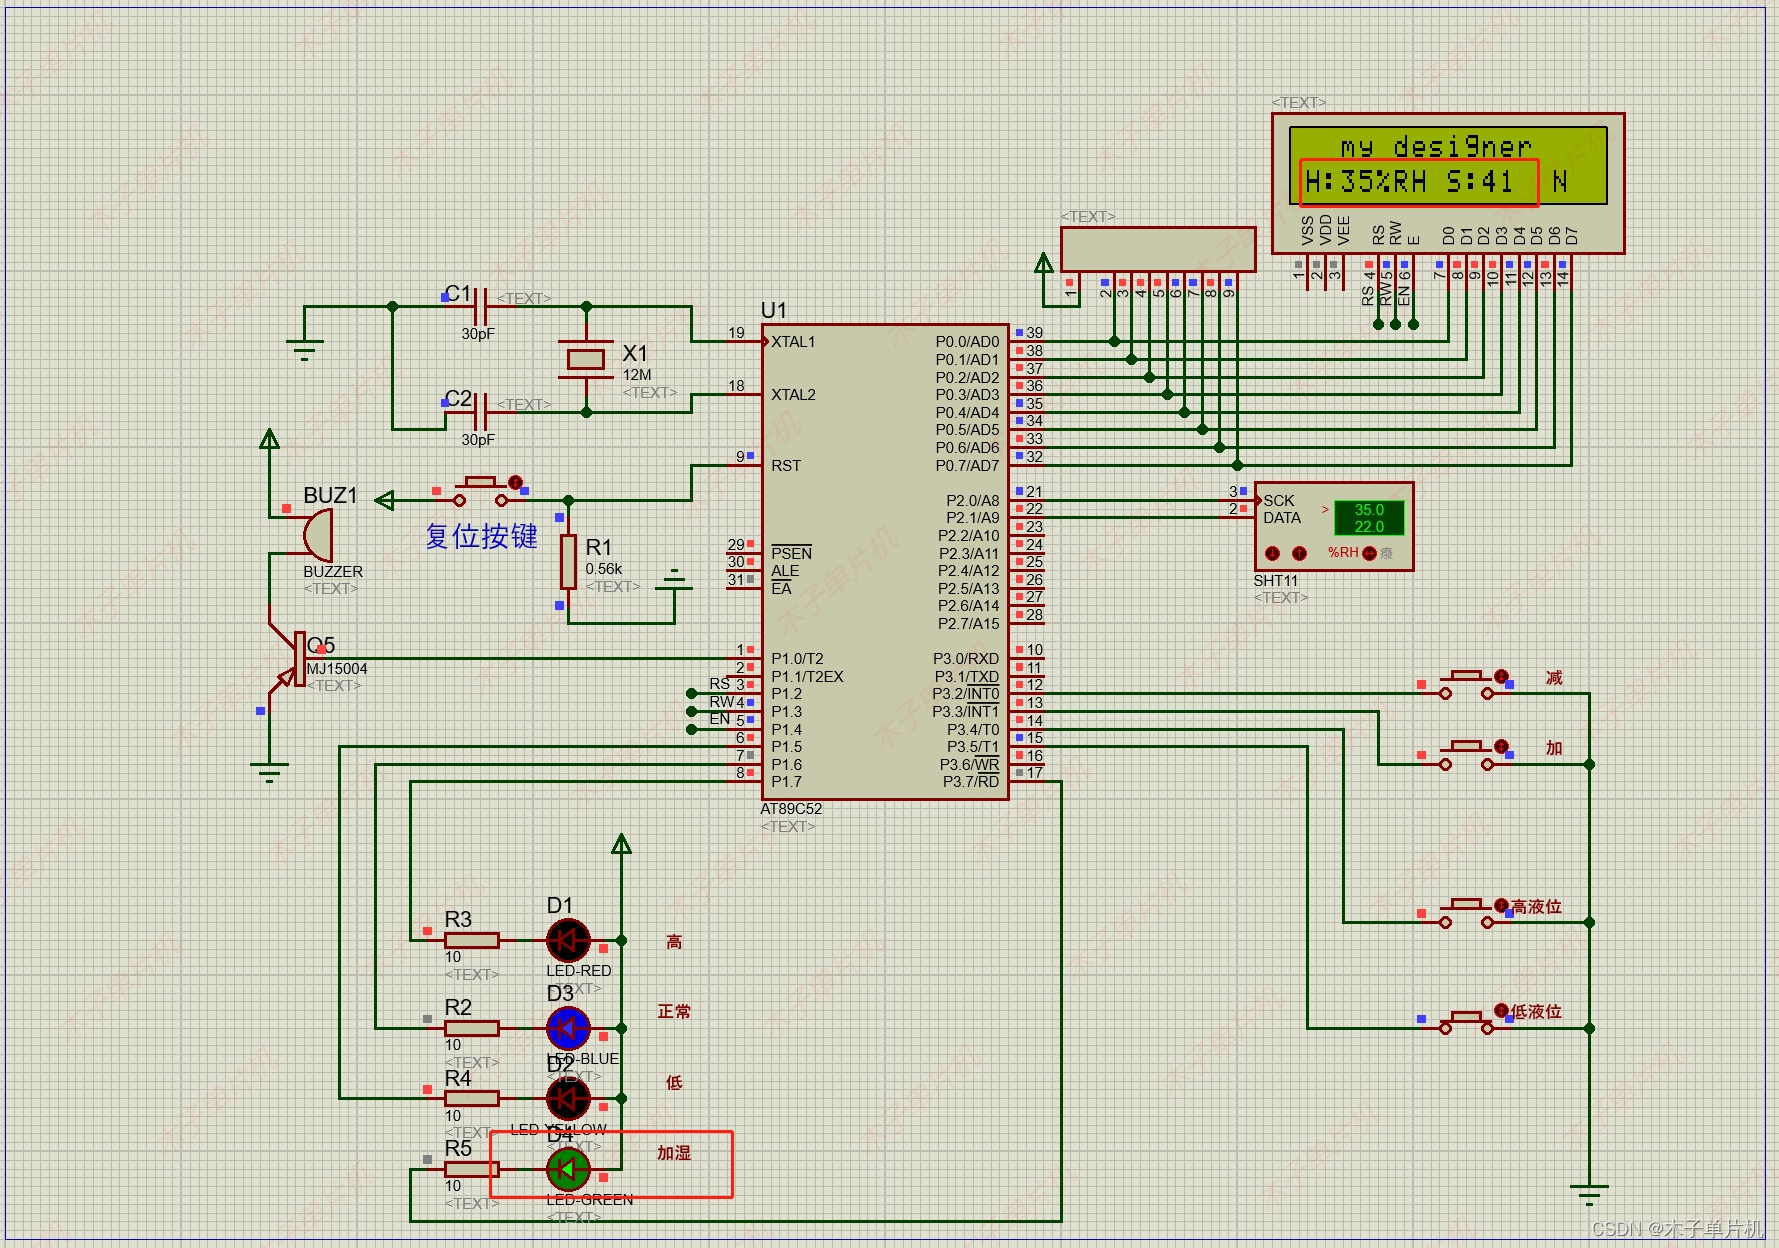
使用元器件:
单片机:AT89C51;
(注意:单片机是通用的,无论51还是52、无论stc还是at都一样,引脚功能都一样。程序也是一样的。)
设计资料
01 仿真图
本设计使用proteus7.8和proteus8.9两个版本设计,向下兼容,无需担心!具体如图!
正常状态

加湿
高液位
低液位

02 原理图
本系统原理图采用Altium Designer19设计,具体如图!

03 程序
本设计使用软件keil4和keil5两个版本编程设计,无需担心!具体如图!

04 设计资料
资料获取请关注同名公众号,全部资料包括仿真源文件 、程序(含注释)、AD原理图、功能说明等。具体内容如下,全网最全! !
资料获取请观看前面演示视频!
点赞分享一起学习成长。