前言:上一篇记录了通过XML文件来定义Bean对象,这一篇将记录通过注解和配置类的方式来定义Bean对象。
核心注解:
定义对象:@Component,@Service,@Repository,@Controller
依赖注入:按类型:@Autowired
按名称:@Resource或者使用@Autowired+@Qualifier@Resource需要导入下面的依赖,因为从JDK9-17移除了javax的包
<dependency>
<groupId>javax.annotation</groupId>
<artifactId>javax.annotation-api</artifactId>
<version>1.3.2</version>
</dependency>
作用域:@Scope
生命周期:@PostConstruct,@PreDestroy
一、注解方式定义Bean对象
定义Bean对象的注解有4个,分别是@Component,@Service,@Repository,@Controller,这四个注解的功能都是一样的,唯一的区别就是名字不从。
这几个注解一般按照这种方式使用
@Component: 用于实体类的Bean对象定义
@Service: 用于接口实现类的Bean对象定义
@Repository: 用于读取数据库的DAO Bean对象定义
@Controller: 用于控制层的Bean对象定义
此外,对于不同的分层使用不同的注解,一方面可以使得层级更加分明,另一方面后续Spring可以依据注解的名称进行灵活操作。
定义Bean&注入
import org.springframework.beans.factory.annotation.Autowired;
import org.springframework.beans.factory.annotation.Qualifier;
import org.springframework.beans.factory.annotation.Value;
import org.springframework.context.annotation.PropertySource;
import org.springframework.stereotype.Component;import javax.annotation.Resource;
import java.util.Arrays;
import java.util.HashMap;
import java.util.List;
import java.util.Set;@Component
@PropertySource("test.properties")
public class Employee {@Value("karry")private String name;@Value("0")private Integer gender;//0=女 1=男@Value("10000.0")private Double salary;@Autowiredprivate Car car;//开的什么车@Resourceprivate Car car2;@Resource(name = "car")private Car car3;@Qualifier("car")@Autowiredprivate Car car4;@Autowiredprivate List<Car> carList;@Autowiredprivate Set<Car> carSet;@Value("#{${my.map}}")private HashMap<String, String> strMap;@Value("#{'${my.set}'.split(',')}")private Set<String> strSet;@Value("#{'${my.set}'}")private Set<String> strSet2;@Value("#{'${my.str}'.split(',')}")private List<String> strList;@Value("${my.str}")private List<String> strList2;@Value("${my.str}")private String[] strArr;public void showInfo(){System.out.println("name:" + name + " gender:" + gender + " salary:" + salary);System.out.println(" car:" + car);System.out.println(" car2:" + car2);System.out.println(" car3:" + car3);System.out.println(" car4:" + car4);System.out.println("carList:" + carList + " size:" + carList.size());System.out.println("carSet:" + carSet + " size:" + carSet.size());System.out.println("strMap:" + strMap + " size:" + strMap.size());System.out.println("strSet:" + strSet + " size:" + strSet.size());System.out.println("strSet2:" + strSet2 + " size:" + strSet2.size());System.out.println("strList:" + strList + " size:" + strList.size());System.out.println("strList2:" + strList2 + " size:" + strList2.size());System.out.println("strArr:" + Arrays.toString(strArr) + " size:" + strArr.length);}}
import org.springframework.beans.factory.annotation.Value;
import org.springframework.stereotype.Component;@Component
public class Car {@Value("red")private String color;@Value("保时捷")private String name;@Value("600")private Integer speed;public Car() {}public void setColor(String color) {this.color = color;}public void setName(String name) {this.name = name;}public void setSpeed(Integer speed) {this.speed = speed;}@Overridepublic String toString() {return "Car{" +"color='" + color + '\'' +", name='" + name + '\'' +", speed=" + speed +'}';}public void showInfo(){System.out.println("color:" + color + " name:" + name + " speed:" + speed);}
}测试类
package com.xlb;import com.xlb.bean.Employee;
import org.springframework.context.ApplicationContext;
import org.springframework.context.annotation.ComponentScan;
import org.springframework.context.support.ClassPathXmlApplicationContext;public class TestBean {public static void main(String[] args) {test1();}public static void test1(){ApplicationContext ctx =new ClassPathXmlApplicationContext("applicationContext.xml");Employee emp = ctx.getBean("employee", Employee.class);emp.showInfo();}
}
配置文件
<?xml version="1.0" encoding="UTF-8"?>
<beans xmlns="http://www.springframework.org/schema/beans"xmlns:xsi="http://www.w3.org/2001/XMLSchema-instance"xmlns:context="http://www.springframework.org/schema/context"xsi:schemaLocation="http://www.springframework.org/schema/beanshttp://www.springframework.org/schema/beans/spring-beans.xsdhttp://www.springframework.org/schema/contexthttps://www.springframework.org/schema/context/spring-context.xsd"><context:component-scan base-package="com.xxx.bean"/>
</beans>
test.propertiest文件
my.set=foo,bar
my.list=foo,bar
my.map={"foo": "bar","foo2": "bar2"}
my.str=foo,bar
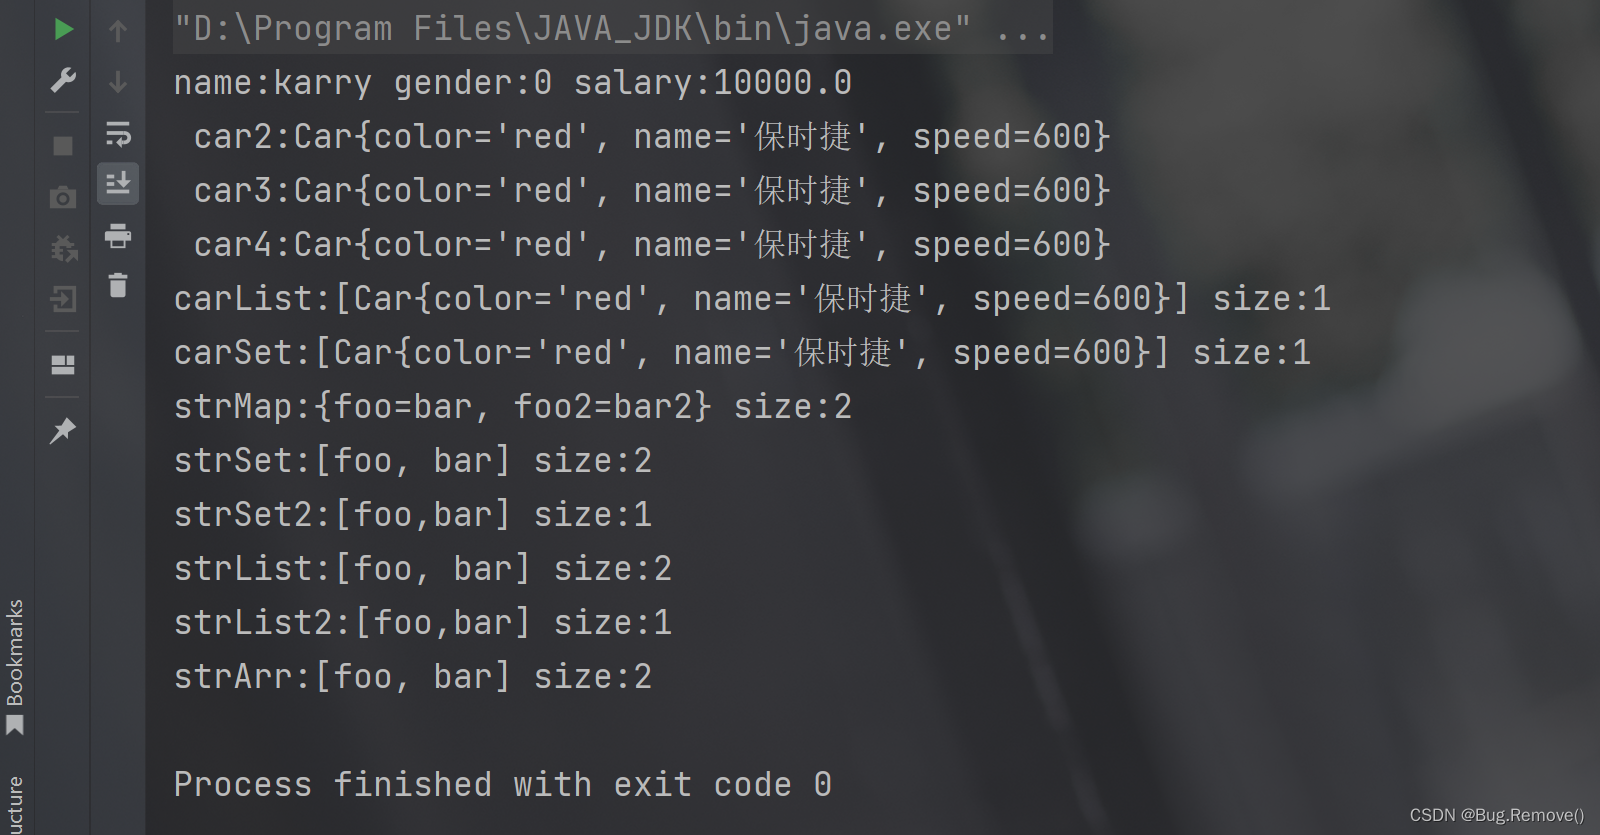
输出结果
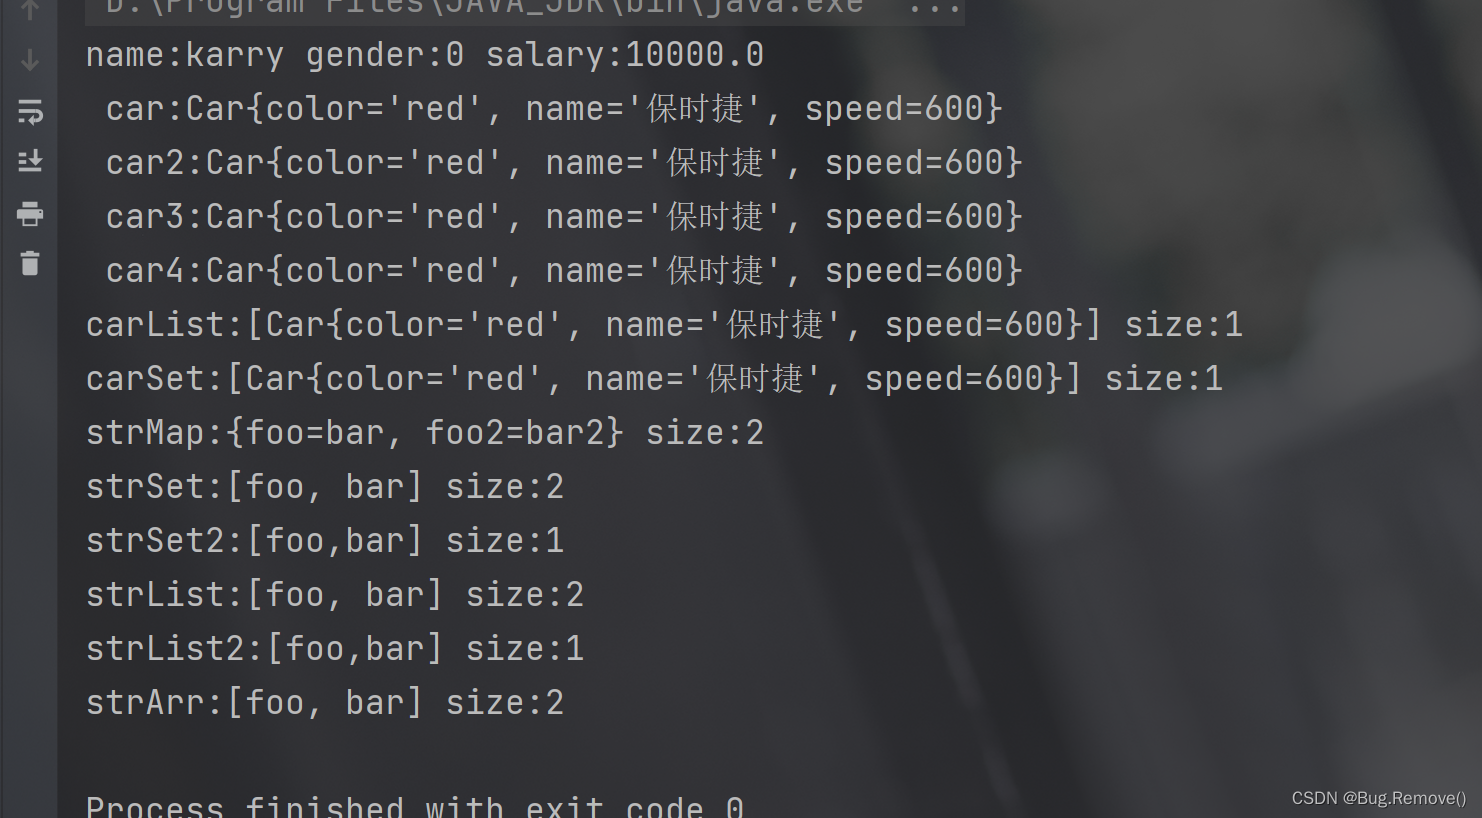
从输出结果我们可以看出以下几点:
1.通过@Component成功定义了Bean对象(也可以使用@Service,@Repository,@Controller等注解来定义Bean对象,具体使用哪个可以根据当前的业务层级来确定。)
2.对于普通类型(包装类型或String)的属性,我们通过@Value注解进行依赖注入。
3.对于引用类型的属性,如Car,我们通过@AutoWired注解进行注入。
4.对于数组类型的属性(数组里的元素为String或者其他包装类型),通过@Value注解,并且各元素间使用逗号分隔,即可以成功将数据注入到数组中。4.1 对于集合类型的属性(集合里的元素为String或者其他包装类型),通过@Value注解,并且各元素间使用逗号分隔,此外需要利用SPEL表达式(即在后面加split(‘,’))来切分元素【注:其中切分的符号不一定是逗号,和注入元素间的符号统一即可】
5.使用注解注入Bean对象时,我们需要在配置文件中添加注解的扫描路径。即 <context:component-scan base-package=“com.xxx.bean”/>这句>话来标识我们包扫描的路径
6.在注入引用类型的对象时,我们可以使用@Autowired,@Autowired+@Qualifier(“car”),@Resource,@Resource(name = “car”),其中:6.1 @Autowired:为按类型注入
6.2 @Autowired+@Qualifier(“car”):为按名称注入,名称即为@Qualifier(“car”)中指定的名称,这里名称为car
6.3 @Resource:为按名称注入,名称为注解内name的值,如果不写,默认是该注解所注解的变量的名称
6.4 @Resource(name = “car”):为按名称注入,名称即为name指定的名称
6.5 @Autowired+@Qualifier(“car”) == @Resource(name = “car”)7.注入map类型的属性时,不需要使用split进行切分。
二、配置类方式定义Bean对象
2.1 环境准备
bean对象
package com.xlb.bean;import org.springframework.beans.factory.annotation.Autowired;
import org.springframework.beans.factory.annotation.Qualifier;
import org.springframework.beans.factory.annotation.Value;
import org.springframework.context.annotation.PropertySource;
import org.springframework.stereotype.Component;import javax.annotation.Resource;
import java.util.Arrays;
import java.util.HashMap;
import java.util.List;
import java.util.Set;@Component("employee2")
@PropertySource("test.properties")
public class Employee2 {@Value("karry")private String name;@Value("0")private Integer gender;//0=女 1=男@Value("10000.0")private Double salary;@Resourceprivate Car2 car2;@Resource(name = "car2")private Car2 car3;@Qualifier("car2")@Autowiredprivate Car2 car4;@Autowiredprivate List<Car2> carList;@Autowiredprivate Set<Car2> carSet;@Value("#{${my.map}}")private HashMap<String, String> strMap;@Value("#{'${my.set}'.split(',')}")private Set<String> strSet;@Value("#{'${my.set}'}")private Set<String> strSet2;@Value("#{'${my.str}'.split(',')}")private List<String> strList;@Value("${my.str}")private List<String> strList2;@Value("${my.str}")private String[] strArr;public void showInfo(){System.out.println("name:" + name + " gender:" + gender + " salary:" + salary);System.out.println(" car2:" + car2);System.out.println(" car3:" + car3);System.out.println(" car4:" + car4);System.out.println("carList:" + carList + " size:" + carList.size());System.out.println("carSet:" + carSet + " size:" + carSet.size());System.out.println("strMap:" + strMap + " size:" + strMap.size());System.out.println("strSet:" + strSet + " size:" + strSet.size());System.out.println("strSet2:" + strSet2 + " size:" + strSet2.size());System.out.println("strList:" + strList + " size:" + strList.size());System.out.println("strList2:" + strList2 + " size:" + strList2.size());System.out.println("strArr:" + Arrays.toString(strArr) + " size:" + strArr.length);}}
package com.xlb.bean;import org.springframework.beans.factory.annotation.Value;
import org.springframework.stereotype.Component;@Component("car2")
public class Car2 {@Value("red")private String color;@Value("保时捷")private String name;@Value("600")private Integer speed;public Car2() {}public void setColor(String color) {this.color = color;}public void setName(String name) {this.name = name;}public void setSpeed(Integer speed) {this.speed = speed;}@Overridepublic String toString() {return "Car{" +"color='" + color + '\'' +", name='" + name + '\'' +", speed=" + speed +'}';}public void showInfo(){System.out.println("color:" + color + " name:" + name + " speed:" + speed);}
}配置类
package com.xlb.config;import org.springframework.context.annotation.ComponentScan;
import org.springframework.context.annotation.Configuration;@Configuration
@ComponentScan("com.xlb.bean")
public class SpringConfig {}
test.properties文件
my.set=foo,bar
my.list=foo,bar
my.map={"foo": "bar","foo2": "bar2"}
my.str=foo,bar
测试类
package com.xlb;import com.xlb.bean.Employee;
import com.xlb.bean.Employee2;
import com.xlb.config.SpringConfig;
import org.springframework.context.ApplicationContext;
import org.springframework.context.annotation.AnnotationConfigApplicationContext;
import org.springframework.context.annotation.ComponentScan;
import org.springframework.context.support.ClassPathXmlApplicationContext;public class TestBean2 {public static void main(String[] args) {test1();}public static void test1(){ApplicationContext ctx =new AnnotationConfigApplicationContext(SpringConfig.class);Employee2 emp = ctx.getBean("employee2", Employee2.class);emp.showInfo();}
}
测试结果
从输出结果可以看到可以正常输出,这个和上面介绍的通过注解实现的方式基本一样,唯一的区别就是在测试类启动时,我们是通过配置类启动的。
2.2 配置类中通过@Bean注解定义Bean对象
首先注释掉通过@Component注解创建的对象
然后在SpringConfig配置类中添加返回Bean对象 的代码
package com.xlb.config;import com.xlb.bean.Car2;
import org.springframework.context.annotation.Bean;
import org.springframework.context.annotation.ComponentScan;
import org.springframework.context.annotation.Configuration;@Configuration
@ComponentScan({"com.xlb.bean", "com.xlb.config"})
public class SpringConfig {@Bean("car2")public Car2 buildCar(){Car2 car = new Car2();car.setColor("blue");car.setName("梅赛德斯-迈巴赫");car.setSpeed(600);return car;}
}
测试结果
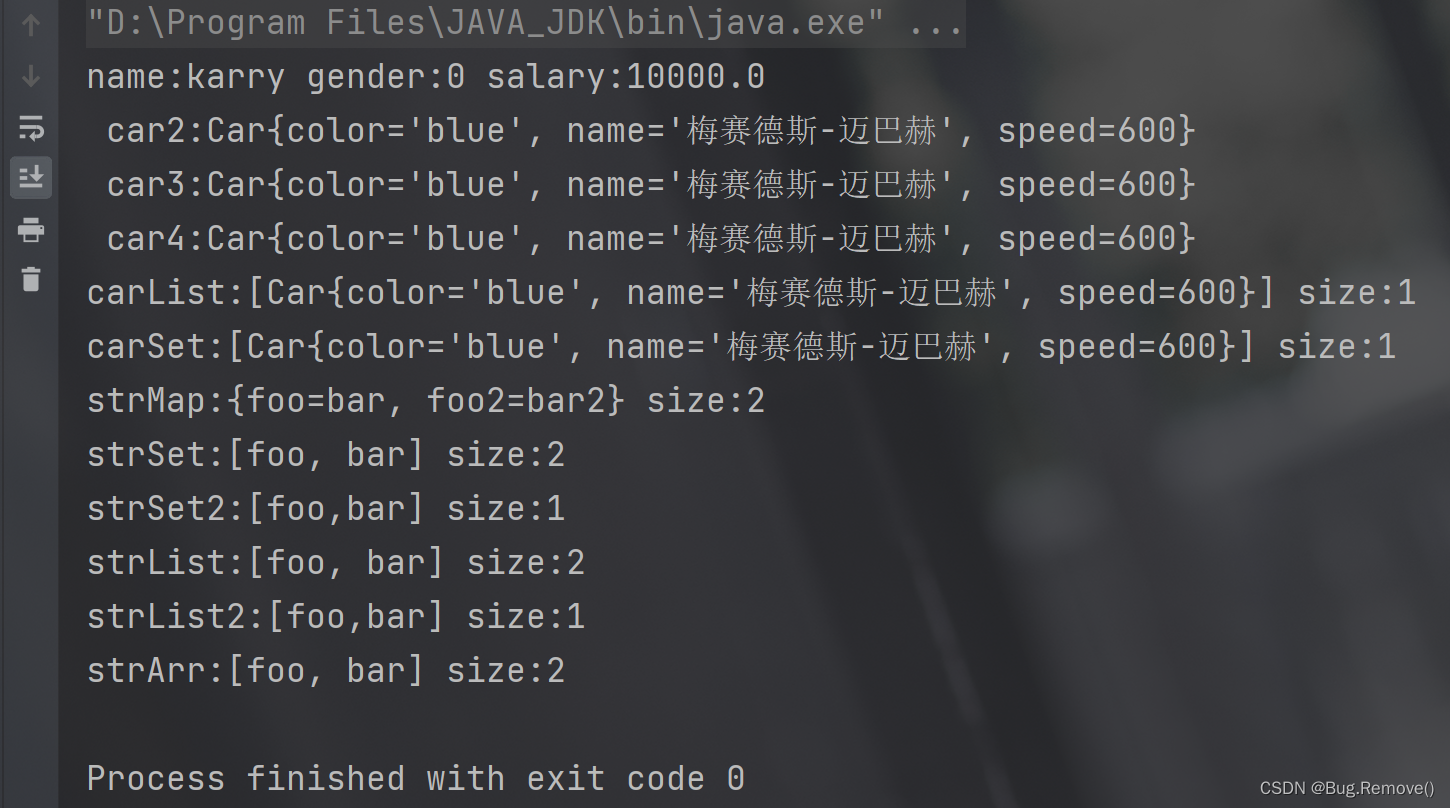
可以看到,在SpringConfig配置类里定义的Bean对象成功输出了。