1.数据与项目文件解读
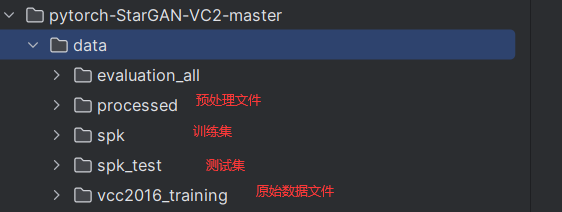
数据文件目录如下所示,需要注意的是,我们并不能直接对声音进行建模,而需要对声音数据进行预处理,从而得到一系列数值特征,然后对特征进行建模,特征数据存储到processed文件夹中
2.环境配置
pip install librosa
librosa主要负责声音数据的预处理
pip install pysptk
有些环境需要C环境,需要安装visual studio
pip install pyworld
3.数据预处理与声音特征提取
运行preprocess.py,指定参数--dataset VCC2016
(1)声音信号的预处理
- 首先,进行16KHZ重采样,即每秒采用16k次
- 然后,进行预加重,通过来说,高频信号价值更大,于是我们补偿高频信号,让高频信号权重更大一些
- 分帧,类似时间窗口,得到多个特征段
代码实现:使用librosa进行读取
def load_wavs(dataset: str, sr):"""`data`: contains all audios file path. `resdict`: contains all wav files. """data = {}with os.scandir(dataset) as it: # 每个人的声音路径for entry in it:if entry.is_dir():data[entry.name] = []with os.scandir(entry.path) as it_f:for onefile in it_f:if onefile.is_file():data[entry.name].append(onefile.path)print(f'* Loaded keys: {data.keys()}')resdict = {}cnt = 0for key, value in data.items():resdict[key] = {}for one_file in value: #预处理,突出高频信号,因为一般发音的话高频信号能表达更多有用的信息filename = one_file.split('/')[-1].split('.')[0] newkey = f'{filename}'wav, _ = librosa.load(one_file, sr=sr, mono=True, dtype=np.float64)#sr:采样率 mono:单通道y, _ = librosa.effects.trim(wav, top_db=15)wav = np.append(y[0], y[1: ] - 0.97 * y[: -1]) # 预加重resdict[key][newkey] = wavprint('.', end='')cnt += 1print(f'\n* Total audio files: {cnt}.')return resdict(2)特征汇总
基频特征(FO):声音可以分解成不同频率的正弦波,其中频率最低的那个就是基频特征
频谱包络:语音是一个时序信号,如采样频率为16kHz的音频文件(每秒包含16000个采样点)分后得到了多个子序列,然后对每个子序列进行傅里叶变换操作,就得到了频率-振幅图(也就是描述频率-振幅图变化趋势的)
Aperiadic参数:基于FO与频谱包络计算得到
代码实现:注意使用pyworld实现
def world_features(wav, sr, fft_size, dim, shiftms):f0, timeaxis = pw.harvest(wav, sr, frame_period=shiftms) #语音基频特征 声音一般可以分解为许多单纯的正弦波,所有的自然声音基本都是由许多频率不同的正弦波组成的,其中频率最低的正弦波即为基音sp = pw.cheaptrick(wav, f0, timeaxis, sr, fft_size=fft_size) # 频谱包络ap = pw.d4c(wav, f0, timeaxis, sr, fft_size=fft_size) # aperiodic参数return f0, timeaxis, sp, ap(3)MFCC
流程:连续语音--预加重--加窗分帧--FFT傅里叶变换--MEL滤波器组--对数运算--DCT
通常来讲,我们人对低频的声音更敏感,例如从100HZ到200HZ,我们明显能够感觉到声音的变化。而如果声音从4000HZ到4100HZ,我们则感觉不到明显的变化。这可以从斜率的角度理解,其图像类似于一个对数函数。
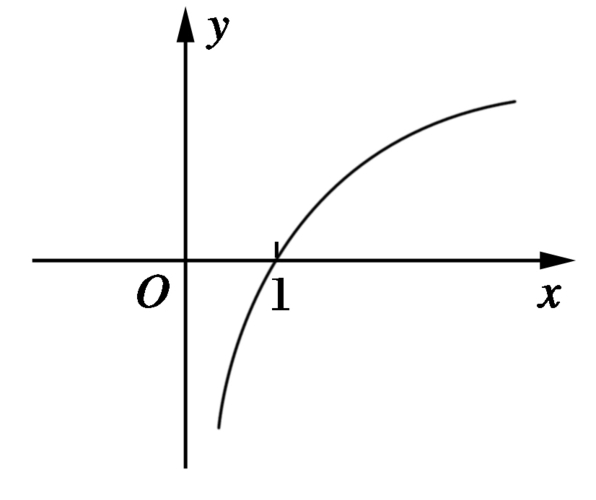
FFT(傅里叶变换)之后就把语音转换到频域,MEL滤波器变换后相当于去模拟人类听觉效果。


最后DCT相当于提取每一帧的包络 (这里面特征多)
代码实现:
def cal_mcep(wav, sr, dim, fft_size, shiftms, alpha):"""Calculate MCEPs given wav singnal."""f0, timeaxis, sp, ap = world_features(wav, sr, fft_size, dim, shiftms)mcep = mcep_from_spec(sp, dim, alpha) #MFCC:连续语音--预加重--加窗分帧--FFT--MEL滤波器组--对数运算--DCTmcep = mcep.Treturn f0, ap, mcep4.网络结构
(1)生成器网络结构
在生成器中,首先使用2D卷积进行下采样,然后reshape成1D,经过AdaIn和GLU门控单元后,使用1D残差模块进行特征提取。然后再reshape成2D,经过上采样和GLU门控单元后输出生成结果。

代码:
class Generator(nn.Module):def __init__(self, num_speakers=4):super(Generator, self).__init__()self.num_speakers = num_speakersself.device = torch.device("cuda:0" if torch.cuda.is_available() else "cpu")# Initial layers.self.conv_layer_1 = nn.Sequential(nn.Conv2d(in_channels=1, out_channels=128, kernel_size=(5, 15), stride=(1, 1), padding=(2, 7)),nn.GLU(dim=1))# Down-sampling layers.self.down_sample_1 = DownsampleBlock(dim_in=64,dim_out=256,kernel_size=(5, 5),stride=(2, 2),padding=(2, 2),bias=False)self.down_sample_2 = DownsampleBlock(dim_in=128,dim_out=512,kernel_size=(5, 5),stride=(2, 2),padding=(2, 2),bias=False)# Reshape data (This operation is done in forward function).# Down-conversion layers.self.down_conversion = nn.Sequential(nn.Conv1d(in_channels=2304,out_channels=256,kernel_size=1,stride=1,padding=0,bias=False),nn.InstanceNorm1d(num_features=256, affine=True))# Bottleneck layers.self.residual_1 = ResidualBlock(dim_in=256,dim_out=512,kernel_size=5,stride=1,padding=2,style_num=self.num_speakers * 2)self.residual_2 = ResidualBlock(dim_in=256,dim_out=512,kernel_size=5,stride=1,padding=2,style_num=self.num_speakers * 2)self.residual_3 = ResidualBlock(dim_in=256,dim_out=512,kernel_size=5,stride=1,padding=2,style_num=self.num_speakers * 2)self.residual_4 = ResidualBlock(dim_in=256,dim_out=512,kernel_size=5,stride=1,padding=2,style_num=self.num_speakers * 2)self.residual_5 = ResidualBlock(dim_in=256,dim_out=512,kernel_size=5,stride=1,padding=2,style_num=self.num_speakers * 2)self.residual_6 = ResidualBlock(dim_in=256,dim_out=512,kernel_size=5,stride=1,padding=2,style_num=self.num_speakers * 2)self.residual_7 = ResidualBlock(dim_in=256,dim_out=512,kernel_size=5,stride=1,padding=2,style_num=self.num_speakers * 2)self.residual_8 = ResidualBlock(dim_in=256,dim_out=512,kernel_size=5,stride=1,padding=2,style_num=self.num_speakers * 2)self.residual_9 = ResidualBlock(dim_in=256,dim_out=512,kernel_size=5,stride=1,padding=2,style_num=self.num_speakers * 2)# Up-conversion layers.self.up_conversion = nn.Conv1d(in_channels=256,out_channels=2304,kernel_size=1,stride=1,padding=0,bias=False)# Reshape data (This operation is done in forward function).# Up-sampling layers.self.up_sample_1 = UpSampleBlock(dim_in=256,dim_out=1024,kernel_size=(5, 5),stride=(1, 1),padding=2,bias=False)self.up_sample_2 = UpSampleBlock(dim_in=128,dim_out=512,kernel_size=(5, 5),stride=(1, 1),padding=2,bias=False)# TODO: The last layer differs from the paper.self.out = nn.Conv2d(in_channels=64,out_channels=1, # 35 in paperkernel_size=(5, 15),stride=(1, 1),padding=(2, 7),bias=False)def forward(self, x, c, c_):c_onehot = torch.cat((c, c_), dim=1).to(self.device)width_size = x.size(3)#print (x.shape)x = self.conv_layer_1(x)#print (x.shape)x = self.down_sample_1(x)#print (x.shape)x = self.down_sample_2(x)#print (x.shape)x = x.contiguous().view(-1, 2304, width_size // 4)#print (x.shape)x = self.down_conversion(x)#print (x.shape)x = self.residual_1(x, c_onehot)#print (x.shape)x = self.residual_2(x, c_onehot)#print (x.shape)x = self.residual_1(x, c_onehot)#print (x.shape)x = self.residual_1(x, c_onehot)#print (x.shape)x = self.residual_1(x, c_onehot)#print (x.shape)x = self.residual_1(x, c_onehot)#print (x.shape)x = self.residual_1(x, c_onehot)#print (x.shape)x = self.residual_1(x, c_onehot)#print (x.shape)x = self.residual_1(x, c_onehot)#print (x.shape)x = self.up_conversion(x)#print (x.shape)x = x.view(-1, 256, 9, width_size // 4)#print (x.shape)x = self.up_sample_1(x)#print (x.shape)x = self.up_sample_2(x)#print (x.shape)out = self.out(x)#print (out.shape)out_reshaped = out[:, :, : -1, :]#print (out.shape)return out_reshaped(2)标签的处理
首先,我们将sourse和target类别的one-hot向量进行拼接,拼接后的向量会用于AdaIn中权重参数和偏置项的学习。
(3)判别器网络结构
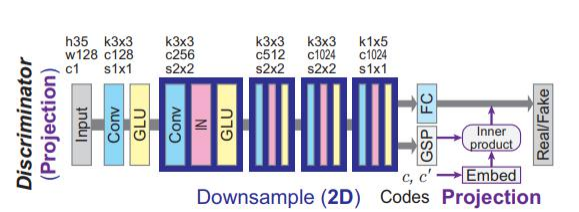
对于输入特征x,首先经过卷积和GLU门单元。然后进行下采样,最后FC层得到B*1的向量
标签的处理:首先每个domain进行one hot编码,得到B*d的编码向量,然后将sourse和target进行拼接。拼接后编码为B*C的向量。而GSP层会将输出向量B*C*H*W压成B*C的向量,最后和标签得到的向量内积得到B*C的向量,对最终结果在sum一下得到B*1的向量,然后加入经过FC层的B*1的向量x中,最终得到预测值
代码
class Discriminator(nn.Module):def __init__(self, num_speakers=4):super(Discriminator, self).__init__()self.num_speakers = num_speakersself.device = torch.device("cuda:0" if torch.cuda.is_available() else "cpu")# Initial layers.self.conv_layer_1 = nn.Sequential(nn.Conv2d(in_channels=1, out_channels=128, kernel_size=(3, 3), stride=(1, 1), padding=1),nn.GLU(dim=1))self.conv_gated_1 = nn.Sequential(nn.Conv2d(in_channels=1, out_channels=128, kernel_size=(3, 3), stride=(1, 1), padding=1),nn.GLU(dim=1))# Down-sampling layers.self.down_sample_1 = DownsampleBlock(dim_in=64,dim_out=256,kernel_size=(3, 3),stride=(2, 2),padding=1,bias=False)self.down_sample_2 = DownsampleBlock(dim_in=128,dim_out=512,kernel_size=(3, 3),stride=(2, 2),padding=1,bias=False)self.down_sample_3 = DownsampleBlock(dim_in=256,dim_out=1024,kernel_size=(3, 3),stride=(2, 2),padding=1,bias=False)self.down_sample_4 = DownsampleBlock(dim_in=512,dim_out=1024,kernel_size=(1, 5),stride=(1, 1),padding=(0, 2),bias=False)# Fully connected layer.self.fully_connected = nn.Linear(in_features=512, out_features=1)# Projection.self.projection = nn.Linear(self.num_speakers * 2, 512)def forward(self, x, c, c_):c_onehot = torch.cat((c, c_), dim=1).to(self.device)#print (x.shape)x = self.conv_layer_1(x) * torch.sigmoid(self.conv_gated_1(x))#print (x.shape)x = self.down_sample_1(x)#print (x.shape)x = self.down_sample_2(x)#print (x.shape)x = self.down_sample_3(x)#print (x.shape)x_ = self.down_sample_4(x)#print (x.shape)h = torch.sum(x_, dim=(2, 3)) # sum pooling#print (h.shape)x = self.fully_connected(h)#print (x.shape)p = self.projection(c_onehot)#print (p.shape)x += torch.sum(p * h, dim=1, keepdim=True)#print (x.shape)return x5.损失函数
(1)分类损失
给定原始图像和生成的图像,预测对应的domain标签

![]()
(2)Cycle-consistency loss
类似于cycle gan,我们需要保证语音的文本内容不变,因此,我们再将生成的语音进行还原,还原的语音需要与原始语言足够相似。
![]()
(3)Identity-mapping loss
输入某段语音,其domain为c,如果我们就希望这段语音转换为其原来domain的语音,那么转换后应该与其自身足够接近。
![]()
(4)Adversarial loss
对抗损失原语音输出概率接近于1,而真实语言输出概率接近于0,但是这里不仅输入了sourse domain的编码,还输入了target domain的编码。标签处理见上文

6.模型的训练与测试
训练指定参数:--dataset VCC2016
转换指定参数:--mode convert --src_speaker "VCC2SM1" --trg_speaker "['VCC2SM1', 'VCC2SF1']" --test_iters 100000 --dataset VCC2018
数据与代码链接:https://pan.baidu.com/s/1aNlghgo6mtD4iWqNgMOWOQ?pwd=s206
提取码:s206

![[通俗易懂]《动手学强化学习》学习笔记1-第1章 初探强化学习](https://img-blog.csdnimg.cn/direct/c387aa2bf11d4302b81ac81cc9eaece7.png)


