瀚高数据库
目录
环境
文档用途
详细信息
环境
系统平台:Linux x86-64 Red Hat Enterprise Linux 7
版本:14
文档用途
从底层理解轻量级锁的实现,从保护共享内存的角度理解轻量级锁的使用场景,包括上锁、等待、释放,理解轻量级锁的互斥(execlusive)和共享(shared)2种状态。
详细信息
1.轻量级锁空间分配
锁作为并发场景下使用的一种进程间的同步机制,因此有必要将其放在共享内存中。
/** Set up shared memory and semaphores.** Note: if using SysV shmem and/or semas, each postmaster startup will* normally choose the same IPC keys. This helps ensure that we will* clean up dead IPC objects if the postmaster crashes and is restarted.*/CreateSharedMemoryAndSemaphores();

以下代码是轻量级锁的初始化代码:LWLock系统通常由一个主要的LWLock数组组成,每个数组元素对应一个具体的锁资源。而"tranche" 是指将LWLock数组进一步分割成更小的单元,以提供更细粒度的并发控制。
/** Allocate shmem space for the main LWLock array and all tranches and* initialize it. We also register extension LWLock tranches here.*/void CreateLWLocks(void){if (!IsUnderPostmaster) // 主进程或者是standlone进程{Size spaceLocks = LWLockShmemSize(); int *LWLockCounter;char *ptr;/* Allocate space */ptr = (char *) ShmemAlloc(spaceLocks);/* Leave room for dynamic allocation of tranches */ptr += sizeof(int);/* Ensure desired alignment of LWLock array */ptr += LWLOCK_PADDED_SIZE - ((uintptr_t) ptr) % LWLOCK_PADDED_SIZE;MainLWLockArray = (LWLockPadded *) ptr;/** Initialize the dynamic-allocation counter for tranches, which is* stored just before the first LWLock.*/LWLockCounter = (int *) ((char *) MainLWLockArray - sizeof(int));*LWLockCounter = LWTRANCHE_FIRST_USER_DEFINED;/* Initialize all LWLocks */InitializeLWLocks();}/* Register named extension LWLock tranches in the current process. */for (int i = 0; i < NamedLWLockTrancheRequests; i++)LWLockRegisterTranche(NamedLWLockTrancheArray[i].trancheId,NamedLWLockTrancheArray[i].trancheName);}
1.1计算轻量级锁数组占用的共享内存的存储空间的大小:
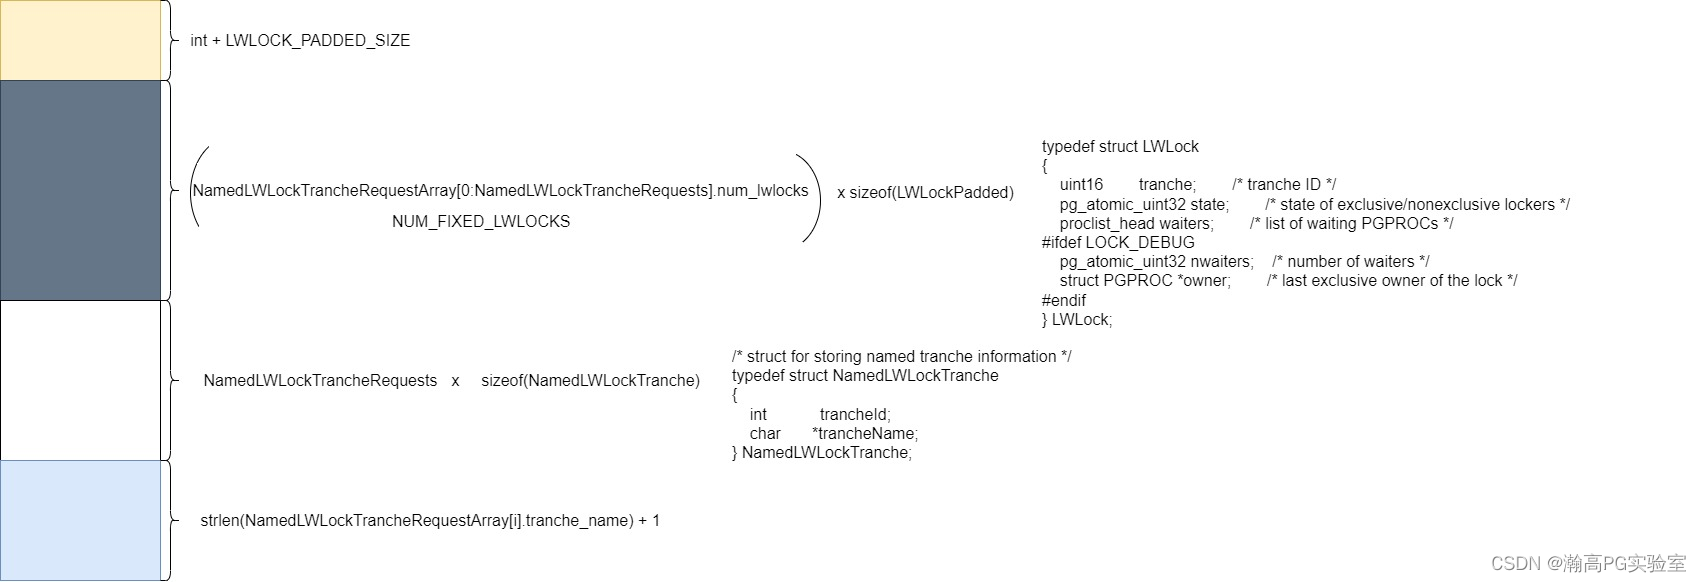
/** Compute shmem space needed for LWLocks and named tranches.*/Size LWLockShmemSize(void){Size size;int i;//NUM_FIXED_LWLLOCKS是pg内核使用的锁的数量,写死的数量int numLocks = NUM_FIXED_LWLOCKS;//加上其它模块比如动态库请求的锁的数量,例如pg_stat_statements在请求共享内存的钩子函数的代码/*static voidpgss_shmem_request(void){if (prev_shmem_request_hook)prev_shmem_request_hook();RequestAddinShmemSpace(pgss_memsize());RequestNamedLWLockTranche("pg_stat_statements", 1);}*//* Calculate total number of locks needed in the main array. */numLocks += NumLWLocksForNamedTranches();/* Space for the LWLock array. */size = mul_size(numLocks, sizeof(LWLockPadded)); // 1.2/* Space for dynamic allocation counter, plus room for alignment. */size = add_size(size, sizeof(int) + LWLOCK_PADDED_SIZE);/* space for named tranches. */size = add_size(size, mul_size(NamedLWLockTrancheRequests, sizeof(NamedLWLockTranche)));/* space for name of each tranche. */for (i = 0; i < NamedLWLockTrancheRequests; i++)size = add_size(size, strlen(NamedLWLockTrancheRequestArray[i].tranche_name) + 1);return size;}
1.2 LWLockPadded结构体解析
/** In most cases, it's desirable to force each tranche of LWLocks to be aligned* on a cache line boundary and make the array stride a power of 2. This saves* a few cycles in indexing, but more importantly ensures that individual* LWLocks don't cross cache line boundaries. This reduces cache contention* problems, especially on AMD Opterons. In some cases, it's useful to add* even more padding so that each LWLock takes up an entire cache line; this is* useful, for example, in the main LWLock array, where the overall number of* locks is small but some are heavily contended.*/通俗一点说,为什么要设计一个LWLockPadded的union?因为union成员共享存储空间,所以整个union占用的空间大小将为LWLOCK_PADDED_SIZE的大小(这个已经断言过了)。LWLOCK_PADDED_SIZE的大小是cpu一级缓存的大小,所以结果将是LWLock独占一个缓存行,也就是CPU一次读取的单位大小。这么做的好处是提高性能:CPU使用分布式一致性缓存协议MESI(当然实际情况不止这四种状态),当CPU1要改动LWLock,那么对其它的CPU会发送read invalidate消息,其它CPU如果有LWLock在其缓存行,将会清空。如果CPU0下次要修改LWLock,同样也会对其它CPU发送read invalidate消息。但是如果缓存行保存了非LWLock内容,那么对非LWLock内容的修改操作,将会产生invalidate影响(false sharing).因此将其扩充到1个缓存行大小,这样避免其它变量对该LWLock的影响。#define LWLOCK_PADDED_SIZE PG_CACHE_LINE_SIZEStaticAssertDecl(sizeof(LWLock) <= LWLOCK_PADDED_SIZE,"Miscalculated LWLock padding");/* LWLock, padded to a full cache line size */typedef union LWLockPadded{LWLock lock;char pad[LWLOCK_PADDED_SIZE];} LWLockPadded;
举例说明:读取物理核心数,将每个线程绑定一个物理cpu,本机只有cpu0~cpu3,然后对atomics进行单字节的修改,随着线程增多,每个线程的执行时间会随时间增长,因为cpu重复清空(invalidate)和加载(read -> modified)。如果是根据业务将数据分在不同的cache line,那么效率会有提升。
#define _GNU_SOURCE#include <stdio.h>#include <stdlib.h>#include <unistd.h>#include <pthread.h>#include <stdatomic.h>#include <time.h>#include <assert.h>#include <sched.h>#define CL_SIZE 64 pthread_barrier_t barrier;pthread_mutex_t sync_mutex;atomic_long nsSum;int sync_count;struct CacheLine {atomic_char atomics[CL_SIZE];};// this function used to get cache line size from runtime/** unsigned int get_cache_line_size_x86() {unsigned int cache_line_size = 0;// Execute CPUID instruction with EAX=0x80000006 to get cache information__asm__ volatile ("mov $0x80000006, %%eax\n\t""cpuid\n\t""mov %%ecx, %0\n\t": "=r" (cache_line_size) // Output: store cache line size in variable: // No input: "%eax", "%ebx", "%ecx", "%edx" // Clobbered registers);// Extract cache line size from bit 0 to 7 of ECX registercache_line_size = cache_line_size & 0xFF;return cache_line_size;}*/// thread function void* threadFunc(void* arg) {struct CacheLine* cacheLine = (struct CacheLine*)arg;pthread_barrier_wait(&barrier);pthread_mutex_lock(&sync_mutex);// .....pthread_mutex_unlock(&sync_mutex);struct timespec start, end;clock_gettime(CLOCK_MONOTONIC, &start);for (size_t r = 10000000LL; r > 0; --r) {atomic_fetch_add_explicit(&cacheLine->atomics[r % CL_SIZE], 1, memory_order_relaxed);}clock_gettime(CLOCK_MONOTONIC, &end);int64_t diff = (end.tv_sec - start.tv_sec) * 1000000000LL + (end.tv_nsec - start.tv_nsec);atomic_fetch_add_explicit(&nsSum, diff, memory_order_relaxed);return NULL;}int main() {int hc = sysconf(_SC_NPROCESSORS_ONLN);cpu_set_t cs;// loops just for counterfor (int nThreads = 1; nThreads <= hc; ++nThreads){pthread_t threads[nThreads];struct CacheLine cacheLine;nsSum = 0;pthread_barrier_init(&barrier, NULL, nThreads);pthread_mutex_init(&sync_mutex, NULL);sync_count = nThreads;// loops for threads numberfor (int t = 0; t < nThreads; ++t) {pthread_create(&threads[t], NULL, threadFunc, &cacheLine);CPU_ZERO(&cs);CPU_SET(t, &cs);assert(pthread_setaffinity_np(threads[t], sizeof(cs), &cs) == 0); }for (int t = 0; t < nThreads; ++t) {pthread_join(threads[t], NULL);}pthread_barrier_destroy(&barrier);pthread_mutex_destroy(&sync_mutex);printf("%d: %ld\n", nThreads, (long)(nsSum/(1.0e7 * nThreads) + 0.5));}return 0;}
结果:


1.3 轻量级锁在共享内存中的布局

2.轻量级锁的初始化
对于上图的空间顺序进行初始化,主要看下LWLockInitialize的实现:
/** Initialize LWLocks that are fixed and those belonging to named tranches.*/static voidInitializeLWLocks(void){int numNamedLocks = NumLWLocksForNamedTranches();int id;int i;int j;LWLockPadded *lock;/* Initialize all individual LWLocks in main array */for (id = 0, lock = MainLWLockArray; id < NUM_INDIVIDUAL_LWLOCKS; id++, lock++)LWLockInitialize(&lock->lock, id);/* Initialize buffer mapping LWLocks in main array */lock = MainLWLockArray + BUFFER_MAPPING_LWLOCK_OFFSET;for (id = 0; id < NUM_BUFFER_PARTITIONS; id++, lock++)LWLockInitialize(&lock->lock, LWTRANCHE_BUFFER_MAPPING);/* Initialize lmgrs' LWLocks in main array */lock = MainLWLockArray + LOCK_MANAGER_LWLOCK_OFFSET;for (id = 0; id < NUM_LOCK_PARTITIONS; id++, lock++)LWLockInitialize(&lock->lock, LWTRANCHE_LOCK_MANAGER);/* Initialize predicate lmgrs' LWLocks in main array */lock = MainLWLockArray + PREDICATELOCK_MANAGER_LWLOCK_OFFSET;for (id = 0; id < NUM_PREDICATELOCK_PARTITIONS; id++, lock++)LWLockInitialize(&lock->lock, LWTRANCHE_PREDICATE_LOCK_MANAGER);/** Copy the info about any named tranches into shared memory (so that* other processes can see it), and initialize the requested LWLocks.*/if (NamedLWLockTrancheRequests > 0){char *trancheNames;NamedLWLockTrancheArray = (NamedLWLockTranche *)&MainLWLockArray[NUM_FIXED_LWLOCKS + numNamedLocks];trancheNames = (char *) NamedLWLockTrancheArray +(NamedLWLockTrancheRequests * sizeof(NamedLWLockTranche));lock = &MainLWLockArray[NUM_FIXED_LWLOCKS];for (i = 0; i < NamedLWLockTrancheRequests; i++){NamedLWLockTrancheRequest *request;NamedLWLockTranche *tranche;char *name;request = &NamedLWLockTrancheRequestArray[i];tranche = &NamedLWLockTrancheArray[i];name = trancheNames;trancheNames += strlen(request->tranche_name) + 1;strcpy(name, request->tranche_name);tranche->trancheId = LWLockNewTrancheId();tranche->trancheName = name;for (j = 0; j < request->num_lwlocks; j++, lock++)LWLockInitialize(&lock->lock, tranche->trancheId);}}}
2.1 LWLock赋初值
分别对LWLock中的成员变量state(包括exclusive、shared等状态)、tranche_id(锁的粒度划分,一个tranche_name下可以有多个lock,每个lock有唯一的tranche_id)、waiters(等待队列,是双向链表实现)进行初始化,当中state成员比较特殊。
/** LWLockInitialize - initialize a new lwlock; it's initially unlocked*/voidLWLockInitialize(LWLock *lock, int tranche_id){pg_atomic_init_u32(&lock->state, LW_FLAG_RELEASE_OK);#ifdef LOCK_DEBUGpg_atomic_init_u32(&lock->nwaiters, 0);#endiflock->tranche = tranche_id;proclist_init(&lock->waiters);}
/** Code outside of lwlock.c should not manipulate the contents of this* structure directly, but we have to declare it here to allow LWLocks to be* incorporated into other data structures.*/对于LWLock不应该外部操作,但是有些结构体需要包含这一LWLock类型,所以把LWLock结构声明放在/src/include/storage/lwlock.htypedef struct LWLock{uint16 tranche; /* tranche ID */pg_atomic_uint32 state; /* state of exclusive/nonexclusive lockers */proclist_head waiters; /* list of waiting PGPROCs */#ifdef LOCK_DEBUGpg_atomic_uint32 nwaiters; /* number of waiters */struct PGPROC *owner; /* last exclusive owner of the lock */#endif} LWLock;
使用lwlock时,会有多个进程进行争用,因此需要保证对该变量的修改原子化,然而在初始化时还未有并发的使用,所以只是简单的赋值,但是该变量要保证修改完成时对其它进程的可见性,所以必须加上volatile关键字,后续每个进程的访问和修改都要从内存读取。
typedef struct pg_atomic_uint32{volatile uint32 value;} pg_atomic_uint32;
/** pg_atomic_init_u32 - initialize atomic variable** Has to be done before any concurrent usage..** No barrier semantics.*/static inline voidpg_atomic_init_u32(volatile pg_atomic_uint32 *ptr, uint32 val){AssertPointerAlignment(ptr, 4);pg_atomic_init_u32_impl(ptr, val);}


