在上一篇博客中,我介绍了用Tensorflow来重现GPT 1的模型和训练的过程。这次我打算用Pytorch来重现GPT 2的模型并从头进行训练。
GPT 2的模型相比GPT 1的改进并不多,主要在以下方面:
1. GPT 2把layer normalization放在每个decoder block的前面。
2. 最终的decoder block之后额外添加了一个layer normalization。
3. 残差层的参数初始化根据网络深度进行调节
4. 训练集采用了webtext(45GB),而不是之前采用的bookcorpus(5GB)
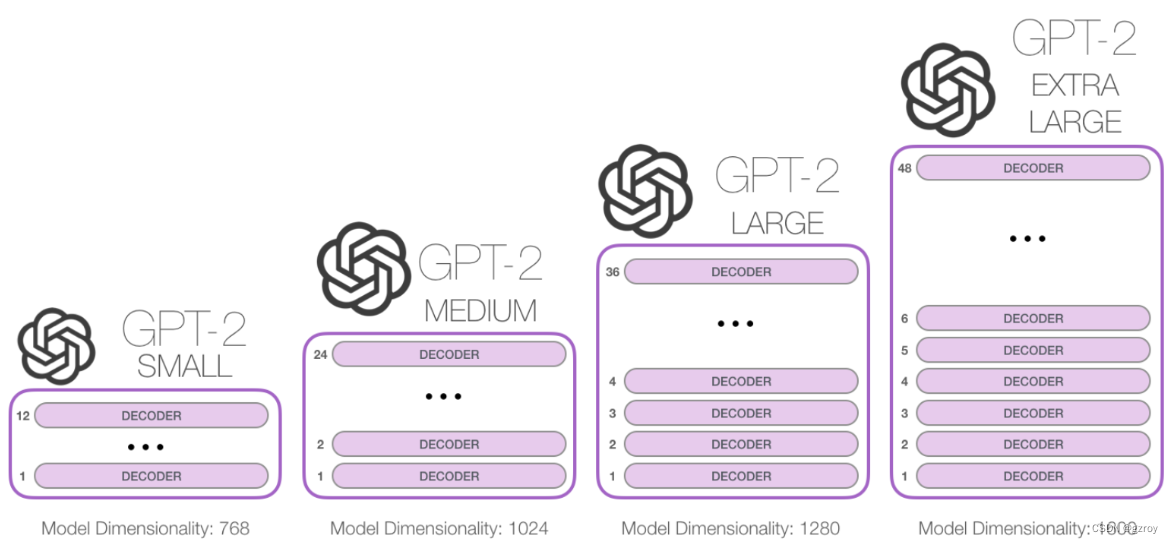
5. 更深的网络结构,最大的模型拥有15亿的参数,对比GPT 1是1.2亿的参数
GPT 2有以下四种不同深度的模型架构,如图:
以下我将用pytorch代码来搭建一个GPT 2的模型,以最小的GPT 2为例,采用bookcorpus的数据,在AutoDL平台的一个40G显存的A100显卡上进行训练,看看效果如何。
模型结构
整个模型的结构和GPT 1是基本一致的。
定义一个多头注意力模块,如以下代码:
class MHA(nn.Module):def __init__(self, d_model, num_heads, attn_pdrop, resid_pdrop):super().__init__()self.d_model = d_modelself.num_heads = num_headsself.attn_pdrop = attn_pdropself.resid_dropout = nn.Dropout(resid_pdrop)self.ln = nn.Linear(d_model, d_model*3)self.c_proj = nn.Linear(d_model, d_model)def forward(self, x):B, T, C = x.size()x_qkv = self.ln(x)q, k, v = x_qkv.split(self.d_model, dim=2)q = q.view(B, T, self.num_heads, C//self.num_heads).transpose(1, 2)k = k.view(B, T, self.num_heads, C//self.num_heads).transpose(1, 2)v = v.view(B, T, self.num_heads, C//self.num_heads).transpose(1, 2)y = torch.nn.functional.scaled_dot_product_attention(q, k, v, attn_mask=None, dropout_p=self.attn_pdrop if self.training else 0, is_causal=True)y = y.transpose(1, 2).contiguous().view(B, T, C)y = self.c_proj(y)y = self.resid_dropout(y)return y这个模块接收一个输入数据,大小为(batch_size, seq_len, dimension),然后进行一个线性变换层,把数据映射为(batch_size, seq_len, dimension*3)的维度,这里的dimension*3表示的是qkv这三个值的拼接。接着就把这个数据切分为q,k,v三份,然后每份都把维度调整为(batch_size, seq_len, num_head, dimension/num_head),num_head表示这个自注意力模块包含多少个head。最后就可以调用scaled_dot_product_attention进行qk的相似度计算,进行缩放之后与v值相乘。Pytorch的这个函数提供了最新的flash attention的实现,可以大幅提升计算性能。最后就是对qkv的结果进行一个线性变换,映射为一个(batch_size, seq_len, dimension)的向量。
自注意力模块的输出结果,将通过一个Feed forward层进行计算,代码如下:
class FeedForward(nn.Module):def __init__(self, d_model, dff, dropout):super().__init__()self.ln1 = nn.Linear(d_model, dff)self.ln2 = nn.Linear(dff, d_model)self.dropout = nn.Dropout(dropout)self.layernorm = nn.LayerNorm(d_model)self.gelu = nn.GELU()def forward(self, x):x = self.ln1(x)x = self.gelu(x)x = self.ln2(x)x = self.dropout(x)return x代码很简单,就是做了两次线性变换,第一次把维度扩充到dimension*4,第二次把维度恢复为dimension。
最后定义一个decoder block模块,把多头注意力模块和feed forward模块组合起来,代码如下:
class Block(nn.Module):def __init__(self, d_model, num_heads, dff, attn_pdrop, resid_pdrop, dropout):super().__init__()self.layernorm1 = nn.LayerNorm(d_model)self.attn = MHA(d_model, num_heads, attn_pdrop, resid_pdrop)self.layernorm2 = nn.LayerNorm(d_model)self.ff = FeedForward(d_model, dff, dropout)def forward(self, x):x = x + self.attn(self.layernorm1(x))x = x + self.ff(self.layernorm2(x))return x有了decoder block之后,GPT 2的模型就是把这些block串起来,例如最小的GPT 2的模型结构是定义了12个decoder block。模型接收的是字符序列经过tokenizer之后的数字,然后把这些数字通过embedding层映射为向量表达,例如对每个token id,映射为784维度的一个向量。为了能在embedding的向量里面反映字符的位置信息,我们需要把字符的位置也做一个embedding,然后两个embedding相加。
输入数据经过embedding处理后,通过多个decoder block处理之后,数据的维度为(batch_size, seq_len, dimension), 我们需要通过一个权重维度为(dimension, vocab_size)的线性变换,把数据映射为(batch_size, seq_len, vocab_size)的维度。这里vocab_size表示tokenizer的单词表的长度,例如对于GPT 2所用的tokenizer,有50257个单词。对于输出数据进行softmax计算之后,我们就可以得到每个token的预测概率,从而可以和label数据,即真实的下一个token id进行比较,计算loss值。
GPT 2模型的代码如下:
class GPT2(nn.Module):def __init__(self, vocab_size, d_model, block_size, embed_pdrop, num_heads, dff, attn_pdrop, resid_pdrop, dropout, num_layer):super().__init__()self.token_embed = nn.Embedding(vocab_size, d_model, sparse=False)self.pos_embed = nn.Embedding(block_size, d_model, sparse=False)self.dropout_embed = nn.Dropout(embed_pdrop)#self.blocks = [Block(d_model, num_heads, dff, attn_pdrop, resid_pdrop, dropout) for _ in range(num_layer)]self.blocks = nn.ModuleList([Block(d_model, num_heads, dff, attn_pdrop, resid_pdrop, dropout) for _ in range(num_layer)])self.num_layer = num_layerself.block_size = block_sizeself.lm_head = nn.Linear(d_model, vocab_size, bias=False)self.token_embed.weight = self.lm_head.weightself.layernorm = nn.LayerNorm(d_model)self.apply(self._init_weights)# apply special scaled init to the residual projections, per GPT-2 paperfor pn, p in self.named_parameters():if pn.endswith('c_proj.weight'):torch.nn.init.normal_(p, mean=0.0, std=0.02/math.sqrt(2 * num_layer))def _init_weights(self, module):if isinstance(module, nn.Linear):torch.nn.init.normal_(module.weight, mean=0.0, std=0.02)if module.bias is not None:torch.nn.init.zeros_(module.bias)elif isinstance(module, nn.Embedding):torch.nn.init.normal_(module.weight, mean=0.0, std=0.02)def forward(self, x, targets=None):device = x.deviceb, t = x.size()pos = torch.arange(0, t, dtype=torch.long, device=device) x = self.token_embed(x) + self.pos_embed(pos)x = self.dropout_embed(x)for block in self.blocks:x = block(x)x = self.layernorm(x)if targets is not None:logits = self.lm_head(x)loss = F.cross_entropy(logits.view(-1, logits.size(-1)), targets.view(-1), ignore_index=-1)else:logits = self.lm_head(x[:, -1, :])loss = Nonereturn logits, lossdef configure_optimizers(self, weight_decay, learning_rate, betas, device_type):# start with all of the candidate parametersparam_dict = {pn: p for pn, p in self.named_parameters()}# filter out those that do not require gradparam_dict = {pn: p for pn, p in param_dict.items() if p.requires_grad}# create optim groups. Any parameters that is 2D will be weight decayed, otherwise no.# i.e. all weight tensors in matmuls + embeddings decay, all biases and layernorms don't.decay_params = [p for n, p in param_dict.items() if p.dim() >= 2]nodecay_params = [p for n, p in param_dict.items() if p.dim() < 2]optim_groups = [{'params': decay_params, 'weight_decay': weight_decay},{'params': nodecay_params, 'weight_decay': 0.0}]num_decay_params = sum(p.numel() for p in decay_params)num_nodecay_params = sum(p.numel() for p in nodecay_params)print(f"num decayed parameter tensors: {len(decay_params)}, with {num_decay_params:,} parameters")print(f"num non-decayed parameter tensors: {len(nodecay_params)}, with {num_nodecay_params:,} parameters")# Create AdamW optimizer and use the fused version if it is availablefused_available = 'fused' in inspect.signature(torch.optim.AdamW).parametersuse_fused = fused_available and device_type == 'cuda'extra_args = dict(fused=True) if use_fused else dict()optimizer = torch.optim.AdamW(optim_groups, lr=learning_rate, betas=betas, **extra_args)print(f"using fused AdamW: {use_fused}")return optimizer@torch.no_grad()def generate(self, idx, max_new_tokens, temperature=1.0, top_k=None, block_size=512):for _ in range(max_new_tokens):# if the sequence context is growing too long we must crop it at block_sizeidx_cond = idx if idx.size(1) <= block_size else idx[:, -block_size:]# forward the model to get the logits for the index in the sequencelogits, _ = self(idx_cond)# pluck the logits at the final step and scale by desired temperaturelogits = logits / temperature# optionally crop the logits to only the top k optionsif top_k is not None:v, _ = torch.topk(logits, min(top_k, logits.size(-1)))logits[logits < v[:, [-1]]] = -float('Inf')# apply softmax to convert logits to (normalized) probabilitiesprobs = F.softmax(logits, dim=-1)# sample from the distributionidx_next = torch.multinomial(probs, num_samples=1)# append sampled index to the running sequence and continueidx = torch.cat((idx, idx_next), dim=1)return idx模型训练
定义好模型之后,我们就可以开始训练了。
首先我们需要准备训练数据集。GPT 2采用的是webtext,网上的一些公开网页数据来进行训练。在Huggingface上面有对应的一个公开数据集。不过考虑到我们的资源有限,我这次还是采用GPT 1所用的bookcorpus数据集来训练。
以下代码是下载huggingface的数据集,并用GPT 2的tokenizer来进行编码:
from datasets import load_dataset
from transformers import GPT2Tokenizerdataset = load_dataset("bookcorpusopen", split="train")block_size=513
tokenizer = GPT2Tokenizer.from_pretrained("gpt2")def tokenize_function(examples):token_ids = [tokenizer(text) for text in examples["text"]]total_length = [len(t["input_ids"]) for t in token_ids]total_length = [(l//(block_size+1))*(block_size+1) for l in total_length]result = []label = []for i in range(len(total_length)):result.extend([token_ids[i]["input_ids"][j:j+block_size+1] for j in range(0, total_length[i], block_size+1)])return {"token_ids": result}ds_test = ds['train'].select(range(10000))tokenized_datasets = ds_test.map(tokenize_function, batched=True, num_proc=8, remove_columns=["title", "text"], batch_size=100
)tokenized_datasets.save_to_disk("data/boocorpusopen_10000_512tokens")
GPT1采用的bookcorpus有7000多本书,huggingface的bookcorpusopen数据集有14000多本,这里我只采用了10000本书来构建数据集,对于每本书进行tokenizer转化后,每513个token写入为1条记录。这样我们在训练时,每条记录我们采用前1-512个token作为训练,取2-513个token作为label。
以下代码将读取我们处理好的数据集,并转化为pytorch的dataloader
from datasets import load_from_diskdataset = load_from_disk("data/boocorpusopen_10000_512tokens")
dataset = dataset.with_format("torch")
dataloader = DataLoader(dataset, batch_size=args.batch_size, shuffle=True, num_workers=4)
然后我们就可以实例化一个GPT 2的model并开始训练,具体的代码可以见repo https://github.com/gzroy/gpt2_torch.git 里面的train.py文件。
如果在本地显卡上训练,对应12层的网络结构需要30多G的显存,我的显卡是2080Ti,只有11G显存,因此只能指定6层decoder。我们可以在autodl上面租用一个40G显存的A100显卡,价格是3.45元每小时,在这个显卡上开启半精度进行训练,大约1个小时可以跑10000个迭代,batch大小为64。我总共训练了2小时,最终在训练集上的Loss值为3.5左右,准确度为35%,花费为7元。
生成文本
最后我们可以基于这个训练了1个小时的GPT 2模型来测试一下,看生成文本的效果如何,如以下代码:
from transformers import GPT2Tokenizer
from model import GPT2
import torch
from torch.nn import functional as F
import argparseif __name__ == '__main__':parser = argparse.ArgumentParser(description='gpt2 predict')parser.add_argument('--checkpoint_path', type=str, default='checkpoints/')parser.add_argument('--checkpoint_name', type=str, default='')parser.add_argument('--d_model', type=int, default=768)parser.add_argument('--block_size', type=int, default=512)parser.add_argument('--dff', type=int, default=768*4)parser.add_argument('--heads', type=int, default=12)parser.add_argument('--decoder_layers', type=int, default=6)parser.add_argument('--device', type=str, default='cuda')parser.add_argument('--input', type=str)parser.add_argument('--generate_len', type=int, default=100)parser.add_argument('--topk', type=int, default=5)args = parser.parse_args()tokenizer = GPT2Tokenizer.from_pretrained("gpt2")vocab_size = len(tokenizer.get_vocab())model = GPT2(vocab_size, args.d_model, args.block_size, 0, args.heads, args.dff, 0, 0, 0, args.decoder_layers)model.to(args.device)model = torch.compile(model)checkpoint = torch.load(args.checkpoint_path+args.checkpoint_name)model.load_state_dict(checkpoint['model_state_dict'])token_id = tokenizer.encode(args.input)input_data = torch.reshape(torch.tensor(token_id, device=args.device), [1,-1])predicted = model.generate(input_data, args.generate_len, 1.0, args.topk, args.block_size)print("Generated text:\n-------------------")print(tokenizer.decode(predicted.cpu().numpy()[0]))
运行以下命令,给定一个文本的开头,然后让模型生成200字看看:
python predict.py --checkpoint_name model_1.pt --input 'it was saturday night, the street' --generate_len 200 --topk 10生成的文本如下:
it was saturday night, the street lights blared and the street lights flickered on. A few more houses were visible.The front door opened, and a large man stepped in and handed him one. He handed the man the keys and a small smile. It looked familiar, and then a little too familiar. The door was closed."Hey! You guys out there?" he said, his eyes wide."What are you up to?" the man asked."I'm just asking for you out in my office."The man was about thirty feet away from them."I'm in a serious situation, but it's just the way you are."He looked around at the man, the man looked up and down, and then his eyes met hers. He was a little older than he was, but his eyes were blue with red blood. He looked like a giant. His eyes were blue and red, and his jaw looked like a giant可见生成的文本语法没有问题,内容上也比较连贯,上下文的逻辑也有关联。如果模型继续训练更长时间,相信生成文本的内容会更加好。